Mybatis源码详解系列(二)--Mybatis如何加载配置及初始化
简介
Mybatis 是一个持久层框架,它对 JDBC 进行了高级封装,使我们的代码中不会出现任何的 JDBC 代码,另外,它还通过 xml 或注解的方式将 sql 从 DAO/Repository 层中解耦出来,除了这些基本功能外,它还提供了动态 sql、延迟加载、缓存等功能。 相比 Hibernate,Mybatis 更面向数据库,可以灵活地对 sql 语句进行优化。
前面已经说完 mybatis 的使用( Mybatis详解系列(一)--持久层框架解决了什么及如何使用Mybatis ),现在开始分析源码,和使用例子一样,我用的 mybatis 是 3.5.4 版本的。考虑连贯性,我会按下面的顺序来展开分析,计划两篇博客写完,本文只涉及第一点内容:
- 加载配置、初始化
SqlSessionFactory; - 获取
SqlSession和Mapper; - 执行
Mapper方法。
这个过程基本符合下面的代码的工作过程。
// 加载配置,初始化SqlSessionFactory对象
String resource = "Mybatis-config.xml";
InputStream in = Resources.getResourceAsStream(resource));
SqlSessionFactory sqlSessionFactory = new SqlSessionFactoryBuilder().build(in);
// 获取 SqlSession 和 Mapper
SqlSession sqlSession = sqlSessionFactory.openSession();
EmployeeMapper baseMapper = sqlSession.getMapper(EmployeeMapper.class);
// 执行Mapper方法
Employee employee = baseMapper.selectByPrimaryKey(id);
// do something
注意,考虑可读性,文中部分源码经过删减。
初始化的过程
这里简单概括下初始化的整个流程,如下图。
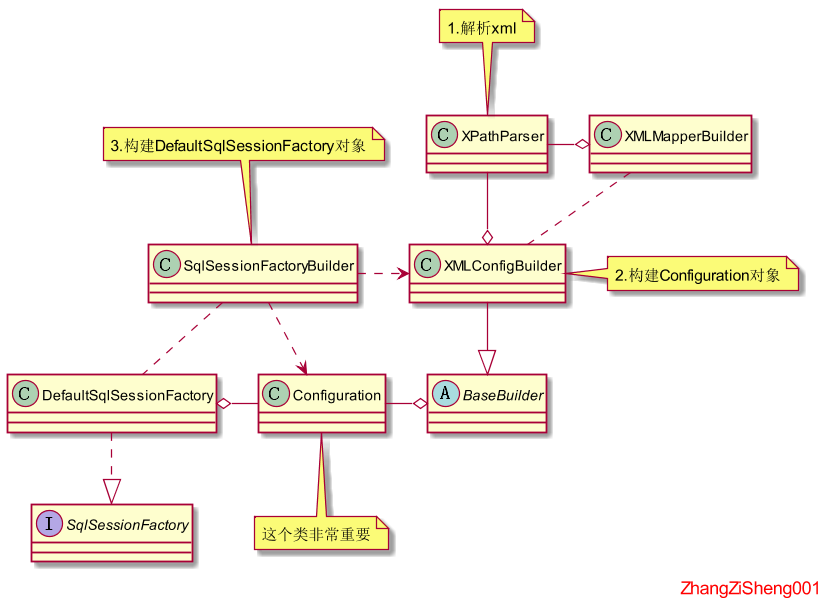
- 构建 xml 的“节点树”。
XPathParser使用的是 JDK 自带的 JAXP API来解析并构建Document对象,并且支持 XPath 功能。 - 初始化
Configuration对象的成员属性。XMLConfigBuilder利用“节点树”来构建Configuration对象(也会去解析注解的配置),Configuration对象包含了 configuration 文件和 mapper 文件的所有配置信息。这部分内容比较难,尤其是初始化 mapper 相关的配置。 - 创建
SqlSessionFactory。SqlSessionFactoryBuilder利用构建好的Configuration对象来创建SqlSessionFactory。
上面的过程只要进入到SqlSessionFactoryBuilder.build(InputStream)方法就可以直观的看到。
public SqlSessionFactory build(InputStream inputStream) {
    return build(inputStream, null, null);
}
// 入参里我们可以指定使用哪个环境,还可以传入properties来“覆盖”xml中<properties>变量
public SqlSessionFactory build(InputStream inputStream, String environment, Properties properties) {
    try {
        // 1. 构建XMLConfigBuilder对象,这个过程会构建Document对象
        XMLConfigBuilder parser = new XMLConfigBuilder(inputStream, environment, properties);
        // 2. 构建Configuration对象后,然后调用build(Configuration)
        return build(parser.parse());
    } catch(Exception e) {
        throw ExceptionFactory.wrapException("Error building SqlSession.", e);
    } finally {
        ErrorContext.instance().reset();
        try {
            inputStream.close();
        } catch(IOException e) {
            // Intentionally ignore. Prefer previous error.
        }
    }
}
public SqlSessionFactory build(Configuration config) {
    // 3. 直接使用构造方法构建DefaultSqlSessionFactory对象
    return new DefaultSqlSessionFactory(config);
}
接下来会具体分析第1和2点的代码,第3点比较简单,就不展开了。
构建xml节点树
XMLConfigBuilder使用XPathParser来解析 xml 获得“节点树”,它本身会通过“节点树”的配置信息来进行初始化操作。现在我们进入到XMLConfigBuilder的构造方法:
private final XPathParser parser;
private String environment;
public XMLConfigBuilder(InputStream inputStream, String environment, Properties props) {
    // 构建XPathParser对象,构建时去解析xml
    this(new XPathParser(inputStream, true, props, new XMLMapperEntityResolver()), environment, props);
}
// 这里只是初始化XMLConfigBuilder的几个成员属性
private XMLConfigBuilder(XPathParser parser, String environment, Properties props) {
    // ······
}
XPathParser的构造方法里将对 xml 进行解析,如下。点进 XPathParser.createDocument(InputSource)方法就会发现 mybatis 使用的是 JAXP 的 API,这部分的内容就不在本文的讨论范围,感兴趣可参考我的另一篇博客: 源码详解系列(三) ------ dom4j的使用和分析(重点对比和DOM、SAX的区别) 。
	private final Document document;
    private Properties variables;
	public XPathParser(Reader reader, boolean validation, Properties variables, EntityResolver entityResolver) {
        // 初始化一列成员属性,没必要看
		commonConstructor(validation, variables, entityResolver);
        // 构建Document对象,使用的是JAXP的API
        this.document = createDocument(new InputSource(reader));
  }
这里补充说明下XMLMapperEntityResolver这个类。它是EntityResolver子类,xml 的解析会基于事件触发对应的 Resolver 或 Handler,当解析到 dtd 等外部资源时会触发EntityResolver的resolveEntity方法。在XMLMapperEntityResolver.resolveEntity中,当解析到 mybatis-3-config.dtd、mybatis-3-mapper.dtd 等资源时,会直接从 classpath 下的 org/apache/ibatis/builder/xml/ 路径获取资源,而不需要通过 url 获取。
注意,上面对构建的Document对象,只是 configuration 文件的,并不包含 mapper 文件。
先认识下Configuration这个类
我们已经拿到了配置信息,接下来就是构建Configuration对象了。
在此之前,我们先认识下Configurantion这个类,如下图。可以看到,这些成员属性对应了 xml 文件中各个配置项,接下来讲的就是如何初始化这些属性。
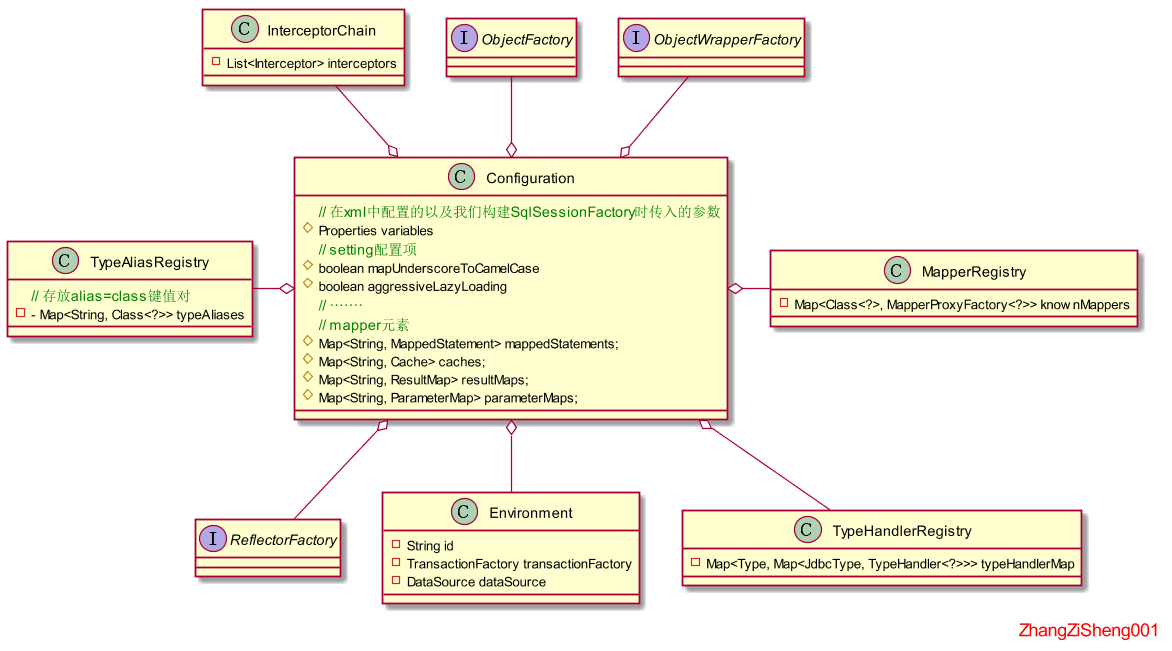
进入到XMLConfigBuilder.parse()方法,可以看到所有配置项的初始化顺序。这里的XNode类是 mybatis 对org.w3c.dom.Node的包装,为后续操作 xml 节点提供了更加简便的接口。
public Configuration parse() {
    if (parsed) {
        throw new BuilderException("Each XMLConfigBuilder can only be used once.");
    }
    // 标记已经解析过
    parsed = true;
    // 通过Document对象构建configuration节点的XNode对象,并构建Configurantion对象
    parseConfiguration(parser.evalNode("/configuration"));
    return configuration;
}
private void parseConfiguration(XNode root) {
    try {
        // 以下初始化不同的配置项
        propertiesElement(root.evalNode("properties"));
        Properties settings = settingsAsProperties(root.evalNode("settings"));
        loadCustomVfs(settings);
        loadCustomLogImpl(settings);
        typeAliasesElement(root.evalNode("typeAliases"));
        pluginElement(root.evalNode("plugins"));
        objectFactoryElement(root.evalNode("objectFactory"));
        objectWrapperFactoryElement(root.evalNode("objectWrapperFactory"));
        reflectorFactoryElement(root.evalNode("reflectorFactory"));
        settingsElement(settings);
        // read it after objectFactory and objectWrapperFactory issue #631
        environmentsElement(root.evalNode("environments"));
        databaseIdProviderElement(root.evalNode("databaseIdProvider"));
        typeHandlerElement(root.evalNode("typeHandlers"));
        mapperElement(root.evalNode("mappers"));
    } catch (Exception e) {
        throw new BuilderException("Error parsing SQL Mapper Configuration. Cause: " + e, e);
    }
}
接下来会挑其中几个配置项展开分析,而不会每个都讲到,重点关注 typeHandlers 和 mapper 节点的配置。
properties
properties 是 xml 中使用的全局参数,可以在 xml 中显式配置或引入外部 properties 文件,也可以在构建SqlSessionFactory对象时通过方法入参传入(比较少用),通过下面的代码可以知道:
- properties节点的属性 resource 和 url 只能配置一个,两个都配置会报错;
- 不同方式配置会覆盖,优先级如下:方法入参方式 > xml 中引入外部 properties 文件方式 > xml 中显示配置方式,优先级低的会被优先级高的覆盖。
private void propertiesElement(XNode context) throws Exception {
    if (context != null) {
        // 获取xml里显式配置的所有property
        Properties defaults = context.getChildrenAsProperties();
        // 获取resource和url属性值
        String resource = context.getStringAttribute("resource");
        String url = context.getStringAttribute("url");
        // resource和url只能有一个
        if (resource != null && url != null) {
            throw new BuilderException("The properties element cannot specify both a URL and a resource based property file reference.  Please specify one or the other.");
        }
        // 添加resource或url指定资源的properties,如果相同,就覆盖
        if (resource != null) {
            defaults.putAll(Resources.getResourceAsProperties(resource));
        } else if (url != null) {
            defaults.putAll(Resources.getUrlAsProperties(url));
        }
        // 添加方法入参的properties,如果相同,就覆盖
        Properties vars = configuration.getVariables();
        if (vars != null) {
            defaults.putAll(vars);
        }
        // 重新设置XPathParser对象和Configuration对象里的成员属性,以备后面配置项使用
        parser.setVariables(defaults);
        configuration.setVariables(defaults);
    }
}
settings
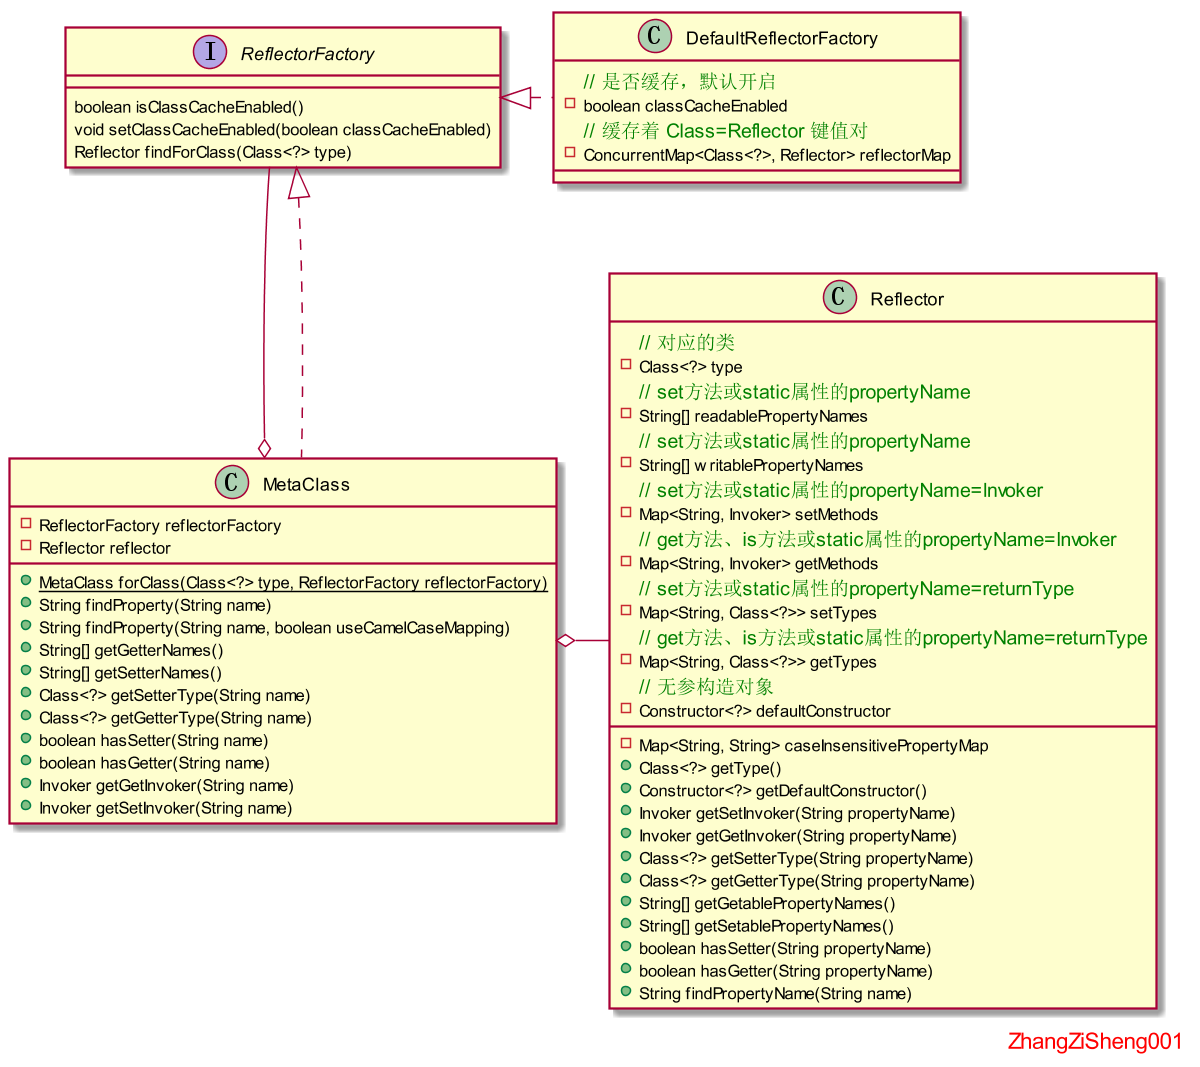
setting 的初始化过程比较简单,这里我们重点关注下MetaClass这个类。
private final ReflectorFactory localReflectorFactory = new DefaultReflectorFactory();
private Properties settingsAsProperties(XNode context) {
    if (context == null) {
        return new Properties();
    }
    // 获取settings子节点的配置信息
    Properties props = context.getChildrenAsProperties();
    // 判断该配置项是否存在,不合法会抛错
    MetaClass metaConfig = MetaClass.forClass(Configuration.class, localReflectorFactory);
    for (Object key : props.keySet()) {
        if (!metaConfig.hasSetter(String.valueOf(key))) {
            throw new BuilderException("The setting " + key + " is not known.  Make sure you spelled it correctly (case sensitive).");
        }
    }
    return props;
}
// 这里就是直接初始化属性了
private void settingsElement(Properties props) {
    // ······
}
通常情况下,如果要判断一个配置参数是否存在,可能会在代码中将参数集给写死,但是 mybatis 没有这么做,它提供了一个非常好用的工具类--MetaClass。MetaClass可以用来初始化某个类的参数集,例如Configuration,并且提供了这些参数的Invoker对象,通过它可以进行值的设置和获取。这个类将在后续源码分析中多次出现。
typeAliases
TypeAliasRegistry,即别名注册器,存放着 alias = Class 的键值对,这些别名仅限于在加载配置的时候使用。
我们可以通过两种方式配置:package 和 typeAlias 的方式,而且这两种方式可以共存。
private void typeAliasesElement(XNode parent) {
    if (parent != null) {
        // 遍历typeAliases下的typeAlias或package节点
        for (XNode child : parent.getChildren()) {
            // 配置包的情况
            if ("package".equals(child.getName())) {
                String typeAliasPackage = child.getStringAttribute("name");
                // 使用包名注册
                configuration.getTypeAliasRegistry().registerAliases(typeAliasPackage);
            } else {
                // 配置具体类的情况
                String alias = child.getStringAttribute("alias");
                String type = child.getStringAttribute("type");
                try {
                    // 加载指定类
                    Class<?> clazz = Resources.classForName(type);
                    if (alias == null) {
                        // 如果没有通过xml显式设置别名,将读取该类的Alias注解里的value值
                        // 如果没有通过xml或注解显式设置别名,将使用该Class对象的simpleName小写作为别名
                        typeAliasRegistry.registerAlias(clazz);
                    } else {
                        typeAliasRegistry.registerAlias(alias, clazz);
                    }
                } catch (ClassNotFoundException e) {
                    throw new BuilderException("Error registering typeAlias for '" + alias + "'. Cause: " + e, e);
                }
            }
        }
    }
}
这里只看使用 package 注册别名的情况,进入到TypeAliasRegistry.registerAliases(String)方法。通过以下代码可知,注册别名时无法注册接口或内部类。这里 mybatis 又提供了一个好用的工具类--ResolverUtil,通过ResolverUtil我们可以获取到指定包路径下的接口、注解或指定类的子类。
public void registerAliases(String packageName) {
    // 查找指定包名下Object的子类,并注册别名
    registerAliases(packageName, Object.class);
}

public void registerAliases(String packageName, Class<?> superType) {
    ResolverUtil<Class<?>> resolverUtil = new ResolverUtil<>();
    // 查找指定包名下superType的子类
    resolverUtil.find(new ResolverUtil.IsA(superType), packageName);
    Set<Class<? extends Class<?>>> typeSet = resolverUtil.getClasses();

    for (Class<?> type : typeSet) {
        // 跳过内部类和接口
        if (!type.isAnonymousClass() && !type.isInterface() && !type.isMemberClass()) {
            // 注册指定类的别名
            registerAlias(type);
        }
    }
}
接着进入TypeAliasRegistry.registerAlias(Class<?>)。因为按 package 注册别名的方式没有在 xml 中指定别名,所以,这里会试图从类的Alias注解里获取,如果没有,默认使用该类的 simpleName。
public void registerAlias(Class<?> type) {
    // 获取指定类的simpleName
    String alias = type.getSimpleName();
    // 获取指定类的Alias注解
    Alias aliasAnnotation = type.getAnnotation(Alias.class);
    if (aliasAnnotation != null) {
        // 如果不为空,设置别名为注解里的value
        alias = aliasAnnotation.value();
    }
    // 注册指定类的别名
    registerAlias(alias, type);
}
最后进入TypeAliasRegistry.registerAlias(String, Class<?>)方法,通过以下代码可知,别名都会被转化为小写,而且,如果同一个别名注册多个不同的类,会报错。最终会以 alias=Class 的键值对存入TypeAliasRegistry维护的 map中,供其他配置项使用。
// 存放着 alias=Class 的键值对
private final Map<String, Class<?>> typeAliases = new HashMap<>();
public void registerAlias(String alias, Class<?> value) {
    if (alias == null) {
        throw new TypeException("The parameter alias cannot be null");
    }
    // 取别名的小写
    String key = alias.toLowerCase(Locale.ENGLISH);
    // 如果相同的别名或类已经注册过,会抛错
    if (typeAliases.containsKey(key) && typeAliases.get(key) != null && !typeAliases.get(key).equals(value)) {
        throw new TypeException("The alias '" + alias + "' is already mapped to the value '" + typeAliases.get(key).getName() + "'.");
    }
	// 存入键值对
    typeAliases.put(key, value);
}
plugins
插件/拦截器的初始化比较简单,就简单过一下吧。通过代码可知,我们可以在 plugin 节点下增加 property节点。
private void pluginElement(XNode parent) throws Exception {
    if (parent != null) {
        for (XNode child : parent.getChildren()) {
            // 获取interceptor名
            String interceptor = child.getStringAttribute("interceptor");
            // 获取interceptor的参数
            Properties properties = child.getChildrenAsProperties();
            // 实例化。注意,这里解析Class时会先从别名注册器查,没有才会用Class.forName的方式实例化
            Interceptor interceptorInstance = (Interceptor) resolveClass(interceptor).getDeclaredConstructor().newInstance();
            // 设置参数
            interceptorInstance.setProperties(properties);
            // 添加到configuration的interceptorChain
            configuration.addInterceptor(interceptorInstance);
        }
    }
}
environments
这里的Environment对象包含了两个部分:事务工厂和数据源,并且使用 id 作为唯一标识。在下面的代码中,事务工厂和数据源的实例化过程有点类似于插件的过程,这里就不展开了。
private void environmentsElement(XNode context) throws Exception {
    if (context != null) {
        // 如果没有指定环境,会使用default
        if (environment == null) {
            environment = context.getStringAttribute("default");
        }
        for (XNode child : context.getChildren()) {
            String id = child.getStringAttribute("id");
            // 判断是否指定环境
            if (isSpecifiedEnvironment(id)) {
                // 根据配置的transactionManager创建TransactionFactory对象
                TransactionFactory txFactory = transactionManagerElement(child.evalNode("transactionManager"));
                // 根据配置的dataSource创建DataSourceFactory对象
                DataSourceFactory dsFactory = dataSourceElement(child.evalNode("dataSource"));
                // 获取数据源
                DataSource dataSource = dsFactory.getDataSource();
                // 根据id(环境名)、数据源和事务工厂构建并设置Environment对象
                Environment.Builder environmentBuilder = new Environment.Builder(id)
                    .transactionFactory(txFactory)
                    .dataSource(dataSource);
                configuration.setEnvironment(environmentBuilder.build());
            }
        }
    }
}
typeHandlers*
配置TypeHandler的规则
TypeHandler用于处理参数映射和结果集映射,一个TypeHandler一般需要包含 javaType 和 jdbcType 两个属性来标识,如果某个 javaType 和数据库的 jdbcType 关系为的 一对一或一对多,则可以不用设置 jdbcType。例如BooleanTypeHandler、ByteTypeHandler。
在分析源码前,我们先来看看声明 javaType 和 jdbcType 的几种方式:
- xml 中声明,如下
<typeHandlers>
  <typeHandler handler="org.mybatis.example.ExampleTypeHandler" javaType="String" jdbcType="VARCHAR"/>
</typeHandlers>
- 在注解中声明,如下:
@MappedTypes(value = String.class)
@MappedJdbcTypes(value = JdbcType.VARCHAR)
public class ExampleTypeHandler implements TypeHandler<String> {
}
- 在泛型中声明,如下。这种只能用来配置 javaType,而且,必须继承
BaseTypeHandler或TypeReference才行。
public class BigDecimalTypeHandler extends BaseTypeHandler<BigDecimal> {
}
兼容的配置方式越多,代码逻辑也会更复杂,如果 xml 中没有显式地配置 javaType 或 jdbcType,mybatis 会尝试去推断出来,只要明白这个逻辑,接下来的代码就简单很多了。
源码分析
现在开始分析源码吧。我们可以使用 package 和 typeHandler 的两种配置方式,且它们可以共存。
private void typeHandlerElement(XNode parent) {
    if (parent != null) {
        for (XNode child : parent.getChildren()) {
            // 使用包名注册的情况
            if ("package".equals(child.getName())) {
                String typeHandlerPackage = child.getStringAttribute("name");
                typeHandlerRegistry.register(typeHandlerPackage);
            } else {
                //使用具体类名注册的情况
                String javaTypeName = child.getStringAttribute("javaType");
                String jdbcTypeName = child.getStringAttribute("jdbcType");
                String handlerTypeName = child.getStringAttribute("handler");
                Class<?> javaTypeClass = resolveClass(javaTypeName);
                JdbcType jdbcType = resolveJdbcType(jdbcTypeName);
                Class<?> typeHandlerClass = resolveClass(handlerTypeName);
                if (javaTypeClass != null) {
                    if (jdbcType == null) {
                        // javaType不为空,jdbcType为空的情况
                        typeHandlerRegistry.register(javaTypeClass, typeHandlerClass);
                    } else {
                        // javaType不为空,jdbcType不为空的情况
                        typeHandlerRegistry.register(javaTypeClass, jdbcType, typeHandlerClass);
                    }
                } else {
                    // javaType为空,jdbcType为空的情况
                    typeHandlerRegistry.register(typeHandlerClass);
                }
            }
        }
    }
}
按 package 注册类型处理器的方式有点像前面提到的按 package 注册别名,都会先加载指定包里的类,这里就不展开了,直接看按类名注册的情况(不指定 javaType 和 jdbcType),进入到TypeHandlerRegistry.register(Class<?>)方法。这种情况下,mybatis 会先去推断出该类型处理器对应的 javaType,方法如下:
- 通过 MappedTypes 注解的 value 来判断;
- 通过泛型判断,这种类型处理器需要继承BaseTypeHandler,而不仅仅只是实现TypeHandler。(3.1.0之后才支持)
public void register(Class<?> typeHandlerClass) {
    boolean mappedTypeFound = false;
    // 获取指定类型处理器的MappedTypes注解,里面的value就是该类型处理器处理的javaType
    MappedTypes mappedTypes = typeHandlerClass.getAnnotation(MappedTypes.class);
    if (mappedTypes != null) {
        // 获取MappedTypes注解的value,并遍历
        for (Class<?> javaTypeClass : mappedTypes.value()) {
            // 根据javaType注册类型处理器
            register(javaTypeClass, typeHandlerClass);
            mappedTypeFound = true;
        }
    }
    // 如果没有MappedTypes注解,mybatis 3.1.0之后会通过泛型推断出javaType,但这种类型处理器需要继承BaseTypeHandler,而不仅仅只是实现TypeHandler
    if (!mappedTypeFound) {
        register(getInstance(null, typeHandlerClass));
    }
}
接下来就是推断 jdbcType 了,这里会通过 MappedJdbcTypes 注解来确定(可配置多个 jdbcType),如果设置了includeNullJdbcType=true,则会将 jdbcTyp 为 null 情况也注册上去。如果没有MappedJdbcTypes 注解,会直接将 jdbcTyp 为 null 情况也注册上去。
public void register(Class<?> javaTypeClass, Class<?> typeHandlerClass) {
    // 实例化类型处理器,并根据javaType注册
    register(javaTypeClass, getInstance(javaTypeClass, typeHandlerClass));
}
public <T> void register(Class<T> javaType, TypeHandler<? extends T> typeHandler) {
    // 强转javaType为Type类型
    register((Type) javaType, typeHandler);
}
private <T> void register(Type javaType, TypeHandler<? extends T> typeHandler) {
    // 获取类型处理器的MappedJdbcTypes注解,里面的value就是该类型处理器处理的jdbcType
    MappedJdbcTypes mappedJdbcTypes = typeHandler.getClass().getAnnotation(MappedJdbcTypes.class);
    if (mappedJdbcTypes != null) {
        // 获取MappedJdbcTypes注解的value,并遍历
        for (JdbcType handledJdbcType : mappedJdbcTypes.value()) {
            // 根据javaType和jdbcType注册类型处理器
            register(javaType, handledJdbcType, typeHandler);
        }
        // 读取MappedJdbcTypes注解的includeNullJdbcType,如果为true,则根据javaType注册类型处理器
        // 当includeNullJdbcType为true时,即使不指定jdbcType,该类型处理器也能被使用。从 Mybatis 3.4.0 开始,如果某个 Java 类型只有一个注册的类型处理器,即使没有设置 includeNullJdbcType=true,那么这个类型处理器也会是 ResultMap 使用 Java 类型时的默认处理器。
        if (mappedJdbcTypes.includeNullJdbcType()) {
            register(javaType, null, typeHandler);
        }
    } else {
        // 根据javaType注册类型处理
        register(javaType, null, typeHandler);
    }
}
最后就是具体的注册过程了。mybatis 进行参数或结果集映射时一般用到的是 typeHandlerMap,其他的成员属性一般用于判断是否有某种类型处理器。
// javaType=(jdbcType=typeHandler)
private final Map<Type, Map<JdbcType, TypeHandler<?>>> typeHandlerMap = new ConcurrentHashMap<>();
// class=typeHandler,这个没什么用
private final Map<Class<?>, TypeHandler<?>> allTypeHandlersMap = new HashMap<>();

private void register(Type javaType, JdbcType jdbcType, TypeHandler<?> handler) {
    // 只有javaType非空时才会放入typeHandlerMap
    if (javaType != null) {
        // 从typeHandlerMap里获取当前javaType的jdbcType=TypeHandler
        Map<JdbcType, TypeHandler<?>> map = typeHandlerMap.get(javaType);
        // 如果这张表为空,则重置
        if (map == null || map == NULL_TYPE_HANDLER_MAP) {
            map = new HashMap<>();
        }
        // 放入当前需要注册的jdbcType=TypeHandler,注意,相同的会被覆盖掉
        map.put(jdbcType, handler);
        // 放入javaType=map
        typeHandlerMap.put(javaType, map);
    }
    // allTypeHandlersMap放入了所有的handler,包括javaType为空的。
    allTypeHandlersMap.put(handler.getClass(), handler);
}
mappers*
mapper 的节点对象
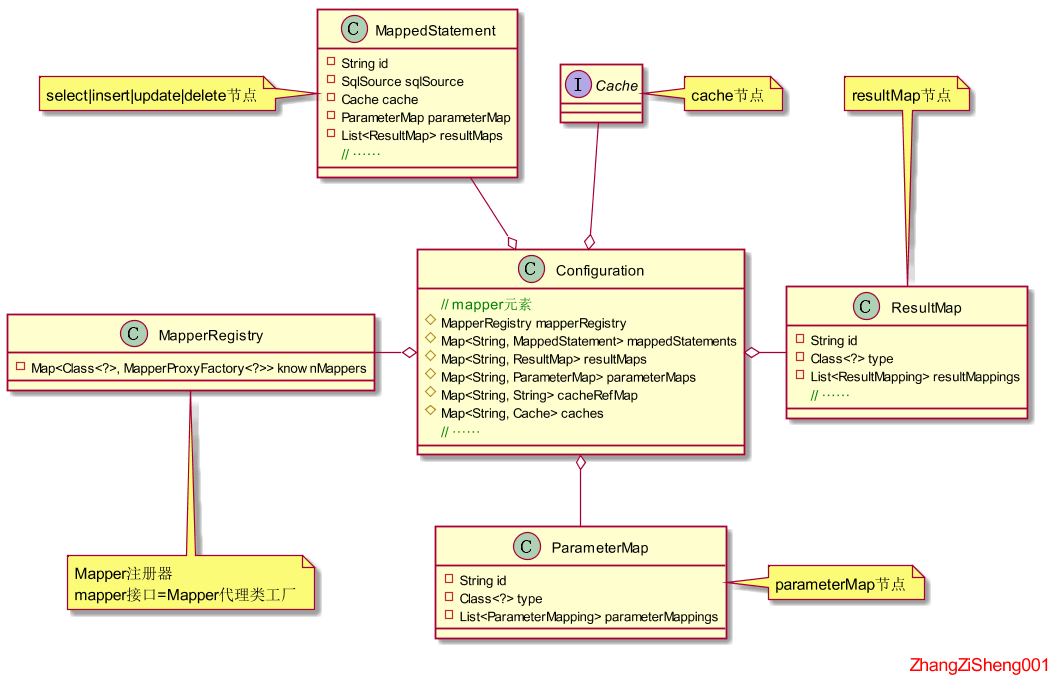
接下来就是初始化中最难的部分了。因为 mybatis 的 mapper 支持了非常多个语法,甚至还允许使用注解配置,所以,在对 mapper 的解析方面需要非常复杂的逻辑。我们先来看看 mapper 中的配置项,如下。
ResultMap的组成
接下来我只会写 resultMap 节点的 xml 配置,其他的就不写了。为了更好地理清代码逻辑,我们先看看 resultMap 的几种配置方式。
<resultMap id="detailedBlogResultMap" type="Blog">
    <constructor>
        <idArg column="blog_id" javaType="int" />
    </constructor>
    <result property="title" column="blog_title" />
    <association property="author" javaType="Author">
        <id property="id" column="author_id" />
        <result property="username" column="author_username" />
        <result property="password" column="author_password" />
        <result property="email" column="author_email" />
    </association>
    <collection property="posts" ofType="Post">
        <id property="id" column="post_id" />
        <result property="subject" column="post_subject" />
        <association property="author" javaType="Author" />
        <collection property="comments" ofType="Comment">
            <id property="id" column="comment_id" />
        </collection>
        <collection property="tags" ofType="Tag">
            <id property="id" column="tag_id" />
        </collection>
    </collection>
    <discriminator javaType="int" column="draft">
        <case value="1" resultMap="resultMap01"/>
        <case value="2" resultMap="resultMap02"/>
        <case value="3" resultMap="resultMap03"/>
        <case value="4" resultMap="resultMap04"/>
    </discriminator>
</resultMap>
针对上面的配置,需要重点理解:
- 整个 resultMap 将作为
ResultMap对象存在,并使用 id 作为唯一标识。除了 id="detailedBlogResultMap" 的ResultMap对象,association 、collection 和 case 节点也会生成新的ResultMap对象(如果不是配置 resultMap 和 select 属性的话)。 - idArg、result、association 和 collection 节点都会被转换为
ResultMapping对象被ResultMap对象持有,区别在于 association 和 collection 的ResultMapping对象会持有 nestedResultMapId 来指向另外一个ResultMap对象,持有 nestedQueryId 来指向另外一个MappedStatement对象。 - discriminator 节点,将转换为
Discriminator对象被ResultMap对象持有。
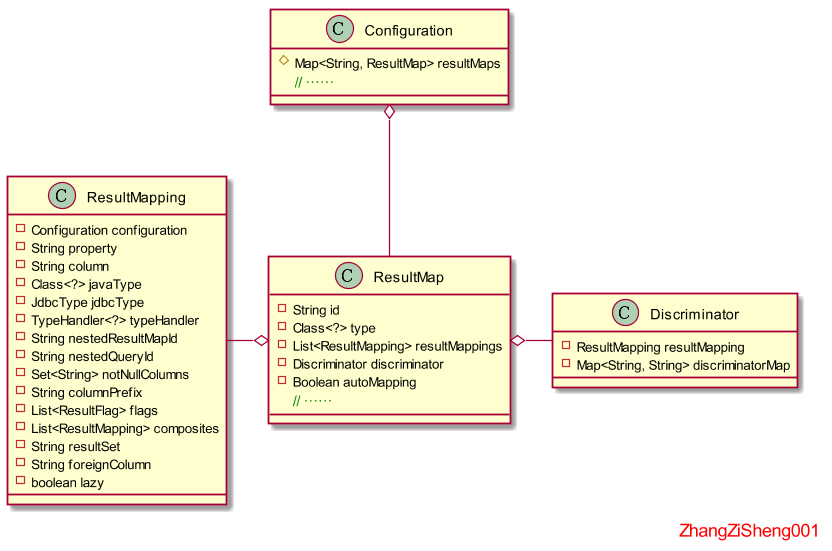
源码分析
那么,开始看源码吧。mapper 的配置支持下面两种配置,两者可以共存:
- mapper 节点配置。支持 resource、url 和 class 属性,但这三个属性只能配置一个,不然会报错。
- package 节点配置。
private void mapperElement(XNode parent) throws Exception {
    if (parent != null) {
        for (XNode child : parent.getChildren()) {
            // 使用包配置的情况
            if ("package".equals(child.getName())) {
                String mapperPackage = child.getStringAttribute("name");
                configuration.addMappers(mapperPackage);
            } else {
                // 使用mapper配置的情况
                String resource = child.getStringAttribute("resource");
                String url = child.getStringAttribute("url");
                String mapperClass = child.getStringAttribute("class");
                if (resource != null && url == null && mapperClass == null) {
                    // resource属性不为空
                    ErrorContext.instance().resource(resource);
                    InputStream inputStream = Resources.getResourceAsStream(resource);
                    XMLMapperBuilder mapperParser = new XMLMapperBuilder(inputStream, configuration, resource, configuration.getSqlFragments());
                    mapperParser.parse();
                } else if (resource == null && url != null && mapperClass == null) {
                    // url属性不为空
                    ErrorContext.instance().resource(url);
                    InputStream inputStream = Resources.getUrlAsStream(url);
                    XMLMapperBuilder mapperParser = new XMLMapperBuilder(inputStream, configuration, url, configuration.getSqlFragments());
                    mapperParser.parse();
                } else if (resource == null && url == null && mapperClass != null) {
                    // class属性不为空
                    Class<?> mapperInterface = Resources.classForName(mapperClass);
                    configuration.addMapper(mapperInterface);
                // resource、url和class只能存在一个
                } else {
                    throw new BuilderException("A mapper element may only specify a url, resource or class, but not more than one.");
                }
            }
        }
    }
}
使用 package 配置 mapper 的情况,会有加载包内类的过程,和前面的 typeAliases 差不多,所以这里选择使用 mapper 配置(属性为class)的情况,进入到Configuration.addMapper(Class<T>)。在注册 mapper 时,其实有两个内容:
- 注册 mapper 接口,初始化 mapperRegistry 里的 type=mapperProxyFactory 的map。
MapperProxyFactory用于生成Mapper的代理类,后面会讲到。 - 解析 mapper 的 xml 文件和注解,初始化 mappedStatements、caches、resultMaps、parameterMaps 等属性。
public <T> void addMapper(Class<T> type) {
    mapperRegistry.addMapper(type);
}
public <T> void addMapper(Class<T> type) {
	// 只有是接口才行
    if (type.isInterface()) {
        // 该mapper是不是已经注册
        if (hasMapper(type)) {
            throw new BindingException("Type " + type + " is already known to the MapperRegistry.");
        }
        boolean loadCompleted = false;
        try {
            // 注册该mapper接口
            knownMappers.put(type, new MapperProxyFactory<>(type));
            // 接下来解析mapper的xml和注解,不要被MapperAnnotationBuilder这个类名误导,接下来不止会解析注解,也会解析xml
            MapperAnnotationBuilder parser = new MapperAnnotationBuilder(config, type);
            parser.parse();
            loadCompleted = true;
        } finally {
            if (!loadCompleted) {
                knownMappers.remove(type);
            }
        }
    }
}
进入到MapperAnnotationBuilder.parse()方法,这里先解析 xml 文件,再解析注解。接下来我们只看 xml 的,注解的就不看了。
// 存放已加载的资源
protected final Set<String> loadedResources = new HashSet<>();
public void parse() {
    String resource = type.toString();
    // 该资源未被加载才进入
    if (!configuration.isResourceLoaded(resource)) {
        // 加载xml
        loadXmlResource();
        // 标记已加载
        configuration.addLoadedResource(resource);
        assistant.setCurrentNamespace(type.getName());
        // 接下来是解析注解
        parseCache();
        parseCacheRef();
        Method[] methods = type.getMethods();
        for (Method method : methods) {
            try {
                // issue #237
                if (!method.isBridge()) {
                    parseStatement(method);
                }
            } catch (IncompleteElementException e) {
                // 未解析完成,会放入对应的集合中,等待最后再解析
                configuration.addIncompleteMethod(new MethodResolver(this, method));
            }
        }
    }
    // 因为存在嵌套引用的问题,有些内容还没解析完,这里会做最后的解析
    parsePendingMethods();
}
进入到MapperAnnotationBuilder.loadXmlResource()方法。这里的XMLMapperBuilder用于解析 mapper 文件的配置,前面说到的XMLConfigBuilder则是解析 configurantion 文件的配置,它们都是BaseBuilder的子类。
private void loadXmlResource() {
    // 该命名空间未被加载,才会进入
    if (!configuration.isResourceLoaded("namespace:" + type.getName())) {
        // 根据mapper获取xml
        String xmlResource = type.getName().replace('.', '/') + ".xml";
        InputStream inputStream = type.getResourceAsStream("/" + xmlResource);
        if (inputStream == null) {
            // Search XML mapper that is not in the module but in the classpath.
            try {
                inputStream = Resources.getResourceAsStream(type.getClassLoader(), xmlResource);
            } catch (IOException e2) {
                // ignore, resource is not required
            }
        }
        if (inputStream != null) {
            // 和XMLConfigBuilder一样,这里会解析xml并构建document
            XMLMapperBuilder xmlParser = new XMLMapperBuilder(inputStream, assistant.getConfiguration(), xmlResource, configuration.getSqlFragments(), type.getName());
            // 进入解析
            xmlParser.parse();
        }
    }
}
进入到XMLMapperBuilder.parse()。我们会发现,如果使用 resource 或 url 的方式来配置 mapper,那么 Mapper 接口的注册会在这个方法里。
public void parse() {
    // 该资源未加载才会进入
    if (!configuration.isResourceLoaded(resource)) {
        // 构建mapper节点的XNode对象,并解析
        configurationElement(parser.evalNode("/mapper"));
        // 标记已解析
        configuration.addLoadedResource(resource);
        // 注册Mapper接口,其实这个注册过了的
        bindMapperForNamespace();
    }
	// 因为存在嵌套引用的问题,有的节点还没初始化完成,这里继续初始化
    parsePendingResultMaps();
    parsePendingCacheRefs();
    parsePendingStatements();
}
private void configurationElement(XNode context) {
    try {
        // mapper文件的namespace不能为空
        String namespace = context.getStringAttribute("namespace");
        if (namespace == null || namespace.equals("")) {
            throw new BuilderException("Mapper's namespace cannot be empty");
        }
        builderAssistant.setCurrentNamespace(namespace);
        // 接下来讲初始化各个节点
        cacheRefElement(context.evalNode("cache-ref"));
        cacheElement(context.evalNode("cache"));
        parameterMapElement(context.evalNodes("/mapper/parameterMap"));
        resultMapElements(context.evalNodes("/mapper/resultMap"));
        sqlElement(context.evalNodes("/mapper/sql"));
        buildStatementFromContext(context.evalNodes("select|insert|update|delete"));
    } catch (Exception e) {
        throw new BuilderException("Error parsing Mapper XML. The XML location is '" + resource + "'. Cause: " + e, e);
    }
}
前面已经说过,我们只看 resultMap 的构建,进入到XMLMapperBuilder.resultMapElements(List<XNode>)。
private void resultMapElements(List<XNode> list) {
    // 我们可以配置多个resultMap,这里一个个遍历
    for (XNode resultMapNode : list) {
        try {
            // 解析resultMap节点
            resultMapElement(resultMapNode);
        } catch (IncompleteElementException e) {
            // ignore, it will be retried
        }
    }
}
private ResultMap resultMapElement(XNode resultMapNode) {
    return resultMapElement(resultMapNode, Collections.emptyList(), null);
}
// 注意,这个类传入的resultMapNode不仅是resultMap节点,也可以是association、collection或case节点
// 如果是association、collection或case节点,enclosingType为当前resultMap节点的type,additionalResultMappings为所属resultMap的ResultMappings
private ResultMap resultMapElement(XNode resultMapNode, List<ResultMapping> additionalResultMappings, Class<?> enclosingType) {
    ErrorContext.instance().activity("processing " + resultMapNode.getValueBasedIdentifier());
    // 获取当前的类名
    String type = resultMapNode.getStringAttribute("type",
                                                   resultMapNode.getStringAttribute("ofType",
                                                                                    resultMapNode.getStringAttribute("resultType",
                                                                                                                     resultMapNode.getStringAttribute("javaType"))));
    // 获取该类的Class对象。如果为空,针对association和case的情况会通过enclosingType来推断
    Class<?> typeClass = resolveClass(type);
    if (typeClass == null) {
        typeClass = inheritEnclosingType(resultMapNode, enclosingType);
    }
    Discriminator discriminator = null;
    List<ResultMapping> resultMappings = new ArrayList<>(additionalResultMappings);
    List<XNode> resultChildren = resultMapNode.getChildren();
    for (XNode resultChild : resultChildren) {
        // 如果为constructor节点
        if ("constructor".equals(resultChild.getName())) {
            // 这里会将每个idArg或arg转换为ResultMapping对象,并放入resultMappings
            processConstructorElement(resultChild, typeClass, resultMappings);
        // 如果为discriminator节点
        } else if ("discriminator".equals(resultChild.getName())) {
            // discriminator将转换为Discriminator对象
            discriminator = processDiscriminatorElement(resultChild, typeClass, resultMappings);
        // 这种就是的result、collection或association节点了
        } else {
			List<ResultFlag> flags = new ArrayList<>();
            // 标记id
            if ("id".equals(resultChild.getName())) {
                flags.add(ResultFlag.ID);
            }
            // 将result、collection或association节点转换为ResultMapping对象,并放入resultMappings,如果是collection或association节点,会指向生成的新的ResultMap对象或已有的ResultMap对象
            resultMappings.add(buildResultMappingFromContext(resultChild, typeClass, flags));
        }
    }
    // 获取resultMap的id、extends和autoMapping属性
    String id = resultMapNode.getStringAttribute("id",
                                                 resultMapNode.getValueBasedIdentifier());
    String extend = resultMapNode.getStringAttribute("extends");
    Boolean autoMapping = resultMapNode.getBooleanAttribute("autoMapping");
    // 创建ResultMapResolver对象
    ResultMapResolver resultMapResolver = new ResultMapResolver(builderAssistant, id, typeClass, extend, discriminator, resultMappings, autoMapping);
    try {
        // 解析resultMap,这里所谓的解析,其实就是将extends的东西放入resultMappings
        return resultMapResolver.resolve();
    } catch (IncompleteElementException  e) {
        // 如果没有解析完成,放入集合incompleteResultMaps,等待后面再解析
        configuration.addIncompleteResultMap(resultMapResolver);
        throw e;
    }
}
以上,mybatis 初始化的源码基本已分析完,不足的地方欢迎指正。
相关源码请移步:mybatis-demo
本文为原创文章,转载请附上原文出处链接:https://www.cnblogs.com/ZhangZiSheng001/p/12704076.html

 前面已经说完 mybatis 的使用,现在开始分析源码,和使用例子一样,我用的 mybatis 是 3.5.4 版本的。考虑连贯性,我会按下面的顺序来展开分析,计划两篇博客写完,本文只涉及第一点内容:
1. 加载配置、初始化SqlSessionFactory;
2. 获取SqlSession和Mapper;
3. 执行Mapper方法。
