
《WebGL编程指南》学习总结——chapter 7
进入三维世界
视点和视线
三维物体与二维图形的最显著的区别:三维物体具有深度,也就是Z轴。当然,三维物体最后还得绘制到二维的屏幕上,即绘制观察者看到的世界,而观察者可以在任意位置观察。故定义一个观察者,需考虑两点:1.观察方向:观察者自己在什么位置,在看场景的哪一部分;2.可视距离:观察者能看多远
我们将观察者所处的位置称为视点(eye point),从视点出发沿着观察方向的射线称作 视线(viewing direction) 。
视图矩阵
为了确定观察者的状态和要把观察到的景象绘制到屏幕上,需要知道三个量:
- 视点:观察者在三维空间中的位置,视线的起点。(eyeX,eyeY,eyeZ)
- 观察目标点:被观察目标所在的点。(atX,atY,atZ)
- 上方向:最终绘制在屏幕上的影像中向上的方向。(upX,upY,upZ)
在webGL中,可以用上述三个矢量创建一个视图矩阵(view matrix),然后将该矩阵传给顶点着色器。可以用cuon-matrex.js提供的Matrix4.setLookAt()函数来创建视图矩阵。
//顶点着色器
var VSHADER_SOURCE =
  'attribute vec4 a_Position;\n' +
  'attribute vec4 a_Color;\n' +
  'uniform mat4 u_ViewMatrix;\n' + //view matrix
  'varying vec4 v_Color;\n' +
  'void main() {\n' +
  '  gl_Position = u_ViewMatrix * a_Position;\n' +
  '  v_Color = a_Color;\n' +
  '}\n';
function main(){
...
 // Get the storage location of u_ViewMatrix
  var u_ViewMatrix = gl.getUniformLocation(gl.program, 'u_ViewMatrix');
  if (!u_ViewMatrix) {
    console.log('Failed to get the storage locations of u_ViewMatrix');
    return;
  }

  // Set the matrix to be used for to set the camera view
  var viewMatrix = new Matrix4();
//setLookAt(eyeX,eyeY,eyeZ,atX,atY,atZ,upX,upY,upZ)
  viewMatrix.setLookAt(0.20, 0.25, 0.25, 0, 0, 0, 0, 1, 0);

  // Set the view matrix
  gl.uniformMatrix4fv(u_ViewMatrix, false, viewMatrix.elements);
...
}
从指定视点观察旋转后的三角形
<“从视点看上去”的旋转后顶点坐标> = <视图矩阵>x<模型矩阵>x<原始顶点坐标>
var VSHADER_SOURCE =
  'attribute vec4 a_Position;\n' +
  'attribute vec4 a_Color;\n' +
  'uniform mat4 u_ViewMatrix;\n' + //视图矩阵
  'uniform mat4 u_ModelMatrix;\n' + //模型矩阵
  'varying vec4 v_Color;\n' +
  'void main() {\n' +
  '  gl_Position = u_ViewMatrix * u_ModelMatrix * a_Position;\n' + //<视图矩阵>x<模型矩阵>x<原始顶点坐标>
  '  v_Color = a_Color;\n' +
  '}\n';
...
function main() {
...

  // Get the storage location of u_ViewMatrix and u_ModelMatrix
  var u_ViewMatrix = gl.getUniformLocation(gl.program, 'u_ViewMatrix');
  var u_ModelMatrix = gl.getUniformLocation(gl.program, 'u_ModelMatrix');
  if(!u_ViewMatrix || !u_ModelMatrix) {
    console.log('Failed to get the storage location of u_viewMatrix or u_ModelMatrix');
    return;
  }

  // Set the matrix to be used for to set the camera view
  var viewMatrix = new Matrix4();
  viewMatrix.setLookAt(0.20, 0.25, 0.25, 0, 0, 0, 0, 1, 0);

  // Calculate matrix for rotate
  var modelMatrix = new Matrix4();
  modelMatrix.setRotate(-10, 0, 0, 1); // Rotate around z-axis

  // Pass the view projection matrix and model matrix
  gl.uniformMatrix4fv(u_ViewMatrix, false, viewMatrix.elements);
  gl.uniformMatrix4fv(u_ModelMatrix, false, modelMatrix.elements);

 // Clear <canvas>
  gl.clear(gl.COLOR_BUFFER_BIT);

  // Draw the rectangle
  gl.drawArrays(gl.TRIANGLES, 0, n);
}
...
上述中,在执行gl.drawArrays(gl.TRIANGLES, 0, n)时,程序对每个顶点都要计算视图矩阵 x 模型矩阵。如果顶点数量较多,这一步的操作就会造成不必要的开销。所以我们可以先把这两个矩阵相乘的结果计算出来,再传给顶点着色器。这两个矩阵相乘得到的结果被称为模型视图矩阵(model view matrix)
<模型视图矩阵> = <视图矩阵>x<模型矩阵> ,故<“从视点看上去”的旋转后顶点坐标> = <模型视图矩阵>x<原始顶点坐标>
var VSHADER_SOURCE =
  'attribute vec4 a_Position;\n' +
  'attribute vec4 a_Color;\n' +
  'uniform mat4 u_ModelViewMatrix;\n' +  //模型视图矩阵
  'varying vec4 v_Color;\n' +
  'void main() {\n' +
  '  gl_Position = u_ModelViewMatrix * a_Position;\n' +
  '  v_Color = a_Color;\n' +
  '}\n';
...
function main() {
...

 // Get the storage location of u_ModelViewMatrix and u_ModelMatrix
  var u_ModelViewMatrix = gl.getUniformLocation(gl.program, 'u_ModelViewMatrix');
  if(!u_ModelViewMatrix) {
    console.log('u_ModelViewMatrix获取失败');
    return;
  }

  //1 Set the matrix to be used for to set the camera view
  var viewMatrix = new Matrix4();
  viewMatrix.setLookAt(0.20, 0.25, 0.25, 0, 0, 0, 0, 1, 0);

  //2 Calculate matrix for rotate
  var modelMatrix = new Matrix4();
  modelMatrix.setRotate(-10, 0, 0, 1);

  //3 Multiply model matrix to view matrix
  var modelViewMatrix = viewMatrix.multiply(modelMatrix);

//上述1\2\3行代码可以用以下两行代码表示
//var modelViewMatrix = new Matrix4();
//modelViewMatrix.setLookAt(0.20, 0.25, 0.25, 0, 0, 0, 0, 1, 0).rotate(-10, 0, 0, 1);

  // Pass the model view projection matrix
  gl.uniformMatrix4fv(u_ModelViewMatrix, false, modelViewMatrix.elements);

 // Clear <canvas>
  gl.clear(gl.COLOR_BUFFER_BIT);

  // Draw the rectangle
  gl.drawArrays(gl.TRIANGLES, 0, n);
}
...
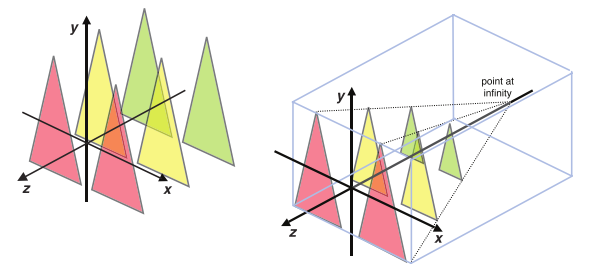
可视空间
WebGL定义了可视空间(view volume),包括水平视角、垂直视角和可视深度
有两种常用的可视空间:
- 长方体可视空间,也称盒状空间,由正射投影(orthographic projection)产生
- 四棱锥/金子塔可视空间,由透视投影(perspective projection)产生
盒状可视空间(正射投影)
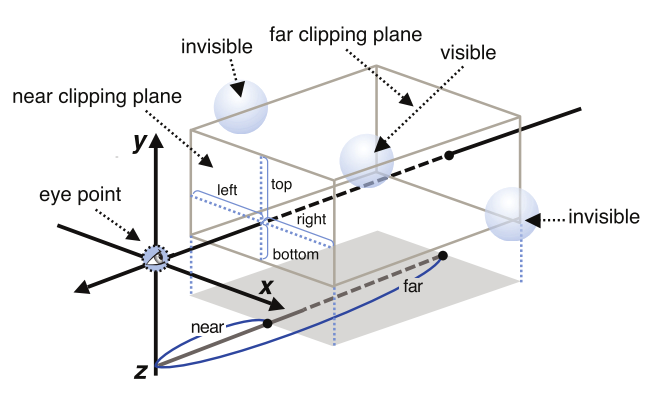
盒状可视空间的状态如下图所示。可视空间由两个矩形表面确定,分别称近裁剪面(near clipping plane)和远裁剪面(far clipping plane) 。前者的四个顶点为( right , top , - near ), (- left , top , - near ), (- left , - bottom , - near ), 和( right , - bottom , - near );后者的四个顶点为right , top , - far ), (- left , top , - far ), (- left , - bottom , - far ), 和( right , - bottom , - far )。
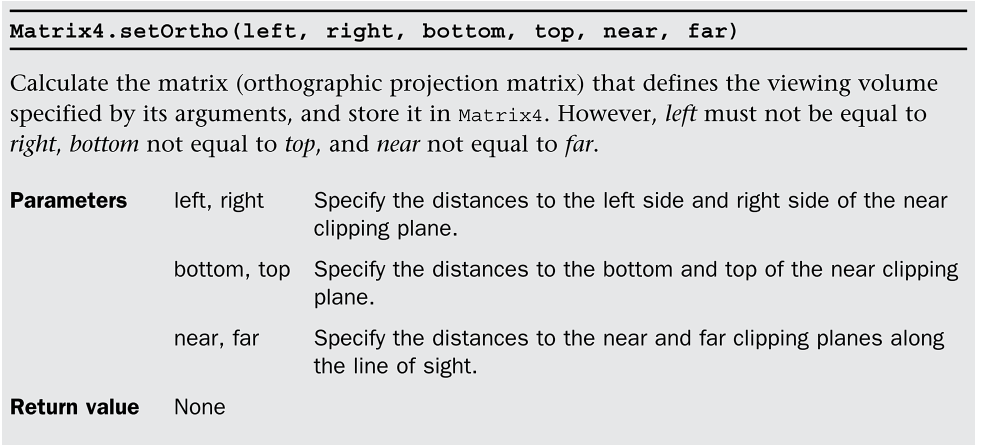
在本书中,用cuon-matirx.js 提供的Matrix4.setOrtho()可用来设置正射投影矩阵(orthographic projection matrix),定义盒状可视空间。
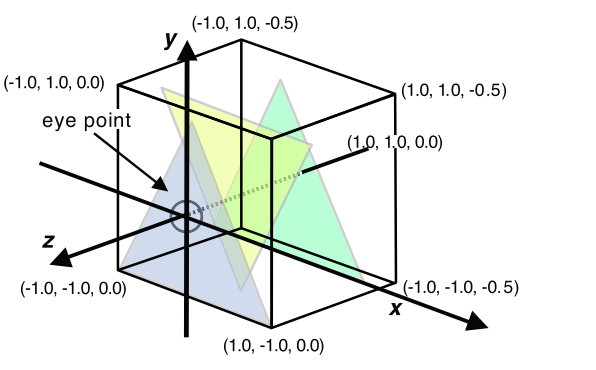
下面代码为Orthview.html和Orthview.js。下图为该例的视点和盒状可视空间。
<!DOCTYPE html>
<html lang="en">
  <head>
    <meta charset="utf-8" />
    <title>Orthographic Projection</title>
  </head>

  <body onload="main()">
    <canvas id="webgl" width="400" height="400">
    Please use a browser that supports "canvas"
    </canvas>
    <p id="nearFar">The near and far values are displayed here.</p> //用于显示当前的near和far值

    <script src="../lib/webgl-utils.js"></script>
    <script src="../lib/webgl-debug.js"></script>
    <script src="../lib/cuon-utils.js"></script>
    <script src="../lib/cuon-matrix.js"></script>
    <script src="OrthoView.js"></script>
  </body>
</html>
// OrthoView.js (c) 2012 matsuda
// Vertex shader program
var VSHADER_SOURCE =
  'attribute vec4 a_Position;\n' +
  'attribute vec4 a_Color;\n' +
  'uniform mat4 u_ProjMatrix;\n' +
  'varying vec4 v_Color;\n' +
  'void main() {\n' +
  '  gl_Position = u_ProjMatrix * a_Position;\n' +
  '  v_Color = a_Color;\n' +
  '}\n';

// Fragment shader program
var FSHADER_SOURCE =
  '#ifdef GL_ES\n' +
  'precision mediump float;\n' +
  '#endif\n' +
  'varying vec4 v_Color;\n' +
  'void main() {\n' +
  '  gl_FragColor = v_Color;\n' +
  '}\n';

function main() {
  // Retrieve <canvas> element
  var canvas = document.getElementById('webgl');
  // Retrieve the nearFar element
  var nf = document.getElementById('nearFar');

  // Get the rendering context for WebGL
  var gl = getWebGLContext(canvas);
  if (!gl) {
    console.log('Failed to get the rendering context for WebGL');
    return;
  }

  // Initialize shaders
  if (!initShaders(gl, VSHADER_SOURCE, FSHADER_SOURCE)) {
    console.log('Failed to intialize shaders.');
    return;
  }

  // Set the vertex coordinates and color (the blue triangle is in the front)
  var n =  initVertexBuffers(gl);
  if (n < 0) {
    console.log('Failed to set the vertex information');
    return;
  }

  // Specify the color for clearing <canvas>
  gl.clearColor(0, 0, 0, 1);

  // get the storage location of u_ProjMatrix
  var u_ProjMatrix = gl.getUniformLocation(gl.program, 'u_ProjMatrix');
  if (!u_ProjMatrix) {
    console.log('Failed to get the storage location of u_ProjMatrix');
    return;
  }

  // Create the matrix to set the eye point, and the line of sight
  var projMatrix = new Matrix4();
  // Register the event handler to be called on key press
  document.onkeydown = function(ev){ keydown(ev, gl, n, u_ProjMatrix, projMatrix, nf); };

  draw(gl, n, u_ProjMatrix, projMatrix, nf);   // Draw the triangles
}

function initVertexBuffers(gl) {
  var verticesColors = new Float32Array([
    // Vertex coordinates and color
     0.0,  0.6,  -0.4,  0.4,  1.0,  0.4, // The back green one
    -0.5, -0.4,  -0.4,  0.4,  1.0,  0.4,
     0.5, -0.4,  -0.4,  1.0,  0.4,  0.4,

     0.5,  0.4,  -0.2,  1.0,  0.4,  0.4, // The middle yellow one
    -0.5,  0.4,  -0.2,  1.0,  1.0,  0.4,
     0.0, -0.6,  -0.2,  1.0,  1.0,  0.4,

     0.0,  0.5,   0.0,  0.4,  0.4,  1.0, // The front blue one
    -0.5, -0.5,   0.0,  0.4,  0.4,  1.0,
     0.5, -0.5,   0.0,  1.0,  0.4,  0.4,
  ]);
  var n = 9;

  // Create a buffer object
  var vertexColorbuffer = gl.createBuffer();
  if (!vertexColorbuffer) {
    console.log('Failed to create the buffer object');
    return -1;
  }

  // Write the vertex coordinates and color to the buffer object
  gl.bindBuffer(gl.ARRAY_BUFFER, vertexColorbuffer);
  gl.bufferData(gl.ARRAY_BUFFER, verticesColors, gl.STATIC_DRAW);

  var FSIZE = verticesColors.BYTES_PER_ELEMENT;
  // Assign the buffer object to a_Position and enable the assignment
  var a_Position = gl.getAttribLocation(gl.program, 'a_Position');
  if(a_Position < 0) {
    console.log('Failed to get the storage location of a_Position');
    return -1;
  }
  gl.vertexAttribPointer(a_Position, 3, gl.FLOAT, false, FSIZE * 6, 0);
  gl.enableVertexAttribArray(a_Position);
  // Assign the buffer object to a_Color and enable the assignment
  var a_Color = gl.getAttribLocation(gl.program, 'a_Color');
  if(a_Color < 0) {
    console.log('Failed to get the storage location of a_Color');
    return -1;
  }
  gl.vertexAttribPointer(a_Color, 3, gl.FLOAT, false, FSIZE * 6, FSIZE * 3);
  gl.enableVertexAttribArray(a_Color);

  return n;
}

// The distances to the near and far clipping plane
var g_near = 0.0, g_far = 0.5;
function keydown(ev, gl, n, u_ProjMatrix, projMatrix, nf) {
  switch(ev.keyCode){
    case 39: g_near += 0.01; break;  // The right arrow key was pressed
    case 37: g_near -= 0.01; break;  // The left arrow key was pressed
    case 38: g_far += 0.01;  break;  // The up arrow key was pressed
    case 40: g_far -= 0.01;  break;  // The down arrow key was pressed
    default: return; // Prevent the unnecessary drawing
  }

  draw(gl, n, u_ProjMatrix, projMatrix, nf);
}

function draw(gl, n, u_ProjMatrix, projMatrix, nf) {
  // Specify the viewing volume
  projMatrix.setOrtho(-1.0, 1.0, -1.0, 1.0, g_near, g_far);

  // Pass the projection matrix to u_ProjMatrix
  gl.uniformMatrix4fv(u_ProjMatrix, false, projMatrix.elements);

  gl.clear(gl.COLOR_BUFFER_BIT);       // Clear <canvas>

  // Display the current near and far values
  nf.innerHTML = 'near: ' + Math.round(g_near * 100)/100 + ', far: ' + Math.round(g_far*100)/100;

  gl.drawArrays(gl.TRIANGLES, 0, n);   // Draw the triangles
}
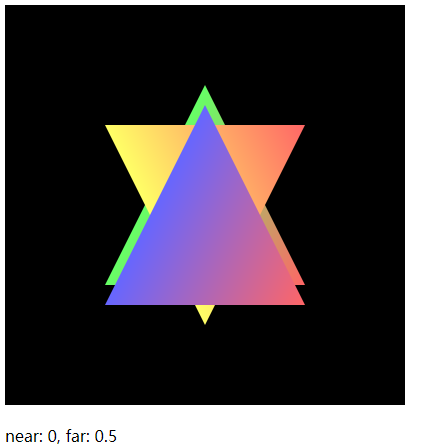
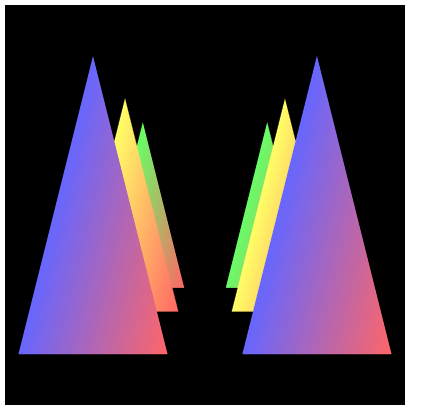
通过右方向键增大near的值如下图
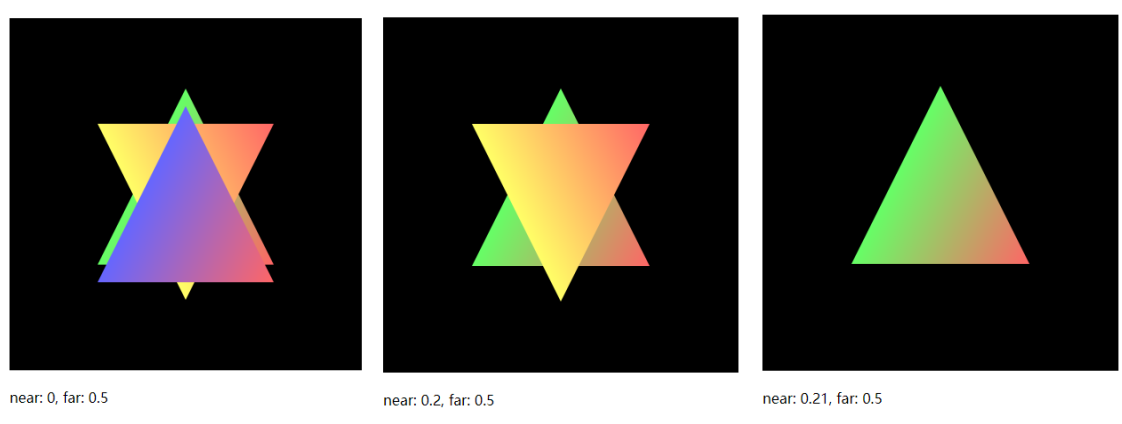
通过下方向键减少far值如下图
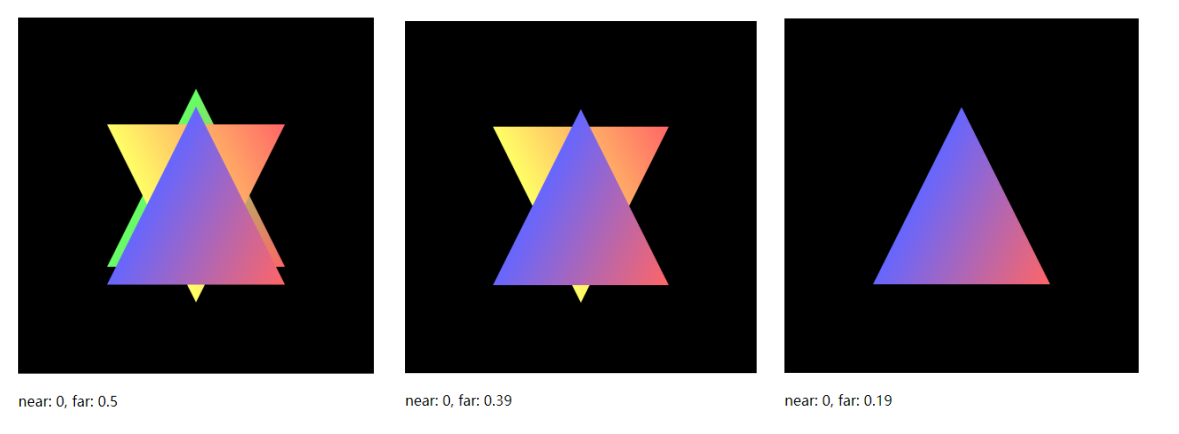
·
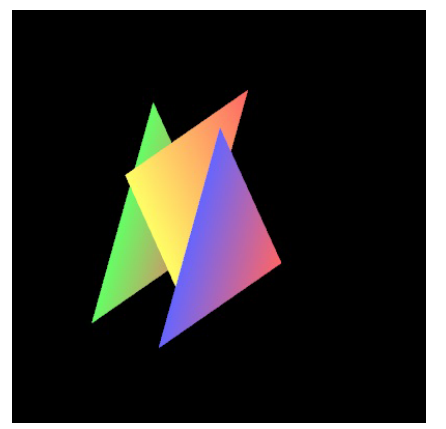
补上残缺的角
当物体在可视空间以外时,会出现残缺。如下图。
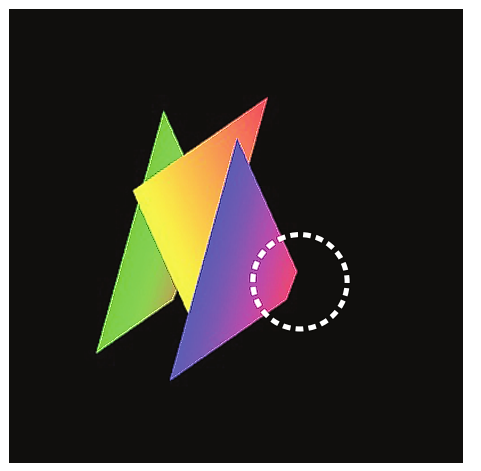
这时候可以修改正射投影矩阵,使之补上残缺的角。在着色器中,<“从视点看上去”的旋转后顶点坐标> = <正射投影矩阵>x<模型视图矩阵>x<原始顶点坐标>
 // LookAtTrianglesWithKeys_ViewVolume.js
var VSHADER_SOURCE =
'attribute vec4 a_Position;\n' +
'attribute vec4 a_Color;\n' +
'uniform mat4 u_ViewMatrix;\n' +
 'uniform mat4 u_ProjMatrix;\n' +
'varying vec4 v_Color;\n' + 'void main() {\n' +
' gl_Position = u_ProjMatrix * u_ViewMatrix * a_Position;\n' +
' ...
function main() {
...

// Get the storage locations of u_ViewMatrix and u_ProjMatrix
var u_ViewMatrix = gl.getUniformLocation(gl.program,'u_ViewMatrix');
var u_ProjMatrix = gl.getUniformLocation(gl.program,'u_ProjMatrix');
...
// Create the matrix to specify the view matrix
var viewMatrix = new Matrix4();
// Register the event handler to be called on key press
document.onkeydown = function(ev){ keydown(ev, gl, n, u_ViewMatrix, viewMatrix); };

// Create the matrix to specify the viewing volume and pass it to u_ProjMatrix
var projMatrix = new Matrix4();
projMatrix.setOrtho(-1.0, 1.0, -1.0, 1.0, 0.0, 2.0);
gl.uniformMatrix4fv(u_ProjMatrix, false, projMatrix.elements);
draw(gl, n, u_ViewMatrix, viewMatrix); // Draw the triangles
}
当可视空间的宽高比与canvas元素宽高不一致时,显示出的物体就会被压缩变形
如果裁剪面的宽高比和canvas上不一致时,那么画面就会被按照canvas的宽高比进行压缩,物体就会被扭曲
OrthoView.js中projMatrix.setOrtho(-1.0, 1.0, -1.0, 1.0, 0, 0.5)原始图像如下:
- projMatrix.setOrtho(-0.5, 0.5, -0.5, 0.5, 0, 0.5)
在OrthoView.js上将裁剪面的宽度和高度改为了原来的一半,但是保持了宽高比。效果如下左图 - projMatrix.setOrtho(-0.3, 0.3, -1.0, 1.0, 0.0, 0.5)
在OrthoView.js上将裁剪面的宽度缩小一半,高度不变。效果如下右图,由于近裁剪面宽度缩小而高度不变,相当于把长方形的近裁剪面映射到了正方形的canvas上,所以绘制出来的三角形在宽度上拉伸而导致变形。
四棱锥可视空间(透视投影空间)
透视投影可视空间(perspective projection view volume) 见下图,可以用透视投影矩阵(perspective projection matrix)表示。该透视投影矩阵可以用Matrix4对象setPerspective()方法来定义,该函数的参数:fov指定垂直视角,即可视空间顶面和底面之间的夹角;aspect指定近裁剪面的宽高比(宽度/高度);near,far表示近裁剪面和远裁剪面的位置。注意:一般情况下,宽高比为canvas的宽高比,这样不管canvas怎么变换,物体都不会变形。
示例程序perspectiveview.js
// PerspectiveView.js (c) 2012 matsuda
// Vertex shader program
var VSHADER_SOURCE =
  'attribute vec4 a_Position;\n' +
  'attribute vec4 a_Color;\n' +
  'uniform mat4 u_ViewMatrix;\n' +
  'uniform mat4 u_ProjMatrix;\n' +
  'varying vec4 v_Color;\n' +
  'void main() {\n' +
  '  gl_Position = u_ProjMatrix * u_ViewMatrix * a_Position;\n' +
  '  v_Color = a_Color;\n' +
  '}\n';

// Fragment shader program
var FSHADER_SOURCE =
  '#ifdef GL_ES\n' +
  'precision mediump float;\n' +
  '#endif\n' +
  'varying vec4 v_Color;\n' +
  'void main() {\n' +
  '  gl_FragColor = v_Color;\n' +
  '}\n';

function main() {
  // Retrieve <canvas> element
  var canvas = document.getElementById('webgl');

  // Get the rendering context for WebGL
  var gl = getWebGLContext(canvas);
  if (!gl) {
    console.log('Failed to get the rendering context for WebGL');
    return;
  }

  // Initialize shaders
  if (!initShaders(gl, VSHADER_SOURCE, FSHADER_SOURCE)) {
    console.log('Failed to intialize shaders.');
    return;
  }

  // Set the vertex coordinates and color (the blue triangle is in the front)
  var n = initVertexBuffers(gl);
  if (n < 0) {
    console.log('Failed to set the vertex information');
    return;
  }

  // Specify the color for clearing <canvas>
  gl.clearColor(0, 0, 0, 1);

  // get the storage locations of u_ViewMatrix and u_ProjMatrix
  var u_ViewMatrix = gl.getUniformLocation(gl.program, 'u_ViewMatrix');
  var u_ProjMatrix = gl.getUniformLocation(gl.program, 'u_ProjMatrix');
  if (!u_ViewMatrix || !u_ProjMatrix) {
    console.log('Failed to get the storage location of u_ViewMatrix and/or u_ProjMatrix');
    return;
  }

  var viewMatrix = new Matrix4(); // The view matrix
  var projMatrix = new Matrix4();  // The projection matrix

  // calculate the view matrix and projection matrix
  viewMatrix.setLookAt(0, 0, 5, 0, 0, -100, 0, 1, 0);
  projMatrix.setPerspective(30, canvas.width/canvas.height, 1, 100);
  // Pass the view and projection matrix to u_ViewMatrix, u_ProjMatrix
  gl.uniformMatrix4fv(u_ViewMatrix, false, viewMatrix.elements);
  gl.uniformMatrix4fv(u_ProjMatrix, false, projMatrix.elements);

  // Clear <canvas>
  gl.clear(gl.COLOR_BUFFER_BIT);

  // Draw the triangles
  gl.drawArrays(gl.TRIANGLES, 0, n);
}

function initVertexBuffers(gl) {
  var verticesColors = new Float32Array([
    // Three triangles on the right side
    0.75,  1.0,  -4.0,  0.4,  1.0,  0.4, // The back green one
    0.25, -1.0,  -4.0,  0.4,  1.0,  0.4,
    1.25, -1.0,  -4.0,  1.0,  0.4,  0.4,

    0.75,  1.0,  -2.0,  1.0,  1.0,  0.4, // The middle yellow one
    0.25, -1.0,  -2.0,  1.0,  1.0,  0.4,
    1.25, -1.0,  -2.0,  1.0,  0.4,  0.4,

    0.75,  1.0,   0.0,  0.4,  0.4,  1.0,  // The front blue one
    0.25, -1.0,   0.0,  0.4,  0.4,  1.0,
    1.25, -1.0,   0.0,  1.0,  0.4,  0.4,

    // Three triangles on the left side
   -0.75,  1.0,  -4.0,  0.4,  1.0,  0.4, // The back green one
   -1.25, -1.0,  -4.0,  0.4,  1.0,  0.4,
   -0.25, -1.0,  -4.0,  1.0,  0.4,  0.4,

   -0.75,  1.0,  -2.0,  1.0,  1.0,  0.4, // The middle yellow one
   -1.25, -1.0,  -2.0,  1.0,  1.0,  0.4,
   -0.25, -1.0,  -2.0,  1.0,  0.4,  0.4,

   -0.75,  1.0,   0.0,  0.4,  0.4,  1.0,  // The front blue one
   -1.25, -1.0,   0.0,  0.4,  0.4,  1.0,
   -0.25, -1.0,   0.0,  1.0,  0.4,  0.4,
  ]);
  var n = 18; // Three vertices per triangle * 6

  // Create a buffer object
  var vertexColorbuffer = gl.createBuffer();
  if (!vertexColorbuffer) {
    console.log('Failed to create the buffer object');
    return -1;
  }

  // Write the vertex coordinates and color to the buffer object
  gl.bindBuffer(gl.ARRAY_BUFFER, vertexColorbuffer);
  gl.bufferData(gl.ARRAY_BUFFER, verticesColors, gl.STATIC_DRAW);

  var FSIZE = verticesColors.BYTES_PER_ELEMENT;

  // Assign the buffer object to a_Position and enable the assignment
  var a_Position = gl.getAttribLocation(gl.program, 'a_Position');
  if(a_Position < 0) {
    console.log('Failed to get the storage location of a_Position');
    return -1;
  }
  gl.vertexAttribPointer(a_Position, 3, gl.FLOAT, false, FSIZE * 6, 0);
  gl.enableVertexAttribArray(a_Position);

  // Assign the buffer object to a_Color and enable the assignment
  var a_Color = gl.getAttribLocation(gl.program, 'a_Color');
  if(a_Color < 0) {
    console.log('Failed to get the storage location of a_Color');
    return -1;
  }

  gl.vertexAttribPointer(a_Color, 3, gl.FLOAT, false, FSIZE * 6, FSIZE * 3);
  gl.enableVertexAttribArray(a_Color);

  return n;
}
视图矩阵和透视投影矩阵设置如下:viewMatrix.setLookAt(0, 0, 5, 0, 0, -100, 0, 1, 0); projMatrix.setPerspective(30, canvas.width/canvas.height, 1, 100);。程序中三角形和可视空间的相对位置和运行结果如下图所示。
投影矩阵的作用
不管是正视投影还是透视投影,都是把可视空间中映射到规范立方体(Canonical View Volume)中。顶点着色器中输出的顶点都必须在规范的立方体中,这样才会显示在屏幕中。
上图是前面透视投影矩阵的例子,从左图中可以看出这些三角形的大小是完全相同的,但实际效果确实距离较远的三角形看上去变小了以及三角形被不同程度地平移以贴近中心线(视线)。其实是透视投影矩阵对三角形进行了两次变换:(1)根据三角形与视点的距离,按比例对三角形进行了缩小变换;(2)对三角形进行了平移变换,使其贴近视线。正射投影矩阵的工作仅仅是将顶点从盒状的可视空间映射到规范立方体中,当不会产生深度感。
这表明,可视空间的规范可以用一系列基本变换(如缩放、平移)来定义。Matrix4中的setOrtho()和setPerspective()方法可以根据各自的参数计算出对应的变换矩阵,正射投影矩阵和透视投影矩阵表达式如下: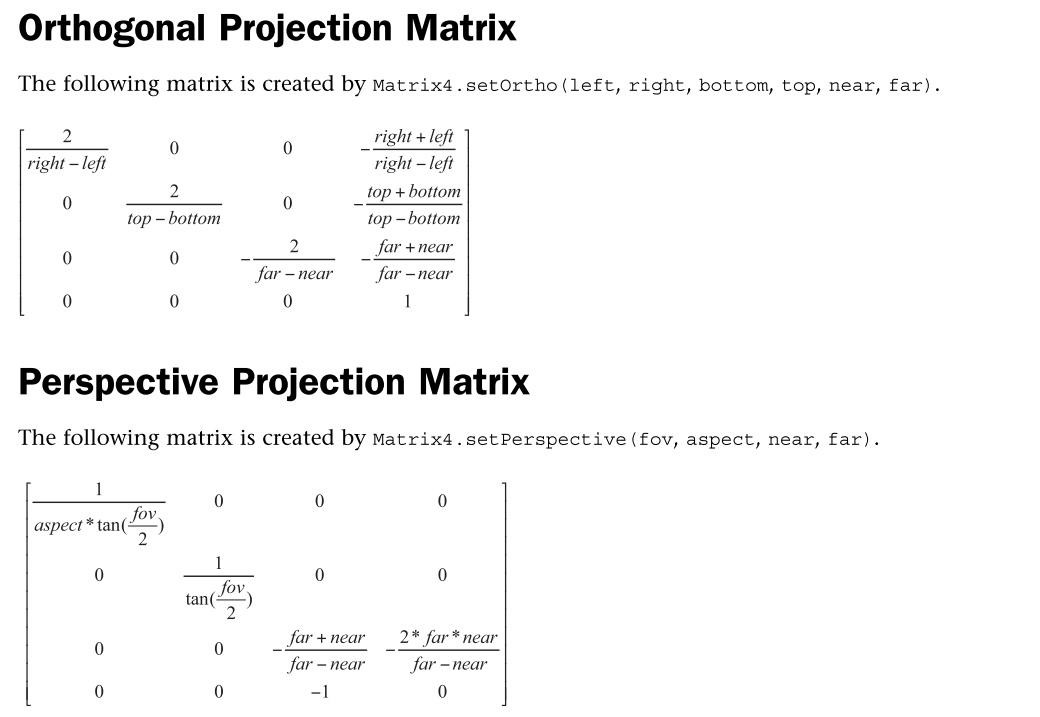
WebGL中,你可以使用投影矩阵、视图矩阵、模型矩阵这3种矩阵计算出最终的顶点坐标(即顶点在规范立方体中的坐标)。计算公式:<投影矩阵>x<视图矩阵>x<模型矩阵>x<顶点坐标>
实现的效果跟上面的perspectiveview.js相同,只不过进行了改进,只用了三个三角形实现了左右六个三角形,且利用了模型视图投影矩阵(=<投影矩阵>x<视图矩阵>x<模型矩阵>),没必要在每个顶点都算一遍投影、视图、模型矩阵。
// PerspectiveView_mvpMatrix.js (c) 2012 matsuda
// Vertex shader program
var VSHADER_SOURCE =
  'attribute vec4 a_Position;\n' +
  'attribute vec4 a_Color;\n' +
  'uniform mat4 u_MvpMatrix;\n' +  //模型视图投影矩阵
  'varying vec4 v_Color;\n' +
  'void main() {\n' +
  '  gl_Position = u_MvpMatrix * a_Position;\n' +
  '  v_Color = a_Color;\n' +
  '}\n';

// Fragment shader program
var FSHADER_SOURCE =
  '#ifdef GL_ES\n' +
  'precision mediump float;\n' +
  '#endif\n' +
  'varying vec4 v_Color;\n' +
  'void main() {\n' +
  '  gl_FragColor = v_Color;\n' +
  '}\n';

function main() {
  // Retrieve <canvas> element
  var canvas = document.getElementById('webgl');

  // Get the rendering context for WebGL
  var gl = getWebGLContext(canvas);
  if (!gl) {
    console.log('Failed to get the rendering context for WebGL');
    return;
  }

  // Initialize shaders
  if (!initShaders(gl, VSHADER_SOURCE, FSHADER_SOURCE)) {
    console.log('Failed to intialize shaders.');
    return;
  }

  // Set the vertex coordinates and color (the blue triangle is in the front)
  var n = initVertexBuffers(gl);
  if (n < 0) {
    console.log('Failed to set the vertex information');
    return;
  }

  // Specify the color for clearing <canvas>
  gl.clearColor(0, 0, 0, 1);

  // Get the storage location of u_MvpMatrix
  var u_MvpMatrix = gl.getUniformLocation(gl.program, 'u_MvpMatrix');
  if (!u_MvpMatrix) {
    console.log('Failed to get the storage location of u_MvpMatrix');
    return;
  }

  var modelMatrix = new Matrix4(); // Model matrix
  var viewMatrix = new Matrix4();  // View matrix
  var projMatrix = new Matrix4();  // Projection matrix
  var mvpMatrix = new Matrix4();   // Model view projection matrix

  // Calculate the model, view and projection matrices
  modelMatrix.setTranslate(0.75, 0, 0);
  viewMatrix.setLookAt(0, 0, 5, 0, 0, -100, 0, 1, 0);
  projMatrix.setPerspective(30, canvas.width/canvas.height, 1, 100);
  // Calculate the model view projection matrix
  mvpMatrix.set(projMatrix).multiply(viewMatrix).multiply(modelMatrix);
  // Pass the model view projection matrix to u_MvpMatrix
  gl.uniformMatrix4fv(u_MvpMatrix, false, mvpMatrix.elements);

  gl.clear(gl.COLOR_BUFFER_BIT);   // Clear <canvas>

  gl.drawArrays(gl.TRIANGLES, 0, n);   // Draw the triangles

 // Prepare the model matrix for another pair of triangles
  modelMatrix.setTranslate(-0.75, 0, 0);
  // Calculate the model view projection matrix
  mvpMatrix.set(projMatrix).multiply(viewMatrix).multiply(modelMatrix);
  // Pass the model view projection matrix to u_MvpMatrix
  gl.uniformMatrix4fv(u_MvpMatrix, false, mvpMatrix.elements);

  gl.drawArrays(gl.TRIANGLES, 0, n);   // Draw the triangles
}

function initVertexBuffers(gl) {
  var verticesColors = new Float32Array([
    // Vertex coordinates and color
     0.0,  1.0,  -4.0,  0.4,  1.0,  0.4, // The back green one
    -0.5, -1.0,  -4.0,  0.4,  1.0,  0.4,
     0.5, -1.0,  -4.0,  1.0,  0.4,  0.4,

     0.0,  1.0,  -2.0,  1.0,  1.0,  0.4, // The middle yellow one
    -0.5, -1.0,  -2.0,  1.0,  1.0,  0.4,
     0.5, -1.0,  -2.0,  1.0,  0.4,  0.4,

     0.0,  1.0,   0.0,  0.4,  0.4,  1.0,  // The front blue one
    -0.5, -1.0,   0.0,  0.4,  0.4,  1.0,
     0.5, -1.0,   0.0,  1.0,  0.4,  0.4,
  ]);
  var n = 9;

  // Create a buffer object
  var vertexColorBuffer = gl.createBuffer();
  if (!vertexColorBuffer) {
    console.log('Failed to create the buffer object');
    return -1;
  }

  // Write the vertex information and enable it
  gl.bindBuffer(gl.ARRAY_BUFFER, vertexColorBuffer);
  gl.bufferData(gl.ARRAY_BUFFER, verticesColors, gl.STATIC_DRAW);

  var FSIZE = verticesColors.BYTES_PER_ELEMENT;

  var a_Position = gl.getAttribLocation(gl.program, 'a_Position');
  if(a_Position < 0) {
    console.log('Failed to get the storage location of a_Position');
    return -1;
  }
  gl.vertexAttribPointer(a_Position, 3, gl.FLOAT, false, FSIZE * 6, 0);
  gl.enableVertexAttribArray(a_Position);

  var a_Color = gl.getAttribLocation(gl.program, 'a_Color');
  if(a_Color < 0) {
    console.log('Failed to get the storage location of a_Color');
    return -1;
  }
  gl.vertexAttribPointer(a_Color, 3, gl.FLOAT, false, FSIZE * 6, FSIZE * 3);
  gl.enableVertexAttribArray(a_Color);

  return n;
}
正确处理对象的前后关系
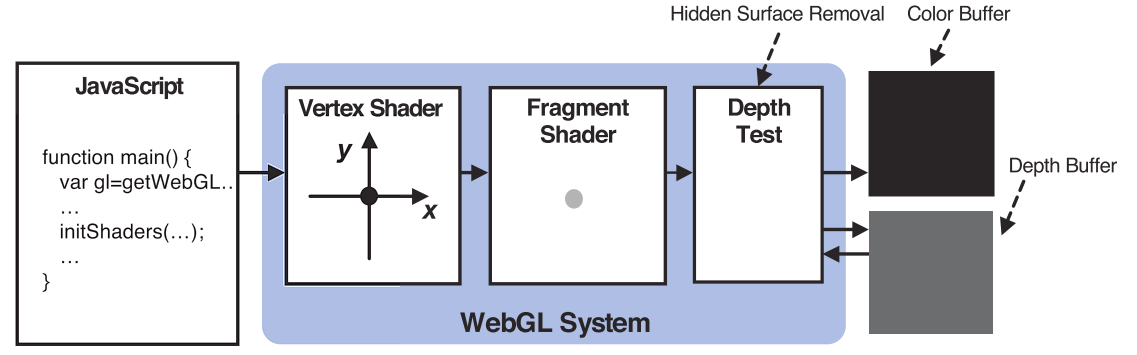
在默认情况下,WebGL为了加速绘图操作,是按照顶点在缓冲区中的顺序来处理它们的,而且后绘制的图形会覆盖先绘制的图形。所以前面的程序都是先定义远处的物体,后定义近的物体,以达到正确的效果。如果场景中的对象不发生运动,观察者的状态也是唯一的,那么这种做法是没有问题的。但是如果你希望不断移动视点,从不同的角度看物体,那么你不可能事先决定对象出现的顺序。 为了解决这样的问题,WebGL提供了隐藏面消除(hidden surface removal)功能。这个功能会帮助我们消除那些被遮挡的表面(隐藏面),你可以放心地绘制场景而不必顾及个各物体在缓冲区中的顺序,因为那些远处地物体会自动被近处地物体挡住,不会被绘制出来。这个功能已经内嵌在WebGL中了,你只需要按下面两步开启这个功能即可。
- 开启隐藏面消除功能。 gl.enable(gl.DEPTH_TEST);
- 在绘制之前,消除深度缓冲区(有时候也称Z缓冲区)。 gl.clear(gl.DEPTH_BUFFER_BIT);
在绘制任意一帧之前,都必须清除深度缓冲区,以消除绘制上一帧时在其中留下的痕迹。如果不这样做,就会出现错误。当然,如果同时清除任意两个缓冲区时,都可以使用按位或符号,gl.clear(gl.COLOR_BUFFER_BIT | gl.DEPTH_BUFFER_BIT)。深度缓冲区与隐藏面消除见下面示意图:
示例程序如下,改进于PerspectiveView_mvpMatrix.js
// DepthBuffer.js
// Vertex shader program
var VSHADER_SOURCE =
  'attribute vec4 a_Position;\n' +
  'attribute vec4 a_Color;\n' +
  'uniform mat4 u_mvpMatrix;\n' +
  'varying vec4 v_Color;\n' +
  'void main() {\n' +
  '  gl_Position = u_mvpMatrix * a_Position;\n' +
  '  v_Color = a_Color;\n' +
  '}\n';

// Fragment shader program
var FSHADER_SOURCE =
  '#ifdef GL_ES\n' +
  'precision mediump float;\n' +
  '#endif\n' +
  'varying vec4 v_Color;\n' +
  'void main() {\n' +
  '  gl_FragColor = v_Color;\n' +
  '}\n';

function main() {
  // Retrieve <canvas> element
  var canvas = document.getElementById('webgl');

  // Get the rendering context for WebGL
  var gl = getWebGLContext(canvas);
  if (!gl) {
    console.log('Failed to get the rendering context for WebGL');
    return;
  }

  // Initialize shaders
  if (!initShaders(gl, VSHADER_SOURCE, FSHADER_SOURCE)) {
    console.log('Failed to intialize shaders.');
    return;
  }

  // Set the vertex coordinates and color (the blue triangle is in the front)
  var n = initVertexBuffers(gl);
  if (n < 0) {
    console.log('Failed to set the vertex information');
    return;
  }

  // Specify the color for clearing <canvas> 指定清除canvas的背景色
  gl.clearColor(0.0, 0.0, 0.0, 1.0);
  // Enable depth test 开启隐藏面影藏
  gl.enable(gl.DEPTH_TEST);

  // Get the storage location of u_mvpMatrix
  var u_mvpMatrix = gl.getUniformLocation(gl.program, 'u_mvpMatrix');
  if (!u_mvpMatrix) {
    console.log('Failed to get the storage location of u_mvpMatrix');
    return;
  }

  var modelMatrix = new Matrix4(); // Model matrix
  var viewMatrix = new Matrix4();  // View matrix
  var projMatrix = new Matrix4();  // Projection matrix
  var mvpMatrix = new Matrix4();   // Model view projection matrix

  // Calculate the view matrix and the projection matrix
  modelMatrix.setTranslate(0.75, 0, 0);
  viewMatrix.setLookAt(0, 0, 5, 0, 0, -100, 0, 1, 0);
  projMatrix.setPerspective(30, canvas.width/canvas.height, 1, 100);
  // Calculate the model view projection matrix
  mvpMatrix.set(projMatrix).multiply(viewMatrix).multiply(modelMatrix);
  // Pass the model view projection matrix
  gl.uniformMatrix4fv(u_mvpMatrix, false, mvpMatrix.elements);

  // Clear color and depth buffer
  gl.clear(gl.COLOR_BUFFER_BIT | gl.DEPTH_BUFFER_BIT);

  gl.drawArrays(gl.TRIANGLES, 0, n);   // Draw the triangles

  // Prepare the model matrix for another pair of triangles
  modelMatrix.setTranslate(-0.75, 0, 0);
  // Calculate the model view projection matrix
  mvpMatrix.set(projMatrix).multiply(viewMatrix).multiply(modelMatrix);
  // Pass the model view projection matrix to u_MvpMatrix
  gl.uniformMatrix4fv(u_mvpMatrix, false, mvpMatrix.elements);

  gl.drawArrays(gl.TRIANGLES, 0, n);   // Draw the triangles
}

function initVertexBuffers(gl) {
  var verticesColors = new Float32Array([
    // Vertex coordinates and color 绘制顺序从前往后,但仍可保证绘制到屏幕时,图形前面的遮住后面的
     0.0,  1.0,   0.0,  0.4,  0.4,  1.0,  // The front blue one
    -0.5, -1.0,   0.0,  0.4,  0.4,  1.0,
     0.5, -1.0,   0.0,  1.0,  0.4,  0.4,

     0.0,  1.0,  -2.0,  1.0,  1.0,  0.4, // The middle yellow one
    -0.5, -1.0,  -2.0,  1.0,  1.0,  0.4,
     0.5, -1.0,  -2.0,  1.0,  0.4,  0.4,

     0.0,  1.0,  -4.0,  0.4,  1.0,  0.4, // The back green one
    -0.5, -1.0,  -4.0,  0.4,  1.0,  0.4,
     0.5, -1.0,  -4.0,  1.0,  0.4,  0.4,
  ]);
  var n = 9;

  // Create a buffer object
  var vertexColorbuffer = gl.createBuffer();
  if (!vertexColorbuffer) {
    console.log('Failed to create the buffer object');
    return -1;
  }

  // Write vertex information to buffer object
  gl.bindBuffer(gl.ARRAY_BUFFER, vertexColorbuffer);
  gl.bufferData(gl.ARRAY_BUFFER, verticesColors, gl.STATIC_DRAW);

  var FSIZE = verticesColors.BYTES_PER_ELEMENT;
  // Assign the buffer object to a_Position and enable the assignment
  var a_Position = gl.getAttribLocation(gl.program, 'a_Position');
  if(a_Position < 0) {
    console.log('Failed to get the storage location of a_Position');
    return -1;
  }
  gl.vertexAttribPointer(a_Position, 3, gl.FLOAT, false, FSIZE * 6, 0);
  gl.enableVertexAttribArray(a_Position);
  // Assign the buffer object to a_Color and enable the assignment
  var a_Color = gl.getAttribLocation(gl.program, 'a_Color');
  if(a_Color < 0) {
    console.log('Failed to get the storage location of a_Color');
    return -1;
  }
  gl.vertexAttribPointer(a_Color, 3, gl.FLOAT, false, FSIZE * 6, FSIZE * 3);
  gl.enableVertexAttribArray(a_Color);

  // Unbind the buffer object
  gl.bindBuffer(gl.ARRAY_BUFFER, null);

  return n;
}
深度冲突
当几何图形或物体的两个表面极为接近时,“消除隐藏面”功能会失效,就会出现新的问题,使得表面上看上去斑斑驳驳的,这种现象被称为深度冲突(z fighting)。之所以会产生深度冲突,是因为两个表面过于接近,深度缓冲区有限的精度已经不能区分哪个在前,哪个在后。
WebGL提供了一种被称为多边形偏移(polygon offset)的机制来解决这个问题。该机制将自动在Z值加上一个偏移量,偏移量的值由物体表面相对于观察者视线的角度来确定。启用该机制只需要两行代码:
- 启用多边形偏移。 gl.enable(gl.POLYGON_OFFSET_FILL);
- 在绘制之前指定用来计算偏移量的参数。 gl.polygonOffset(1.0,1.0);
示例程序我们画了一个绿色三角形,然后通过gl.polygonOffset()设置了多边形偏移参数,使之后的绘制受到多边形偏移机制影响,再画了一个黄色三角形。运行程序,你将看到两个三角形没有发生深度冲突,如下图左;如果没有多边形;偏移机制那两行代码,如下图右。则如下:
...
function main() {
...
  // Enable the polygon offset function
  gl.enable(gl.POLYGON_OFFSET_FILL);   //启用多边形偏移
  // Draw the triangles
  gl.drawArrays(gl.TRIANGLES, 0, n/2);   // The green triangle
  gl.polygonOffset(1.0, 1.0);          // Set the polygon offset    设置多边形偏移
  gl.drawArrays(gl.TRIANGLES, n/2, n/2); // The yellow triangle
}

function initVertexBuffers(gl) {
  var verticesColors = new Float32Array([
    // Vertex coordinates and color
     0.0,  2.5,  -5.0,  0.4,  1.0,  0.4, // The green triangle
    -2.5, -2.5,  -5.0,  0.4,  1.0,  0.4,
     2.5, -2.5,  -5.0,  1.0,  0.4,  0.4,

     0.0,  3.0,  -5.0,  1.0,  0.4,  0.4, // The yellow triagle
    -3.0, -3.0,  -5.0,  1.0,  1.0,  0.4,
     3.0, -3.0,  -5.0,  1.0,  1.0,  0.4,
  ]);
  var n = 6;

  ...
}
立方体
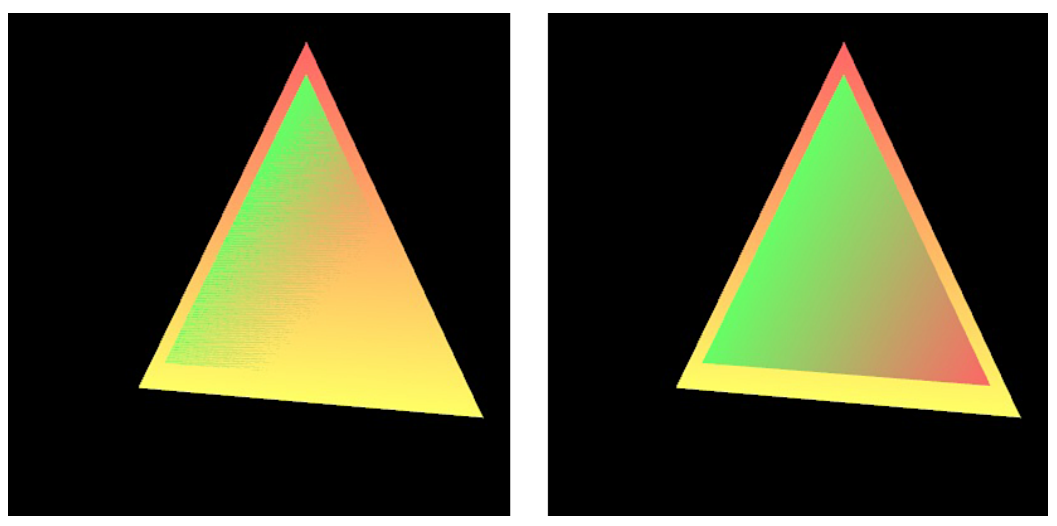
绘制一个立方体,我们如果调用gl.drawArrays()函数,第一个参数只能使用gl.TRIANGLES、gl.TRIANGLE_STRIP、gl.TRIANGLE_FAN。如果调用参数gl.TRIANGLES,则由于立方体的每一个面由两个三角形组成,每个三角形由3个顶点,每个面需要调用到6个顶点,立方体一共有6个面,一共需要调用6 x 6个共36个顶点。将36个顶点的数据写入缓冲区,再调用gl.drawArrays(gl.TREANGLES,0,36)就可以绘制出立方体。或者,你也可以使用gl.TRIANGLE_STRIP或者gl.TRIANGLE_FAN模式来绘制立方体,用4个顶点(V0,V1,V2,V3)就可以会绘制出一个四边形,所以你需要4 x 6个共24个顶点。但是,你如果这样做,你就必须为立方体的每一个面调用一次gl.drawArrays(),一共需要6次调用。所以这两种绘制方法各有优缺点,WebGL确实提供了一种完美的方案:gl.drawElements(),使用该函数替代gl.drawArrays()函数来绘制,能够避免重复定义顶点,保持顶点数量最小。该函数参数如下:
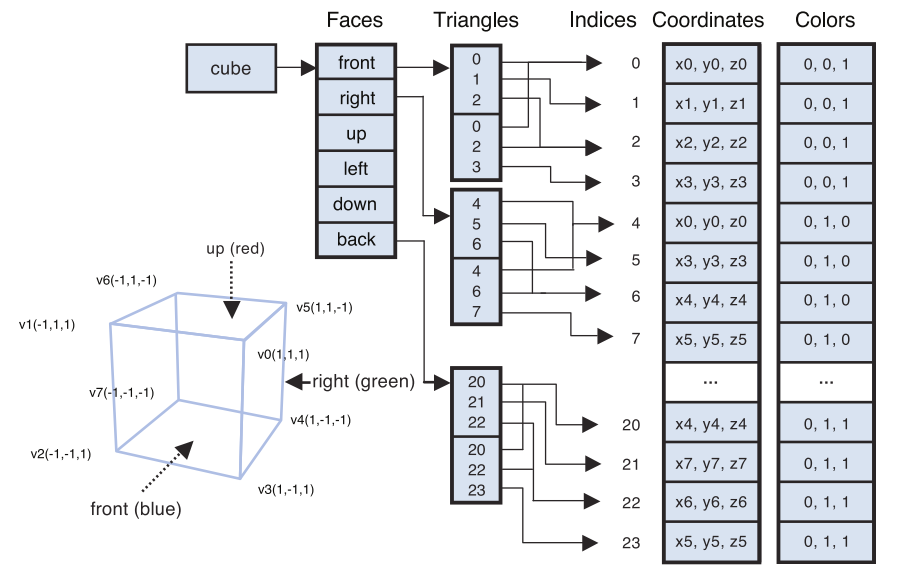
我们将立方体拆分为顶点和三角形,如下图左所示。立方体被拆分为6个面:前、后、左、右、上、下,每个面都由两个三角形组成,与Triangles中的两个三角形相关联。每个三角形都有3个顶点,与Coordinates中的3个顶点相关联,如图右所示。Triangles中的数字表示该三角形的3个顶点在Coordinates中的索引值。顶点列表中共有8个顶点,索引值为从0到7。
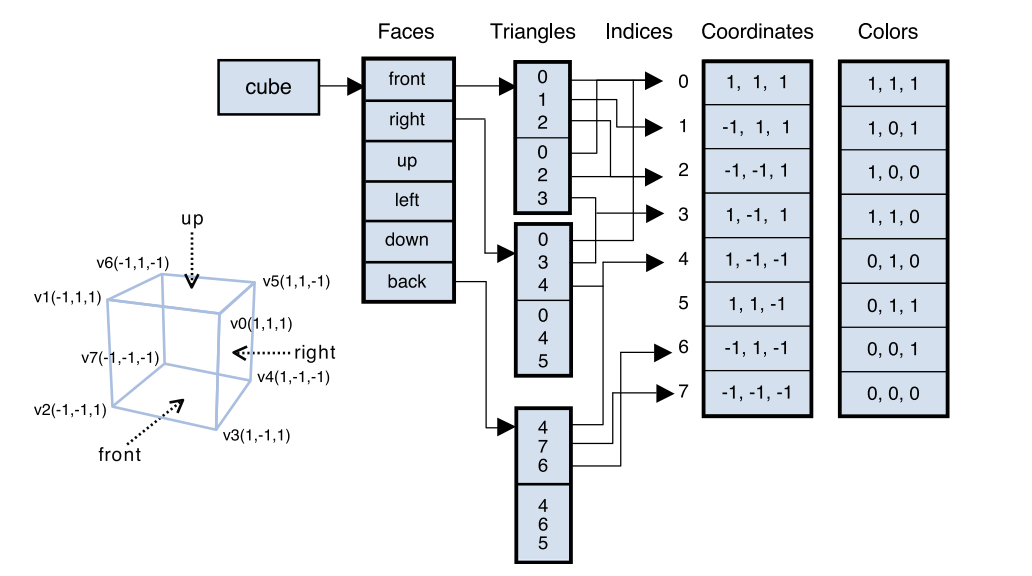
通过顶点索引绘制物体
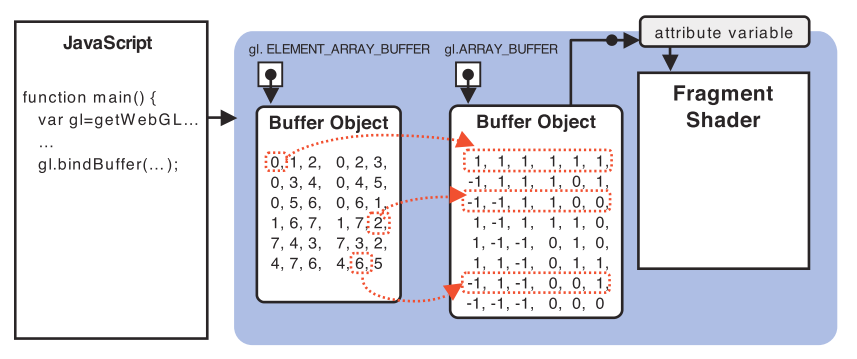
我们先看看如何来使用gl.drawElements(),需要在gl.ELEMENT_ARRAY_BUFFER(而不是之前一直使用的gl.ARRAY_BUFFER)中指定顶点的索引值,它管理着具有索引值结构的三维模型数据。示例程序如下:
// HelloCube.js (c) 2012 matsuda
// Vertex shader program
var VSHADER_SOURCE =
  'attribute vec4 a_Position;\n' +
  'attribute vec4 a_Color;\n' +
  'uniform mat4 u_MvpMatrix;\n' +
  'varying vec4 v_Color;\n' +
  'void main() {\n' +
  '  gl_Position = u_MvpMatrix * a_Position;\n' +
  '  v_Color = a_Color;\n' +
  '}\n';

// Fragment shader program
var FSHADER_SOURCE =
  '#ifdef GL_ES\n' +
  'precision mediump float;\n' +
  '#endif\n' +
  'varying vec4 v_Color;\n' +
  'void main() {\n' +
  '  gl_FragColor = v_Color;\n' +
  '}\n';

function main() {
  // Retrieve <canvas> element
  var canvas = document.getElementById('webgl');

  // Get the rendering context for WebGL
  var gl = getWebGLContext(canvas);
  if (!gl) {
    console.log('Failed to get the rendering context for WebGL');
    return;
  }

  // Initialize shaders
  if (!initShaders(gl, VSHADER_SOURCE, FSHADER_SOURCE)) {
    console.log('Failed to intialize shaders.');
    return;
  }

  // Set the vertex coordinates and color
  var n = initVertexBuffers(gl);
  if (n < 0) {
    console.log('Failed to set the vertex information');
    return;
  }

  // Set clear color and enable hidden surface removal
  gl.clearColor(0.0, 0.0, 0.0, 1.0);
  gl.enable(gl.DEPTH_TEST);

  // Get the storage location of u_MvpMatrix
  var u_MvpMatrix = gl.getUniformLocation(gl.program, 'u_MvpMatrix');
  if (!u_MvpMatrix) {
    console.log('Failed to get the storage location of u_MvpMatrix');
    return;
  }

  // Set the eye point and the viewing volume
  var mvpMatrix = new Matrix4();
  mvpMatrix.setPerspective(30, 1, 1, 100);
  mvpMatrix.lookAt(3, 3, 7, 0, 0, 0, 0, 1, 0);

  // Pass the model view projection matrix to u_MvpMatrix
  gl.uniformMatrix4fv(u_MvpMatrix, false, mvpMatrix.elements);

  // Clear color and depth buffer
  gl.clear(gl.COLOR_BUFFER_BIT | gl.DEPTH_BUFFER_BIT);

  // Draw the cube
  gl.drawElements(gl.TRIANGLES, n, gl.UNSIGNED_BYTE, 0);
}

function initVertexBuffers(gl) {
  // Create a cube
  //    v6----- v5
  //   /|      /|
  //  v1------v0|
  //  | |     | |
  //  | |v7---|-|v4
  //  |/      |/
  //  v2------v3
  var verticesColors = new Float32Array([
    // Vertex coordinates and color
     1.0,  1.0,  1.0,     1.0,  1.0,  1.0,  // v0 White
    -1.0,  1.0,  1.0,     1.0,  0.0,  1.0,  // v1 Magenta
    -1.0, -1.0,  1.0,     1.0,  0.0,  0.0,  // v2 Red
     1.0, -1.0,  1.0,     1.0,  1.0,  0.0,  // v3 Yellow
     1.0, -1.0, -1.0,     0.0,  1.0,  0.0,  // v4 Green
     1.0,  1.0, -1.0,     0.0,  1.0,  1.0,  // v5 Cyan
    -1.0,  1.0, -1.0,     0.0,  0.0,  1.0,  // v6 Blue
    -1.0, -1.0, -1.0,     0.0,  0.0,  0.0   // v7 Black
  ]);

  // Indices of the vertices
  var indices = new Uint8Array([
    0, 1, 2,   0, 2, 3,    // front
    0, 3, 4,   0, 4, 5,    // right
    0, 5, 6,   0, 6, 1,    // up
    1, 6, 7,   1, 7, 2,    // left
    7, 4, 3,   7, 3, 2,    // down
    4, 7, 6,   4, 6, 5     // back
 ]);

  // Create a buffer object
  var vertexColorBuffer = gl.createBuffer();
  var indexBuffer = gl.createBuffer();
  if (!vertexColorBuffer || !indexBuffer) {
    return -1;
  }

  // Write the vertex coordinates and color to the buffer object
  gl.bindBuffer(gl.ARRAY_BUFFER, vertexColorBuffer);
  gl.bufferData(gl.ARRAY_BUFFER, verticesColors, gl.STATIC_DRAW);

  var FSIZE = verticesColors.BYTES_PER_ELEMENT;
  // Assign the buffer object to a_Position and enable the assignment
  var a_Position = gl.getAttribLocation(gl.program, 'a_Position');
  if(a_Position < 0) {
    console.log('Failed to get the storage location of a_Position');
    return -1;
  }
  gl.vertexAttribPointer(a_Position, 3, gl.FLOAT, false, FSIZE * 6, 0);
  gl.enableVertexAttribArray(a_Position);
  // Assign the buffer object to a_Color and enable the assignment
  var a_Color = gl.getAttribLocation(gl.program, 'a_Color');
  if(a_Color < 0) {
    console.log('Failed to get the storage location of a_Color');
    return -1;
  }
  gl.vertexAttribPointer(a_Color, 3, gl.FLOAT, false, FSIZE * 6, FSIZE * 3);
  gl.enableVertexAttribArray(a_Color);

  // Write the indices to the buffer object
  gl.bindBuffer(gl.ELEMENT_ARRAY_BUFFER, indexBuffer);
  gl.bufferData(gl.ELEMENT_ARRAY_BUFFER, indices, gl.STATIC_DRAW);

  return indices.length;
}
该程序和ProjectiveView_mvpmatrix.js基本一样,只不过在main()函数用了gl.drawElements()函数来绘制图形,以及在initVertexBuffers()函数中作出了一些改变。main()函数的流程:首先调用initVertexBuffers()函数将顶点数据写入缓冲区;然后开启隐藏面消除,使WebGL能够根据立方体各表面的前后关系正确的进行绘制;接着设置视点和可视空间,把模型视图投影矩阵传给顶点着色器中的u_MvpMatrix变量;最后,清空颜色和深度缓冲区,使用gl.drawElements()绘制立方体。
我们来看看initVertexBuffers()函数,gl.drawElememnts()方法的第2个参数n表示顶点索引数组的长度,也就是顶点着色器的执行次数。注意,n与gl.ARRAY_BUFFER中的顶点个数不同。在调用gl.drawElements()时,WebGL首先从绑定到gl.ELEMENT_ARRAY_BUFFER的缓冲区(也就是indexBuffer)中获取顶点的索引值,然后根据该索引值,从绑定到gl.ARRAY_BUFFER的缓冲区(即vertexColorBuffer)中获取顶点的坐标、颜色等信息,然后传递给attribute变量并执行顶点着色器。对每个索引值都这样做,最后绘制出了整个立方体,而此时你只调用了一次gl.drawElements()。这种方式通过索引来访问顶点数据,从而循环利用顶点信息,控制内存的开销,但代价是你需要通过索引来间接地访问顶点,在某种程度下使程序复杂化了。所以,gl.drawElements()和gl.drawArrays()各有优劣,具体使用哪一个取决于具体地系统要求。 其中,indices中地顶点索引数据,不需要手动创建,三维建模工具会帮助我们创建它们。
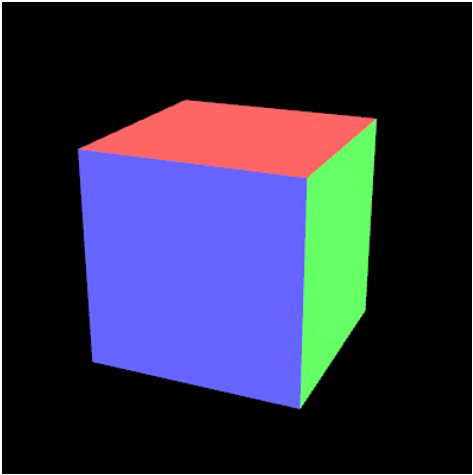
这样,我们希望立方体的每一个表面都是不同的单一颜色(而非颜色渐变效果)或者纹理图像,如下图;我们需要把每个面的颜色或纹理信息写入Indices中,如下图和示例程序ColoredCube.js
// ColoredCube.js (c) 2012 matsuda
// Vertex shader program
var VSHADER_SOURCE =
  'attribute vec4 a_Position;\n' +
  'attribute vec4 a_Color;\n' +
  'uniform mat4 u_MvpMatrix;\n' +
  'varying vec4 v_Color;\n' +
  'void main() {\n' +
  '  gl_Position = u_MvpMatrix * a_Position;\n' +
  '  v_Color = a_Color;\n' +
  '}\n';

// Fragment shader program
var FSHADER_SOURCE =
  '#ifdef GL_ES\n' +
  'precision mediump float;\n' +
  '#endif\n' +
  'varying vec4 v_Color;\n' +
  'void main() {\n' +
  '  gl_FragColor = v_Color;\n' +
  '}\n';

function main() {
  // Retrieve <canvas> element
  var canvas = document.getElementById('webgl');

  // Get the rendering context for WebGL
  var gl = getWebGLContext(canvas);
  if (!gl) {
    console.log('Failed to get the rendering context for WebGL');
    return;
  }

  // Initialize shaders
  if (!initShaders(gl, VSHADER_SOURCE, FSHADER_SOURCE)) {
    console.log('Failed to intialize shaders.');
    return;
  }

  // Set the vertex information
  var n = initVertexBuffers(gl);
  if (n < 0) {
    console.log('Failed to set the vertex information');
    return;
  }

  // Set the clear color and enable the depth test
  gl.clearColor(0.0, 0.0, 0.0, 1.0);
  gl.enable(gl.DEPTH_TEST);

  // Get the storage location of u_MvpMatrix
  var u_MvpMatrix = gl.getUniformLocation(gl.program, 'u_MvpMatrix');
  if (!u_MvpMatrix) {
    console.log('Failed to get the storage location of u_MvpMatrix');
    return;
  }

  // Set the eye point and the viewing volume
  var mvpMatrix = new Matrix4();
  mvpMatrix.setPerspective(30, 1, 1, 100);
  mvpMatrix.lookAt(3, 3, 7, 0, 0, 0, 0, 1, 0);

  // Pass the model view projection matrix to u_MvpMatrix
  gl.uniformMatrix4fv(u_MvpMatrix, false, mvpMatrix.elements);

  // Clear color and depth buffer
  gl.clear(gl.COLOR_BUFFER_BIT | gl.DEPTH_BUFFER_BIT);

  // Draw the cube
  gl.drawElements(gl.TRIANGLES, n, gl.UNSIGNED_BYTE, 0);
}

function initVertexBuffers(gl) {
  // Create a cube
  //    v6----- v5
  //   /|      /|
  //  v1------v0|
  //  | |     | |
  //  | |v7---|-|v4
  //  |/      |/
  //  v2------v3

  var vertices = new Float32Array([   // Vertex coordinates
     1.0, 1.0, 1.0,  -1.0, 1.0, 1.0,  -1.0,-1.0, 1.0,   1.0,-1.0, 1.0,  // v0-v1-v2-v3 front
     1.0, 1.0, 1.0,   1.0,-1.0, 1.0,   1.0,-1.0,-1.0,   1.0, 1.0,-1.0,  // v0-v3-v4-v5 right
     1.0, 1.0, 1.0,   1.0, 1.0,-1.0,  -1.0, 1.0,-1.0,  -1.0, 1.0, 1.0,  // v0-v5-v6-v1 up
    -1.0, 1.0, 1.0,  -1.0, 1.0,-1.0,  -1.0,-1.0,-1.0,  -1.0,-1.0, 1.0,  // v1-v6-v7-v2 left
    -1.0,-1.0,-1.0,   1.0,-1.0,-1.0,   1.0,-1.0, 1.0,  -1.0,-1.0, 1.0,  // v7-v4-v3-v2 down
     1.0,-1.0,-1.0,  -1.0,-1.0,-1.0,  -1.0, 1.0,-1.0,   1.0, 1.0,-1.0   // v4-v7-v6-v5 back
  ]);

  var colors = new Float32Array([     // Colors
    0.4, 0.4, 1.0,  0.4, 0.4, 1.0,  0.4, 0.4, 1.0,  0.4, 0.4, 1.0,  // v0-v1-v2-v3 front(blue)
    0.4, 1.0, 0.4,  0.4, 1.0, 0.4,  0.4, 1.0, 0.4,  0.4, 1.0, 0.4,  // v0-v3-v4-v5 right(green)
    1.0, 0.4, 0.4,  1.0, 0.4, 0.4,  1.0, 0.4, 0.4,  1.0, 0.4, 0.4,  // v0-v5-v6-v1 up(red)
    1.0, 1.0, 0.4,  1.0, 1.0, 0.4,  1.0, 1.0, 0.4,  1.0, 1.0, 0.4,  // v1-v6-v7-v2 left
    1.0, 1.0, 1.0,  1.0, 1.0, 1.0,  1.0, 1.0, 1.0,  1.0, 1.0, 1.0,  // v7-v4-v3-v2 down
    0.4, 1.0, 1.0,  0.4, 1.0, 1.0,  0.4, 1.0, 1.0,  0.4, 1.0, 1.0   // v4-v7-v6-v5 back
  ]);

  var indices = new Uint8Array([       // Indices of the vertices
     0, 1, 2,   0, 2, 3,    // front
     4, 5, 6,   4, 6, 7,    // right
     8, 9,10,   8,10,11,    // up
    12,13,14,  12,14,15,    // left
    16,17,18,  16,18,19,    // down
    20,21,22,  20,22,23     // back
  ]);

  // Create a buffer object
  var indexBuffer = gl.createBuffer();
  if (!indexBuffer)
    return -1;

  // Write the vertex coordinates and color to the buffer object
  if (!initArrayBuffer(gl, vertices, 3, gl.FLOAT, 'a_Position'))
    return -1;

  if (!initArrayBuffer(gl, colors, 3, gl.FLOAT, 'a_Color'))
    return -1;

  // Write the indices to the buffer object
  gl.bindBuffer(gl.ELEMENT_ARRAY_BUFFER, indexBuffer);
  gl.bufferData(gl.ELEMENT_ARRAY_BUFFER, indices, gl.STATIC_DRAW);

  return indices.length;
}

function initArrayBuffer(gl, data, num, type, attribute) {
  var buffer = gl.createBuffer();   // Create a buffer object
  if (!buffer) {
    console.log('Failed to create the buffer object');
    return false;
  }
  // Write date into the buffer object
  gl.bindBuffer(gl.ARRAY_BUFFER, buffer);
  gl.bufferData(gl.ARRAY_BUFFER, data, gl.STATIC_DRAW);
  // Assign the buffer object to the attribute variable
  var a_attribute = gl.getAttribLocation(gl.program, attribute);
  if (a_attribute < 0) {
    console.log('Failed to get the storage location of ' + attribute);
    return false;
  }
  gl.vertexAttribPointer(a_attribute, num, type, false, 0, 0);
  // Enable the assignment of the buffer object to the attribute variable
  gl.enableVertexAttribArray(a_attribute);

  return true;
}
如果数组color的颜色信息全部修为白色,如下图,我们只能看到一个白色的不规则六边形。总之,如果物体各表面颜色相同,它就会失去立体感。
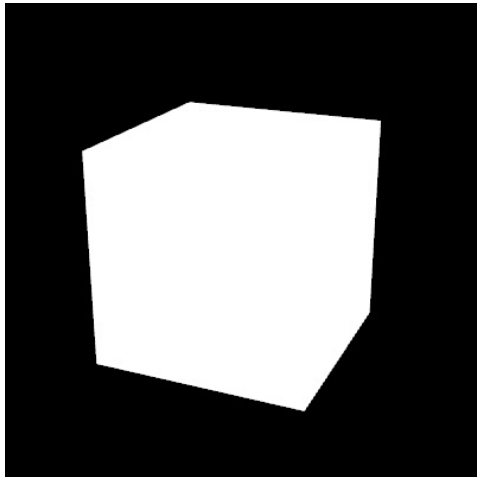
现实中世界中的纯白色盒子如下图,因为各个表面的角度不同,受到环境中光照的情况也不同,而这些都没有在程序中实现,下一章将研究如何实现三维场景中的光照。


 浙公网安备 33010602011771号