
Vuex的基本概念、项目搭建、入坑点

前言:Vuex是一个专门为Vue.js应用程序开发的状态管理模式, 它采用集中式存储管理所有组件的公共状态, 并以相应的规则保证状态以一种可预测的方式发生变化.
Vuex的四大核心
1.state 驱动应用的数据源
2.mutations 基因突变 类如C# 属性get set
3.actions 行为
4.getters 读取器
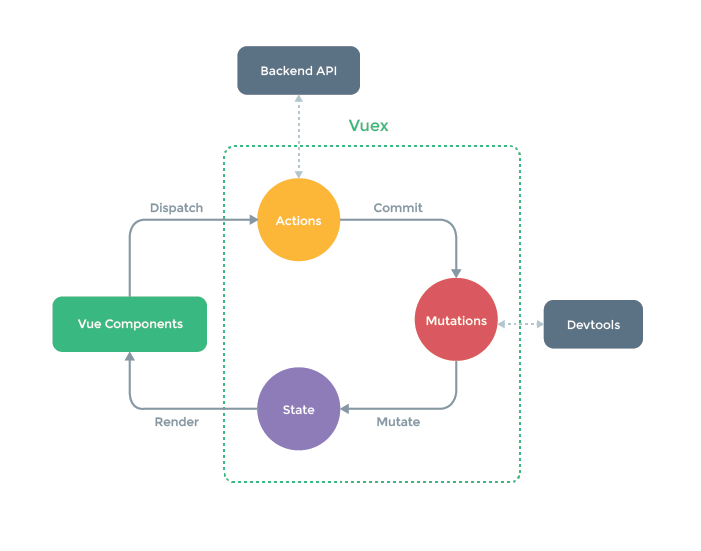
上图中绿色虚线包裹起来的部分就是Vuex的核心, state中保存的就是公共状态, 改变state的唯一方式就是通过mutations进行更改. 可能你现在看这张图有点不明白, 等经过本文的解释和案例演示, 再回来看这张图, 相信你会有更好的理解.
如何引入Vuex?
1.npm install vuex
2.装好了之后,在全局上去使用你的Vuex
3.创建Store对象,最好在src创建一个store这样的文件夹然后创建index.js
4.在main.js中注册使用
import Vuex from 'vuex'

Vue.use( Vuex );

const store = new Vuex.Store({
    //待添加
})

new Vue({
    el: '#app',
    store,
    render: h => h(App)
})
为了讲解Vuex,我们做了一个项目,这个项目需要连接apicloud,异步操作使用了axios以及样式bootstrap,其中包括了登录注册以及其中的父组件向子节点传值等,我们给项目安装相关的modules
npm install bootstrap
npm install axios
router.js
import Vue from 'vue'
import Router from 'vue-router'

Vue.use(Router)

export default new Router({
  routes: [
    {
      path: '/',
      name: 'index',
     component:()=>import('../views/index.vue')
    },
    {
      path:'/detail/:id',
      name:'detail',
      component:()=>import ('../views/detail.vue')
    },
    {
      path:'/login',
      name:'login',
      component:()=>import ('../views/login.vue')
    },
    {
      path:'/register',
      name:'register',
      component:()=>import ('../views/register.vue')
    }
  ]
})
store.js
我们来上述代码中来讲解其中vuex的奥秘,State就是所有组件提出来的data,用于所有组件公共数据,而其中mutations就像C#中get\set,属性赋值器,其中方法的两个参数除了state只能带一个参数。
actions是操作数据的方法,说过说你的actions中需要改变state中的数据,那么必须要通过commit关键字去提交给mutations,还有一点就是actions中很多操作都是关于异步处理的,最关键就是它是操作state数据的,那getters是什么呢?它是组件访问vuex的入口,里面写好了方法去操作,它也是过滤器,就像程序中的三层架构BLL.
main.js
// The Vue build version to load with the `import` command
// (runtime-only or standalone) has been set in webpack.base.conf with an alias.
import Vue from 'vue'
import App from './App'
import router from './router'
import boostrap from 'bootstrap/dist/css/bootstrap.css'
import store from './store/index.js'

Vue.config.productionTip = false

/* eslint-disable no-new */
new Vue({
  el: '#app',
  router,
  store,//在全局对象上加载仓库
  components: { App },
  template: '<App/>'
})
两个组件
import Vue from 'vue'
import Vuex from 'vuex'
import API from '../utils/api.js'

var api = new API('goods')
var userApi = new API('userinfo');

Vue.use(Vuex);

const state = {
    user: null,
    products: []
}
const mutations = {
    //加载产品数据
    INIT_PRODUCTS(state, data) {
        state.products = data;
    },
    SET_LOGIN_USER(state, u) {
        state.user = u;
    }
}
const actions = {
    LOAD_PRODUCTS({ commit }) {
        api.Select().then(res => {
            commit('INIT_PRODUCTS', res.data);
        })
    },
    LOGIN({ commit }, user) {
        return userApi.Select().then(res => {
            let users = res.data;//所有的用户
            for (let u of users) {
                if (u.name == user.name && u.password == user.password) {
                    commit('SET_LOGIN_USER', u);
                    return u;
                }
            }
        })
    },
    REGISTER({ commit }, user) {
        return userApi.Insert(user).then(res => {
            console.log(res.data);
            return 'OK';
        }).catch(err => {
            return err;
        })
    }

}
const getters = {
    ALL_PRODUCTS(state) {
        return state.products;
    },
    GET_PRODUCT_BYID: (state) => function (id) {
        //遍历 is == id
        for (let p of state.products) {
            if (p.id == id) {
                return p;
            }
        }
        return null;
    }
}

//仓库
const store = new Vuex.Store({
    state: state,
    mutations: mutations,
    actions: actions,
    getters: getters
})
export default store;
navbar.vue
<template>
     <nav class="navbar navbar-expand-lg  navbar-dark bg-dark">
        <div class="container">
            <a class="navbar-brand" href="#">购物车</a>
            <ul class="navbar-nav ml-auto">
                <li class="nav-item active dropdown" v-if="user!==null">
                    <a class="nav-link dropdown-toggle"  data-toggle="dropdown" @click="showDropdown=!showDropdown">欢迎你:{{user.name}} </a>
                    <div class="dropdown-menu show">
                        <a class="dropdown-item" href="#">我的订单</a>
                        <div class="dropdown-divider"></div>
                        <a class="dropdown-item" >注销</a>
                    </div>
                </li>
                <li class="nav-item active" style="margin-right:5px" v-if="user===null">
                    <router-link  class="nav-link btn btn-warning btn-sm" style="color:#fff" to="/login">登录</router-link>
                </li>
                <li class="nav-item active" v-if="user===null">
                    <router-link  class="nav-link btn btn-danger btn-sm" style="color:#fff" to="/register">注册</router-link>
                </li>
            </ul>
        </div>
    </nav>
</template>

<script>
export default {
    data(){
        return{
            showDropdown:false
        }
    },
    computed:{
        user(){
            return this.$store.state.user;
        }

    }
}
</script>
product.vue 该组件用于显示商品的详细信息
<template>
    <div class="card">
        <img class="card-img-top" src="../../assets/logo.png" alt="Card image cap">
        <div class="card-body">
            <h5 class="card-title">{{product.name}}</h5>
            <p class="card-text">{{product.description===null?"暂无描述":product.description}}</p>
            <p>价格: {{product.price}}</p>
            <a href="#" class="btn btn-warning float-left" @click="goDetail">查看详情</a>
            <a href="#" class="btn btn-primary float-right">加入购物车</a>
        </div>
    </div>
</template>

<script>
export default {
    props:['product'],
    methods:{
        goDetail(){
            console.log(this.product.id);
            this.$router.push(`/detail/${this.product.id}`);
        }
    }
}
</script>
程序入口APP.vue
<template>
  <div id="app">
    <nav-bar></nav-bar>
    <router-view></router-view>
  </div>
</template>

<script>
import NavBar from './views/components/navbar'
export default {
    name: 'App',
    components:{NavBar}
}
</script>
注册:通过this.$store.dispatch去调用actions中的方法,其中有趣的是commit的参数竟然被方法名给..这个以后在思考。。
<template>
    <div class="container">
        <div class="row">
            <div class="card" style="margin:50px auto;width:400px">
                <div class="card-body">
                    <h5 class="card-title">注册</h5>
                    <hr>
                    <div class="form-group">
                        <label for="">用户名</label>
                        <input type="text" class="form-control" v-model="user.name">
                    </div>
                    <div class="form-group">
                        <label for="">真实姓名</label>
                        <input type="text" class="form-control" v-model="user.realname">
                    </div>
                    <div class="form-group">
                        <label for="">密码</label>
                        <input type="password" class="form-control" v-model="user.password">
                    </div>
                    <div class="form-group">
                        <button class="btn btn-primary btn-block" @click="register">注册</button>
                    </div>
                </div>
            </div>
        </div>
    </div>
</template>
<script>
export default {
    data(){
        return{
            user:{
                name:'',
                realname:'',
                password:''
            }
        }
    },methods:{
        register(){
            this.$store.dispatch('REGISTER',this.user).then(res=>{
                if(res=="OK")
                    this.$router.push('/index');
            })
        }
    }
}
</script>
登录
<template>
<div class="container">
<div class="row">
<div class="card" style="margin:50px auto;width:400px">
<div class="card-body">
<h5 class="card-title">登录</h5>
<hr>
<div class="form-group">
<label for="">用户名</label>
<input type="text" class="form-control" v-model="user.name">
</div>
<div class="form-group">
<label for="">密码</label>
<input type="password" class="form-control" v-model="user.password">
</div>
<div class="form-group">
<button class="btn btn-primary btn-block" @click="login">登录</button>
</div>
</div>
</div>
</div>
</div>
</template>
<script>
export default {
data(){
return {
user:{
name:'',
password:''
}
}
},
methods:{
login(){
this.$store.dispatch('LOGIN',this.user).then(res=>{
console.log(res);
if (res){
this.$router.push('/')
}
})
}
}
}
</script>
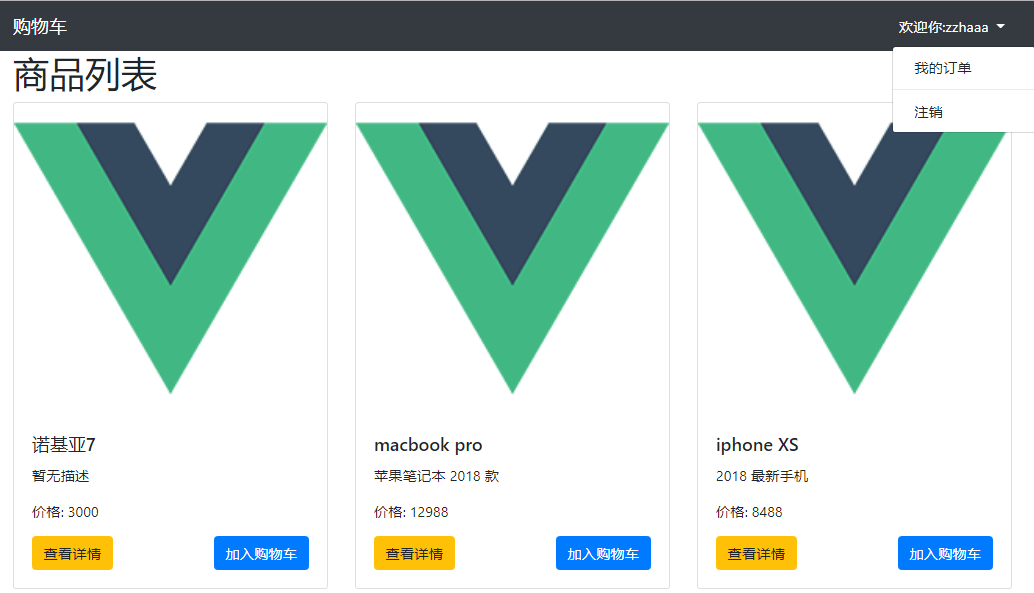
主页面
<template>
<div class="container">
<h1>商品列表</h1>
<div class="row">
<div class="col-md-4" v-for="p in products" :key="p.id">
<!-- 传递商品信息到子组件 -->
<product-card :product="p"></product-card>
</div>
</div>
</div>
</template>
<script>
import ProductCard from './components/product.vue'
export default {
components:{ProductCard},
computed:{
products(){
return this.$store.getters.ALL_PRODUCTS;
}
},
created(){
this.$store.dispatch('LOAD_PRODUCTS');
}
}
</script>
本文结语知识总结:
获取url中的参数
let id = this.$route.params.id;
this.details = this.$store.getters.GET_PRODUCT_BYID(id);
有的小伙伴在复制我的代码运行报错,说什么未初始化;一定要在index.vue添加这个代码,LOAD_PRODUCTS给数据初始化
    created(){
        this.$store.dispatch('LOAD_PRODUCTS');
    }
跳转路由
this.$router.push('/')
ApiClound万能帮助类
import crypto from 'crypto'     // 加密
import axios from 'axios'
class API {
    constructor(classname){
        this.api = `https://d.apicloud.com/mcm/api/${classname}`;
        let ID = '';
        let KEY = '';
        let now = Date.now(); //当前时间
        let sha1 = crypto.createHash('sha1');
        sha1.update(ID + "UZ" + KEY + "UZ" + now);
        axios.defaults.headers["X-APICloud-AppId"] = ID;
        axios.defaults.headers["X-APICloud-AppKey"] = sha1.digest('hex') + "." + now;
    }

    Select(){
        return axios.get(this.api);
    }
    Insert(obj){
        return axios.post(this.api,obj);
    }
    Update(id,obj){
        // RESTFUL API
        return axios.put(this.api+`/${id}`,obj);
    }
    Delete(id){
        return axios.delete(this.api + `/${id}`);
    }
}

export default API;
还有同学问我父组件和子组件如何传值?
在父页面引用的地方以":"表示的值都可以在子页面的props获取到
<template>
<div>
    <h3>图书管理</h3><hr>
    <div class="row">
        <div class="col-md-4 col-sm-4" v-for="b in books" :key="b.id">
            <book-detail @abc="xyz" :Book="b" :MSG="abc"></book-detail>
        </div>
    </div>
</div>
</template>
<script>
    import BookDetail from './components/BookDetails.vue'
    export default{
        components:{BookDetail},
        data(){
            return {
                abc:'heheda',
                books:[{
                    id:1,
                    name:'7天 JAVA 从入门到放弃',
                    text:'到底是人性的扭曲,还是道德的沦丧. 青年男子为何突然脱发,中年男人为何删库跑路。',
                    price:20,
                    img:'img2.jpg',
                    showHehe:true
                },{
                    id:2,
                    name:'7天 C# 从入门到自杀',
                    text:'到底是人性的扭曲啊,还是道德的沦丧啊. 祖国的花朵为何自杀。',
                    price:20,
                    img:'../../static/img2.jpg',
                    showHehe:false
                }]
            }
        },
        methods:{
            xyz(bid){
                alert(bid);
            }
        }
    }
</script>
在子页面中可以这么搞
<script>
export default{
    props:["Book","MSG"],
    created(){
        console.log(this.Book.name);
    },
    methods:{
        select(id){
            this.$emit('abc',id);
        },
        detail(bid){
            this.$router.push(`/admin/Details/${bid}`);
        }
    }
}
</script>
而其中的$emit是可以调用父页面的方法的。
谢谢大家收看!!!

 浙公网安备 33010602011771号