深度学习-pytorch模型构建
构建自己的模型
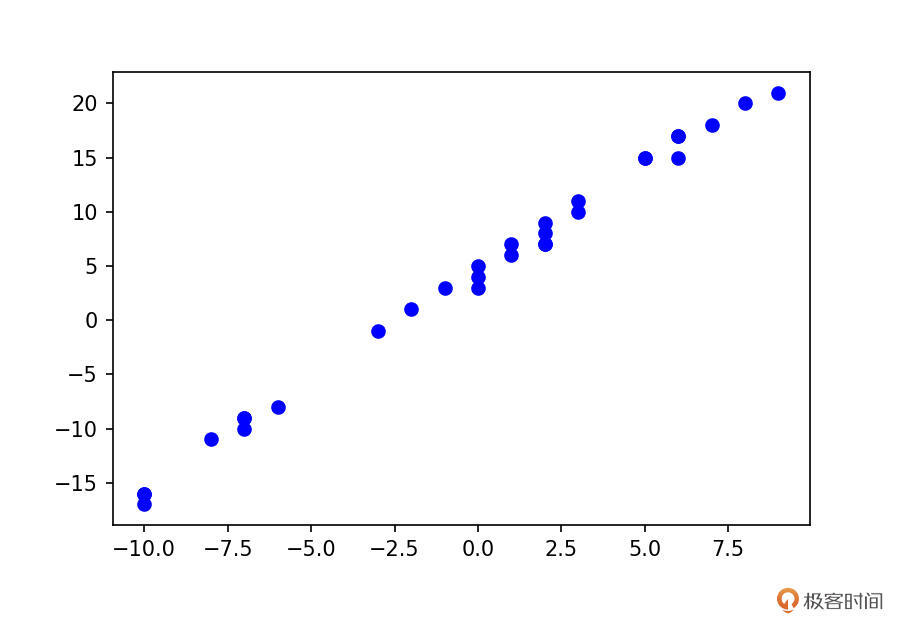
让我们直接切入主题,使用 PyTorch,自己构建并训练一个线性回归模型,来拟合出训练集中的走势分布。我们先随机生成训练集 X 与对应的标签 Y,具体代码如下:
import numpy as np
import random
from matplotlib import pyplot as plt

w = 2
b = 3
xlim = [-10, 10]
x_train = np.random.randint(low=xlim[0], high=xlim[1], size=30)

y_train = [w * x + b + random.randint(0,2) for x in x_train]

plt.plot(x_train, y_train, 'bo')

熟悉回归的同学应该知道,我们的回归模型为:y=wx+b。这里的 x 与 y,其实就对应上述代码中的 x_train 与 y_train,而 w 与 b 正是我们要学习的参数。好,那么我们看看如何构建这个模型。我们还是先看代码,再具体讲解
import torch
from torch import nn

class LinearModel(nn.Module):
  def __init__(self):
    super().__init__()
    self.weight = nn.Parameter(torch.randn(1))
    self.bias = nn.Parameter(torch.randn(1))

  def forward(self, input):
    return (input * self.weight) + self.bias
-
1.必须继承 nn.Module 类。
-
2.重写 init() 方法。通常来说要把有需要学习的参数的层放到构造函数中,例如,例子中的 weight 与 bias,还有我们之前学习的卷积层。我们在上述的
__init__()中使用了nn.Parameter(),它主要的作用就是作为nn.Module中可训练的参数使用。必须调用父类的构造方法才可以,也就是这行代码:super().__init__()因为在 nn.Module 的
__init__()中,会初始化一些有序的字典与集合。这些集合用来存储一些模型训练过程的中间变量,如果不初始化 nn.Module 中的这些参数的话, -
3.
forward()是必须重写的方法。看函数名也可以知道,它是用来定义这个模型是如何计算输出的,也就是前向传播。对应到我们的例子,就是获得最终输出y=weight * x+bias的计算结果。对于一些不需要学习参数的层,一般来说可以放在这里。例如,BN 层,激活函数还有 Dropout。 -
4.
Sequential()按顺序执行里头的模块 -
5 Embedding 随机初始化嵌入的s向量
embedding = nn.Embedding(5, 3)# 定义一个具有5个单词,维度为3的查询矩阵 -
6
torch.nn.Lineartorch.nn.Linear类用于定义模型的线性层,即完成前面提到的不同的层之间的线性变换。 线性层接受的参数有3个:分别是输入特征数、输出特征数、是否使用偏置,默认为True,使用torch.nn.Linear类,会自动生成对应维度的权重参数和偏置,对于生成 的权重参数和偏置,我们的模型默认使用一种比之前的简单随机方式更好的参数初始化方式。embedding = nn.Embedding(5, 3) # 定义一个具有5个单词,维度为3的查询矩阵 print(embedding.weight) # 展示该矩阵的具体内容 test = torch.LongTensor([[0, 2, 0, 1], [1, 3, 4, 4]]) # 该test矩阵用于被embed,其size为[2, 4] # 其中的第一行为[0, 2, 0, 1],表示获取查询矩阵中ID为0, 2, 0, 1的查询向量 # 可以在之后的test输出中与embed的输出进行比较 test = embedding(test) print(test.size()) # 输出embed后test的size,为[2, 4, 3],增加 # 的3,是因为查询向量的维度为3 print(test) # 输出embed后的test的内容 —————————————————————————————————————— 输出: Parameter containing: tensor([[-1.8056, 0.1836, -1.4376], [ 0.8409, 0.1034, -1.3735], [-1.3317, 0.8350, -1.7235], [ 1.5251, -0.2363, -0.6729], [ 0.4148, -0.0923, 0.2459]], requires_grad=True) torch.Size([2, 4, 3]) tensor([[[-1.8056, 0.1836, -1.4376], [-1.3317, 0.8350, -1.7235], [-1.8056, 0.1836, -1.4376], [ 0.8409, 0.1034, -1.3735]], [[ 0.8409, 0.1034, -1.3735], [ 1.5251, -0.2363, -0.6729], [ 0.4148, -0.0923, 0.2459], [ 0.4148, -0.0923, 0.2459]]], grad_fn=<EmbeddingBackward>)可以看出创建了一个具有5个ID(可以理解为拥有5个词的词典)的查询矩阵,每个查询向量的维度是3维,然后用一个自己需要Embedding的矩阵与之计算,其中的内容就是需要匹配的ID号,注意!如果需要Embedding的矩阵中的查询向量不为1,2这种整数,而是1.1这种浮点数,就不能与查询向量成功匹配,会报错,且如果矩阵中的值大于了查询矩阵的范围,比如这里是5,也会报错。
-
nn.Parameter
-
nn.Module模块nn.Module是所有神经网络模块的基类。当我们自己要设计一个网络结构的时候,就要继承该类。也就说,其实Torchvison中的那些模型,也都是通过继承nn.Module模块来构建网络模型的。需要注意的是,模块本身是 callable 的,当调用它的时候,就是执行 forward 函数,也就是前向传播。我们还是结合代码例子直观感受一下。请看下面的代码,先创建一个LinearModel的实例 model,然后model(x)就相当于调用LinearModel中的 forward 方法。
模型的训练
我们的模型定义好之后,还没有被训练。要想训练我们的模型,就需要用到损失函数与优化方法,这一部分前面课里(如果你感觉陌生的话,可以回顾 11~13 节课)已经学过了,所以现在我们直接看代码就可以了。
这里选择的是 MSE 损失与 SGD 优化方法。
# 定义优化器
optimizer = torch.optim.SGD(model.parameters(), lr=1e-4, weight_decay=1e-2, momentum=0.9)

y_train = torch.tensor(y_train, dtype=torch.float32)
for _ in range(1000):
    input = torch.from_numpy(x_train)
    output = model(input)
    loss = nn.MSELoss()(output, y_train)
    model.zero_grad()
    loss.backward()
    optimizer.step()
经过 1000 个 Epoch 的训练以后,我们可以打印出模型的 weight 与 bias,看看是多少。对于一个模型的可训练的参数,我们可以通过 named_parameters() 来查看,请看下面代码。
  print(parameter)
# 输出:
('weight', Parameter containing:
tensor([2.0071], requires_grad=True))
('bias', Parameter containing:
tensor([3.1690], requires_grad=True))
复杂的定义方法
class CustomModel(nn.Module):
  def __init__(self):
    super().__init__()
    self.conv1_1 = nn.Conv2d(in_channels=1, out_channels=3, kernel_size=3, padding='same')
    self.conv1_2 = nn.Conv2d(in_channels=3, out_channels=1, kernel_size=2, padding='same')
    ...
    self.conv_m_1 = nn.Conv2d(in_channels=1, out_channels=3, kernel_size=3, padding='same')
    self.conv_m_2 = nn.Conv2d(in_channels=3, out_channels=1, kernel_size=2, padding='same')
    ...
    self.conv_n_1 = nn.Conv2d(in_channels=1, out_channels=3, kernel_size=3, padding='same')
    self.conv_n_2 = nn.Conv2d(in_channels=3, out_channels=1, kernel_size=2, padding='same')

  def forward(self, input):
    x = self.conv1_1(input)
    x = self.conv1_2(x)
    ...
    x = self.conv_m_1(x)
    x = self.conv_m_2(x)
    ...
    x = self.conv_n_1(x)
    x = self.conv_n_2(x)
    ...
    return x
其实这部分重复的结构完全可以放在一个单独的 module 中,然后,在我们模型中直接调用这部分即可,具体实现你可以参考下面的代码:
class CustomLayer(nn.Module):
  def __init__(self, input_channels, output_channels):
    super().__init__()
    self.conv1_1 = nn.Conv2d(in_channels=input_channels, out_channels=3, kernel_size=3, padding='same')
    self.conv1_2 = nn.Conv2d(in_channels=3, out_channels=output_channels, kernel_size=2, padding='same')

  def forward(self, input):
    x = self.conv1_1(input)
    x = self.conv1_2(x)
    return x
然后呢,CustomModel 就变成下面这样了:
  def __init__(self):
    super().__init__()
    self.layer1 = CustomLayer(1,1)
    ...
    self.layerm = CustomLayer(1,1)
    ...
    self.layern = CustomLayer(1,1)

  def forward(self, input):
    x = self.layer1(input)
    ...
    x = self.layerm(x)
    ...
    x = self.layern(x)
    ...
    return x
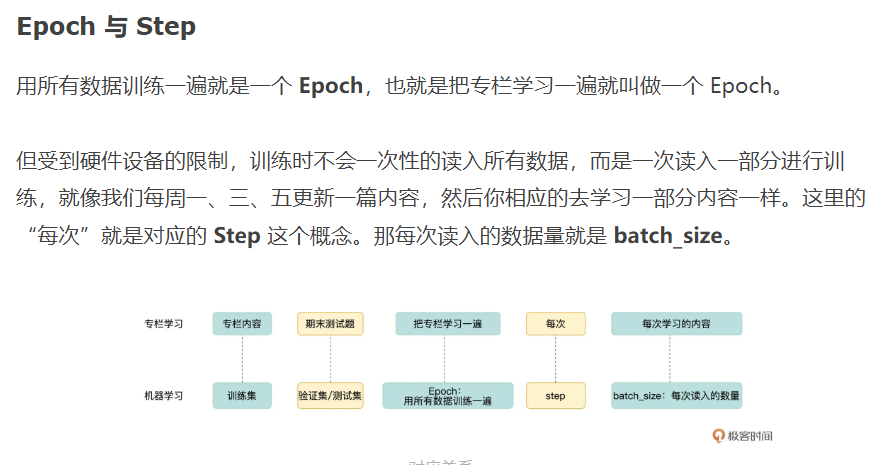
Epoch


【推荐】国内首个AI IDE,深度理解中文开发场景,立即下载体验Trae
【推荐】编程新体验,更懂你的AI,立即体验豆包MarsCode编程助手
【推荐】抖音旗下AI助手豆包,你的智能百科全书,全免费不限次数
【推荐】轻量又高性能的 SSH 工具 IShell:AI 加持,快人一步
· AI与.NET技术实操系列:基于图像分类模型对图像进行分类
· go语言实现终端里的倒计时
· 如何编写易于单元测试的代码
· 10年+ .NET Coder 心语,封装的思维:从隐藏、稳定开始理解其本质意义
· .NET Core 中如何实现缓存的预热?
· 分享一个免费、快速、无限量使用的满血 DeepSeek R1 模型,支持深度思考和联网搜索!
· 25岁的心里话
· 基于 Docker 搭建 FRP 内网穿透开源项目(很简单哒)
· ollama系列01:轻松3步本地部署deepseek,普通电脑可用
· 按钮权限的设计及实现