Sentinel源码之滑动时间窗口解析
1.固定时间窗算法#
概念:固定时间窗口计数器算法思想,在固定的时间窗口内,可以允许固定数量的请求进入。超过数量就拒绝或者排队,等下一个时间段进入。
具体分析一下:
- 将当前的时间分为10t大小的几个时间窗
- 规则是阈值为100个请求数,每个时间窗里面的请求数量不能超过阈值100
- 10t到16t进入请求10个,16t到20t进入请求50个,总数60个请求,没有超过阈值100
- 20t到26t进入请求60个,26t到30t进入请求20个,总数80个请求,没有超过阈值100
- 30t到40t之间进入请求120个,超过阈值20个,所以20个请求无法进入
存在问题:16t到26t之间也是10t大小的一个时间窗,但是请求总数为110,超过阈值,这种固定时间窗无法处理这部分超出的请求,解决办法就是使用滑动时间窗。

2.滑动时间窗算法#
使用滑动时间窗的原因,就在于虽然以上提到超出阈值的部分分别在两个时间窗中,但是实际上我们要清楚,我们系统限流的目的是要在任意时间都要能应对突然的流量暴增,如果使用以上的算法,就会造成在16t和26t之间的请求无法限流,从而严重会导致服务雪崩。
要解决的话,我们就需要使用滑动时间窗算法,具体原理如下:滑动时间窗限流算法解决了固定时间窗限流算法的问题。其没有划分固定的时间窗起点与终点,而是将每一次请求的到来时间点作为统计时间窗的终点,起点则是终点向前推时间窗长度的时间点。这种时间窗称为“滑动时间窗”
看图分析:此图中我们可以分析中,实际上当前的时间窗不再是固定的,而是可以从时间的起始位置一直向右滑动
这样的话就可以解决固定时间窗带来的问题,如图所示:
其原理就是:
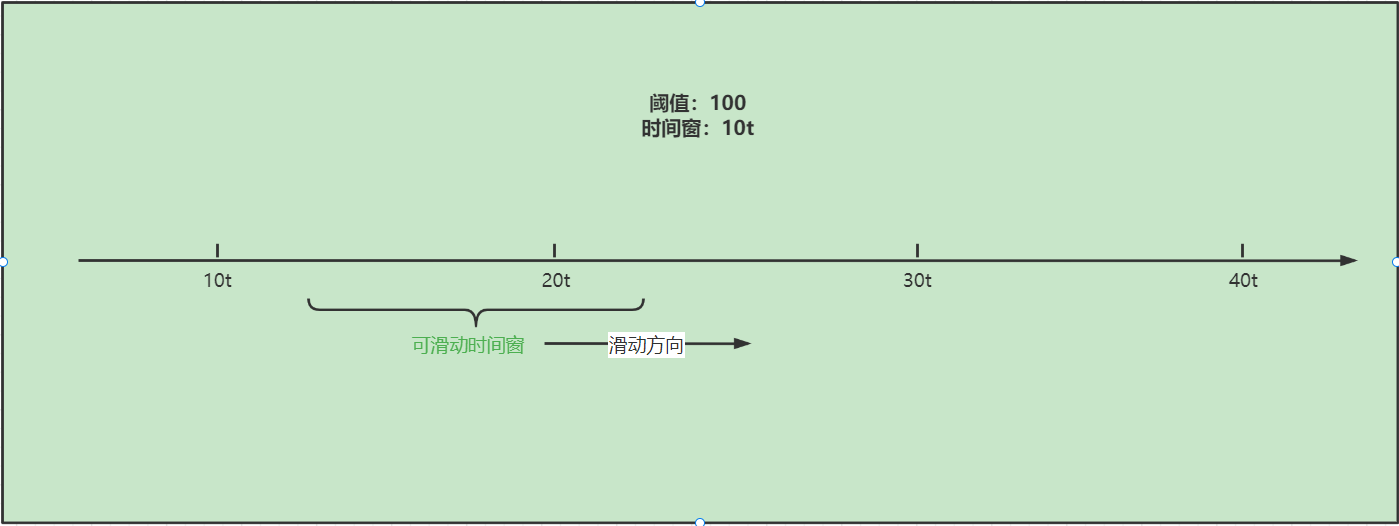
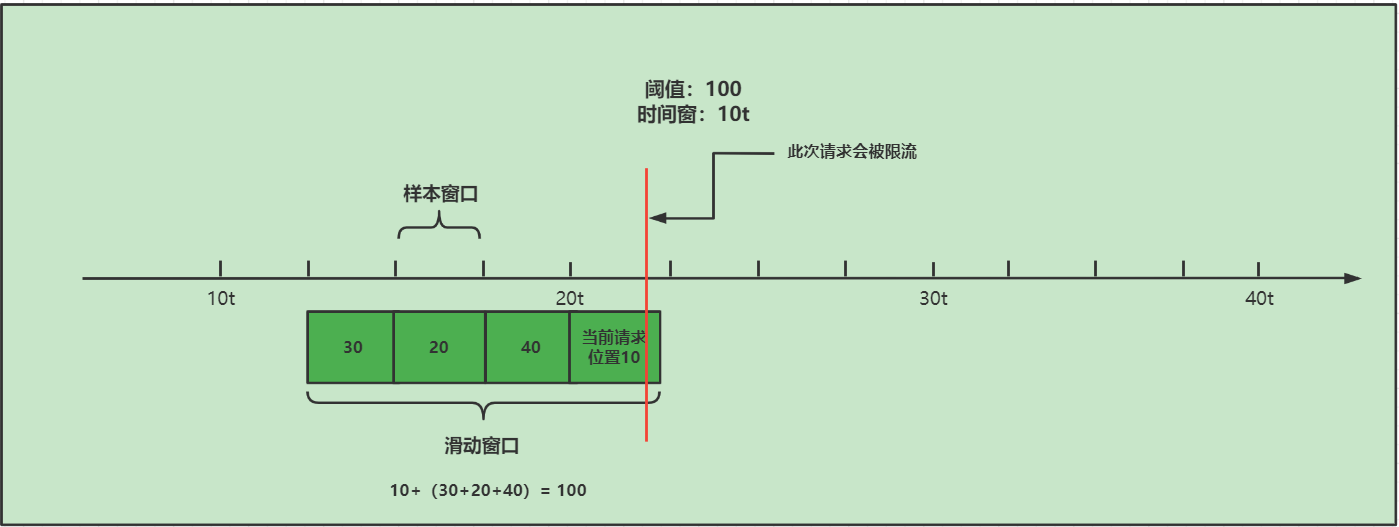
- 当前时间窗口为滑动窗口,可以从左向右按照时间顺序进行滑动,并且大小为10t,同时此时的阈值为100
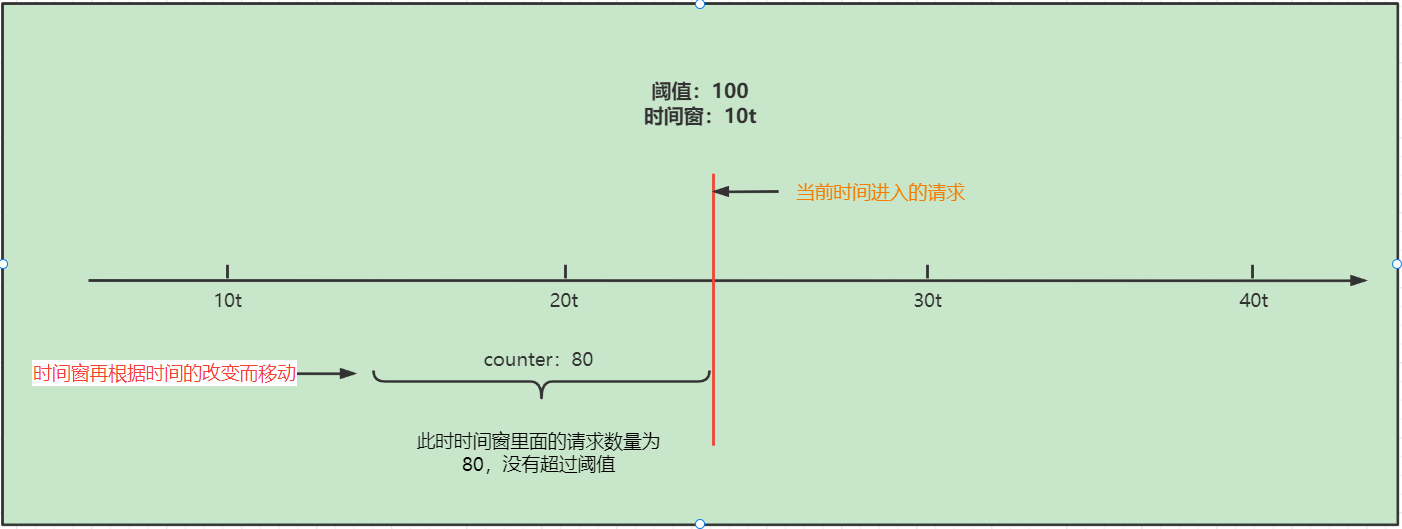
- 红色线的位置进入一个请求,此时想要判断这个请求是否能够正常通过,就要看当前滑动窗口中的请求数量是否达到阈值,如果当前没有达到阈值100,就可以正常通过,但是如果一旦超过阈值,就会被进行限流。
没有超过阈值:
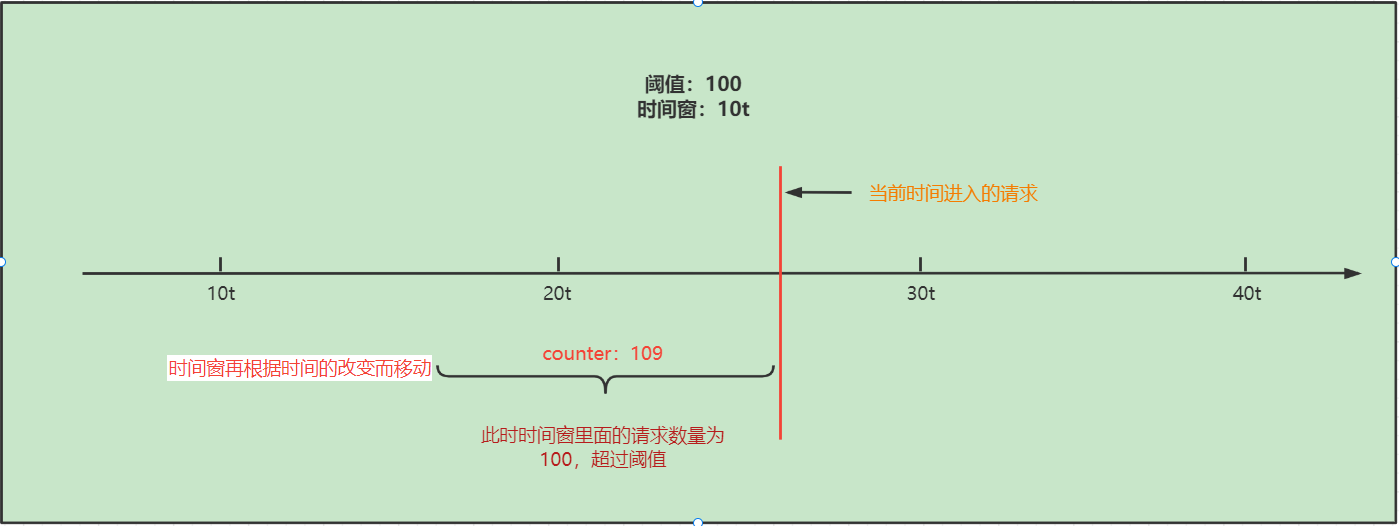
超过阈值:
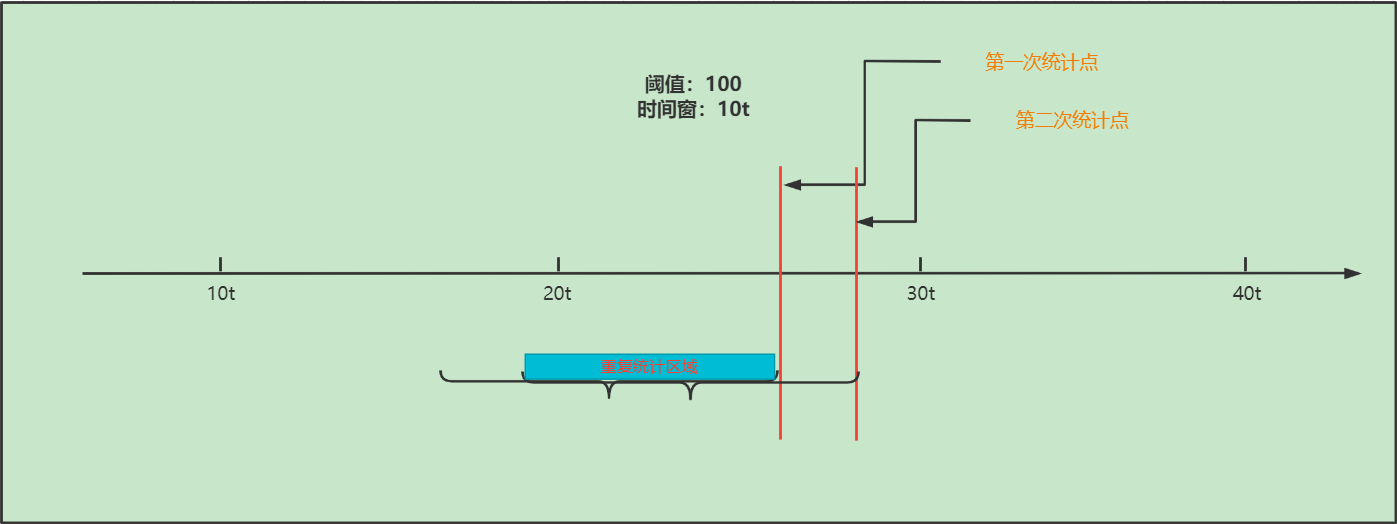
但是此时滑动时间窗还是有问题的,问题就是会出现大量的重复统计,造成系统效率下降,如下图所示:在此图中我们就可以看出,这个蓝色的区域就是重复统计的区域,也就是说每一次移动时间窗口,都需要重新统计重复区域的请求数量,从而导致浪费大量的系统资源。
滑动时间窗口算法-改进
想要解决以上的问题,我们就需要更加细粒度话的计算,增加多个子时间窗口:样本窗口
概念:
- 样本窗口的长度必须小于滑动窗口长度,如果等于滑动窗口长度就会变成固定时间窗口
- 一般滑动窗口长度是样本窗口的整数倍,比如:4*样本窗口=1个滑动窗口
- 每个样本窗口在到达终点时间时,会统计本样本窗口中的流量数据并且记录下来。
- 当一个请求达到时,会统计当前请求时间点所在的样本窗口中的流量数据,然后在获取当前请求时间的样本窗口以外的同一个滑动窗口中的样本窗口的统计数据,进行求和,如果没有超出阈值,则通过,否则就会被限流。
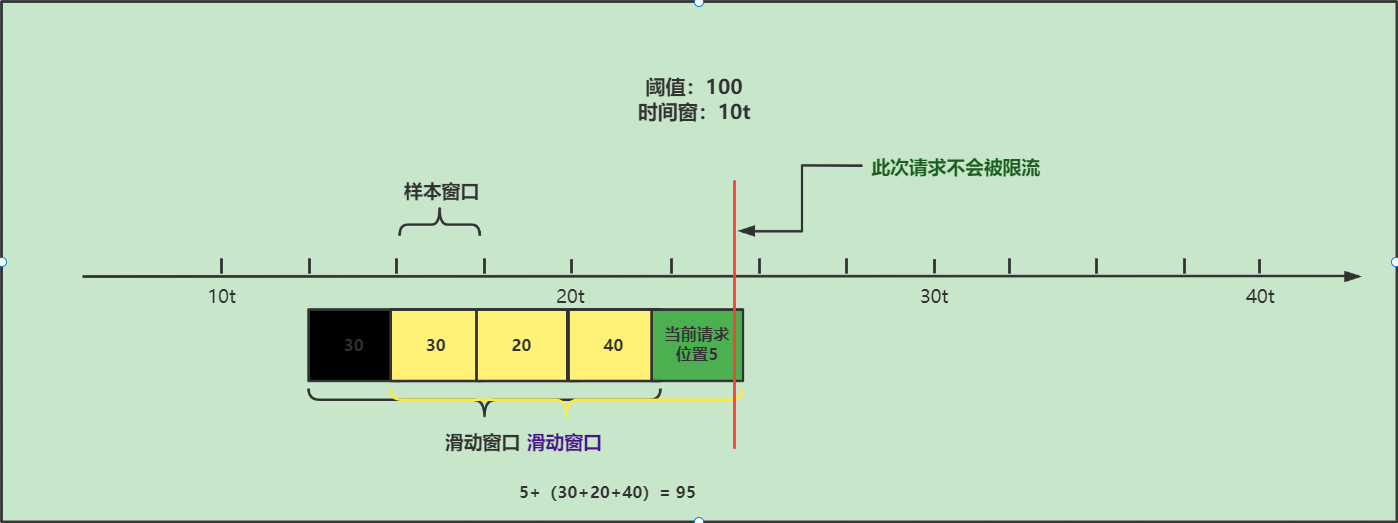
原理图:
下一个进入请求的时间点
此时这个请求将不会被限流,因为本次请求的时间的对应的样本窗口只有5个请求加上之前重复的样本窗口统计的流量值,没有超过阈值100,所以本次请求会通过。
3.Sentinel滑动时间窗口算法源码解析#
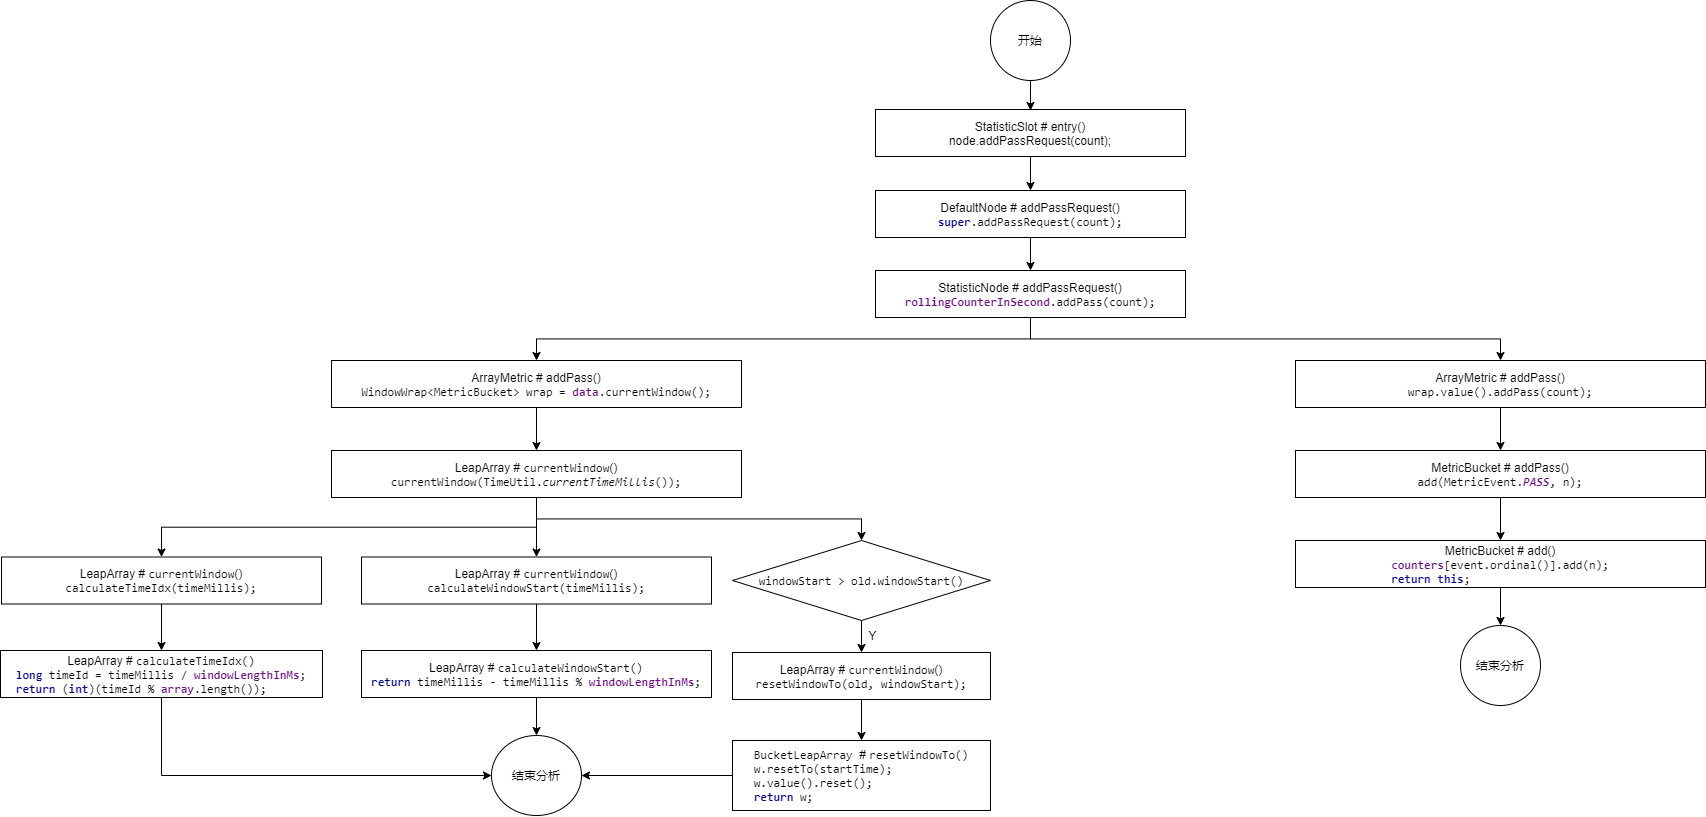
整体流程图:
源码分析:
那我们就按照这个流程图来从头分析,首先看StatisticSlot.entry方法中node.addPassRequest(count)方法,这里我之前就提到过用到了滑动窗口算法,那我们来具体分析
// 增加通过请求的数量(这里涉及到滑动窗口算法)
node.addPassRequest(count);
进入方法DefaultNode.addPassRequest
@Override
public void addPassRequest(int count) {
 super.addPassRequest(count);
 this.clusterNode.addPassRequest(count);
}
继续向下跟踪
@Override
public void addPassRequest(int count) {
 // 为滑动计数器增加本次的访问数据
 rollingCounterInSecond.addPass(count);
 rollingCounterInMinute.addPass(count);
}
最后进入ArrayMetric.addPass,这是一个使用数组保存数据的计量器类
@Override
public void addPass(int count) {
 // 获取当前时间点所在的样本窗口
 WindowWrap<MetricBucket> wrap = data.currentWindow();
 // 将当前请求的计数量添加到当前样本窗口的统计数据中
 wrap.value().addPass(count);
}
先来跟踪data.currentWindow();
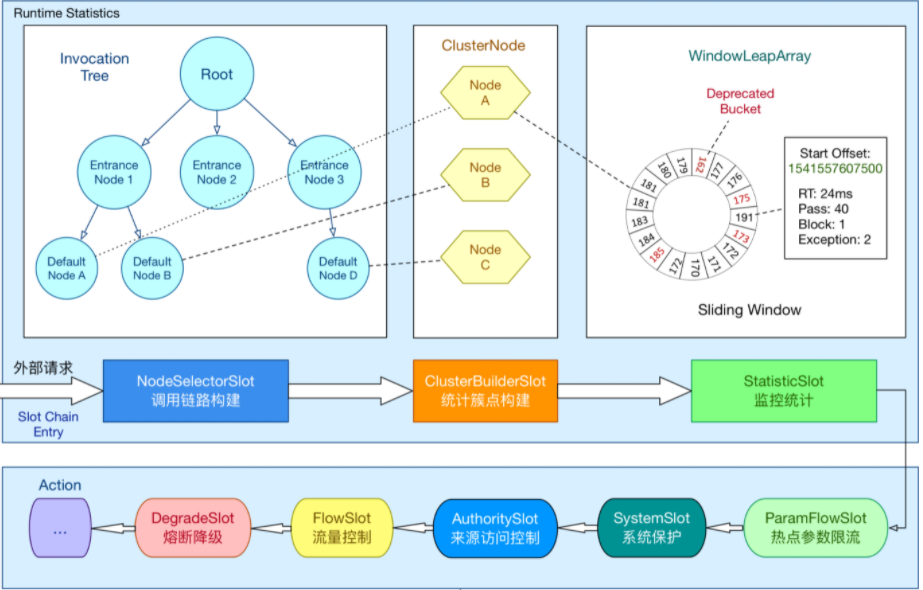
public WindowWrap<T> currentWindow() {
 // 获取当前时间所在的样本窗口
 return currentWindow(TimeUtil.currentTimeMillis());
}
这里就会进入LeapArray(环形数组)中的currentWindow方法中,这个环形数组,其实就是Sentinel官方提供的原理图中的环形数组WindowLeapArray
// 环形数组
public abstract class LeapArray<T> {
 // 样本窗口长度
 protected int windowLengthInMs;
 // 一个时间窗中包含的时间窗数量
 protected int sampleCount;
 // 时间窗长度
 protected int intervalInMs;
 private double intervalInSecond;

 // 这个一个数组,元素为WindowWrap样本窗口
 // 注意,这里的泛型 T 实际为 MetricBucket 类型
 protected final AtomicReferenceArray<WindowWrap<T>> array;
......
}
这里要注意这个数组,这个数组里面所存放的类型就是WindowWrap窗口类型,泛型T是MetricBucket这里我们来看一下这个类型
public WindowWrap(long windowLengthInMs, long windowStart, T value) {
 //样本窗口长度
 this.windowLengthInMs = windowLengthInMs;
 //样本窗口的起始时间戳
 this.windowStart = windowStart;
 //当前样本窗口的统计数据 其类型为MetricBucket
 this.value = value;
}
//..LeapArraypublic WindowWrap<T> currentWindow() { // 获取当前时间所在的样本窗口 return currentWindow(TimeUtil.currentTimeMillis());}//------------------------------------------------------------public WindowWrap<T> currentWindow(long timeMillis) { if (timeMillis < 0) { return null; } // 计算当前时间所在的样本窗口id,即在计算数组LeapArray中的索引 int idx = calculateTimeIdx(timeMillis); // Calculate current bucket start time. // 计算当前样本窗口的开始时间点 long windowStart = calculateWindowStart(timeMillis); .....}在这里我们先分析calculateTimeIdx方法
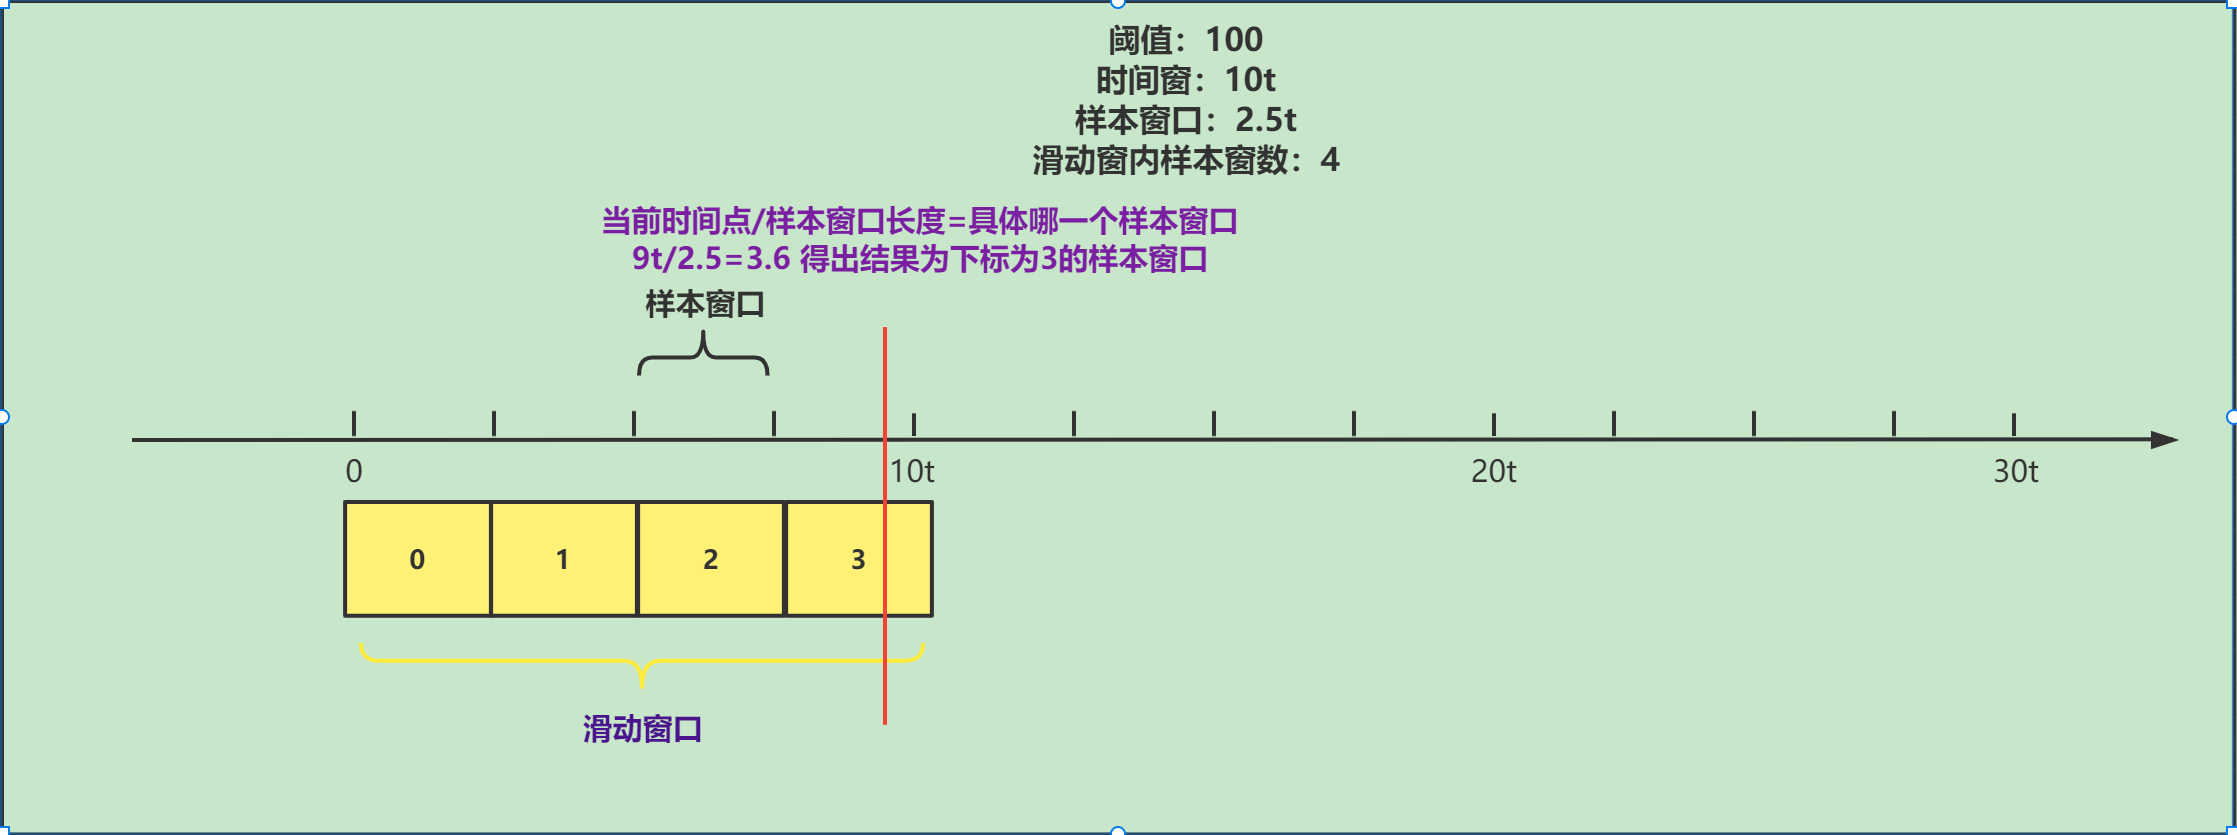
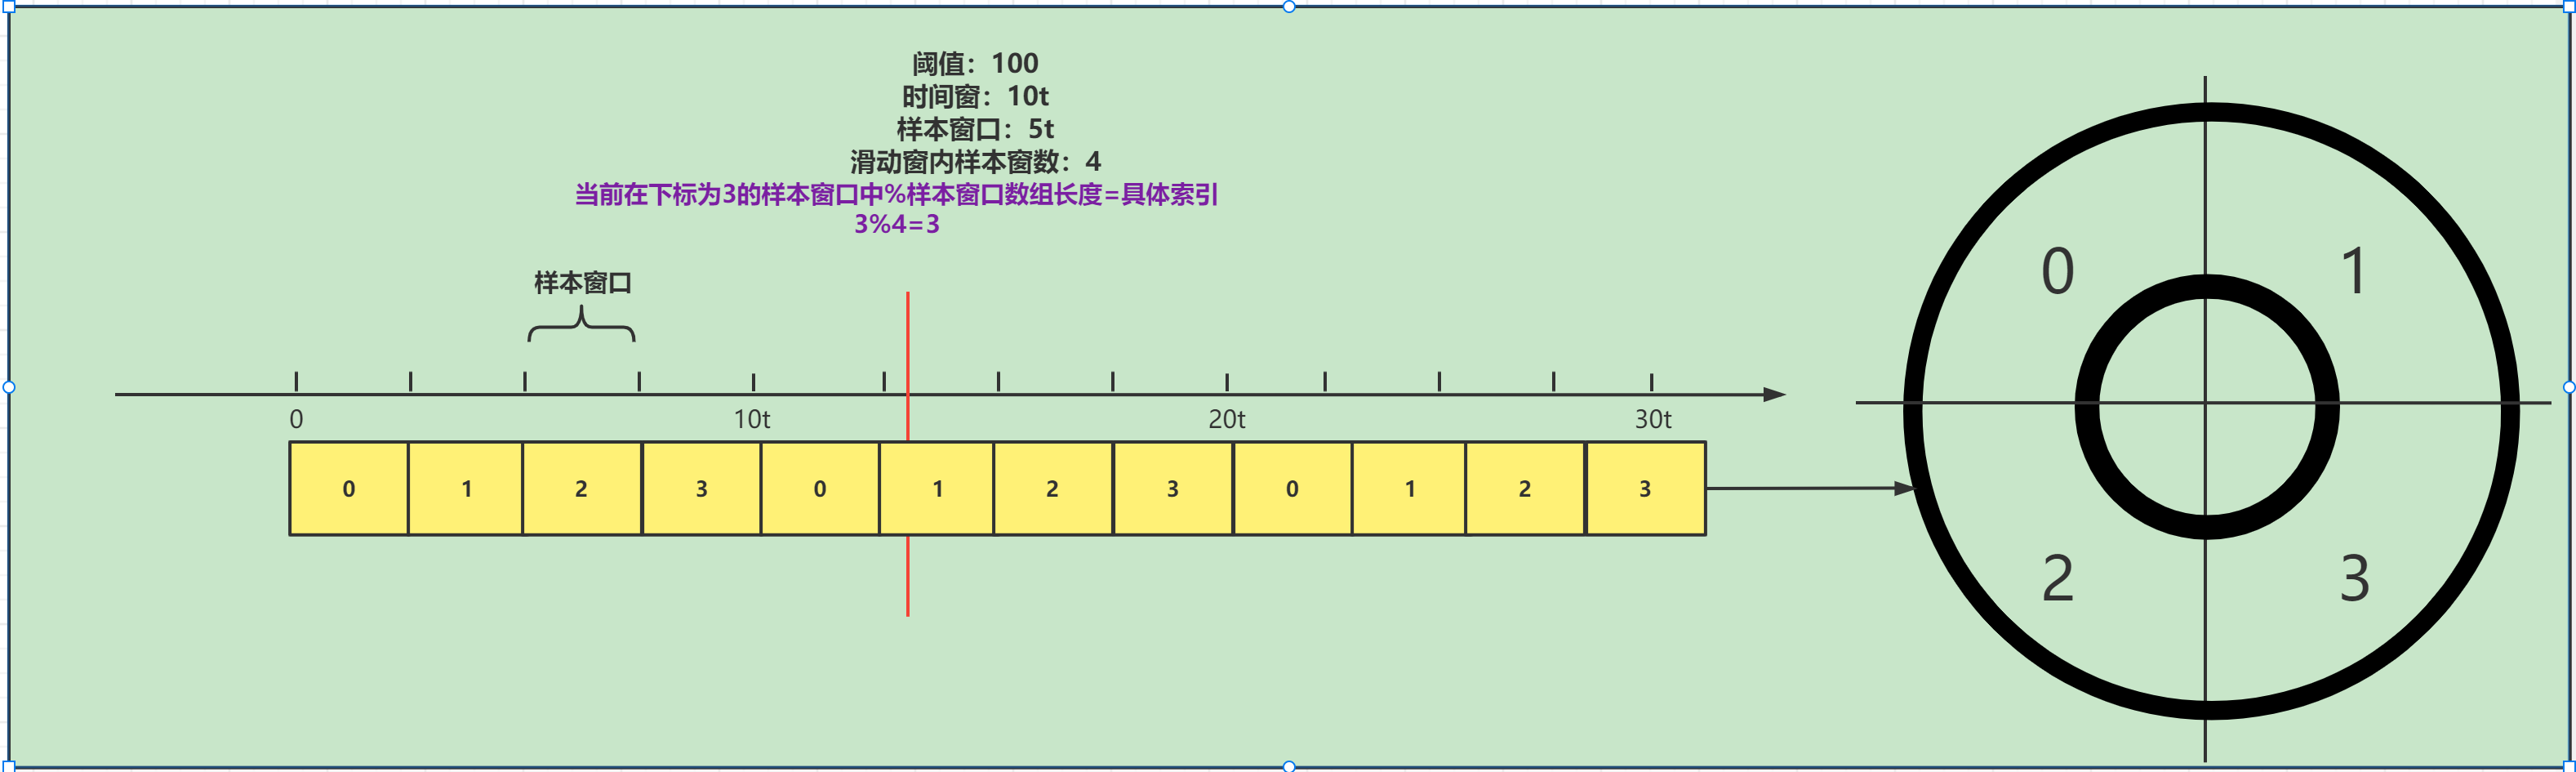
private int calculateTimeIdx(/*@Valid*/ long timeMillis) { // 计算当前时间在那个样本窗口(样本窗口下标),当前时间/样本窗口长度 long timeId = timeMillis / windowLengthInMs; // Calculate current index so we can map the timestamp to the leap array. // 计算具体索引,这个array就是装样本窗口的数组 return (int)(timeId % array.length());}timeId(样本窗口下标)原理如下:
具体索引原理:
这里分析完成我们接着分析这里,计算当前样本窗口的起点
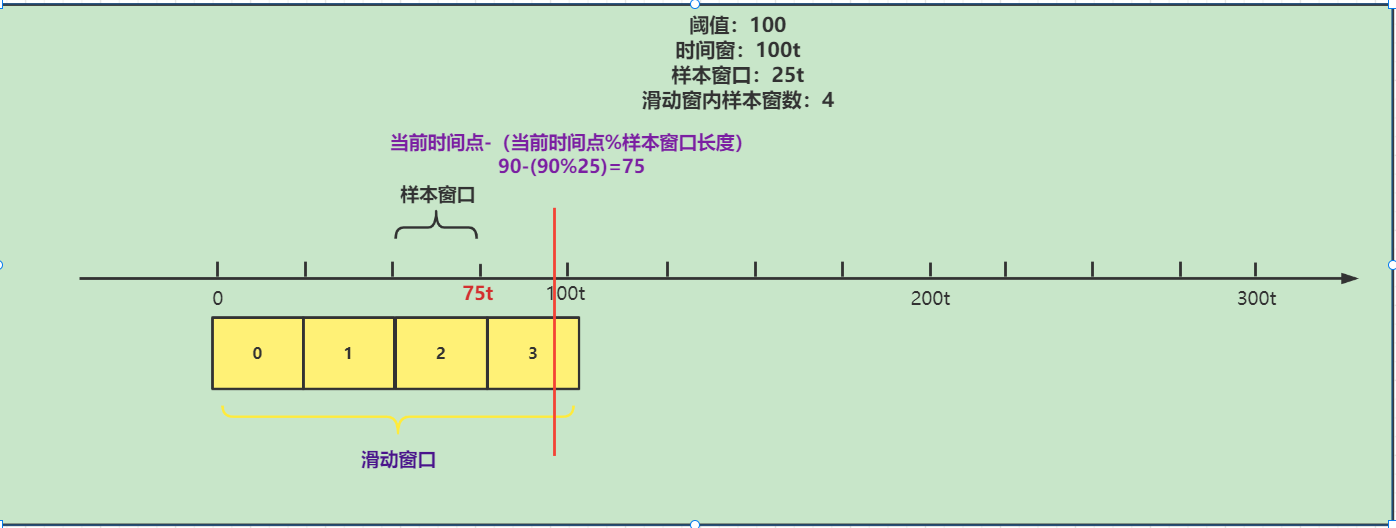
// 计算当前样本窗口的开始时间点long windowStart = calculateWindowStart(timeMillis);//------------------------------protected long calculateWindowStart(/*@Valid*/ long timeMillis) { // 计算当前样本窗口的起点 当前时间点-(当前时间点%样本窗口长度) return timeMillis - timeMillis % windowLengthInMs;}原理如下:
这里分析完成之后我们继续向下分析
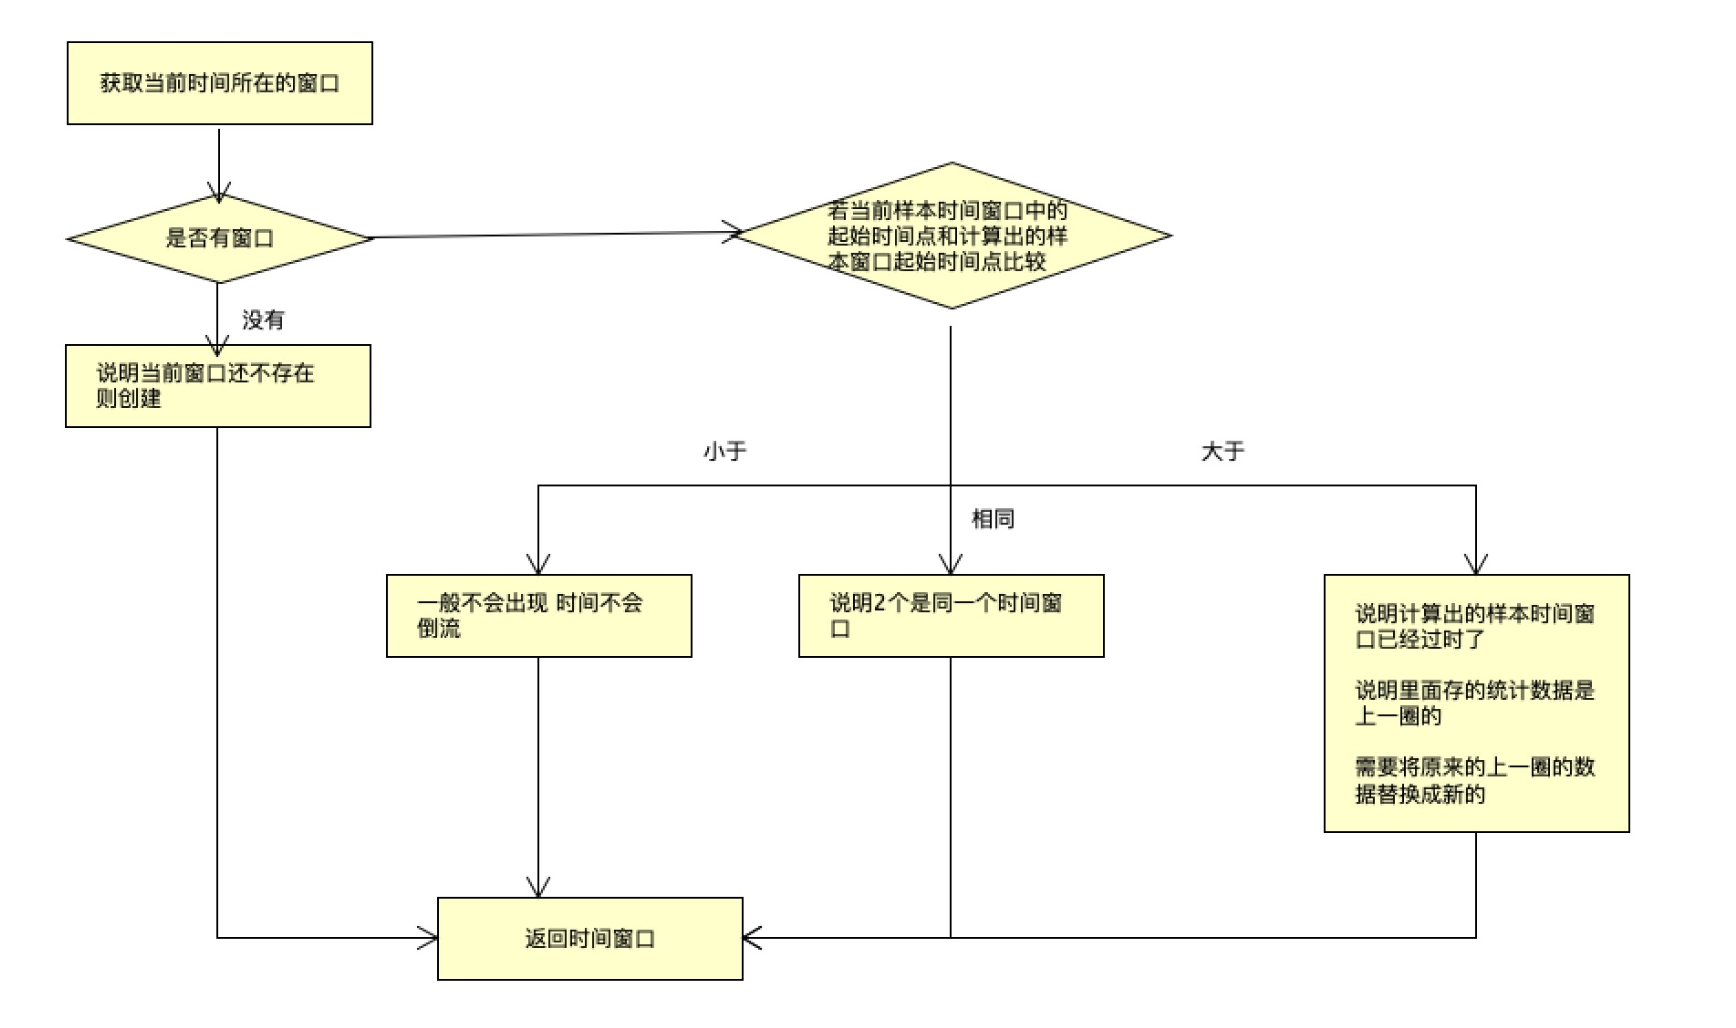
while (true) { // 获取到当前时间所在的样本窗口 WindowWrap<T> old = array.get(idx); // 如果获取不到,表示没有创建 if (old == null) { /* * B0 B1 B2 NULL B4 * ||_______|_______|_______|_______|_______||___ * 200 400 600 800 1000 1200 timestamp * ^ * time=888 * bucket is empty, so create new and update * * If the old bucket is absent, then we create a new bucket at {@code windowStart}, * then try to update circular array via a CAS operation. Only one thread can * succeed to update, while other threads yield its time slice. */ // 创建新的时间窗口 WindowWrap<T> window = new WindowWrap<T>(windowLengthInMs, windowStart, newEmptyBucket(timeMillis)); // 通过CAS方式将新建窗口放入Array if (array.compareAndSet(idx, null, window)) { // Successfully updated, return the created bucket. return window; } else { // Contention failed, the thread will yield its time slice to wait for bucket available. Thread.yield(); } // 若当前样本窗口的起始时间点与计算出的样本窗口起始点相同,则说明两个是同一个样本窗口 } else if (windowStart == old.windowStart()) { /* * B0 B1 B2 B3 B4 * ||_______|_______|_______|_______|_______||___ * 200 400 600 800 1000 1200 timestamp * ^ * time=888 * startTime of Bucket 3: 800, so it's up-to-date * * If current {@code windowStart} is equal to the start timestamp of old bucket, * that means the time is within the bucket, so directly return the bucket. */ return old; // 若当前样本窗口的起始时间点 大于 计算出的样本窗口起始时间点,说明计算出的样本窗口已经过时了, // 需要将原来的样本窗口替换 } else if (windowStart > old.windowStart()) { /* * (old) * B0 B1 B2 NULL B4 * |_______||_______|_______|_______|_______|_______||___ * ... 1200 1400 1600 1800 2000 2200 timestamp * ^ * time=1676 * startTime of Bucket 2: 400, deprecated, should be reset * * If the start timestamp of old bucket is behind provided time, that means * the bucket is deprecated. We have to reset the bucket to current {@code windowStart}. * Note that the reset and clean-up operations are hard to be atomic, * so we need a update lock to guarantee the correctness of bucket update. * * The update lock is conditional (tiny scope) and will take effect only when * bucket is deprecated, so in most cases it won't lead to performance loss. */ if (updateLock.tryLock()) { try { // Successfully get the update lock, now we reset the bucket. // 替换掉老的样本窗口 return resetWindowTo(old, windowStart); } finally { updateLock.unlock(); } } else { // Contention failed, the thread will yield its time slice to wait for bucket available. Thread.yield(); } // 当前样本窗口的起始时间点 小于 计算出的样本窗口起始时间点, // 这种情况一般不会出现,因为时间不会倒流。除非人为修改了系统时钟 } else if (windowStart < old.windowStart()) { // Should not go through here, as the provided time is already behind. return new WindowWrap<T>(windowLengthInMs, windowStart, newEmptyBucket(timeMillis)); }}这里的原理如下:
具体是如何替换的拿,我们来看源码
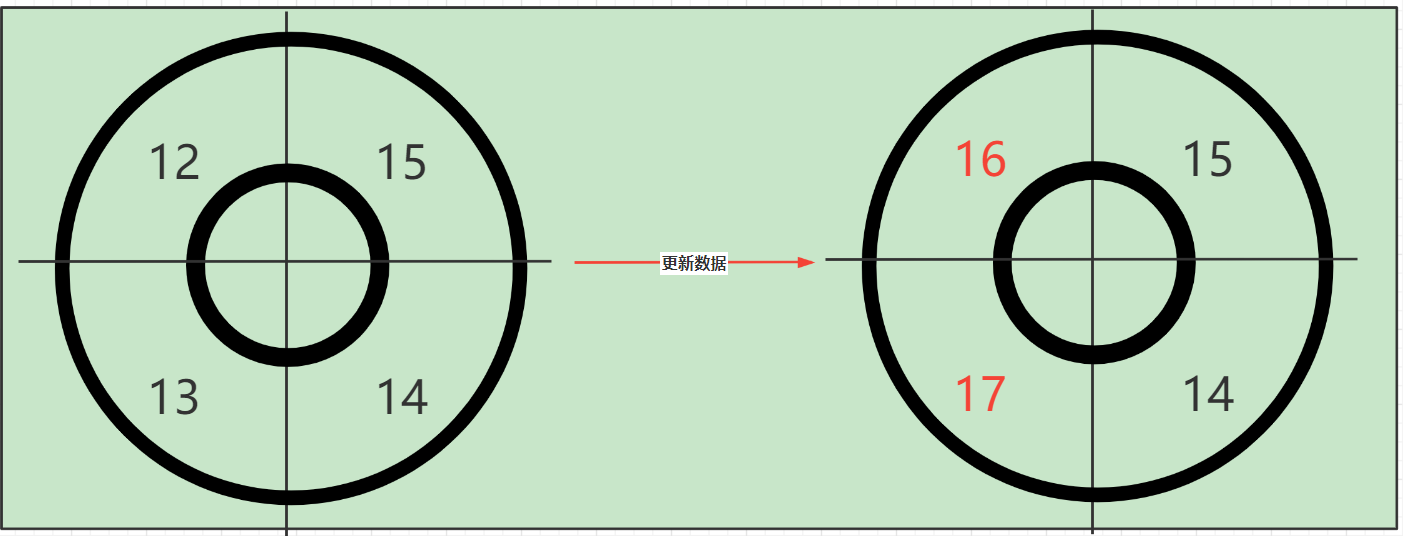
// 替换掉老的样本窗口return resetWindowTo(old, windowStart);//------------------------------------------------------------// BucketLeapArray.resetWindowTo@Overrideprotected WindowWrap<MetricBucket> resetWindowTo(WindowWrap<MetricBucket> w, long startTime) { // Update the start time and reset value. // 更新窗口起始时间 w.resetTo(startTime); // 将多维度统计数据清零 w.value().reset(); return w;}更新数据分析
public MetricBucket reset() { // 将每个维度的统计数据清零 for (MetricEvent event : MetricEvent.values()) { counters[event.ordinal()].reset(); } initMinRt(); return this;}最后我们再来看一下具体是那个维度,其实是通过维度
@Overridepublic void addPass(int count) { // 获取当前时间点所在的样本窗口 WindowWrap<MetricBucket> wrap = data.currentWindow(); // 将当前请求的计数量添加到当前样本窗口的统计数据中 wrap.value().addPass(count);}//----------------------------------------public void addPass(int n) { add(MetricEvent.PASS, n);}
4.Sentinel滑动时间窗口数据统计解析#
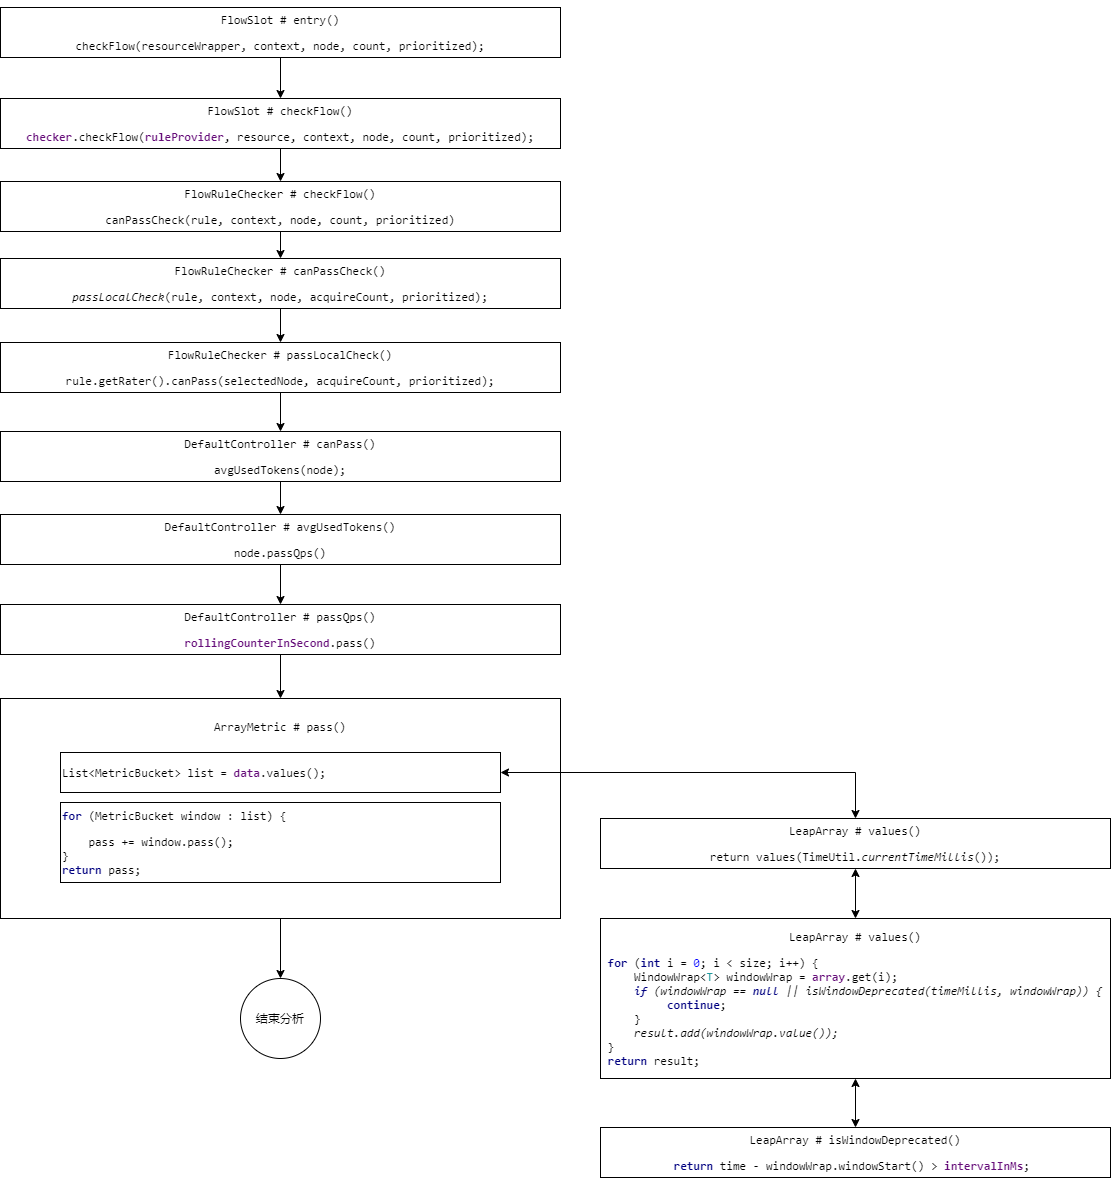
整体流程图:
分析源码:
入口我们就从限流的Slot:FlowSlot的entry方法入手:
@Overridepublic void entry(Context context, ResourceWrapper resourceWrapper, DefaultNode node, int count, boolean prioritized, Object... args) throws Throwable { //检测并且应用流控规则 checkFlow(resourceWrapper, context, node, count, prioritized); //触发下一个Slot fireEntry(context, resourceWrapper, node, count, prioritized, args);}void checkFlow(ResourceWrapper resource, Context context, DefaultNode node, int count, boolean prioritized) throws BlockException { // 从这里进入 checker.checkFlow(ruleProvider, resource, context, node, count, prioritized);}checkFlow方法里面找到遍历所有规则的canPassCheck方法然后在进入canPass方法,找到DefaultController对应实现,快速失败的流控效果,我们从这里来看,这里我们要关注的是avgUsedTokens方法,这个方法实际上就是获取当前时间窗里面的已经统计的数据
@Overridepublic boolean canPass(Node node, int acquireCount, boolean prioritized) { //获取当前node节点的线程数或者请求通过的qps总数 // 获取当前时间窗已经统计的数据 int curCount = avgUsedTokens(node); //当前请求数(请求的令牌)+申请总数是否(已经消耗的令牌)>该资源配置的总数(阈值) // 以前的数据+新的数据 if (curCount + acquireCount > count) { if (prioritized && grade == RuleConstant.FLOW_GRADE_QPS) { long currentTime; long waitInMs; currentTime = TimeUtil.currentTimeMillis(); waitInMs = node.tryOccupyNext(currentTime, acquireCount, count); if (waitInMs < OccupyTimeoutProperty.getOccupyTimeout()) { node.addWaitingRequest(currentTime + waitInMs, acquireCount); node.addOccupiedPass(acquireCount); sleep(waitInMs); // PriorityWaitException indicates that the request will pass after waiting for {@link @waitInMs}. throw new PriorityWaitException(waitInMs); } } return false; } return true;}所以这里我们跟进一下,看如何获取已经统计的数据
private int avgUsedTokens(Node node) { // 如果没有选出node,代表没有做统计工作,直接返回0 if (node == null) { return DEFAULT_AVG_USED_TOKENS; } // 判断阈值类型,如果为QPS,则返回当前统计的QPS // 如果为线程数,则返回当前的线程数总量 return grade == RuleConstant.FLOW_GRADE_THREAD ? node.curThreadNum() : (int)(node.passQps());}这里实际上就是判断阈值类型,我们这里看QPS类型的统计
@Overridepublic double passQps() { // rollingCounterInSecond.pass() 当前时间窗中统计的通过请求数量 // rollingCounterInSecond.getWindowIntervalInSec() 时间窗口长度 // 这两个数相除,计算出的就是QPS return rollingCounterInSecond.pass() / rollingCounterInSecond.getWindowIntervalInSec();}那么这里就需要查看pass方法,看是如何统计通过请求总量的
@Overridepublic long pass() { // 更新array中当前时间点所在样本窗口实例中的数据 data.currentWindow(); long pass = 0; // 将当前时间窗口中的所有样本窗口统计的value读取出来,并且记录 List<MetricBucket> list = data.values(); for (MetricBucket window : list) { pass += window.pass(); } return pass;}那么这里我们先跟踪values(),其实这里就是拿出没有过时有效的样本窗口数据
public List<T> values() { return values(TimeUtil.currentTimeMillis());}// ----------------------------public List<T> values(long timeMillis) { if (timeMillis < 0) { return new ArrayList<T>(); } int size = array.length(); List<T> result = new ArrayList<T>(size); // 这个遍历array中的每一个样本窗口实例 for (int i = 0; i < size; i++) { WindowWrap<T> windowWrap = array.get(i); // 若当前遍历实例为空或者已经过时,则继续下一个 if (windowWrap == null || isWindowDeprecated(timeMillis, windowWrap)) { continue; } result.add(windowWrap.value()); } return result;}判断位置过时判断逻辑:
public boolean isWindowDeprecated(long time, WindowWrap<T> windowWrap) { // 当前时间-样本窗口起始时间>时间窗口 说明过时了 return time - windowWrap.windowStart() > intervalInMs;}那么这里分析完成以后我们再回到ArrayMetric中的pass方法中,看遍历方法,就是将所有的有效并且是通过维度的数据统计出来进行求和,看是否超过阈值。
@Overridepublic long pass() { // 更新array中当前时间点所在样本窗口实例中的数据 data.currentWindow(); long pass = 0; // 将当前时间窗口中的所有样本窗口统计的value读取出来,并且记录 List<MetricBucket> list = data.values(); // 将List中所有pass维度的统计数据并取出求和 for (MetricBucket window : list) { // 通过维度 pass += window.pass(); } return pass;}


【推荐】国内首个AI IDE,深度理解中文开发场景,立即下载体验Trae
【推荐】编程新体验,更懂你的AI,立即体验豆包MarsCode编程助手
【推荐】抖音旗下AI助手豆包,你的智能百科全书,全免费不限次数
【推荐】轻量又高性能的 SSH 工具 IShell:AI 加持,快人一步
· winform 绘制太阳,地球,月球 运作规律
· 超详细:普通电脑也行Windows部署deepseek R1训练数据并当服务器共享给他人
· TypeScript + Deepseek 打造卜卦网站:技术与玄学的结合
· AI 智能体引爆开源社区「GitHub 热点速览」
· 写一个简单的SQL生成工具