SpringBoot
1.介绍
平时项目开发导入一堆依赖,配置一堆东西,它的作用用来简化spring的配置和开发
一起学学SpringBoot的起点:JavaConfig
拥有JavaConfig就可以将平时的配置文件当成一个类来处理
2.注解
2.1.原始方式
applicationContext.xml
<?xml version="1.0" encoding="UTF-8"?>
<beans xmlns="http://www.springframework.org/schema/beans"
       xmlns:xsi="http://www.w3.org/2001/XMLSchema-instance"
       xsi:schemaLocation="http://www.springframework.org/schema/beans http://www.springframework.org/schema/beans/spring-beans.xsd">

    <bean id="someBean" class="cn.wolfcode.javaconfig._01_ioc_xml.SomeBean"></bean>
</beans>
测试类
@RunWith(SpringRunner.class)
@ContextConfiguration("classpath:applicationContext.xml")
public class App {

    @Autowired
    private ApplicationContext ctx;

    @Test
    public void testBean(){
        SomeBean someBean = ctx.getBean("someBean",SomeBean.class);
        System.out.println(someBean);
    }
}
2.2.注解方式
AppConfig
@Configuration  //等价于classpath=applicationContext.xml
public class AppConfig {

    @Bean    //将方法的返回对象交给spring容器
    public SomeBean someBean(){
        return new SomeBean();
    }

}
测试类
@RunWith(SpringRunner.class)
@ContextConfiguration(classes = AppConfig.class)
public class App {

    @Autowired
    private ApplicationContext ctx;

    @Test
    public void testBean(){
        SomeBean someBean = ctx.getBean("someBean",SomeBean.class);
        System.out.println(someBean);
    }
}
2.3.扫描路径
AppConfig
@ComponentScan    //扫描组件,扫描指定包贴有版型标签的类,没指定就是同包与子包(basePackages = "cn.......")
@Configuration
public class AppConfig {

}
测试类
@RunWith(SpringRunner.class)
@ContextConfiguration(classes = AppConfig.class)
public class App {

    @Autowired
    private ApplicationContext ctx;

    @Test
    public void testBean(){
        SomeBean someBean = ctx.getBean("someBean",SomeBean.class);
        System.out.println(someBean);
    }
}
2.4.注解属性
AppConfig
@Configuration
public class AppConfig {

    /**
     *  id等于方法名
     *  name有点等于id
     *  Scope()默认单例
     */
    @Scope("singleton")
    @Bean(name="sb",initMethod = "init",destroyMethod = "destroy")
    public SomeBean someBean(){
        return new SomeBean();
    }
}
测试类
@RunWith(SpringRunner.class)
@ContextConfiguration(classes = AppConfig.class)
public class App {

    @Autowired
    private ApplicationContext ctx;

    @Test
    public void testBean(){
        SomeBean someBean = ctx.getBean("sb",SomeBean.class);
        System.out.println(someBean);
    }
}
2.5.DI
AppConfig
@ComponentScan
@Configuration
public class AppConfig {

}
OtherBean
@Component
public class OtherBean {

    @Override
    public String toString() {
        return "OtherBean{}";
    }
}
SomeBean
@Setter
@Getter
@ToString
@Component
public class SomeBean {

    @Autowired
    private OtherBean otherBean;
}
测试类
@RunWith(SpringRunner.class)
@ContextConfiguration(classes = AppConfig.class)
public class App {

    @Autowired
    private ApplicationContext ctx;

    @Test
    public void testBean(){
        SomeBean someBean = ctx.getBean("someBean",SomeBean.class);
        OtherBean otherBean = ctx.getBean("otherBean",OtherBean.class);
        System.out.println(someBean);
        System.out.println(otherBean);
    }
}
注意!
@Configuration
public class AppConfig {

    //需求:往someBean对象注入otherBean
    //步骤:获取SomeBean对象
    //步骤:获取OtherBean对象

    @Bean
    public OtherBean otherBean(){
        return new OtherBean();
    }

    /**
     *
     *  如果spring中存在otherBean对象,则不会执行示例方法,只会执行一次
     */
    @Bean
    public SomeBean someBean(){
        SomeBean someBean = new SomeBean();
        someBean.setOtherBean(otherBean());
        return someBean;
    }
}
注意!
@Bean      //注入bean还可以通过参数的方式
    public SomeBean someBean(OtherBean otherBean){
        SomeBean someBean = new SomeBean();
        someBean.setOtherBean(otherBean);
        return someBean;
    }
2.6.引入配置类
OtherConfig
@Configuration
public class OtherConfig {

    @Bean
    public OtherBean otherBean(){
        return new OtherBean();
    }
}
AppConfig
@Import(OtherConfig.class)
@Configuration
public class AppConfig {

    @Bean
    public SomeBean someBean(){
        return new SomeBean();
    }
}
测试类
@RunWith(SpringRunner.class)
@ContextConfiguration(classes = AppConfig.class)
public class App {

    @Autowired
    private ApplicationContext ctx;

    @Test
    public void testBean(){
        SomeBean someBean = ctx.getBean("someBean",SomeBean.class);
        OtherBean otherBean = ctx.getBean("otherBean",OtherBean.class);
        System.out.println(someBean);
        System.out.println(otherBean);
    }
}
2.7.引入配置文件
AppConfig
@ImportResource("classpath:applicationContext.xml")
@Configuration
public class AppConfig {

    @Bean
    public SomeBean someBean(){
        return new SomeBean();
    }
}
测试类
@RunWith(SpringRunner.class)
@ContextConfiguration(classes = AppConfig.class)
public class App {

    @Autowired
    private ApplicationContext ctx;

    @Test
    public void testBean(){
        SomeBean someBean = ctx.getBean("someBean",SomeBean.class);
        OtherBean otherBean = ctx.getBean("otherBean",OtherBean.class);
        System.out.println(someBean);
        System.out.println(otherBean);
    }
}
2.8.引入资源文件
AppConfig
@PropertySource("classpath:db.properties")
@Configuration
public class AppConfig{

    @Value("${jdbc.driverClassName}")
    private String driverClassName;

    @Value("${jdbc.url}")
    private String url;

    @Value("${jdbc.username}")
    private String username;

    @Value("${jdbc.password}")
    private String password;

    //@Autowired
    //private Environment ev;


    @Bean
    public MyDataSource myDataSource(){
        MyDataSource myDataSource = new MyDataSource();
        myDataSource.setDriverClassName(driverClassName);
        myDataSource.setUrl(url);
        myDataSource.setUsername(username);
        myDataSource.setPassword(password);
        return myDataSource;
    }
    //@Bean
    //public MyDataSource myDataSource(){
    //    MyDataSource myDataSource = new MyDataSource();
    //    myDataSource.setDriverClassName(ev.getProperty("driverClassName"));
    //    myDataSource.setUrl(ev.getProperty("url"));
    //    myDataSource.setUsername(ev.getProperty("username"));
    //    myDataSource.setPassword(ev.getProperty("password"));
    //    return myDataSource;
    //}
}
测试类
@RunWith(SpringRunner.class)
@ContextConfiguration(classes = AppConfig.class)
public class App {

    @Autowired
    private ApplicationContext ctx;

    @Test
    public void testBean(){
        MyDataSource myDataSource = ctx.getBean("myDataSource",MyDataSource.class);
        System.out.println(myDataSource);
    }
}
3.入门案例
pom.xml
<?xml version="1.0" encoding="UTF-8"?>
<project xmlns="http://maven.apache.org/POM/4.0.0"
         xmlns:xsi="http://www.w3.org/2001/XMLSchema-instance"
         xsi:schemaLocation="http://maven.apache.org/POM/4.0.0 http://maven.apache.org/xsd/maven-4.0.0.xsd">
    <modelVersion>4.0.0</modelVersion>

    <groupId>org.example</groupId>
    <artifactId>spring-demo</artifactId>
    <version>1.0-SNAPSHOT</version>
    <packaging>jar</packaging>

    <parent>
        <groupId>org.springframework.boot</groupId>
        <artifactId>spring-boot-starter-parent</artifactId>
        <version>2.4.3</version>
        <relativePath/>
    </parent>

    <dependencies>
        <dependency>
            <groupId>org.springframework.boot</groupId>
            <artifactId>spring-boot-starter-web</artifactId>
        </dependency>
    </dependencies>


</project>
App
@SpringBootApplication
public class App {
    public static void main(String[] args) {
        SpringApplication.run(App.class,args);
    }

}
1.解疑
web打包不应该是war,为什么是jar
SpringBoot将猫内嵌进去了(将Tmocat以编码的形式),将部署,启动,运行一体化,不按照Tomcat原来的规则
pom.xml文件中继承的spring-boot-starter-parent有啥用
spring-boot-starter-parent其实是SpringBoot提供的工具工程,
当我们的项目继承这个项目工程,就自动成为springboot项目
同时只有继承这个项目工程,才有权利去使用springboot提供的方便程序员开发的工具集
pom.xml文件中导入的依赖spring-boot-starter-web又有啥用
为了使用springboot提供的部分功能,需要导入对应的依赖
springboot提供了很多依赖工具集
每个工具集都解决特定领域的依赖问题。springboot将这些依赖工具称为:启动器(组件)
spring-boot-starter-web即是springboot提供的web开发组件

工具集的为命名规则: spring-boot-starter-xxx。
如果是非springboot定制的启动器, 一般命名规则:xxx-spring-boot-starter

spring-boot-starter: 核心启动器 , 提供了自动配置,日志和YAML配置支持
启动类App头顶上的@SpringBootApplication注解做了什么
这涉及springboot的自动装配原理
SSM写项目需要
---------------------------------
1.导入依赖(这个依旧需要)
2.配置前端控制器
3.编写控制器(这个依旧需要)
4.配置扫描包路径
5.启动Tomcat
---------------------------------
@SpringBootConfiguration(说明带有SpringBootApplication注解的类是配置类)
@ComponentScan(说明带有SpringBootApplication注解的类拥有扫描包的功能)

@EnableAutoConfiguration(在spring眼中,配置也是一个对象)
通过这个注解,spring可以通过添加的依赖去猜测如何配置spring

默认配置在哪里定义?
为何依赖已引入就触发?

@Import(AutoConfigurationImportSelector.class)

一堆默认配置的文件:spring.factories

@ConditionalOnWebApplication(type = Type.SERVLET)         web环境
@ConditionalOnClass({ Servlet.class, DispatcherServlet.class, WebMvcConfigurer.class })    是否导入依赖
@ConditionalOnMissingBean(WebMvcConfigurationSupport.class)      自己手动配置

总结:
EnableAutoConfiguration里面有个引入了AutoConfigurationImportSelector字节码可以去加载
spring.factories文件,这个文件存放了spring的各种默认配置类,
而里面的配置类激活条件是需要引入相应的依赖,引入了依赖就有了该依赖下的的字节码对象
激活后的配置类会去创建该依赖需要的配置对象。
没有配置tomcat,没有设置端口服务器怎么来,又怎么启动的
springboot拥有内嵌的Tomcat,默认8080,可以通过properties修改
main方法中SpringApplication.run(..)又是什么情况
main方法作为程序的入口,执行run方法可以去解析该类头顶上SpringBootApplication注解
从而实现功能
2.项目部署
部署插件
<!-- pom.xml中添加插件 -->
<build>
    <plugins>
        <!-- SpringBoot打包插件 -->
        <plugin>
            <groupId>org.springframework.boot</groupId>
            <artifactId>spring-boot-maven-plugin</artifactId>
        </plugin>
    </plugins>
</build>
配图解析
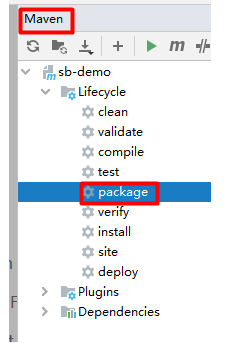
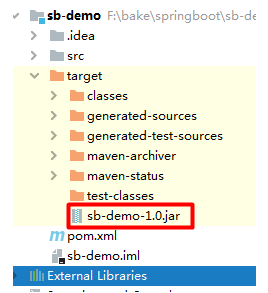
运行命令
打开cmd命令框, 运行: java -jar xxx.jar
如果想修改项目端口, 可以: java -jar xxx.jar   --server.post=8888
3.热部署
插件
<!-- SpringBoot热部署插件 -->
<dependency>
    <groupId>org.springframework.boot</groupId>
    <artifactId>spring-boot-devtools</artifactId>
</dependency>
4.环境更换
application.properties          spring.properties.active = dev
application-dev.properties      service.port = 81
application-pro.properties      service.port = 82
application-test.properties     service.port = 83
5.参数配置
解释:往项目传递一些配置参数
参数又分为默认配置(jar提供)和自定义配置(自己手写,比如数据库连接)
命令行参数的优先级最高
5.1.文件格式
application.properties
server.port=80
server.session-timeout=30
server.tomcat.uri-encoding=UTF-8

spring.datasource.url = jdbc:mysql://localhost:3306/crm
spring.datasource.username = root
spring.datasource.password = mymysql
spring.datasource.driverClassName = com.mysql.jdbc.Driver
yaml后面的等号注意有空格
server:
  port: 80
  session-timeout: 30
  tomcat.uri-encoding: UTF-8

spring:
  datasource:
    url : jdbc:mysql://localhost:3306/crm
    username : root
    password : mymysql
    driverClassName : com.mysql.jdbc.Driver
5.2.properties优先级
- 项目/config/application.properties (优先级最高)
- 项目/application.properties
- 项目classpath:config/application.properties
- classpath:application.properties
一般都在classpath:application.properties做配置,其他方式不使用
5.3.批量绑定属性
自定义类
@ConfigurationProperties("jdbc") //相当于 @ConfigurationProperties(prefix="jdbc")
配置类
@Bean
@ConfigurationProperties("jdbc")
6.整合
6.1.连接数据库
依赖
<!-- MySQL驱动 -->
<dependency>
    <groupId>mysql</groupId>
    <artifactId>mysql-connector-java</artifactId>
</dependency>
<dependency>
    <groupId>org.springframework.boot</groupId>
    <artifactId>spring-boot-starter-jdbc</artifactId>
</dependency>
配置参数
spring.datasource.driver-class-name=com.mysql.cj.jdbc.Driver
spring.datasource.url=jdbc:mysql:///springboot?useUnicode=true&characterEncoding=utf8&serverTimezone=GMT%2B8
spring.datasource.username=root
spring.datasource.password=admin
默认HikariDataSource

原先的方式
<!--    关联db.properties-->
    <context:property-placeholder location="classpath:db.properties"/>

    <!--    数据库连接池-->
    <bean id="dataSource" class="com.alibaba.druid.pool.DruidDataSource" init-method="init" destroy-method="close">
        <property name="driverClassName" value="${jdbc.driverClassName}"/>
        <property name="url" value="${jdbc.url}"/>
        <property name="username" value="${jdbc.username}"/>
        <property name="password" value="${jdbc.password}"/>
    </bean>
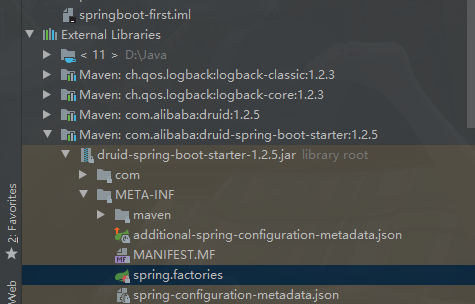
6.2.Druid
依赖
<!-- druid -->
<dependency>
    <groupId>com.alibaba</groupId>
    <artifactId>druid-spring-boot-starter</artifactId>
    <version>1.2.5</version>
</dependency>
原先Druid
spring.datasource.type=com.alibaba.druid.pool.DruidDataSource
jar包

6.3.MyBatis
逆向
<build>
        <plugins>
            <plugin>
                <groupId>org.mybatis.generator</groupId>
                <artifactId>mybatis-generator-maven-plugin</artifactId>
                <version>1.3.2</version>
                <configuration>
                    <verbose>true</verbose>
                    <overwrite>false</overwrite>
                </configuration>
                <dependencies>
                    <dependency>
                        <groupId>mysql</groupId>
                        <artifactId>mysql-connector-java</artifactId>
                        <version>5.1.45</version>
                    </dependency>
                </dependencies>
            </plugin>
        </plugins>
    </build>
依赖
<!--mybatis集成到SpringBoot中的依赖-->
<dependency>
    <groupId>org.mybatis.spring.boot</groupId>
    <artifactId>mybatis-spring-boot-starter</artifactId>
    <version>2.1.4</version>
</dependency>
扫描
@SpringBootApplication
@MapperScan("cn.wolfcode.car.mapper")
public class App {
    public static void main(String[] args) {
        SpringApplication.run(App.class,args);
    }
}
属性配置
#mybatis.configuration.lazy-loading-enabled=true
#mybatis.configuration.lazy-load-trigger-methods=clone
#mybatis.mapper-locations=classpath:cn/wolfcode/*/mapper/*Mapper.xml
#mybatis.type-aliases-package=cn.wolfcode.sb.domain

#打印SQL日志
logging.level.cn.wolfcode.crm.mapper=trace
6.4.事务
依赖
<dependency>
    <groupId>org.springframework.boot</groupId>
    <artifactId>spring-boot-starter-aop</artifactId>
</dependency>
再贴@Transactional,性能优化就在后面加上(readOnly = true)
7.页面处理
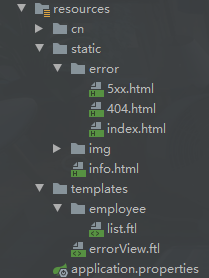
7.1.资源路径
默认下,Springboot会从classpath下的/static找,还有其他位置
需要修改的话可以通过properties来设置
7.2.集成
依赖
<!-- SpringBoot集成FreeMarker的依赖 -->
<dependency>
    <groupId>org.springframework.boot</groupId>
    <artifactId>spring-boot-starter-freemarker</artifactId>
</dependency>
properties
#一般我们会做3个配置,其余默认即可
#暴露session对象的属性
spring.freemarker.expose-session-attributes=true
#配置为传统模式,空值自动处理
spring.freemarker.settings.classic_compatible=true
#重新指定模板文件后缀 springboot 2.2.x 后 默认后缀为 .ftlh
spring.freemarker.suffix=.ftl
7.3.错误页面
404
SpringBoot默认情况下,会把所有错误都交给BasicErrorController类完成处理,错误的视图导向到
classpath:/static/error/ 和 classpath:/templates/error/ 路径上,http状态码就是默认视图的名称
统一异常:针对出现特定异常从而显示特点的页面
@ControllerAdvice //控制器增强器
public class ExceptionControllerAdvice {
    @ExceptionHandler(RuntimeException.class) //处理什么类型的异常
    public String handlException(RuntimeException e, Model model) {
        return "errorView"; //错误页面视图名称
    }
}
8.拦截器
拦截器类跟之前SSM一样
springboot的配置
@Configuration
public class MvcJavaConfig implements WebMvcConfigurer {

    @Autowired
    private LoginInterceptor loginInterceptor;

    @Autowired
    private PermissionInterceptor permissionInterceptor;

    public void addInterceptors(InterceptorRegistry registry) {
        // 注册登录拦截器
        registry.addInterceptor(loginInterceptor)
            // 对哪些资源起过滤作用
            .addPathPatterns("/**")
            // 对哪些资源起排除作用
            .excludePathPatterns("/loginUser","/login.html","/css/**","/js/**");

    }
}
9.日志
springboot默认选择Logback作为日志框架
日志框架用于定义输出环境,比如控制台,文件和数据库,可以方便定义输出格式和输出级别
默认格式为
时间 日志级别 线程ID 线程名称 日志类 日志说明
默认级别为info
**trace** < debug < **info** < warn < **error**
使用日志输出步骤
这里传入当前类的作用是方便输出日志时可以清晰地看到该日志信息是属于哪个类的
private static final Logger log = LoggerFactory.getLogger(当前类.class);
使用注解简化
@Slf4j
@Service
public class xxxxxx
日志输出方法
log.info(...);
log.error(...);
...
//输出日志中有变量可以使用{}作为占位符
log.info("删除id为{}的数据", id);
10.综合案例
10.1.继承springboot
<parent>
    <groupId>org.springframework.boot</groupId>
    <artifactId>spring-boot-starter-parent</artifactId>
    <version>2.4.3</version>
    <relativePath/>
</parent>
10.2.添加环境
<dependency>
    <groupId>org.springframework.boot</groupId>
    <artifactId>spring-boot-starter-web</artifactId>
</dependency>
10.3.其他流程
添加application.properties
编写启动类App
创建static静态资源目录
创建templates模板目录
准备数据模型
10.4.数据库
Druid
<dependency>
    <groupId>mysql</groupId>
    <artifactId>mysql-connector-java</artifactId>
</dependency>
<dependency>
    <groupId>com.alibaba</groupId>
    <artifactId>druid-spring-boot-starter</artifactId>
    <version>1.2.5</version>
</dependency>
<dependency>
    <groupId>org.springframework.boot</groupId>
    <artifactId>spring-boot-starter-jdbc</artifactId>
</dependency>
数据库四要素
spring.datasource.driver-class-name=com.mysql.cj.jdbc.Driver
spring.datasource.url=jdbc:mysql://192.168.126.129:3306/springboot?useUnicode=true&characterEncoding=utf8&serverTimezone=GMT%2B8
spring.datasource.username=root
spring.datasource.password=admin
mybatis
<dependency>
    <groupId>org.mybatis.spring.boot</groupId>
    <artifactId>mybatis-spring-boot-starter</artifactId>
    <version>2.1.4</version>
</dependency>
扫描
@SpringBootApplication
@MapperScan("cn.wolfcode.crm.mapper")
public class App {
    public static void main(String[] args) {
        SpringApplication.run(App.class, args);
    }
}
mybatis日志功能
logging.level.cn.wolfcode.sb.mapper=trace
引入事务依赖,然后再需要事务的类上贴@Transactional
<dependency>
    <groupId>org.springframework.boot</groupId>
    <artifactId>spring-boot-starter-aop</artifactId>
</dependency>
10.5.页面
依赖
<dependency>
    <groupId>org.springframework.boot</groupId>
    <artifactId>spring-boot-starter-freemarker</artifactId>
</dependency>
配置属性
#一般我们会做3个配置,其余默认即可
#暴露session对象的属性
spring.freemarker.expose-session-attributes=true
#配置为传统模式,空值自动处理
spring.freemarker.settings.classic_compatible=true
#重新指定模板文件后缀 springboot 2.2.x 后 默认后缀为 .ftlh
spring.freemarker.suffix=.ftl
10.6.分页
依赖
<dependency>
    <groupId>com.github.pagehelper</groupId>
    <artifactId>pagehelper-spring-boot-starter</artifactId>
    <version>1.3.0</version>
</dependency>
后面跟SSM项目步骤一样

