shiro
1.介绍
权限管理(RBAC:Role Based Access Control)框架:某个用户(认证)扮演什么角色(分配)被允许做什么事情(鉴权)
常见框架:Apache Shiro;Spring Security
学习步骤:概念、架构、代码、运用
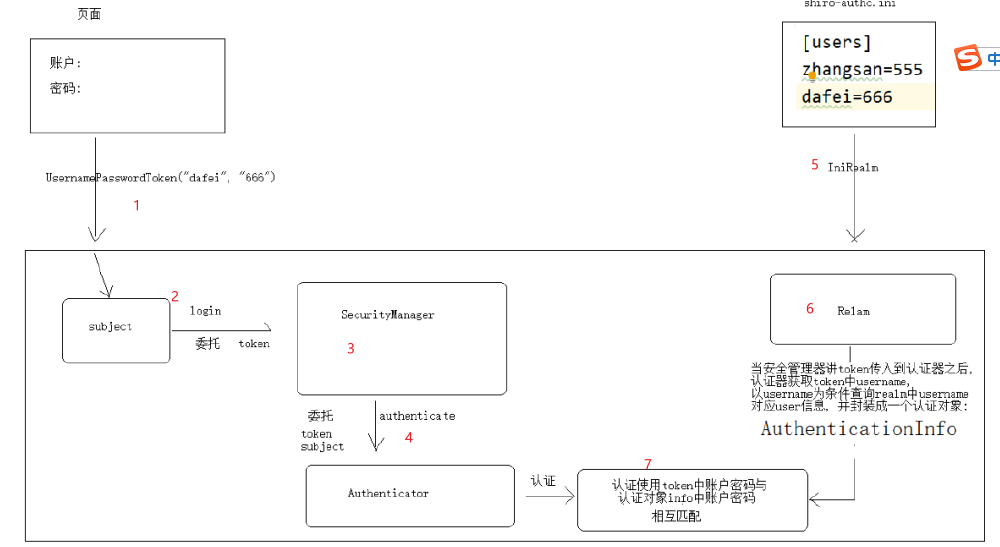
2.架构

3.认证
3.1.ini
#用户的身份、凭据
[users]
zhangsan=555
dafei=666
3.2.api
@Test
public void testLogin(){
    //创建Shiro的安全管理器,是shiro的核心
    DefaultSecurityManager securityManager = new DefaultSecurityManager();
    //加载shiro.ini配置,得到配置中的用户信息(账号+密码)
    IniRealm iniRealm = new IniRealm("classpath:shiro-authc.ini");
    securityManager.setRealm(iniRealm);

    //把安全管理器注入到当前的JavaSE环境中
    SecurityUtils.setSecurityManager(securityManager);
    //无论有无登录都可以获取到subject主体对象,但是判断登录状态需要利用里面的属性来判断
    Subject subject = SecurityUtils.getSubject();
    System.out.println("认证状态:"+subject.isAuthenticated());

    //创建令牌(携带登录用户的账号和密码)
    UsernamePasswordToken token = new UsernamePasswordToken("dafei","666");
    //执行登录操作(将用户的和 ini 配置中的账号密码做匹配)
    subject.login(token);
    System.out.println("认证状态:"+subject.isAuthenticated());
    //登出
    //subject.logout();
    //System.out.println("认证状态:"+subject.isAuthenticated());
}
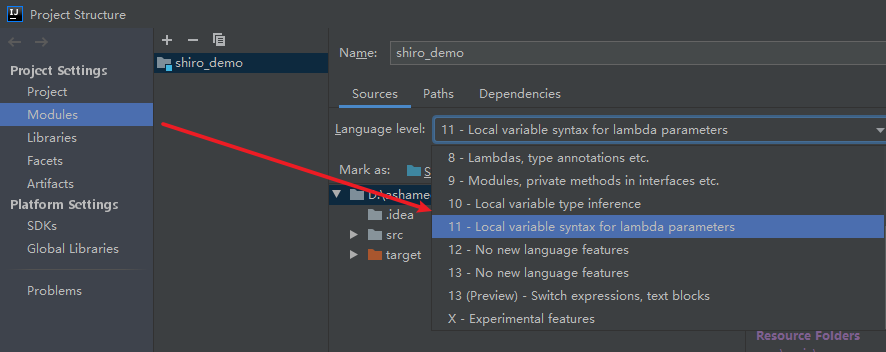
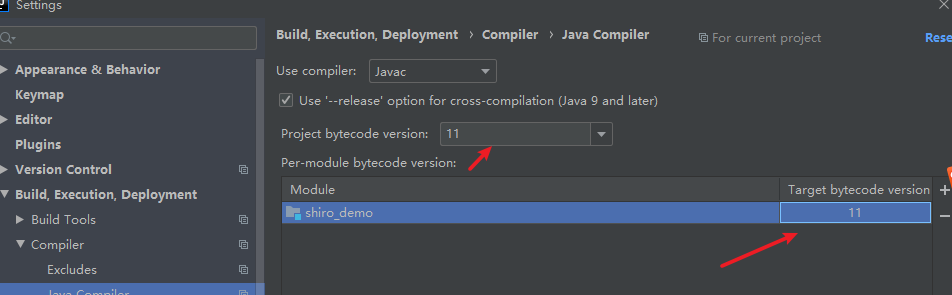
3.3.设置版本
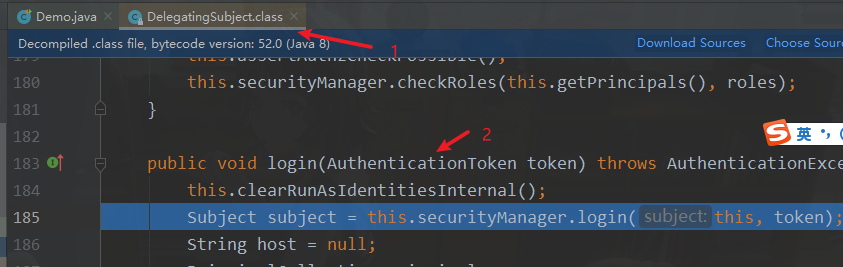
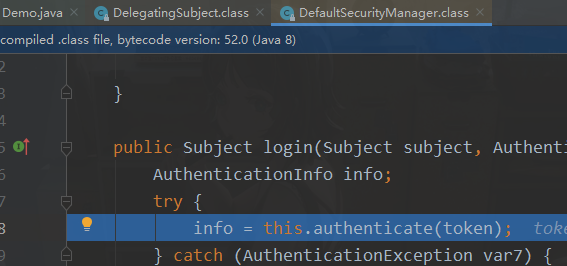
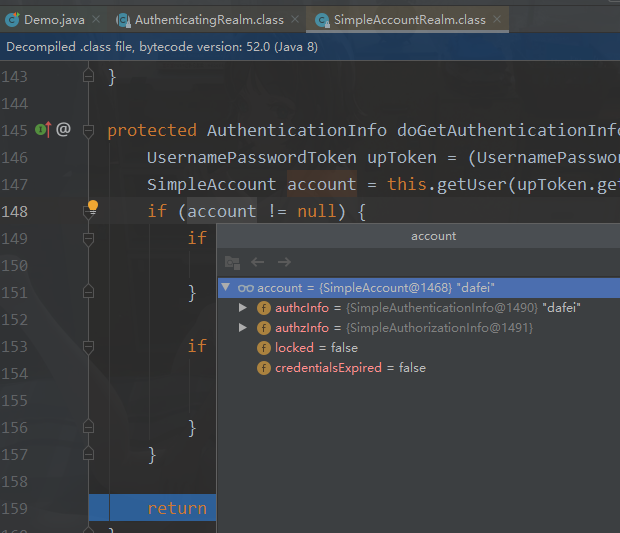
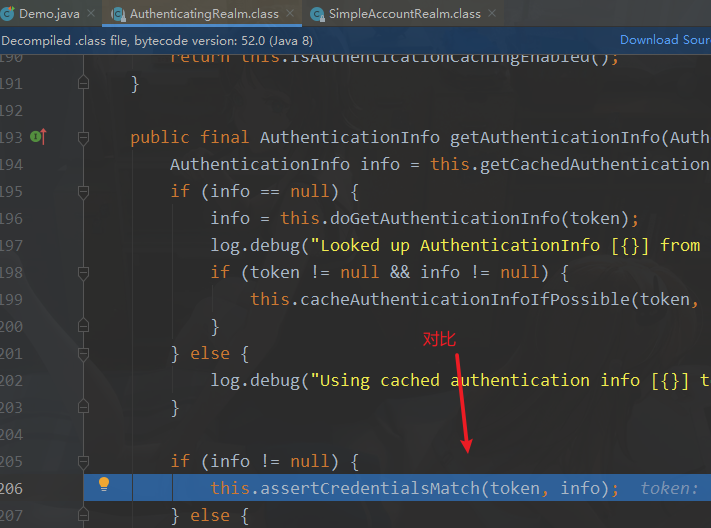
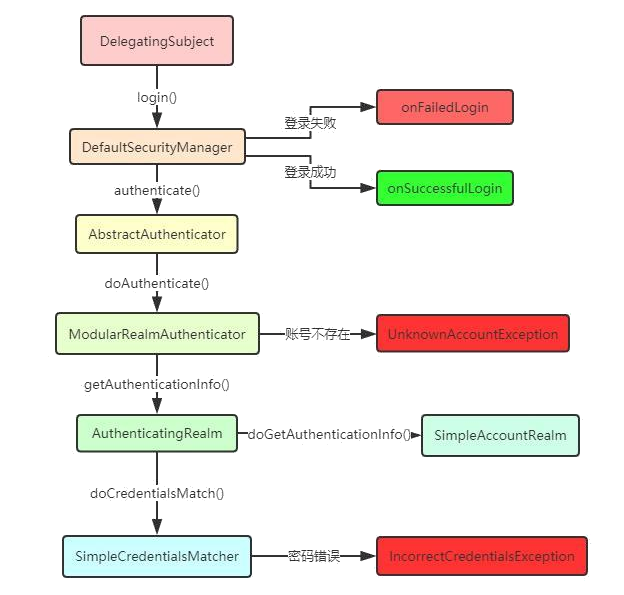
3.4.源码分析
核心控制器
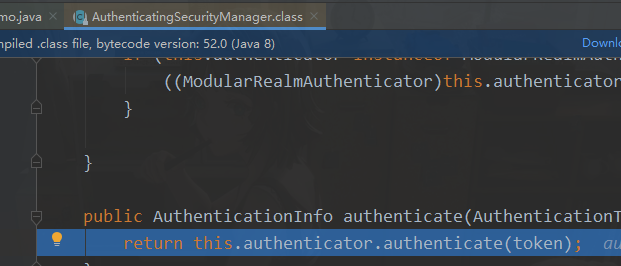
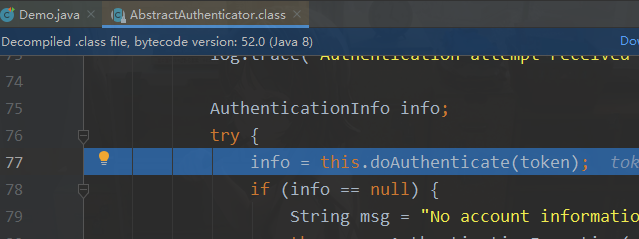

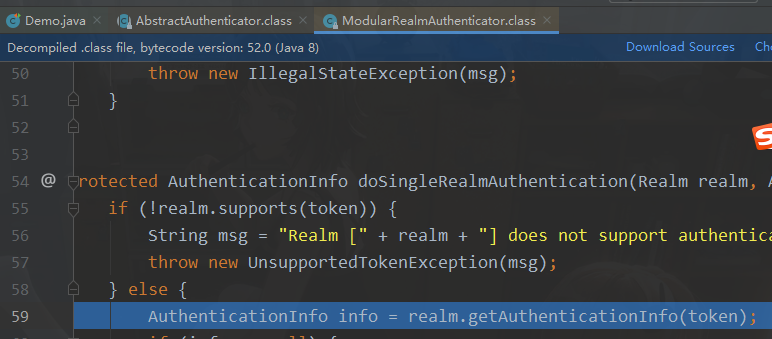
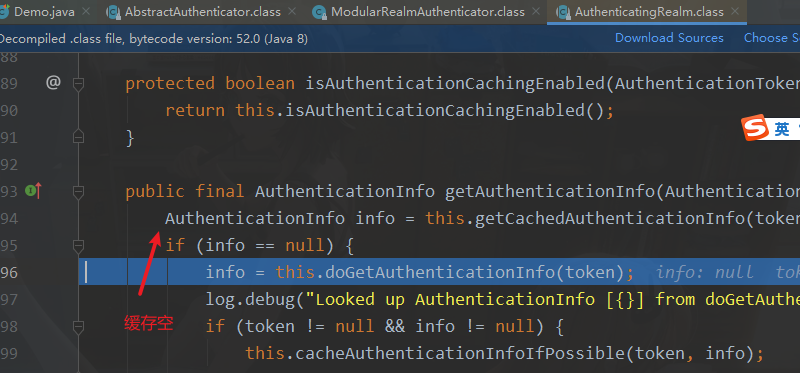
总结
4.自定义Realm
public class EmployeeRealm extends AuthorizingRealm {
    //提供认证信息
    protected AuthenticationInfo doGetAuthenticationInfo(AuthenticationToken token)
        throws AuthenticationException {
         //页面传入的账号
        String name = (String) token.getPrincipal();
        //暂且使用假数据来模拟数据库中真实的账号和密码
        Employee employee = new Employee();
        employee.setName("admin");
        employee.setPassword("1");
        //获取token中需要登录的账号名
        Object username = token.getPrincipal();
        //如果账号存在,则返回一个 AuthenticationInfo 对象
        if(username.equals(employee.getName())){
            return new SimpleAuthenticationInfo(
                employee,//身份对象,与主体subject绑定在一起的对象,暂时无用但后续要用
                employee.getPassword(),//该账号真正的密码,传给shiro做密码校验的
                this.getName()//当前 Realm 的名称,暂时无用,不需纠结
            );
        }
        return null;
    }
	//提供授权信息
    protected AuthorizationInfo doGetAuthorizationInfo(PrincipalCollection principals) {
        return null;
    }
}
5.web项目
web.xml
<filter>
        <filter-name>shiroFilter</filter-name>
        <filter-class>
            org.springframework.web.filter.DelegatingFilterProxy
        </filter-class>
    </filter>
    <filter-mapping>
        <filter-name>shiroFilter</filter-name>
        <url-pattern>/*</url-pattern>
    </filter-mapping>
mvc.xml记得导入shiro.xml
shiro.xml
<bean id="securityManager" class="org.apache.shiro.web.mgt.DefaultWebSecurityManager"> </bean>
<bean id="shiroFilter"
          class="org.apache.shiro.spring.web.ShiroFilterFactoryBean">
        <!--引用指定的安全管理器-->
        <property name="securityManager" ref="securityManager"/>
        <!--shiro默认的登录地址是/login.jsp 现在要指定我们自己的登录页面地址-->
        <property name="loginUrl" value="/login.html"/>
        <!--路径对应的规则-->
        <property name="filterChainDefinitions">
            <value>
                /userLogin=anon
                /css/**=anon
                /js/**=anon
                /img/**=anon
                /upload/**=anon
                /userLogout=logout
                /**=authc
            </value>
        </property>
    </bean>
自义定Realm
public class CarBusinessRealm extends AuthorizingRealm {\

    @Override
    protected AuthenticationInfo doGetAuthenticationInfo(AuthenticationToken authenticationToken) throws AuthenticationException {

        String username = (String) authenticationToken.getPrincipal();

        Employee employee = employeeService.selectByUsername(username);

        if(employee == null){
            return null;
        }
        return new SimpleAuthenticationInfo(employee,employee.getPassword(),this.getName());
    }
}
shiro.xml
<bean id="carBusinessRealm" class="cn.wolfcode.shiro.CarBusinessRealm"></bean>

    <bean id="securityManager" class="org.apache.shiro.web.mgt.DefaultWebSecurityManager">
        <property name="realm" ref="carBusinessRealm"/>
<!--        <property name="cacheManager" ref="cacheManager"/>-->
    </bean>
token
@RequestMapping("/userLogin")
    @ResponseBody
    public JsonResult login(String username, String password) {
        try {
            UsernamePasswordToken token = new UsernamePasswordToken(username, password);
            SecurityUtils.getSubject().login(token);
            return new JsonResult();
        } catch (UnknownAccountException e) {
            return new JsonResult(false, "账号不存在");
        } catch (IncorrectCredentialsException e) {
            return new JsonResult(false, "密码错误");
        } catch (Exception e) {
            e.printStackTrace();
            return new JsonResult(false, "登录异常,请联系管理员");
        }
    }
6.鉴权
6.1.ini
#用户的身份、凭据、角色
[users]
zhangsan=555,hr,seller
dafei=666,seller

#角色与权限信息
[roles]
hr=employee:list,employee:delete
seller=customer:list,customer:save
6.2.api
@Test
public void testAuthor(){
    //创建Shiro的安全管理器,是shiro的核心
    DefaultSecurityManager securityManager = new DefaultSecurityManager();
    //加载shiro.ini配置,得到配置中的用户信息(账号+密码)
    IniRealm iniRealm = new IniRealm("classpath:shiro-author.ini");
    securityManager.setRealm(iniRealm);
    //把安全管理器注入到当前的环境中
    SecurityUtils.setSecurityManager(securityManager);
    //无论有无登录都可以获取到subject主体对象,但是判断登录状态需要利用里面的属性来判断
    Subject subject = SecurityUtils.getSubject();
    System.out.println("认证状态:"+subject.isAuthenticated());
    //创建令牌(携带登录用户的账号和密码)
    UsernamePasswordToken token = new UsernamePasswordToken("dafei","666");
    //执行登录操作(将用户的和 ini 配置中的账号密码做匹配)
    subject.login(token);
    System.out.println("认证状态:"+subject.isAuthenticated());
    //登出
    //subject.logout();
    //System.out.println("认证状态:"+subject.isAuthenticated());

    //判断用户是否有某个角色
    System.out.println("role1:"+subject.hasRole("role1"));
    System.out.println("role2:"+subject.hasRole("role2"));
    System.out.println("role2:"+subject.hasRoles("role2","hr"));

    //是否同时拥有多个角色
    System.out.println("是否同时拥有role1和role2:"+subject.hasAllRoles(Arrays.asList("role1", "role2")));

    //check开头的是没有返回值的,当没有权限时就会抛出异常
    subject.checkRole("hr");

    //判断用户是否有某个权限
    System.out.println("user:delete:"+subject.isPermitted("user:delete"));
    subject.checkPermission("user:delete");
}
6.3.流程分析
从Token获取的username查询出员工对象后,根据员工对象的id去查询角色和权限
7.自定义Realm
@Override
    protected AuthorizationInfo doGetAuthorizationInfo(PrincipalCollection principals) {

        //获取用户名字,根据名字获取id
        Employee employee = (Employee) principals.getPrimaryPrincipal();

        //根据名字或id查询数据库,获取角色权限
        //List<String> roles = roleService.queryById(employee.getId());
        //List<String> permission = permissionService.queryById(employee.getId());
        List<String> roles = Arrays.asList("empmgr","deptmgr");
        List<String> permissions = Arrays.asList("employee:list","department:list");

        //将角色权限进行封装
        SimpleAuthorizationInfo info = new SimpleAuthorizationInfo();
        info.addRoles(roles);
        info.addStringPermissions(permissions);
        return info;
    }
8.Web项目
访问的方法上面贴上权限注解
shiro.xml配置注解生效
<aop:config />
    <!-- Pointcut advisor通知器, 会匹配所有加了shiro权限注解的方法 -->
    <bean class="org.apache.shiro.spring.security.interceptor.AuthorizationAttributeSourceAdvisor">
        <property name="securityManager" ref="securityManager"/>
    </bean>
Realm
@Override
    protected AuthorizationInfo doGetAuthorizationInfo(PrincipalCollection principalCollection) {

        SimpleAuthorizationInfo info = new SimpleAuthorizationInfo();

        //获取用户对象
        Employee employee =(Employee)principalCollection.getPrimaryPrincipal();

        //获取用户对象的权限集合,角色集合
        List<String> roles = roleService.queryByEmpId(employee.getId());
        List<String> permissions = permissionService.selectByEmpId(employee.getId());


        //将权限集合和角色集合封装到info对象中
        //超管处理
        if(employee.isAdmin()){
            List<Role> roles1 = roleService.listAll();
            for (Role role : roles1) {
                info.addRole(role.getName());
            }

            info.addStringPermission("*:*");
            return info;
        }

        info.addRoles(roles);
        info.addStringPermissions(permissions);
        return info;

    }
9.统一异常
小知识:控制类增强可看成前置增强和后置增强,前值增强可用于日期格式化操作
@ExceptionHandler(AuthorizationException.class)
    public String exceptionHandler(AuthorizationException e, HandlerMethod method, HttpServletResponse response){
        e.printStackTrace(); //方便开发的时候找bug
        //如果原本控制器的方法是返回jsonresult数据,现在出异常也应该返回jsonresult
        //获取当前出现异常的方法,判断是否有ResponseBody注解,有就代表需要返回jsonresult
        if(method.hasMethodAnnotation(ResponseBody.class)){
            try {
                response.setContentType("application/json;charset=UTF-8");
                response.getWriter().print(JSON.toJSONString(new JsonResult(false,"没有权限操作!")));
            } catch (IOException e1) {
                e1.printStackTrace();
            }
            return null;
        }
        //如果原本控制器的方法是返回视图页面,现在也应该返回视图页面
        return "common/nopermission";
    }
10.权限加载
更改方法名上的注解
@RequiresPermissions(value={"employee:list", "员工列表"}, logical = Logical.OR)
reload
@Override
    public void reload() {
        //需求:通过程序自动生成权限数据,并保存到数据库
        //查询数据库中所有权限表达式
        List<String> permissions = permissionMapper.selectAllExpression();
        Map<RequestMappingInfo, HandlerMethod> map = handlerMapping.getHandlerMethods();
        //获取所有控制器的方法(@RequestMapping)
        Collection<HandlerMethod> methods = map.values();
        //遍历方法集合,获取到每一个方法HandlerMethod
        for (HandlerMethod method : methods) {

            RequiresPermissions requiredPermission = method.getMethodAnnotation(RequiresPermissions.class);
            if(requiredPermission==null){
                //跳过当前循坏,执行下一次循环
                continue;
            }

            String[] value = requiredPermission.value();
            String exp = value[0];
            String name = value[1];

            if(permissions.contains(exp)){
                continue;
            }

            Permission permission = new Permission();
            permission.setName(name);
            permission.setExpression(exp);
            permissionMapper.insert(permission);


            ////获取注解上的权限表达式
            //String expression = requiredPermission.expression();
            ////判断是否已经存在数据库
            //if(!permissions.contains(expression)){
            //    //不存在就封装为权限对象,并插入到数据
            //    Permission permission = new Permission();
            //    permission.setName(requiredPermission.name());
            //    permission.setExpression(expression);
            //    permissionMapper.insert(permission);
        }
    }
11.标签权限
11.1.拓展标签
告诉FreeMarker这种标签也要解析
更改mvc.xml配置的FreeMarker
public class ShiroFreeMarkerConfig extends FreeMarkerConfigurer {
    @Override
    public void afterPropertiesSet() throws IOException, TemplateException {
        //继承之前的属性配置,这不能省
        super.afterPropertiesSet();
        Configuration cfg = this.getConfiguration();
        cfg.setSharedVariable("shiro", new ShiroTags());//注册shiro 标签
    }
}
11.2.常用标签
authenticated 标签:已认证通过的用户。
<@shiro.authenticated> </@shiro.authenticated>
notAuthenticated 标签:未认证通过的用户。与 authenticated 标签相对。
<@shiro.notAuthenticated></@shiro.notAuthenticated>
principal 标签:输出当前用户信息,通常为登录帐号信息
后台是直接将整个员工对象作为身份信息的,所以这里可以直接访问他的 name 属性得到员工的姓名
<@shiro.principal property="name" />
对应realm中返回的SimpleAuthenticationInfo对象的第一个参数
new SimpleAuthenticationInfo(employee,employee.getPassword(),this.getName());
hasRole 标签:验证当前用户是否拥有该角色
<@shiro.hasRole name="admin">Hello admin!</@shiro.hasRole>
hasAnyRoles 标签:验证当前用户是否拥有这些角色中的任何一个,角色之间逗号分隔
<@shiro.hasAnyRoles name="admin,user,operator">Hello admin</@shiro.hasAnyRoles>
hasPermission 标签:验证当前用户是否拥有该权限
<@shiro.hasPermission name="department:delete">删除</@shiro.hasPermission>
12.加密
Hd5Hash类
Md5Hash hash = new Md5Hash(password,"wolcode",100);
验证密码
password = new Md5Hash(password,"wolcode",100).toString();
13.缓存
shiro-ehcache.xml
<?xml version="1.0" encoding="UTF-8"?>
<!--安全管理器-->
<!--安全管理器-->
<ehcache>
    <defaultCache
            maxElementsInMemory="1000"
            eternal="false"
            timeToIdleSeconds="600"
            timeToLiveSeconds="600"
            memoryStoreEvictionPolicy="LRU">
    </defaultCache>
</ehcache>
shiro.xml引入
<bean id="securityManager" class="org.apache.shiro.web.mgt.DefaultWebSecurityManager">
        <property name="realm" ref="carBusinessRealm"/>
        <property name="cacheManager" ref="cacheManager"/>
    </bean>

    <bean id="cacheManager" class="org.apache.shiro.cache.ehcache.EhCacheManager">
        <!-- 设置配置文件 -->
        <property name="cacheManagerConfigFile" value="classpath:shiro-ehcache.xml"/>
    </bean>

