

docker swarm 外部负载均衡(Haproxy+keepalived) +ingress
外部负载均衡(Haproxy+keepalived) +ingress
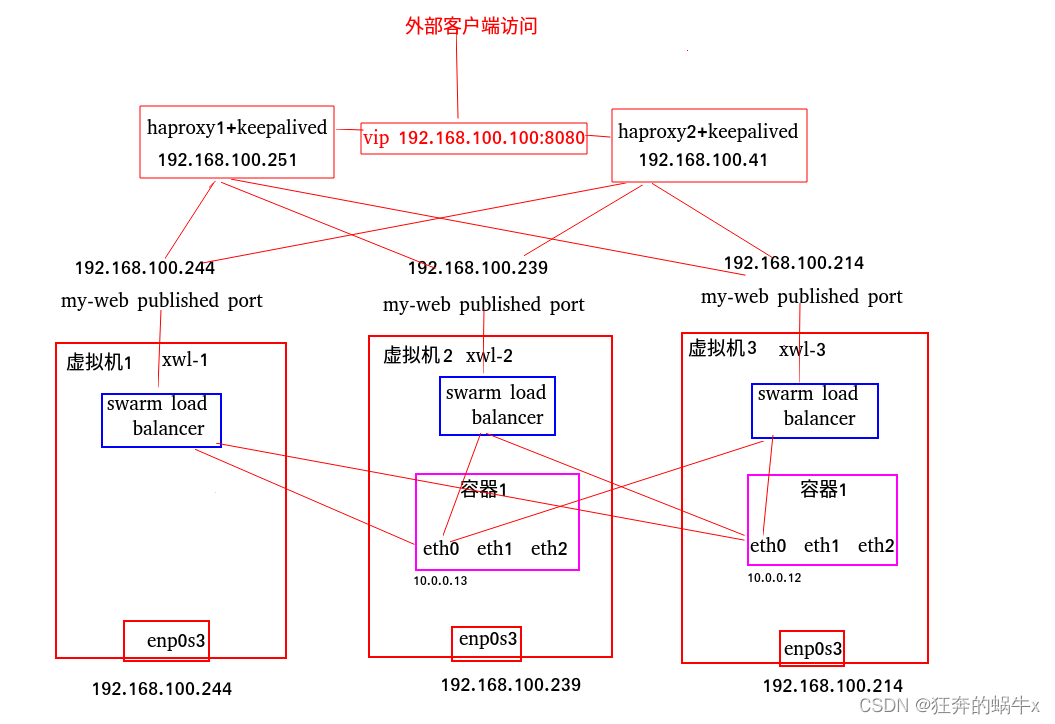
1.整体拓扑图(其它博客上的)
2.实例:

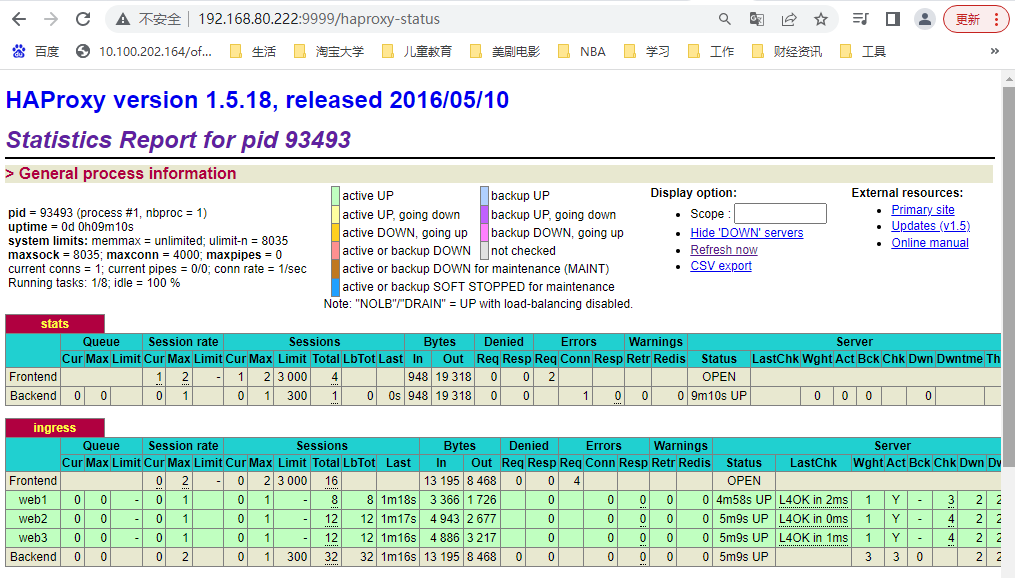
localhost7A 192.168.80.100     Haproxy+keepalived
localhost7B 192.168.80.110     Haproxy+keepalived
localhost7C 192.168.80.120     manager
localhost7D 192.168.80.130     manager
localhost7E 192.168.80.140     work


[root@localhost7A ~]# yum install keepalived   haproxy  -y

#keepalived主配置
[root@localhost7A ~]# cat  /etc/keepalived/keepalived.conf
global_defs {
   notification_email {
     root@localhost
   }
   notification_email_from root@localhost
   smtp_server 127.0.0.1
   smtp_connect_timeout 30
   router_id localhost7A
   vrrp_iptables
   vrrp_garp_interval 0
   vrrp_gna_interval 0
   vrrp_mcast_group4 224.0.0.18
}
vrrp_instance zzhz {
    state MASTER
    interface eth0
    virtual_router_id 51
    priority 95
    advert_int 2
    authentication {
        auth_type PASS
        auth_pass centos
    }
    virtual_ipaddress {
        192.168.80.222/24 dev eth0 label eth0:1
    }
}

#keepalived次配置
[root@localhost7B ~]# cat  /etc/keepalived/keepalived.conf
global_defs {
   notification_email {
     root@localhost
   }
   notification_email_from root@localhost
   smtp_server 127.0.0.1
   smtp_connect_timeout 30
   router_id localhost7B
   vrrp_iptables
   vrrp_garp_interval 0
   vrrp_gna_interval 0
   vrrp_mcast_group4 224.0.0.18
}
vrrp_instance zzhz {
    state BACKUP
    interface eth0
    virtual_router_id 51
    priority 80
    advert_int 2
    authentication {
        auth_type PASS
        auth_pass centos
    }
    virtual_ipaddress {
        192.168.80.222/24 dev eth0 label eth0:1
    }
}
#haproxy配置
[root@localhost7A ~]# cat  /etc/haproxy/haproxy.cfg
global
    log         127.0.0.1 local2
    chroot      /var/lib/haproxy
    pidfile     /var/run/haproxy.pid
    maxconn     4000
    user        haproxy
    group       haproxy
    daemon
    # turn on stats unix socket
    stats socket /var/lib/haproxy/stats

defaults
    mode                    http
    log                     global
    option                  httplog
    option                  dontlognull
    option http-server-close
    option forwardfor       except 127.0.0.0/8
    option                  redispatch
    retries                 3
    timeout http-request    10s
    timeout queue           1m
    timeout connect         10s
    timeout client          1m
    timeout server          1m
    timeout http-keep-alive 10s
    timeout check           10s
    maxconn                 3000

listen stats
    mode http
    bind 0.0.0.0:9999
    stats enable
    log global
    stats uri /haproxy-status
    stats auth admin:123456

listen ingress
    bind  192.168.80.222:80
    balance     roundrobin
    server  web1 192.168.80.120:80 check inter 3000 fall 2 rise 5
    server  web2 192.168.80.130:80 check
    server  web3 192.168.80.140:80 check

#haproxy次配置
[root@localhost7B ~]# cat  /etc/haproxy/haproxy.cfg
global
    log         127.0.0.1 local2
    chroot      /var/lib/haproxy
    pidfile     /var/run/haproxy.pid
    maxconn     4000
    user        haproxy
    group       haproxy
    daemon
    # turn on stats unix socket
    stats socket /var/lib/haproxy/stats

defaults
    mode                    http
    log                     global
    option                  httplog
    option                  dontlognull
    option http-server-close
    option forwardfor       except 127.0.0.0/8
    option                  redispatch
    retries                 3
    timeout http-request    10s
    timeout queue           1m
    timeout connect         10s
    timeout client          1m
    timeout server          1m
    timeout http-keep-alive 10s
    timeout check           10s
    maxconn                 3000


listen stats
    mode http
    bind 0.0.0.0:9999
    stats enable
    log global
    stats uri /haproxy-status
    stats auth admin:123456

listen ingress
    bind  192.168.80.222:80
    balance     roundrobin
    server  web1 192.168.80.120:80 check inter 3000 fall 2 rise 5
    server  web2 192.168.80.130:80 check
    server  web3 192.168.80.140:80 check


创建服务容器
[root@localhost7D netns]# docker service create  -p 80:80 --replicas 3 --name  nginx  harbor1.abc.com/web/nginx:v1
[root@localhost7D netns]# docker service ps  nginx
ID                  NAME                IMAGE                          NODE                      DESIRED STATE       CURRENT STATE            ERROR               PORTS
ea2gcepeywot        nginx.1             harbor1.abc.com/web/nginx:v1   localhost7e.localdomain   Running             Running 24 seconds ago
13l81vy1orin        nginx.2             harbor1.abc.com/web/nginx:v1   localhost7C.localdomain   Running             Running 24 seconds ago
eqqhwcw1l743        nginx.3             harbor1.abc.com/web/nginx:v1   localhost7D.localdomain   Running             Running 24 seconds ago


看效果,修改两个容器的内容。
[root@localhost7D netns]# docker exec  -it  nginx.3.eqqhwcw1l743ufrtijdevxvto bash
[root@6b4f8c750eb6 nginx-1.21.0]# echo localhost7D.localdomain--nginx > /usr/local/nginx/html/index.html
[root@6b4f8c750eb6 nginx-1.21.0]# exit
exit

[root@localhost7e ~]# docker exec   -it nginx.1.ea2gcepeywot493zrza19md97 bash
[root@d6ce971cc5ec nginx-1.21.0]# echo localhost7E.localdomain--nginx > /usr/local/nginx/html/index.html
[root@d6ce971cc5ec nginx-1.21.0]# exit
exit


[root@localhost7F ~]# curl  192.168.80.222
dockerfile nginx test
[root@localhost7F ~]# curl  192.168.80.222
localhost7E.localdomain--nginx
[root@localhost7F ~]# curl  192.168.80.222
dockerfile nginx test
[root@localhost7F ~]# curl  192.168.80.222
localhost7D.localdomain--nginx
=========================================================================
------------------------------------------------------------------------其它图文说明---------------------------------------
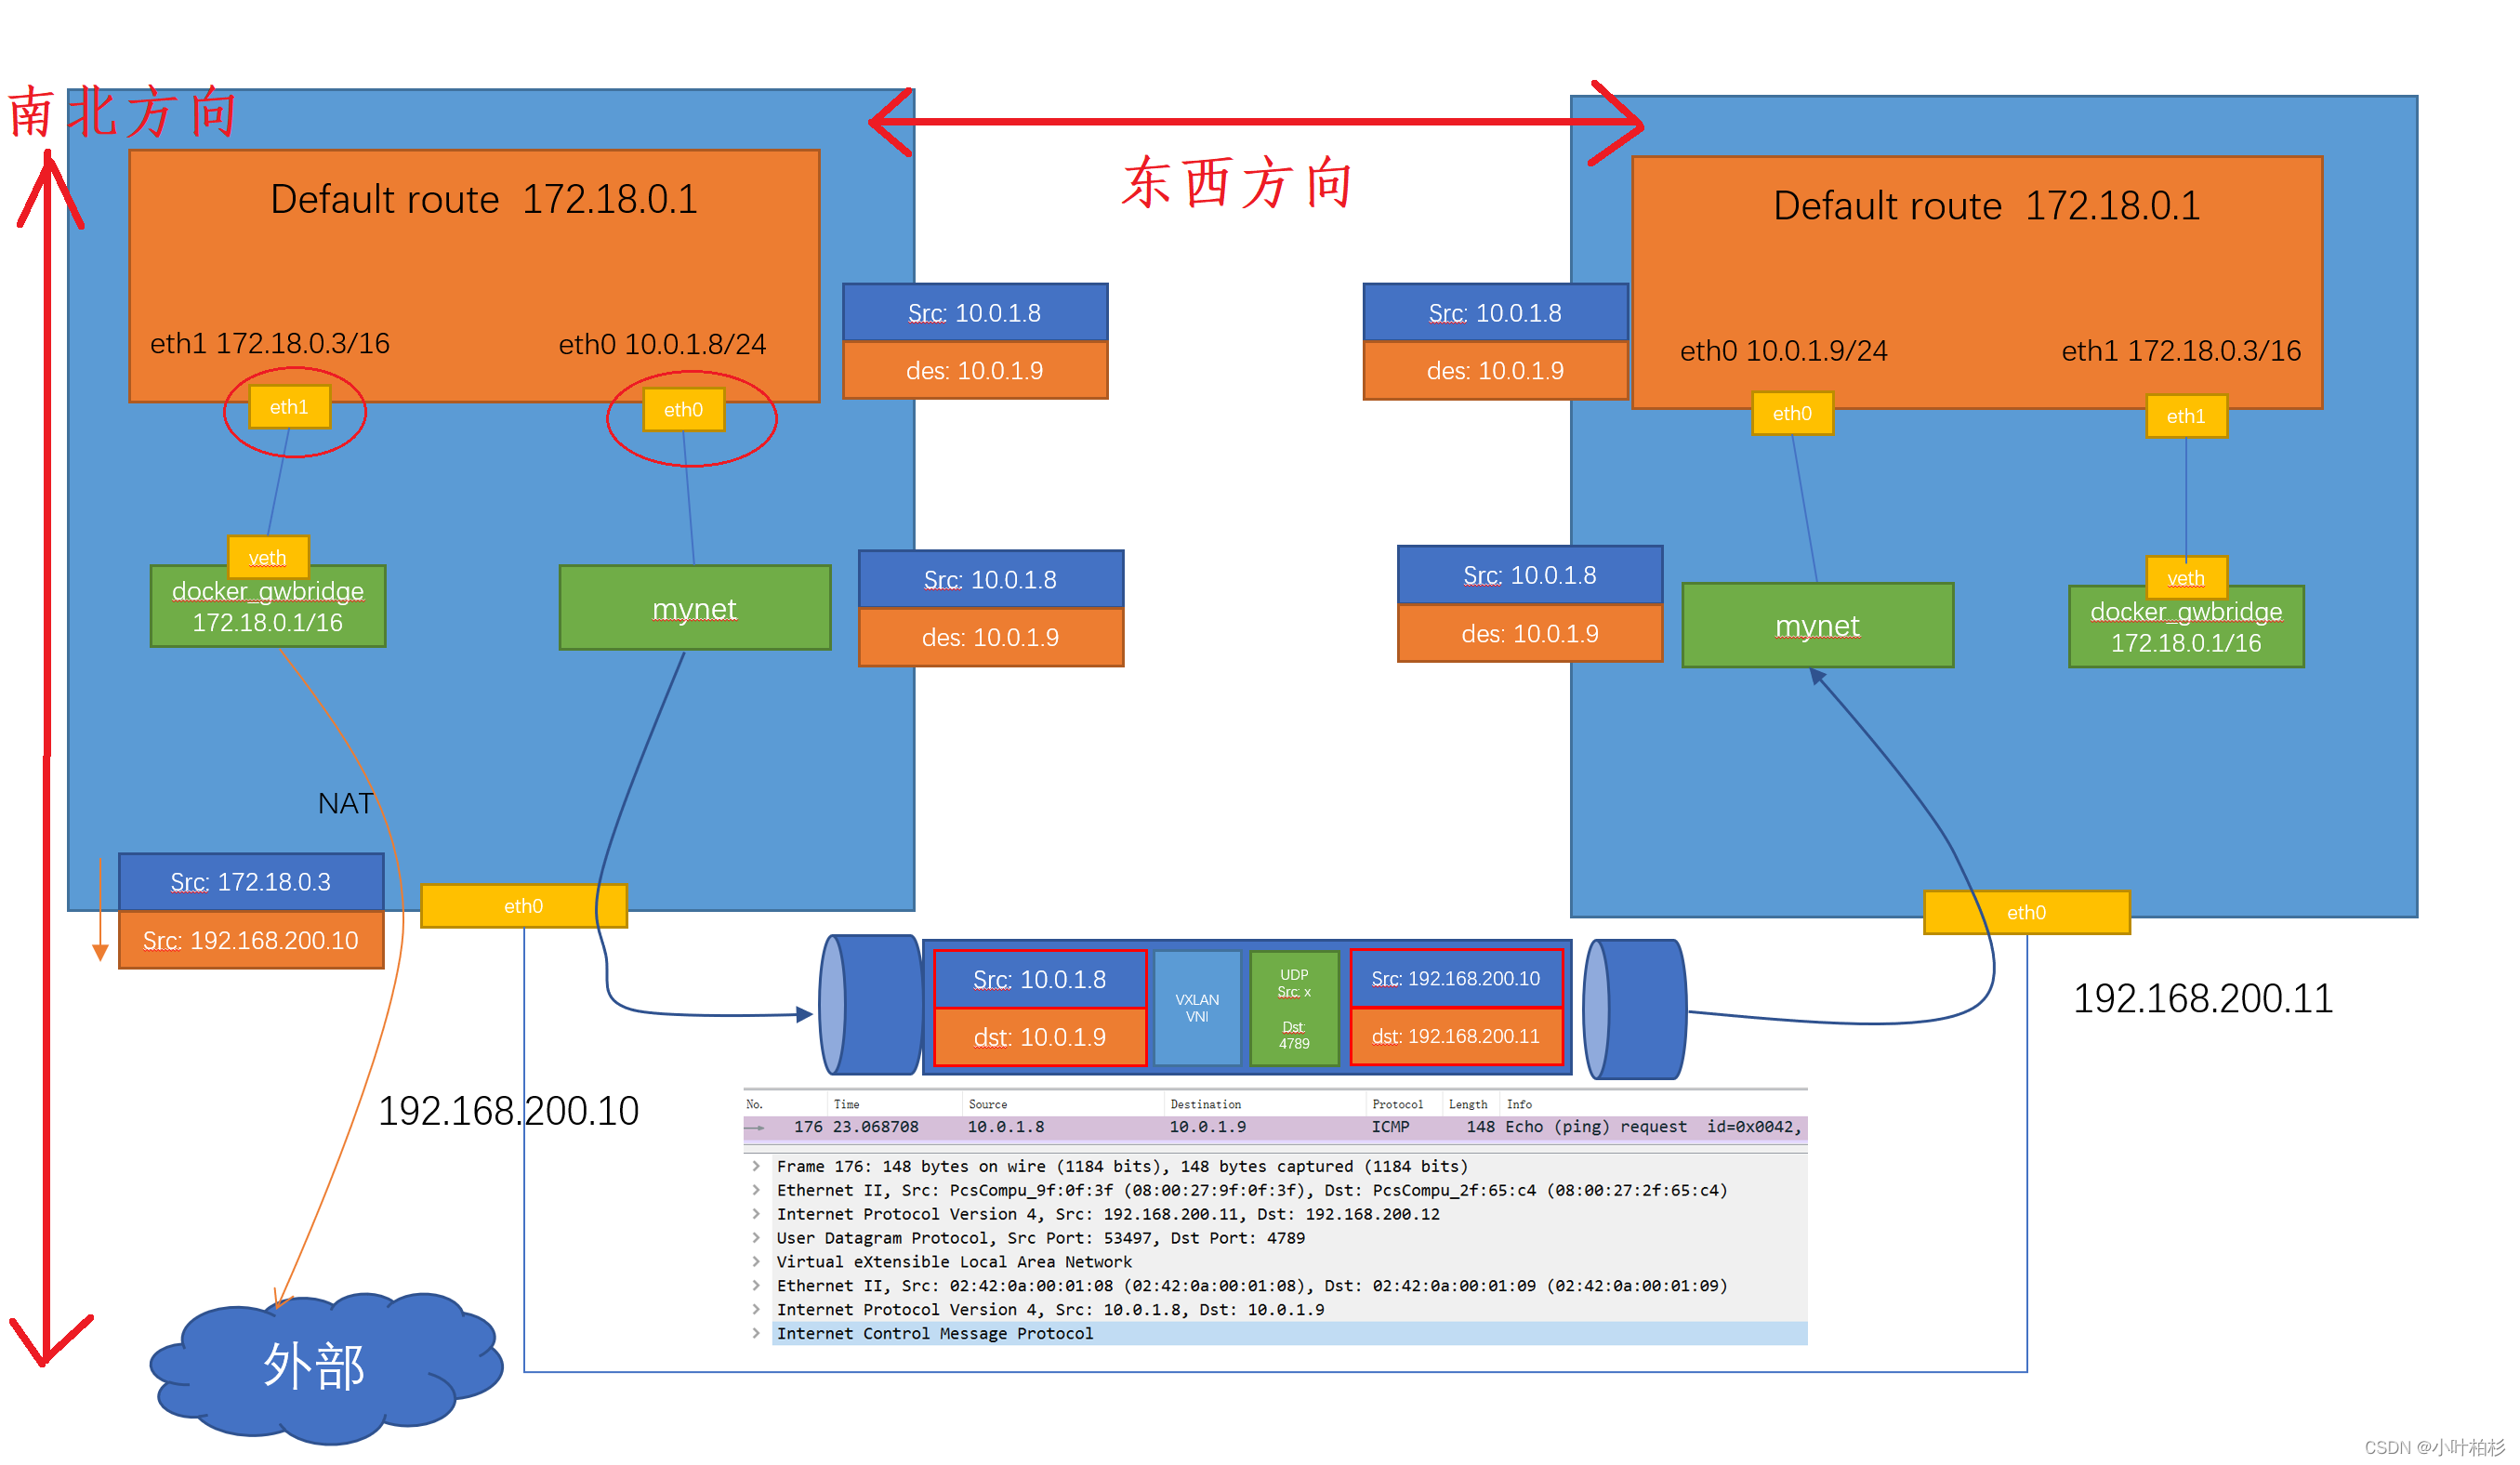
结构图讲解
南北向:主要用于访问外部网络。通过eht1网卡,走veth的docker_gwbridge网络,根据NAT把容器地址转换成主机地址,访问到外部网络。
东西向:用于集群之间的网络访问。192.168.200.10上的容器通过eht0访问overlay的网络mynet,将原始数据加一个VXLAN的头,封装成数据包,这时会原始地址就是192.168.200.10,目标IP地址192.168.200.11,通过这个管道发送到目标机器上,再通过overlay网络的mynet接收解封,发送到192.168.200.11的容器上。
集群的两个节点之间 10.0.1.8 - > 10.0.1.9 转换后两台机器 192.168.200.10 -> 192.168.200.11
------------------------------------------------------------------------其它图文说明-----------------------------------------
通过ipvs做了负载均衡


【推荐】编程新体验,更懂你的AI,立即体验豆包MarsCode编程助手
【推荐】凌霞软件回馈社区,博客园 & 1Panel & Halo 联合会员上线
【推荐】抖音旗下AI助手豆包,你的智能百科全书,全免费不限次数
【推荐】博客园社区专享云产品让利特惠,阿里云新客6.5折上折
【推荐】轻量又高性能的 SSH 工具 IShell:AI 加持,快人一步