docker镜像说明和镜像制作(一)
Docker 镜像说明
从镜像大小上面来说,一个比较小的镜像只有1KB多点,或几MB,而内核文件需要几十MB, 因此镜像里面是没有内核的,镜像在被启动为容器后将直接使用宿主机的内核,
而镜像本身则只提供相应的rootfs,即系统正常运行所必须的用户空间的文件系统,比如/dev/,/proc,/bin,/etc等目录,所以容器当中基本是没有/boot目录的,而/boot当中保存的就是与内核相关的文件和目录。

为什么没有内核
由于容器启动和运行过程中是直接使用了宿主机的内核,不会直接调用过物理硬件,所以也不会涉及到硬件驱动,因此也用不上内核和驱动。而如果虚拟机技术,对应每个虚拟机都有自已独立的内核

容器中的程序后台运行,会导致此容器启动后立即退出?
Docker容器如果希望启动后能持续运行,就必须有一个能前台持续运行的进程,如果在容器中启动传统的服务,如:httpd,php-fpm等均为后台进程模式运行,就导致 docker 前台没有运行的应用,
这样的容器启动后,会立即自杀。所以一般会将服务程序以前台方式运行,对于有一些可能不知道怎么前台运行的程序,只需要在你启动的命令之后添加类似于 tail ,top 这种可以前台运行的程序,
常用的方法,如tail -f /etc/hosts
docker镜像生命周期:图文说明
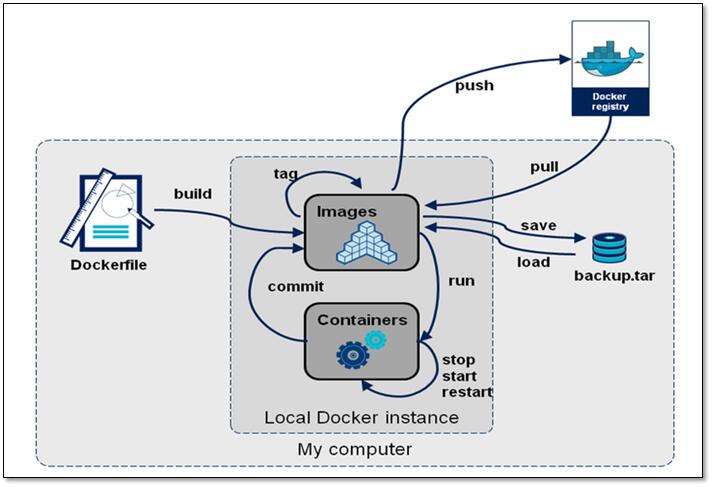
Docker 镜像制作
Docker 镜像制作类似于虚拟机的镜像(模版)制作,即按照公司的实际业务务求将需要安装的软件、相关配置等基础环境配置完成,然后将其做成镜像,最后再批量从镜像批量生产实例,
这样可以极大的简化相同环境的部署工作,Docker的镜像制作分为手动制作(基于容器)和自动制作(基于DockerFile),企业通常都是基于Dockerfile制作镜像


基于容器手动制作镜像步骤具体如下:
    1.下载一个基础的官方镜像,如:centos 或ubuntu
    2.基于基础镜像启动一个容器,并进入到容器
    3.在容器里面做配置操作
        -安装基础命令
        -配置运行环境
        -安装服务和配置服务
        -放程序代码
    4.提交为一个新镜像 docker commit
    5.基于自己的的镜像创建容器并测试访问,或者使用docker-compose编排容器并测试访问。


docker镜像制作方法
1.使用commit运行容器时构造
2.dockerfile文件,使用docker build
3.docker-compose(查看其它文章)
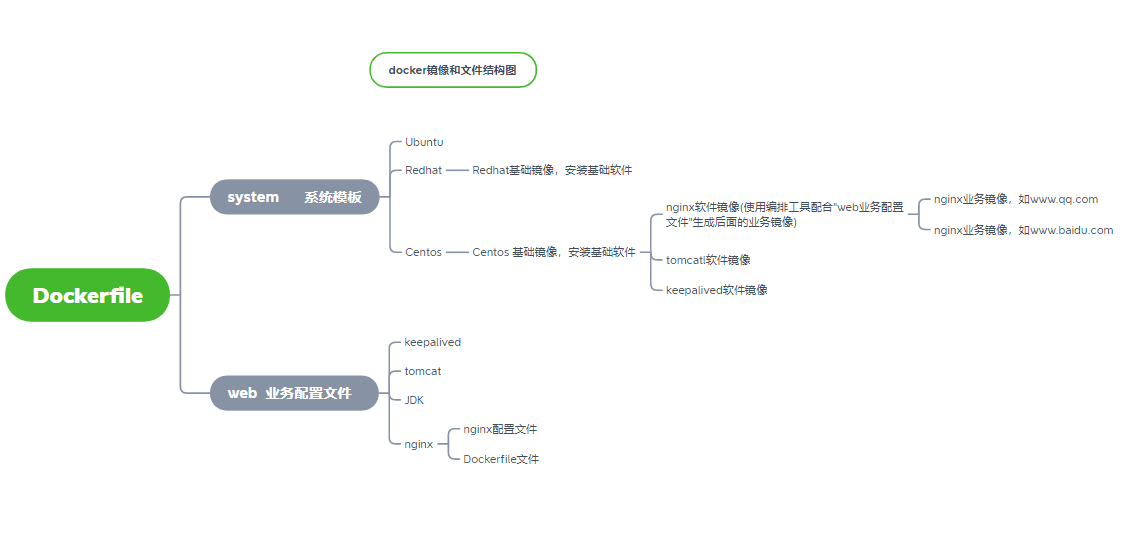
Dockerfile文件的制作镜像的分层结构
一、使用commit运行容器时构造,
实战案例:在容器中利用yum安装手动制作nginx的镜像
1.下载centos镜像为基础
[root@localhost7B ~]# docker pull centos:7
[root@localhost7B ~]# docker images

2.运行镜像为容器
[root@localhost7B ~]# docker run -it --name centosv1  centos:7  bash
[root@e94e714fca8d /]# cat /etc/redhat-release
CentOS Linux release 7.9.2009 (Core)

3.容器安装相关软件和工具
[root@e94e714fca8d /]# yum install wget -y
[root@e94e714fca8d /]# wget -O /etc/yum.repos.d/CentOS-Base.repo http://mirrors.aliyun.com/repo/Centos-7.repo
[root@e94e714fca8d /]# wget -O /etc/yum.repos.d/epel.repo http://mirrors.aliyun.com/repo/epel-7.repo
4.安装软件和修改服务的配置信息关闭服务后台运行
[root@e94e714fca8d /]# yum install nginx  -y
[root@e94e714fca8d /]# yum install -y vim wget pcre pcre-devel zlib  zlib-devel openssl openssl-devel iproute net-tools iotop

[root@e94e714fca8d /]# cat   /etc/nginx/nginx.conf
user nginx;
worker_processes auto;
error_log /var/log/nginx/error.log;
pid /run/nginx.pid;
daemon off; #

[root@e94e714fca8d /]# cat /usr/share/nginx/html/index.html
Docker Yum Nginx

5.提交为镜像 docker commit 命令在宿主机基于容器ID 提交为镜像,并打上tag号
[root@localhost7B ~]# docker  commit -a "12345678@qq.com" --change="EXPOSE 8888 9999" -m "nginx image"  centosv1  zzhz/centos-nginx:v1
[root@localhost7B ~]# docker images
REPOSITORY TAG IMAGE ID CREATED SIZE
zzhz/centos-nginx v1 be39b9c4f749 43 minutes ago 525MB
centos 7 eeb6ee3f44bd 13 months ago 204MB
6.运行容器
[root@localhost7B ~]# docker run -d -p 80:80  --name nginxv1 zzhz/centos-nginx:v1  /usr/sbin/nginx

6.查看
[root@localhost7B ~]# docker ps  -a
CONTAINER ID        IMAGE                  COMMAND             CREATED             STATUS                      PORTS                                    NAMES
3b64bf3b4f7d        zzhz/centos-nginx:v1   "/usr/sbin/nginx"   14 minutes ago      Up 14 minutes               8888/tcp, 0.0.0.0:80->80/tcp, 9999/tcp   nginxv1
e94e714fca8d        centos:7               "bash"              45 minutes ago      Exited (0) 16 minutes ago                                            centosv1


[root@localhost7A ~]# curl 192.168.80.110:80

Docker Yum Nginx
二、dockerfile文件,使用docker build
案例: Dockerfile 制作手动制作编译版本nginx 镜像
1.1.镜像的分层结构目录,按照业务类型或系统类型等方式划分创建目录环境,方便后期镜像比较多的时候进行分类
mkdir /data/dockerfile/{web/{nginx,tomcat,jdk},system/{centos,ubuntu,redhat}} -pv
[root@localhost7B nginx]# tree  /data/dockerfile/
/data/dockerfile/
├── system
│   ├── centos
│   │   ├── build-Centos.sh
│   │   └── Dockerfile
│   ├── redhat
│   └── ubuntu
└── web
    ├── jdk
    ├── nginx
    │   ├── build-centos-nginx.sh
    │   ├── Dockerfile
    │   └── index.html
    └── tomcat


1.2.下载centos镜像为基础
[root@localhost7B ~]# docker pull centos:7

1.3.编写Dockerfile文件,在centos基础镜像上添加基本软件程序
[root@localhost7B ~]#cd /data/dockerfile/centos/
[root@localhost7B centos]# cat  Dockerfile
# 基础镜像
FROM centos:7
MAINTAINER yuanbangchen 12345678@qq.com
#安装基本软件
RUN yum install wget  -y
RUN wget -O /etc/yum.repos.d/CentOS-Base.repo http://mirrors.aliyun.com/repo/Centos-7.repo
RUN wget -O /etc/yum.repos.d/epel.repo http://mirrors.aliyun.com/repo/epel-7.repo
RUN yum install -y vim  tree lrzsz gcc gcc-c++ automake pcre pcre-devel zlib zlib-devel openssl openssl-devel iproute net-tools iotop
#添加系统账户
RUN groupadd www -g 2020 && useradd www -u 2020 -g www
RUN yum clean all && rm -f /etc/localtime && ln -s ../usr/share/zoneinfo/Asia/Shanghai /etc/localtime
1.4.构造镜像,名为centos-base:v1
[root@localhost7B centos]# cat build-Centos.sh
#!/bin/bash
docker build -t centos-base:v1 .

1.5.构造过程
[root@localhost7B centos]# chmod + x build-Centos.sh
[root@localhost7B centos]# ./build-Centos.sh
Sending build context to Docker daemon  3.584kB
Step 1/7 : FROM centos:7
 ---> eeb6ee3f44bd
Step 2/7 : MAINTAINER yuanbangchen 12345678@qq.com
...
省略
...
Step 7/7 : RUN groupadd www -g 2020 && useradd www -u 2020 -g www
 ---> Running in 94b0cd1b1ece
Removing intermediate container 94b0cd1b1ece
 ---> 568629c634fc
Successfully built 568629c634fc
Successfully tagged centos-base:v1

1.6.查看镜像
[root@localhost7B centos]# docker images
REPOSITORY          TAG                 IMAGE ID            CREATED             SIZE
centos-base         v1                  568629c634fc        7 minutes ago       782MB
centos              7                   eeb6ee3f44bd        13 months ago       204MB

1.7.测试
[root@localhost7B centos]# docker run  -it  --rm  centos-base:v1  bash
[root@ab17aab986bd /]#
[root@ab17aab986bd /]# cat /etc/passwd  | grep www
www:x:2020:2020::/home/www:/bin/bash


2.镜像的分层结构目录,按照业务类型或系统类型等方式划分创建目录环境,方便后期镜像比较多的时候进行分类
2.1业务镜像
[root@localhost7B ~]#cd /data/dockerfile/web/nginx/

2.2 编写Dockerfile文件
[root@localhost7B nginx]# vim Dockerfile
#基准镜像
FROM centos-base:v1
#作者信息
MAINTAINER "zzhzzjol"
#工作目录
WORKDIR /usr/local/src/
#定义环境变量
ENV NG_VERSION nginx-1.21.0
#安装epel仓库
RUN yum -y install epel-release
#安装wget
RUN yum -y install wget
#下载nginx文件并解压
RUN wget http://nginx.org/download/$NG_VERSION.tar.gz && tar xzvf $NG_VERSION.tar.gz
#安装编译依赖包
RUN yum install -y gcc gcc-c++ glibc make autoconf openssl openssl-devel && yum install -y pcre-devel libxslt-devel gd-devel GeoIP GeoIP-devel GeoIP-data
#清理仓库
RUN yum clean all
#创建nginx用户
RUN useradd -M -s /sbin/nologin nginx
#切换工作目录
WORKDIR /usr/local/src/$NG_VERSION
#编译安装nginx
RUN ./configure --user=nginx --group=nginx --prefix=/usr/local/nginx --with-file-aio --with-http_ssl_module --with-http_realip_module --with-http_addition_module --with-http_xslt_module --with-http_image_filter_module --with-http_geoip_module --with-http_sub_module --with-http_dav_module --with-http_flv_module --with-http_mp4_module --with-http_gunzip_module --with-http_gzip_static_module --with-http_auth_request_module --with-http_random_index_module --with-http_secure_link_module --with-http_degradation_module --with-http_stub_status_module && make && make install
#复制测试页面到容器中
ADD index.html /usr/local/nginx/html
#设置容器中要挂在到宿主机的目录
VOLUME /usr/local/nginx/html
#设置sbin环境变量
ENV PATH /usr/local/nginx/sbin:$PATH
#暴露容器80端口
EXPOSE 80/tcp
#当ENTRYPOINT和CMD连用时,CMD的命令是ENTRYPOINT命令的参数,两者连用相当于nginx -g "daemon off;"而当一起连用的时候命令格式最好一致(这里选择的都是json格式的是成功的,如果都是sh模式可以试一下)
ENTRYPOINT ["nginx"]
CMD ["-g","daemon off;"]

2.3测试页面
[root@localhost7B nginx]# cat index.html
dockerfile nginx test


2.4构造镜像,名为nginx:v1
[root@localhost7B nginx]# cat build-centos-nginx.sh
#!/bin/bash
docker build -t nginx:v1 .

[root@localhost7B nginx]# chmod +x build-centos-nginx.sh
[root@localhost7B nginx]# ./build-centos-nginx.sh
Step 11/16 : ADD index.html /usr/local/nginx/html
 .....
 .....
Step 16/16 : CMD ["-g","daemon off;"]
 ---> Running in 5a0135bfef6d
Removing intermediate container 5a0135bfef6d
 ---> e6b2d5a5a6b4
Successfully built e6b2d5a5a6b4
Successfully tagged nginx:v1


2.5查看测试
[root@localhost7B nginx]# docker images
REPOSITORY          TAG                 IMAGE ID            CREATED              SIZE
nginx               v1                  e6b2d5a5a6b4        About a minute ago   1.16GB
centos-base         v1                  568629c634fc        51 minutes ago       782MB
centos              7                   eeb6ee3f44bd        13 months ago        204MB

[root@localhost7B nginx]# docker run  -it -d  --name nginx  -p 80:80  nginx:v1

[root@localhost7B nginx]# docker ps
CONTAINER ID        IMAGE               COMMAND                  CREATED             STATUS              PORTS                NAMES
0c879980959f        nginx:v1            "nginx -g 'daemon of…"   20 seconds ago      Up 18 seconds       0.0.0.0:80->80/tcp   nginx

[root@localhost7B nginx]# docker exec  -it nginx  bash

[root@localhost7A ~]# curl 192.168.80.110:80
dockerfile nginx test
三、docker-compose(查看其它文章)

 浙公网安备 33010602011771号