

实验:实践单主组 KeeAlived 和IPVS(LVS--DR模式)的双集群、高可用、健康性检查、FWM标签
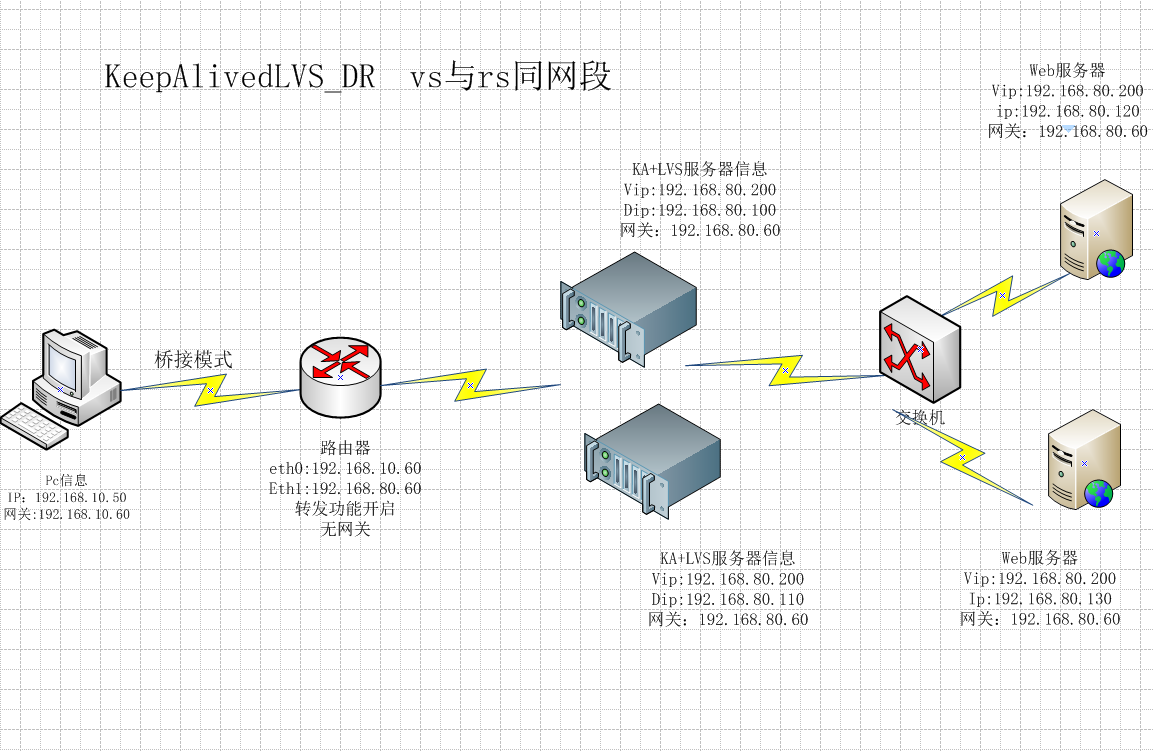
一、前期规则设置
CIP:192.168.10.50 gateway:192.168.10.2
Route: 192.168.10.60 192.168.80.60 启用IP_forward的功能,不能有网关。
KA1:DIP:192.168.80.100 gateway:192.168.80.60 配置文件绑定VIP
KA2: RIP:192.168.80.110 gateway:192.168.80.60 配置文件绑定VIP
RS1: RIP:192.168.80.120 gateway:192.168.80.60 VIP: 192.168.80.222/32 VIP绑定在lo
RS2: RIP:192.168.80.130 gateway:192.168.80.60 VIP: 192.168.80.222/32 VIP绑定在lo

KA 其它配置准备:
  (1) 各节点时间必须同步 ntp, chrony
  (2) 确保iptables及selinux不会成为阻碍
  (3) 各节点之间可通过主机名互相通信(对KA并非必须)建议使用/etc/hosts文件实现
  (4) 各节点之间的root用户可以基于密钥认证的ssh服务完成互相通信(对KA并非必须)
  (5)两台KA服务器文件对密钥对考(非必须) ssh-keygen ssh-copy-id KA_IP
  (6)vim /etc/hosts (非必须) 192.168.80.100 KA1 192.168.80.110 KA2
二、KA服务器软件安装
	yum install keepalived   ipvsadm
	yum install  httpd	    #用于sorry server
	测试页:
	echo sorry_server ka1 > /var/www/html/index.html
	echo sorry_server ka2 > /var/www/html/index.html


三、RS的服务器DR模式设置方法一:(手动)
	echo 1 > /proc/sys/net/ipv4/conf/all/arp_ignore
	echo 1 > /proc/sys/net/ipv4/conf/lo/arp_ignore
	echo 2 > /proc/sys/net/ipv4/conf/all/arp_announce
	echo 2 > /proc/sys/net/ipv4/conf/lo/arp_announce

	RS服务器安装软件
	yum install  httpd
	两台RS设置VIP地址
	ip addr add 192.168.80.222/32 dev lo:1
	测试页:
	echo 192.168.80.120_index.html RS1 > /var/www/html/index.html
	echo 192.168.80.130_index.html RS2 > /var/www/html/index.html

三、RS的服务器DR模式设置方法二 :(脚本)
cat lvs_dr_rs.sh
#!/bin/bash
#Author:wangxiaochun
#Date:2017-08-13
vip=192.168.80.222
mask='255.255.255.255'
dev=lo:1
rpm -q httpd &> /dev/null || yum -y install httpd &>/dev/null
service httpd start &> /dev/null && echo "The httpd Server is Ready!"
echo "<h1>hostname</h1>" > /var/www/html/index.html

case 1 in
start)
    echo 1 > /proc/sys/net/ipv4/conf/all/arp_ignore
    echo 1 > /proc/sys/net/ipv4/conf/lo/arp_ignore
    echo 2 > /proc/sys/net/ipv4/conf/all/arp_announce
    echo 2 > /proc/sys/net/ipv4/conf/lo/arp_announce
    ifconfig $dev $vip netmask $mask #broadcast $vip up
    #route add -host $vip dev $dev
    echo "The RS Server is Ready!"
    ;;
stop)
    ifconfigdev down
    echo 0 > /proc/sys/net/ipv4/conf/all/arp_ignore
    echo 0 > /proc/sys/net/ipv4/conf/lo/arp_ignore
    echo 0 > /proc/sys/net/ipv4/conf/all/arp_announce
    echo 0 > /proc/sys/net/ipv4/conf/lo/arp_announce
    echo "The RS Server is Canceled!"
    ;;
*)
    echo "Usage: $(basename $0) start|stop"
    exit 1
    ;;
esac

三、测试下访问两台RS是否能访问,IP绑定情况
curl 192.168.80.120
	192.168.80.120_index.html RS1
curl 192.168.80.130
	192.168.80.130_index.html RS2
四、KA服务器文件配置单主机模式的lvs集群
1.vim /etc/keepalived/keepalived.conf
global_defs {
   notification_email {
     root@localhost
   }
   notification_email_from 6m1@localhost
   smtp_server 127.0.0.1
   smtp_connect_timeout 30
   router_id ka1
   vrrp_mcast_group4 224.100.100.43
}
vrrp_instance zzhz {
    state MASTER
    interface eth0
    virtual_router_id 51
    priority 95
    advert_int 2
    authentication {
        auth_type PASS
        auth_pass centos
    }
    virtual_ipaddress {
        192.168.80.222/24 dev eth0 label eth0:1    #这里的IP跟virtual_server同一个。
}
notify_master "/etc/keepalived/notify.sh master"
notify_backup "/etc/keepalived/notify.sh backup"
notify_fault "/etc/keepalived/notify.sh fault"
}
virtual_server 192.168.80.222  80 {     ##这里的IP跟virtual_ipaddress 同一个。
    delay_loop 6
    lb_algo rr
    lb_kind DR
    protocol TCP
    sorry_server 127.0.0.1 80

    real_server 192.168.80.120 80 {
        weight 1
	HTTP_GET {       #应用层检测  访问日志有日志
	    url {
		path /
		status_code 200
	    }
	connect_timeout 3
	nb_get_retry 3
	delay_before_retry 3
	}
    }
    real_server 192.168.80.130 80 {
	weight 1
	TCP_CHECK {    #另一台主机使用TCP检测  tcpdump -i eth0 -nn host 192.168.80.100
	connect_ip 192.168.80.130
        connect_port 80
        bindto 192.168.80.100
        bind_port 7777
	connect_timeout 3
	nb_get_retry 3
	delay_before_retry 3
	}
    }
}
五:另一台 KA2服务器文件配置单主机模式的lvs集群
global_defs {
   notification_email {
     root@localhost
   }
   notification_email_from keepalived@localhost
   smtp_server 127.0.0.1
   smtp_connect_timeout 30
   router_id ka2
   vrrp_mcast_group4 224.100.100.43
}
vrrp_instance zzhz {
    state BACKUP
    interface eth0
    virtual_router_id 51
    priority 85
    advert_int 2
    authentication {
        auth_type PASS
        auth_pass centos
    }
    virtual_ipaddress {
        192.168.80.222/24 dev eth0 label eth0:1
    }
    notify_master "/etc/keepalived/notify.sh master"
    notify_backup "/etc/keepalived/notify.sh backup"
    notify_fault "/etc/keepalived/notify.sh fault"
}
virtual_server 192.168.80.222  80 {
    delay_loop 6
    lb_algo rr
    lb_kind DR
    protocol TCP
    sorry_server 127.0.0.1 80

    real_server 192.168.80.120 80 {
        weight 1
        HTTP_GET {
            url {
                path /
                status_code 200
            }
            connect_timeout 3
            nb_get_retry 3
            delay_before_retry 3
        }
    }
    real_server 192.168.80.130 80 {
        weight 1
        TCP__CHECK {
            connect_timeout 3
            nb_get_retry 3
            delay_before_retry 3
            connect_ip 192.168.80.130
            connect_port 80
            bindto 192.168.80.100
            bind_port 7777
        }
    }
}
六、测试: RS故障
  # while true ; do curl http://192.168.80.222 ;sleep 1; done
192.168.80.130_index.html RS2
192.168.80.120_index.html RS1       #正常
curl: (7) couldn't connect to host  #130使用TCP_CHECK方法的,这里的断网测试, #TCP检测,使用systemctl stop httpd,ipvsadm -Ln的列表是不删除的,还是会调用。

192.168.80.120_index.html RS1
192.168.80.120_index.html RS1
curl: (7) couldn't connect to host  #120 使用HTTP_CHECK方法,systemctl stop httpd
curl: (7) couldn't connect to host
sorry_server ka1
sorry_server ka1

[root@localhost7A ~]# ipvsadm -Ln
IP Virtual Server version 1.2.1 (size=4096)
Prot LocalAddress:Port Scheduler Flags
  -> RemoteAddress:Port           Forward Weight ActiveConn InActConn
TCP  192.168.80.222:80 rr
  -> 127.0.0.1:80                 Route   1      0          5


六、测试:KA故障
systemctl status keepalived.service
tcpdump -i eth0 -nn host 224.100.100.43
virtual_server fwmark int #ipvs的防火墙打标,实现基于防火墙的负载均衡集群,(FWM标签)
virtual_server fwmark 6 {    #指定FWM为6
        delay_loop 6
        lb_algo rr
        lb_kind DR
        protocol TCP
        sorry_server 127.0.0.1 80
        real_server 192.168.80.120 80 {
               省略部分
        }
        real_server 192.168.80.130 80 {
	      省略部分
        }
}
#防火墙中两个节点都执行以下操作
[root@ka1]#iptables -t mangle -A PREROUTING -d 192.168.80.222  -p tcp --dport 80 -j MARK --set-mark 6
[root@ka2]#iptables -t mangle -A PREROUTING -d 192.168.80.222  -p tcp --dport 80 -j MARK --set-mark 6

