HTML-Bootstrap下载和基本使用
Bootstrap官网啊下载,对于他的CSS样式我们用的基本就是DIST下的 dist/css/bootstrap.css和bootstrap.min.css。
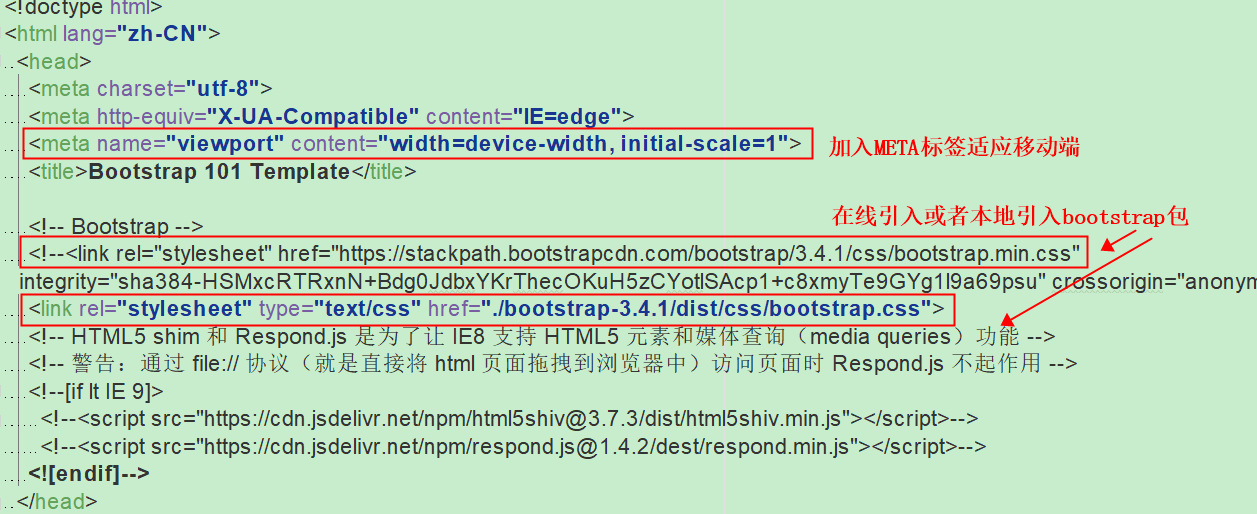
head头部导入<link rel="stylesheet" type="text/css" href="./bootstrap-3.4.1/dist/css/bootstrap.css">
在官网可以看到关于meta标签讲解.为了考虑兼容移动设备,加入meta标签

<meta name="viewport" content="width=device-width, initial-scale=1">
1.布局容器
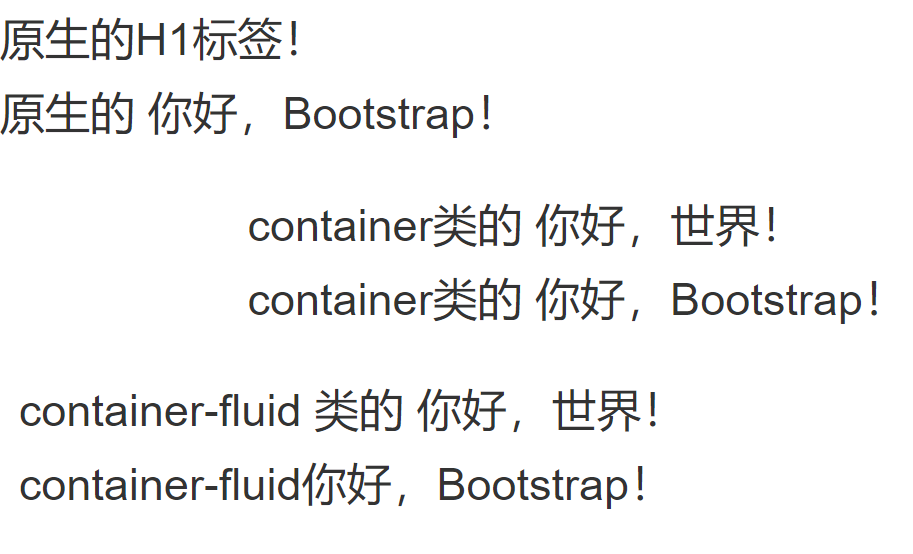
.container 类用于固定宽度并支持响应式布局的容器。
.container-fluid 类用于 100% 宽度,占据全部视口(viewport)的容器。
<h1>原生的H1标签!</h1>
<h1>原生的 你好,Bootstrap!</h1>
<br>
<div class="container">
    <h1> container类的 你好,世界!</h1>
    <h1>container类的 你好,Bootstrap!</h1>

</div>
<br>
<div class="container-fluid">
    <h1>container-fluid 类的 你好,世界!</h1>
    <h1>container-fluid你好,Bootstrap!</h1>

</div>
效果图如下
2. 栅格系统
Bootstrap 提供了一套响应式、移动设备优先的流式栅格系统,随着屏幕或视口(viewport)尺寸的增加,系统会自动分为最多12列.
<div class="container">  #修改为 .container-fluid,就可以将固定宽度的栅格布局转换为 100% 宽度的布局。
    <div class="row">
            <div class="col-lg-3 col-md-4 col-sm-6"> #栅格类必须包含在container>row中

3. 常见的样式
-
标签
-
small标签或者.small 用于副标签
-
.lead用于强调内容
-
加粗 <b>或者<strong>
-
斜体 <i>或者<em>
-
被删除的文本<del>或者<s>
-
文本颜色
<p class="text-muted">文本颜色展示</p>
<p class="text-primary">文本颜色展示</p>
<p class="text-success">文本颜色展示</p>
<p class="d">文本颜色展示</p>
-
文本对齐
<p class="text-left">Left aligned text.</p>
<p class="text-center">Center aligned text.</p>
<p class="text-right">Right aligned text.</p>
<p class="text-justify">Justified text.</p>
<p class="text-nowrap">No wrap text.</p>
-
表格
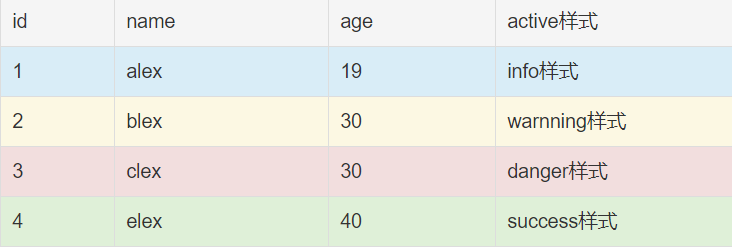
<table class="table table-bordered table-striped"> # 默认的是table类, 然后table-borderd是添加边框,striped是条纹状,table-hover 是hover的时候显示颜色的变化
                <tr>
                    <td>id</td>
                    <td>name</td>
                    <td>age</td>
                </tr>
                <tr>
                    <td>1</td>
                    <td>alex</td>
                    <td>19</td>
                </tr>
                <tr>
                    <td>2</td>
                    <td>blex</td>
                    <td>30</td>
                </tr>
            </table>
- 状态类,有active,info warning,success,danger 5个 都是默认的样式
- 响应式表格
默认表格,如果文字太多,会用内容填充表格

但是如果在table类外面再加一层table-responsive,可以让表格变成响应式,当在小屏幕上会显示水平滚动条,显示剩余的内容.

    <div class="row">
        <div class="col-lg-6 col-md-6 col-sm-12 col-lg-offset-3 col-md-offset-3 table-responsive">
            <table class="table table-bordered table-striped">
                <tr class="success">
                    <td>4</td>
                    <td>elex</td>
                    <td>40</td>
                    <td>响应式测试响应式测试响应式测试响应式测试响应式测试响应式测试响应式测试响应式测试响应式测试</td>
                </tr>
            </table>

        </div>


    </div>
-
表单
单独的表单控件会被自动赋予一些全局样式。所有设置了 .form-control 类的 <input>、<textarea> 和 <select> 元素都将被默认设置宽度属性为 width: 100%;。 将 label 元素和前面提到的控件包裹在 .form-group 中可以获得最好的排列。
<form>
  <div class="form-group">
    <label for="exampleInputEmail1">Email address</label>
    <input type="email" class="form-control" id="exampleInputEmail1" placeholder="Email">
  </div>
  <div class="form-group">
    <label for="exampleInputPassword1">Password</label>
    <input type="password" class="form-control" id="exampleInputPassword1" placeholder="Password">
  </div>
  <div class="form-group">
    <label for="exampleInputFile">File input</label>
    <input type="file" id="exampleInputFile">
    <p class="help-block">Example block-level help text here.</p>
  </div>
  <div class="checkbox">
    <label>
      <input type="checkbox"> Check me out
    </label>
  </div>
  <button type="submit" class="btn btn-default">Submit</button>
</form>
-
按钮样式
<!-- Standard button -->
<button type="button" class="btn btn-default">(默认样式)Default</button>

<!-- Provides extra visual weight and identifies the primary action in a set of buttons -->
<button type="button" class="btn btn-primary">(首选项)Primary</button>

<!-- Indicates a successful or positive action -->
<button type="button" class="btn btn-success">(成功)Success</button>

<!-- Contextual button for informational alert messages -->
<button type="button" class="btn btn-info">(一般信息)Info</button>

<!-- Indicates caution should be taken with this action -->
<button type="button" class="btn btn-warning">(警告)Warning</button>

<!-- Indicates a dangerous or potentially negative action -->
<button type="button" class="btn btn-danger">(危险)Danger</button>

<!-- Deemphasize a button by making it look like a link while maintaining button behavior -->
<button type="button" class="btn btn-link">(链接)Link</button>

-
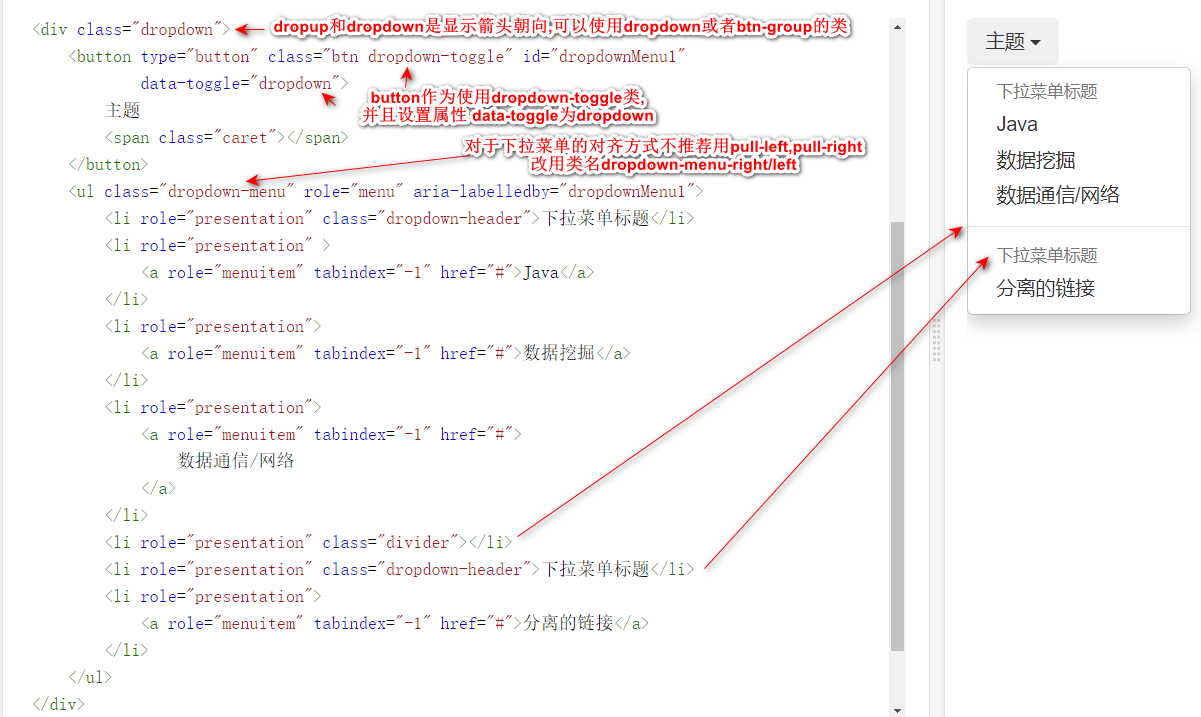
下拉菜单
    <div class="dropdown">
	<button type="button" class="btn dropdown-toggle" id="dropdownMenu1"
			data-toggle="dropdown">
		主题
		<span class="caret"></span>
	</button>
	<ul class="dropdown-menu" role="menu" aria-labelledby="dropdownMenu1">
		<li role="presentation" class="dropdown-header">下拉菜单标题</li>
		<li role="presentation" >
			<a role="menuitem" tabindex="-1" href="#">Java</a>
		</li>
		<li role="presentation">
			<a role="menuitem" tabindex="-1" href="#">数据挖掘</a>
		</li>
		<li role="presentation">
			<a role="menuitem" tabindex="-1" href="#">
				数据通信/网络
			</a>
		</li>
		<li role="presentation" class="divider"></li>
		<li role="presentation" class="dropdown-header">下拉菜单标题</li>
		<li role="presentation">
			<a role="menuitem" tabindex="-1" href="#">分离的链接</a>
		</li>
	</ul>
    </div>
对bootstrap的自定义修改
自定义内置按钮样式
Bootstrap就是内置好了样式,如果他提供的样式不符合我们需求,可以自己定义,这里以自定义按钮样式
使用blog.koalite.com/bbg/ 使用该网站生成代码样式
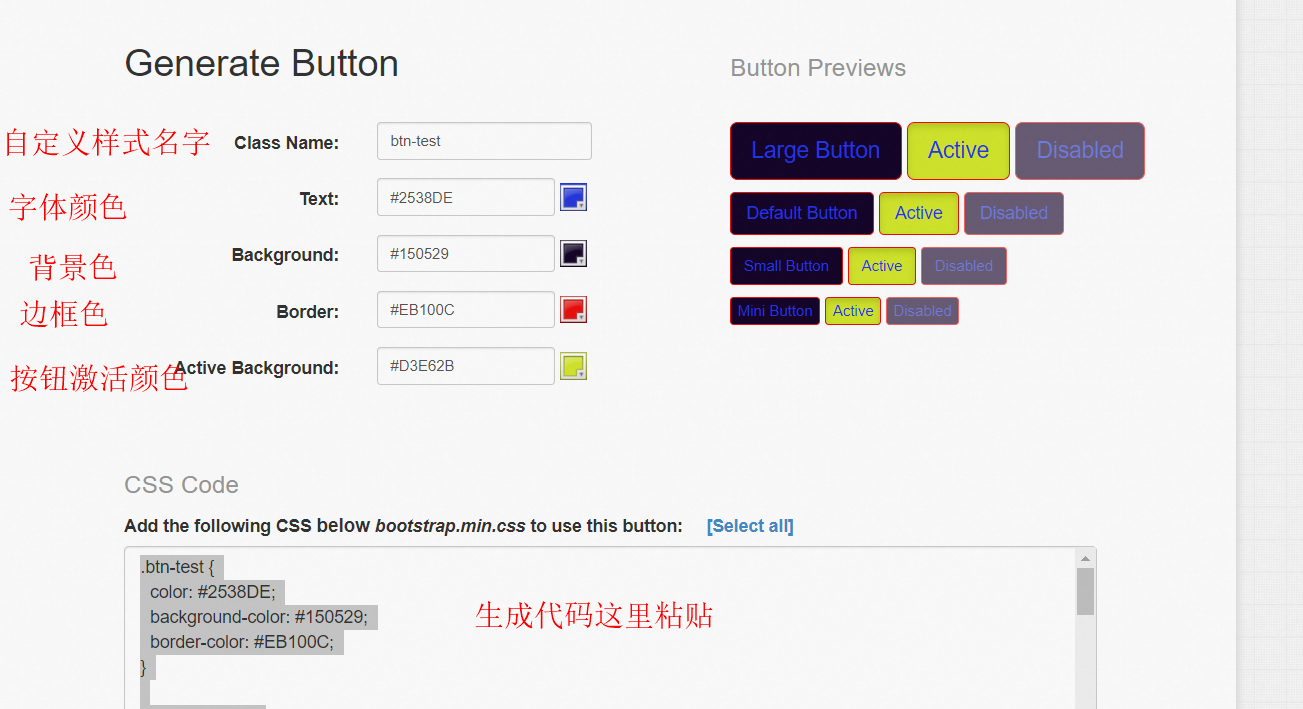
直接在自定义的css文件导入或者去bootstrap.css文件中添加,然后和bootsrrap样式使用一样 <button class="btn btn-test"></button>
导入自定义字体
注意,官方字体已经在css文件导入,但是文件夹命名必须是fonts
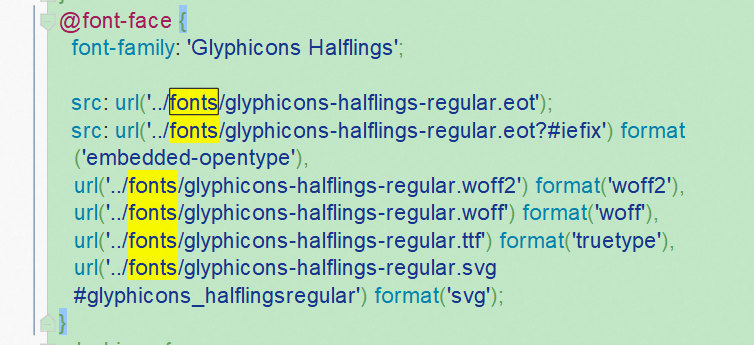
bootstrap的Glyphicons字体如果有不喜欢的,可以去其他网站生成字体文件(一般包括了eot svg ttf woff格式) 这里以https://f2er.club/中框架/库-icommon举例
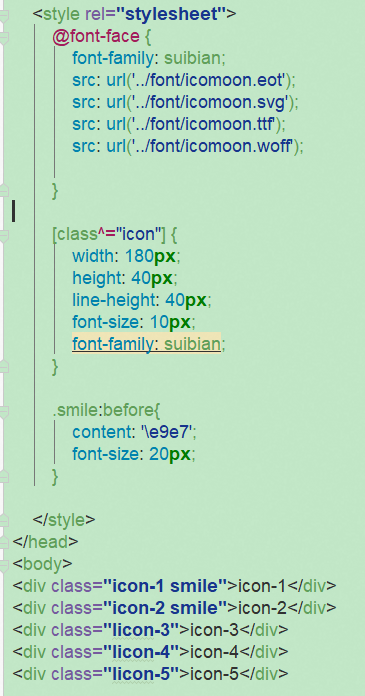
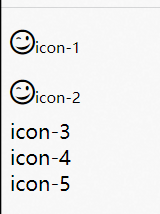
在https://icomoon.io/app/#/select/font选择字体下载后,记住笑脸对应的是e9e7 注意content填进去时前面加\

然后在css文件中用@font-face导入字体文件的路径
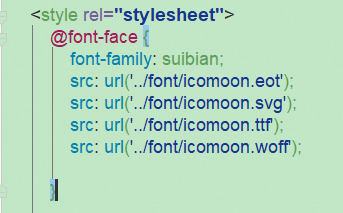
这里的font-family可以自定义名字,用来给下面元素选择器设置font-family的名字.然后用伪元素before或者after进行设置
效果如下
Bootstrap案例
创建工程文件
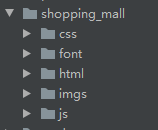
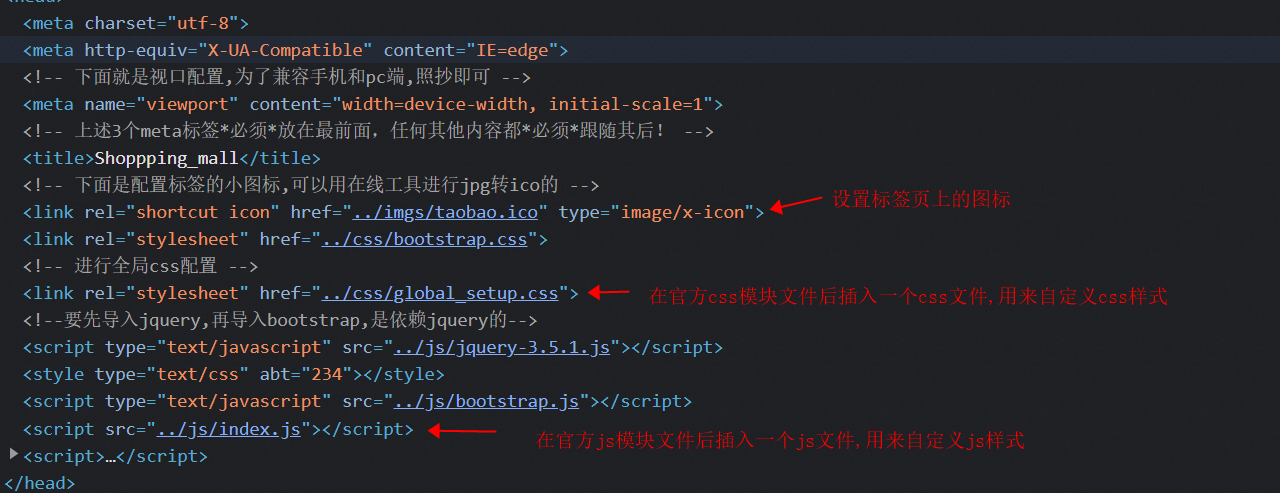
导入视口和ico图标以及bootstrap的模块文件导入
注意导入bootstrap的js文件前要先导入jQuery
<!DOCTYPE html>
<html lang="zh-CN">
<head>
    <meta charset="utf-8">
    <meta http-equiv="X-UA-Compatible" content="IE=edge">
    <!-- 下面就是视口配置,为了兼容手机和pc端,照抄即可 -->
    <meta name="viewport" content="width=device-width, initial-scale=1">
    <!-- 上述3个meta标签*必须*放在最前面,任何其他内容都*必须*跟随其后! -->
    <title>Shoppping_mall</title>

    <!-- 进行全局css配置 -->
    <link rel="stylesheet" href="../css/global_setup.css">
    <!-- 下面是配置标签的小图标,可以用在线工具进行jpg转ico的 -->
    <link rel="shortcut icon" href="../imgs/taobao.ico" type="image/x-icon">
    <link rel="stylesheet" href="../css/bootstrap.css">
    <script type="text/javascript" src="../js/jquery-3.5.1.js"></script>
    <script type="text/javascript" src="../js/bootstrap.js"></script>


</head>
<body>
</body>
</html>
--------------------css全局配置如下,初步定义下字体大小和颜色-----------------

body{
    font-size: 16px;
    color: black;
    font-family: "Times New Roman","sans-serif","微软雅黑";
}
网页源码分析
1. 我们通常在导入插件后,需要对插件的样式进行修改调整,所以需要在后面插入自定义的css和js文件,当然也可以在bootsrap官网自定义模块样式,但那个是全局的.
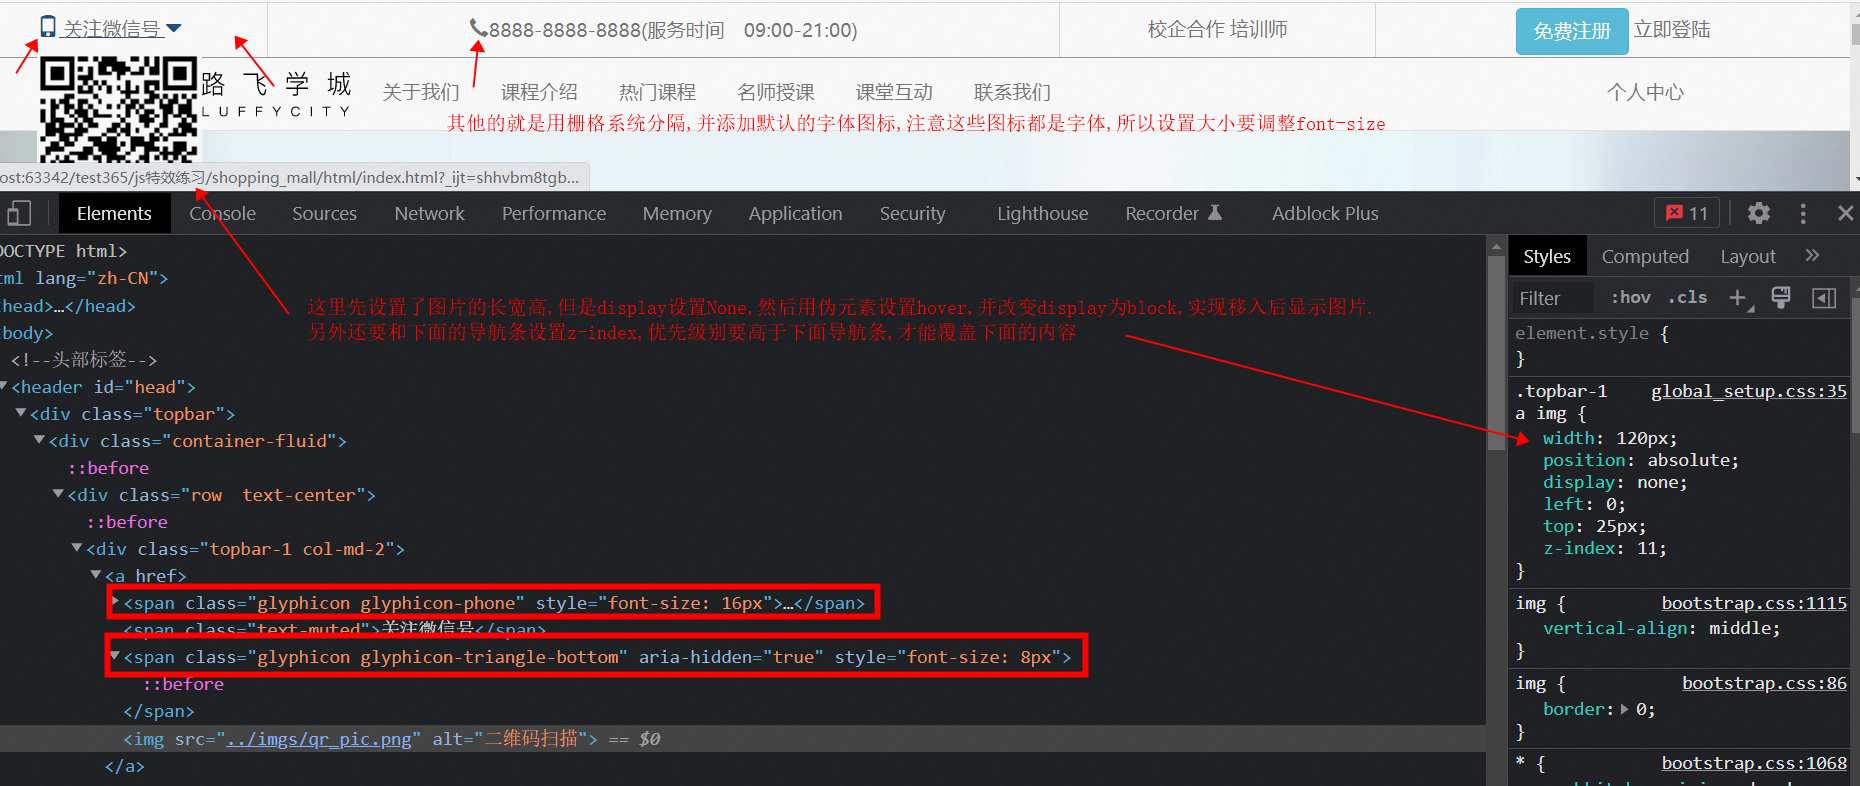
2. 头部信息条
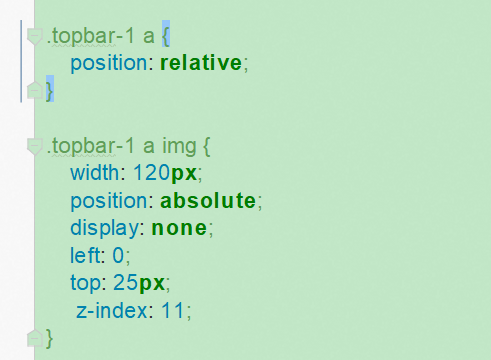
注意二维码这里要用子绝父相定位.
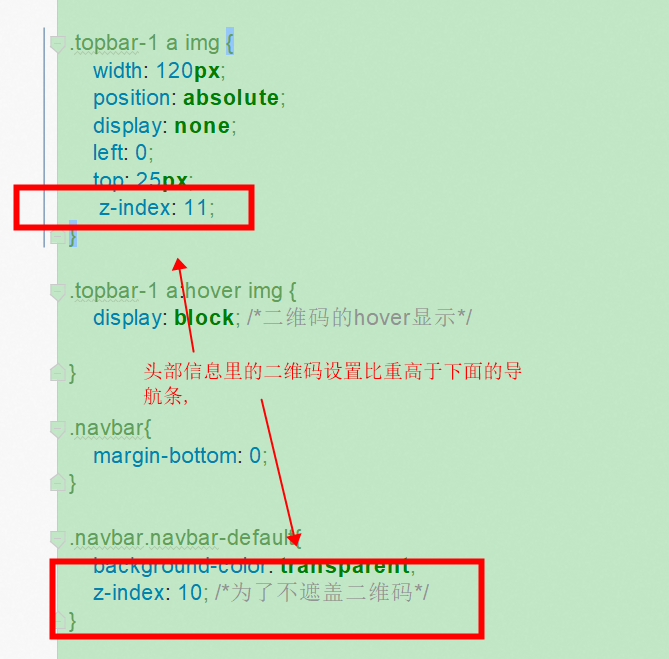
3. 导航条用到bootstrap的组件中的导航条
上面二维码显示层级要高于下面的导航条


添加了导航条hover显示border-bottom的特效

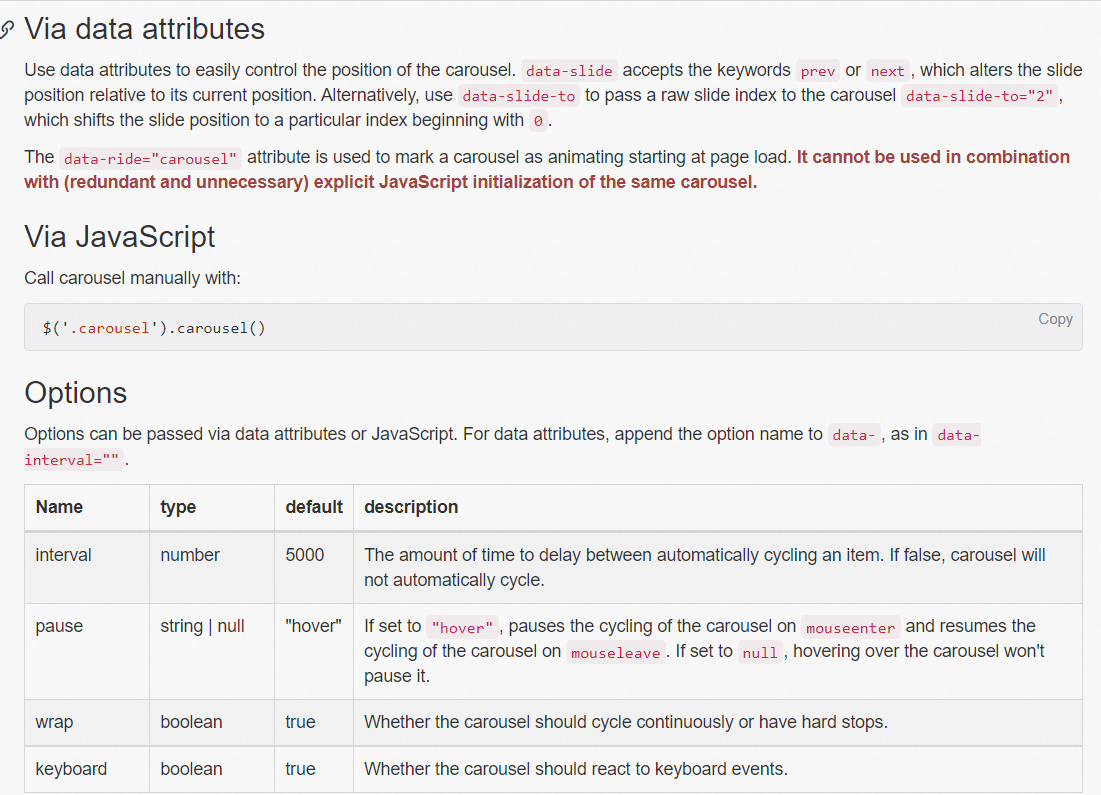
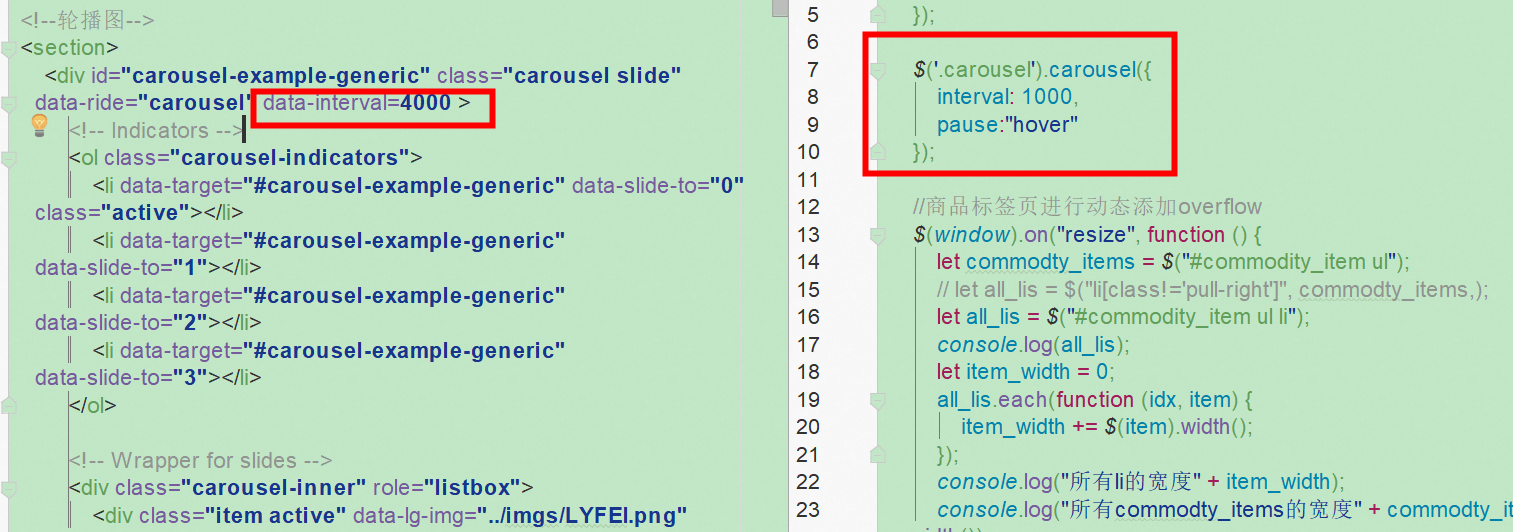
4. 轮播图用到bootstrap的Js组件中的Carousel
根据官网,轮播图的设置示例

5. 关于我们
并不一定需要用display:flex进行实现,也可以用2个块级元素居中实现


6. 关于我们的内容

7. 商品标签页
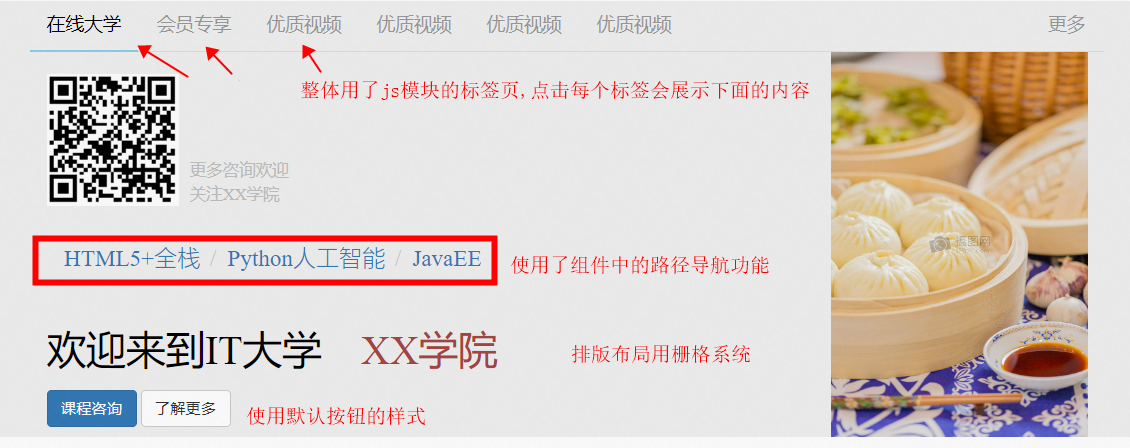
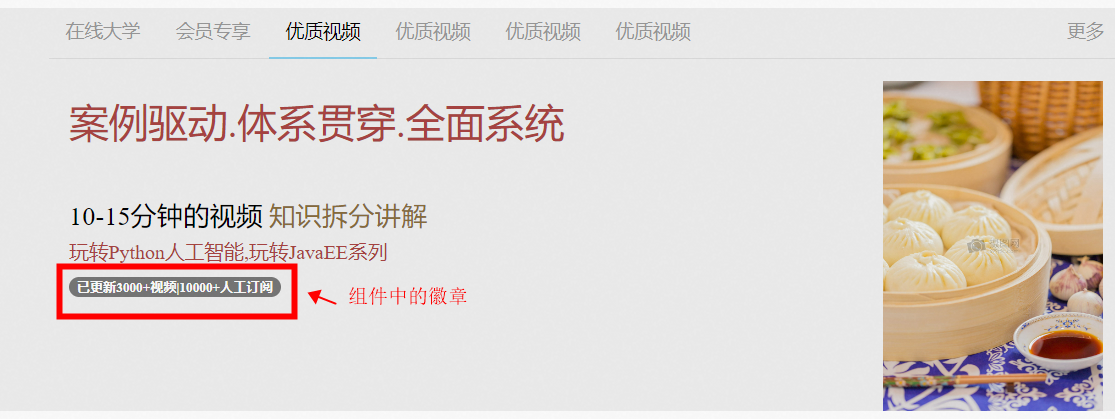
这里实现了一个效果,就是当页面缩小一定程度时候,多余的商品标签页显示不下时候,就用滚动条进行拖拽.
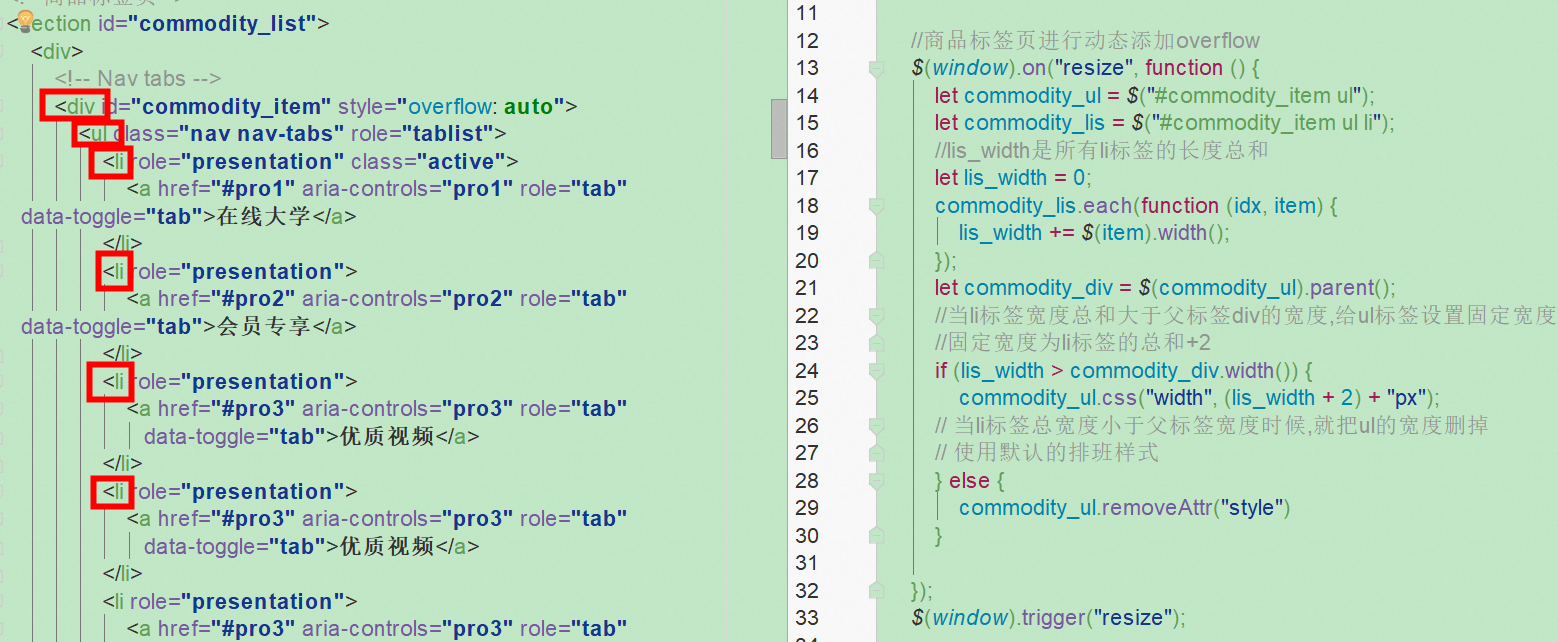
效果图例如下,这个效果需要讲父标签设置overflow为auto,然后给子标签设置一个固定宽度.当缩放宽度小于子标签宽度时候,父标签这里就显示滚动条

对于实现原理看js代码的注释
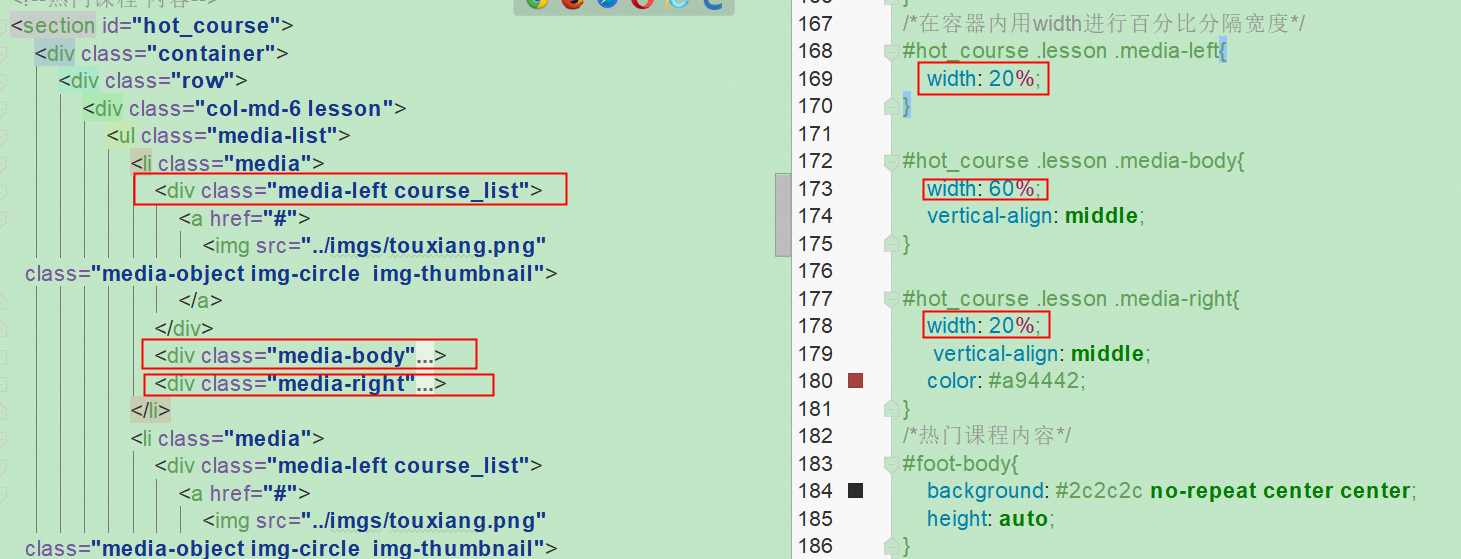
8. 热门课程
使用了媒体对象,注意官网示例中只有media-left和media-body,但是还有个media-right的
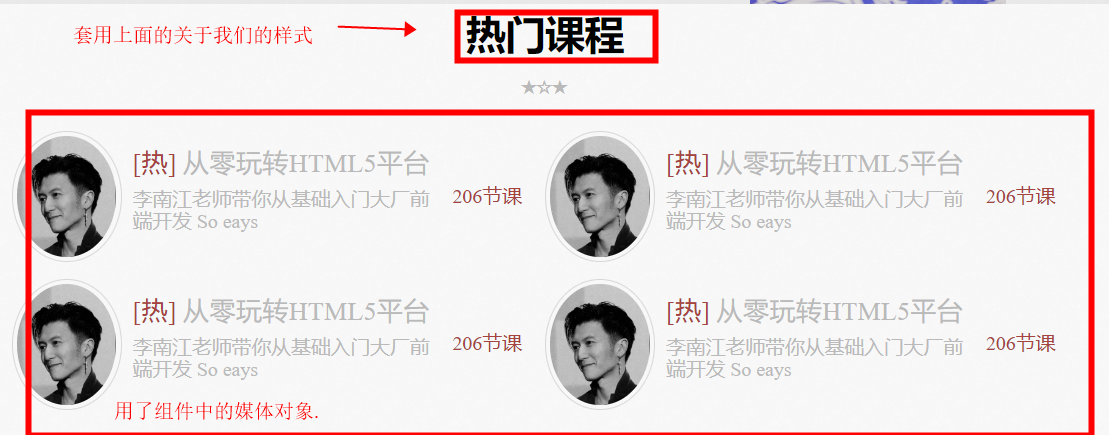
虽然media-left,media-body和media-right 可以控制在媒体标签里左中右的比例,但是如果要自定义他的宽度比例,还是要自定义设置
9.底部信息

底部信息这里微信鼠标hover后会出现提示信息,用了js插件的工具提示,配置信息和标签看下图

10.导航点击跳转
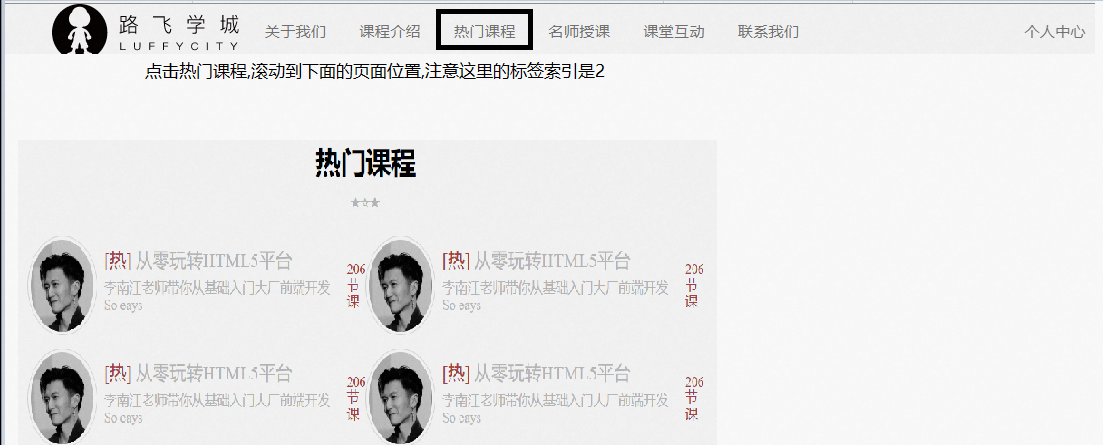
js代码如下
let hot_course = $("#bs-example-navbar-collapse-1 ul li");
    $(hot_course[2]).on("click", function () {
        console.log(2222);
        $("html").animate({scrollTop: $("#hot_course").offset().top}, 1000)
    })
本文作者:死了也要PY
本文链接:https://www.cnblogs.com/Young-shi/p/15104224.html
版权声明:本作品采用知识共享署名-非商业性使用-禁止演绎 2.5 中国大陆许可协议进行许可。


【推荐】国内首个AI IDE,深度理解中文开发场景,立即下载体验Trae
【推荐】编程新体验,更懂你的AI,立即体验豆包MarsCode编程助手
【推荐】抖音旗下AI助手豆包,你的智能百科全书,全免费不限次数
【推荐】轻量又高性能的 SSH 工具 IShell:AI 加持,快人一步