身份证分解(类型转化器)(使用注解)
一、要完成的功能就是:
1、从前端中获取一个18位数的身份证号码:
2、在后台中分解ID中获取到省份、出生日期、性别等字段,并传回前端
二、使用注解定义自己的类型转化器规则
1、实现了AnnotationFormatterFactory<A extends Annotation>接口
2、如果想进一步的简化可以自定义注解
实现了AnnotationFormatterFactory<A extends Annotation>:
 1 package com.wgc.jsonp.date;
 2
 3 import com.wgc.jsonp.entity.PersonMsg;
 4 import org.springframework.format.Formatter;
 5
 6 import java.text.ParseException;
 7 import java.text.SimpleDateFormat;
 8 import java.util.Date;
 9 import java.util.HashMap;
10 import java.util.Locale;
11 import java.util.Map;
12
13 //实现一个Formatter<T>接口
14 public class MyDateFormatter implements Formatter<PersonMsg> {
15
16     //返回一个PersonMsg对象
17     @Override
18     public PersonMsg parse(String text, Locale locale) throws ParseException {
19         return new PersonMsg(parsonProvinceID(text), parsonBirthodayID(text), parsonGenderID(text));
20     }
21
22     @Override
23     public String print(PersonMsg object, Locale locale) {
24         return null;
25     }
26
27     //获取一个省份
28     private String parsonProvinceID(String ID) {
29         return map.get(ID.substring(0, 2));
30     }
31
32     //获取一个出生日期
33     private Date parsonBirthodayID(String ID) throws ParseException {
34        return new SimpleDateFormat("yyyyMMdd").parse(ID.substring(6, 14));
35     }
36
37     //获取一个性别
38     private String parsonGenderID(String ID) {
39         return ID.charAt(16) % 2 == 0 ? "女" : "男";
40     }
41
42     //在实际的工作中下列的数据是从数据库中调出的
43     private static Map<String, String> map = new HashMap<String, String>(){{
44         this.put("11","北京市");
45         this.put("12","天津市");
46         this.put("13","河北省");
47         this.put("14","山西省");
48         this.put("15","内蒙古自治区");
49         this.put("21","辽宁省");
50         this.put("22","吉林省");
51         this.put("23","黑龙江省");
52         this.put("31","上海市");
53         this.put("32","江苏省");
54         this.put("33","浙江省");
55         this.put("34","安徽省");
56         this.put("35","福建省");
57         this.put("36","江西省");
58         this.put("37","山东省");
59         this.put("41","河南省");
60         this.put("42","湖北省");
61         this.put("43","湖南省");
62         this.put("44","广东省");
63         this.put("45","广西壮族自治区");
64         this.put("46","海南省");
65         this.put("51","四川省");
66         this.put("52","贵州省");
67         this.put("53","云南省");
68         this.put("54","西藏自治区");
69         this.put("50","重庆市");
70         this.put("61","陕西省");
71         this.put("62","甘肃省");
72         this.put("63","青海省");
73         this.put("64","宁夏回族自治区");
74         this.put("65","新疆维吾尔自治区");
75         this.put("83","台湾地区");
76         this.put("81","香港特别行政区");
77         this.put("82","澳门特别行政区");
78     }};
79 }
实现AnnotationFormatterFactory<A extends Annotation>接口后我们要在spring-web.xml配置:
 1 <!--启用 conversionService-->
 2     <mvc:annotation-driven conversion-service="conversionService" />
 3
 4     <!---->
 5     <bean id="conversionService" class="org.springframework.format.support.FormattingConversionServiceFactoryBean">
 6         <property name="formatters">
 7             <set>
 8                 <!--没有启用注解-->
 9                <!-- <bean class="com.wgc.jsonp.date.MyDateFormatter" />-->
10                 <!--启用注解-->
11                 <bean class="com.wgc.jsonp.annotations.DateFormIDRealize"></bean>
12             </set>
13         </property>
14     </bean>
2、使用注解的方法
自定义注解:
 1 package com.wgc.jsonp.annotations;
 2
 3 import java.lang.annotation.*;
 4
 5 /*
 6 * @Documented
 7 * @Retention
 8 * @Target
 9 * 这个头部如果不会写,可以IDEA中查找@DateTimeFormat注解,
10 * 直接复制@DateTimeFormat头部就可以了
11 * */
12 @Documented
13 @Retention(RetentionPolicy.RUNTIME)
14 @Target({ElementType.METHOD, ElementType.FIELD, ElementType.PARAMETER, ElementType.ANNOTATION_TYPE})
15 public @interface DateFormID {
16
17 }
3、创建一个注解的实现类
 1 package com.wgc.jsonp.annotations;
 2
 3 import com.wgc.jsonp.date.MyDateFormatter;
 4 import com.wgc.jsonp.entity.PersonMsg;
 5 import org.springframework.format.AnnotationFormatterFactory;
 6 import org.springframework.format.Formatter;
 7 import org.springframework.format.Parser;
 8 import org.springframework.format.Printer;
 9
10 import java.util.HashSet;
11 import java.util.Set;
12
13 //在spring-web.xml中配置就可以使用了
14 public class DateFormIDRealize implements AnnotationFormatterFactory<DateFormID> {
15
16
17     @Override
18     //注解局限于那个类中
19     public Set<Class<?>> getFieldTypes() {
20         HashSet<Class<?>> types = new HashSet<>();
21         types.add(PersonMsg.class);
22         return types;
23     }
24
25     @Override
26     public Printer<?> getPrinter(DateFormID annotation, Class<?> fieldType) {
27         return null;
28     }
29
30     @Override
31     public Parser<?> getParser(DateFormID annotation, Class<?> fieldType) {
32         //把实现类添加过来
33         return getMyDateFormatter(annotation);
34     }
35
36     private Formatter getMyDateFormatter(DateFormID annotation) {
37         //创建一个实现类
38         return new MyDateFormatter();
39     }
40 }
实现注解后在去spring-web.xml中配置
@Controller:
 1 package com.wgc.jsonp.controller;
 2
 3 import com.wgc.jsonp.annotations.DateFormID;
 4 import com.wgc.jsonp.entity.PersonMsg;
 5 import com.wgc.jsonp.service.PersonMsgService;
 6 import org.springframework.beans.factory.annotation.Autowired;
 7 import org.springframework.stereotype.Controller;
 8 import org.springframework.web.bind.annotation.RequestMapping;
 9 import org.springframework.web.bind.annotation.RequestMethod;
10 import org.springframework.web.bind.annotation.RequestParam;
11 import org.springframework.web.bind.annotation.ResponseBody;
12
13 @Controller
14 public class PersonMsgController {
15     @Autowired
16     private PersonMsgService personMsgService;
17
18     @RequestMapping(value = "/pageid", method = RequestMethod.GET)
19     public String index() {
20         return "index";
21     }
22
23     //如果PersonMsg实体类中没有id字段
24     //可以设置@RequestParam(value = "id", required = false),有就不用设置required
25     @RequestMapping(value = "/addid", method = RequestMethod.GET)
26     @ResponseBody
27     public PersonMsg add(@RequestParam(value = "id", required = false) @DateFormID PersonMsg personMsg ){
28         return personMsg;
29     }
30 }
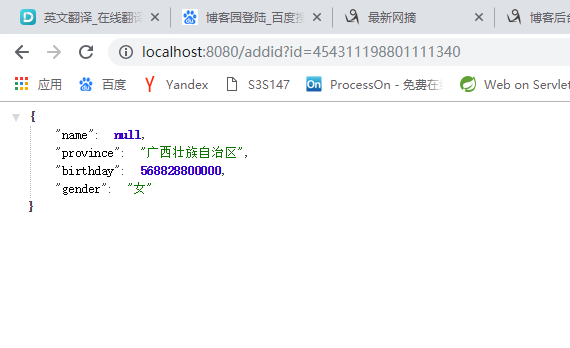
最后显示的结果:

 浙公网安备 33010602011771号