虚拟化技术:存储管理(七)
七、存储管理
1. 虚拟磁盘概述
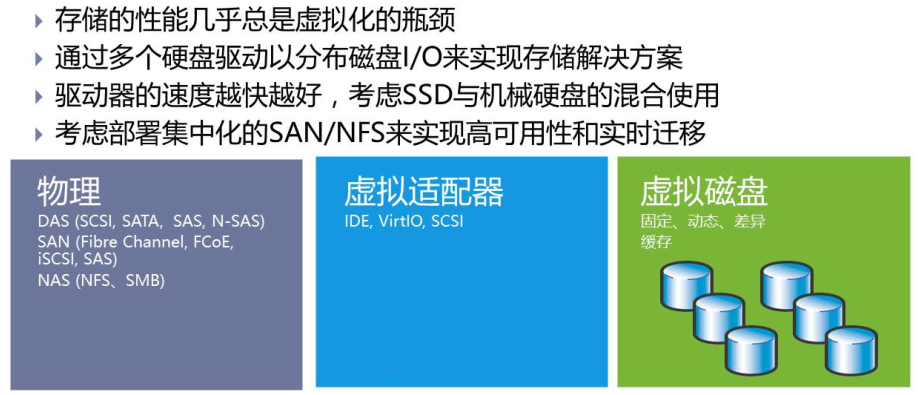
Tips:上面也就是物理磁盘加上虚拟适配器和虚拟磁盘的类型决定了I/O的读写情况。
2. KVM的存储模式
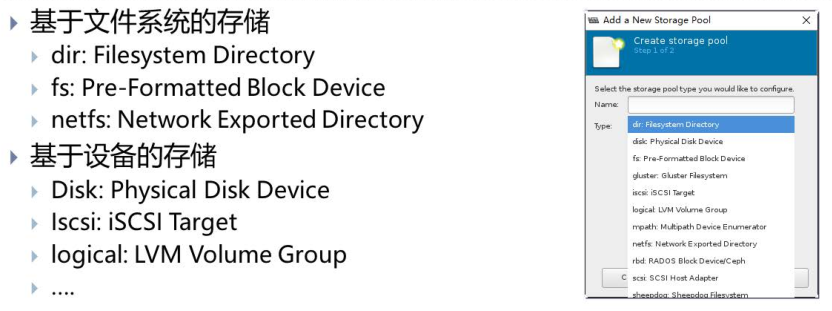
2.1 存储模式讲解
dir:用户指定本地文件系统中的一个目录用于创建磁盘镜像文件。
fs:可以允许用户指定某个格式化文件系统的名称,把它作为专用的磁盘镜像文件存储。相当于把一个磁盘分区直接挂载给KVM
netfs:用户可以指定一个网络文件系统的名称,如Samba、NFS用这种方式作为KVM存储很方便,因为这样很容易访问到位于其它服务器上的文件系统,同时用户也可以通过多台宿主机访问磁盘文件。
disk:磁盘方式指直接读写硬盘设备。
iSCSI:取决于用户采取iSCSI地址把磁盘设备连接。
以上两种方式:优势在于磁盘的名称是固定的,而不需要取决于宿主机OS搜索到磁盘设备的顺序。这种连接磁盘的方式也有缺点:灵活性不足。虚拟磁盘的大小很难改变,而且基于设备的KVM存储不支持快照。
lvm:LVM的优势在于可以使用快照,而快照并不是KVM虚拟化自带的功能。LVM可以把所有存储放到一个卷组里,从而轻松创建一个逻辑卷。该卷组是物理磁盘设备的一个抽象,所以如果超出可用磁盘空间最大值,还可以向卷组中添加新的设备,从而极大简化了增加存储空间的过程,增加的空间在逻辑卷中直接可以使用。使用LVM使得磁盘空间分配更加灵活,而且增加和删除存储也更为容易。在多宿主机环境中,您可以在SAN上创建逻辑卷。如果使用Cluster LVM,可以很容易的配置成多个主机同时访问某个逻辑卷。
2.2 使用存储池的目的
为简化KVM存储管理的目的,可以创建存储池。在宿主机上创建存储池,可以简化KVM存储设备的管理。采用存储池的方式还可以实现对提前预留的存储空间的分配。这种策略对于大型应用环境很有效,存储管理员和创建虚拟机的管理经常不是同一个人。这样,在创建首台虚拟机之前先完成KVM存储池的创建是很好的方法。
3. 虚拟磁盘类型

差异磁盘通常用于链接克隆!固定也就是完全分配磁盘空间,动态也就是创建磁盘文件但不分配全部空间。
4. 虚拟磁盘格式
raw:如果客户机文件系统(如Linux上的ext2/ext3/ext4、Windows的NTFS)支持“空洞(hole),那么镜像文件只有在被写有数据的扇区才会真正占用磁盘空间,从而起到节省磁盘空间的作用,就如前面用"qemu-img info"命令查看镜像文件信息中看到的那样。qemu-img默认的raw格式的文件其实是稀疏文件(sparse file )。
qcow2:是QEMU目前推荐的镜像格式,它是功能最多的格式。支持稀疏文件(即支持空洞)以节省存储空间,支持可选的AES加密以提高镜像文件安全性,支持基于zlib的压缩,支持在一个镜像文件中有多个虚拟机快照。
vmdk:vmware默认磁盘格式
vhd:微软Hyper-V的默认磁盘格式
Vdi:VirtualBox的默认磁盘格式
主流的还是qcow2和vmdk!
5.磁盘分配策略
off:缺省策略,即不使用预分配策略(默认是metadata)
metadata:分配元数据,预分配后的虚拟磁盘仍然属于稀疏磁盘类型
full:分配所有磁盘空间并置零,与分配后的虚拟磁盘属于非稀疏磁盘类型
falloc:分配文件的块并标识它们的状态为初始化,相对full模式来说,只是没有把数据置零。
Tips:qemu-img对qcow2格式支持以上所有,对raw格式只支持full和falloc
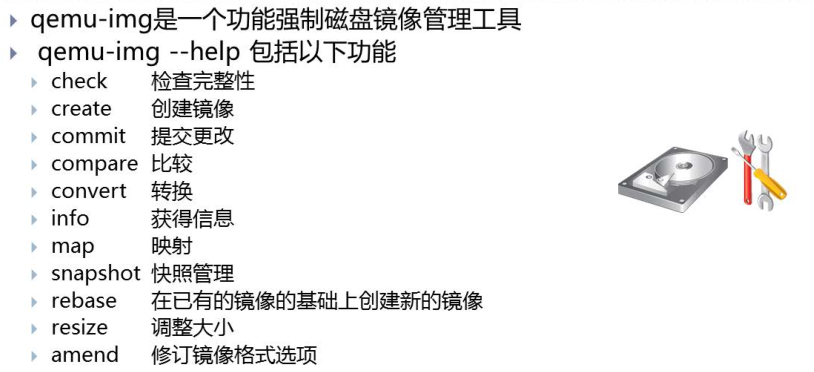
6. qemu-img工具
qemu-img概述
常用create和convert这两个功能,下面通过演示看看。
6.1 创建磁盘
#创建一个img格式的磁盘 1G
[root@localhost test_image]# qemu-img create test01.img 1g
Formatting 'test01.img', fmt=raw size=1073741824

#磁盘大小描述1G
[root@localhost test_image]# ll -h
total 0
-rw-r--r-- 1 root root 1.0G Mar 12 14:57 test01.img

#磁盘实际占用目前为0,因为默认创建是稀疏文件,且文件系统支持稀疏
[root@localhost test_image]# du -h test01.img
0       test01.img

#通过info信息可以看到创建的raw格式,且实际占用为0
[root@localhost test_image]# qemu-img info test01.img
image: test01.img
file format: raw
virtual size: 1.0G (1073741824 bytes)
disk size: 0
6.2 指定格式创建磁盘
[root@localhost test_image]# qemu-img create -f raw test02.img 2g
Formatting 'test02.img', fmt=raw size=2147483648

[root@localhost test_image]# ll -h
total 0
-rw-r--r-- 1 root root 1.0G Mar 12 14:57 test01.img
-rw-r--r-- 1 root root 2.0G Mar 12 15:05 test02.img

[root@localhost test_image]# du -h test02.img
0       test02.img
6.3 指定分配策略
[root@localhost test_image]# qemu-img create -f raw test03.img  -o preallocation=full 1g
Formatting 'test03.img', fmt=raw size=1073741824 preallocation='full'

[root@localhost test_image]# ll -h
total 1.0G
-rw-r--r-- 1 root root 1.0G Mar 12 14:57 test01.img
-rw-r--r-- 1 root root 2.0G Mar 12 15:14 test02.img
-rw-r--r-- 1 root root 1.0G Mar 12 15:26 test03.img

[root@localhost test_image]# du -h test03.img
1.0G    test03.img
6.4 创建qcow2格式的三种分配策略对比
#metadata分配方式
[root@localhost test_image]# qemu-img create -f qcow2 test01.qcow2  -o preallocation=metadata 2g
Formatting 'test01.qcow2', fmt=qcow2 size=2147483648 encryption=off cluster_size=65536 preallocation='metadata' lazy_refcounts=off

#full分配方式
[root@localhost test_image]# qemu-img create -f qcow2 test02.qcow2  -o preallocation=full 1g
Formatting 'test02.qcow2', fmt=qcow2 size=1073741824 encryption=off cluster_size=65536 preallocation='full' lazy_refcounts=off

#falloc分配方式
[root@localhost test_image]# qemu-img create -f qcow2 test03.qcow2  -o preallocation=falloc 1g
Formatting 'test03.qcow2', fmt=qcow2 size=1073741824 encryption=off cluster_size=65536 preallocation='falloc' lazy_refcounts=off

#查看文件大小
[root@localhost test_image]# ll -h
total 3.1G
-rw-r--r-- 1 root root 1.0G Mar 12 14:57 test01.img
-rw-r--r-- 1 root root 2.1G Mar 12 15:41 test01.qcow2
-rw-r--r-- 1 root root 2.0G Mar 12 15:14 test02.img
-rw-r--r-- 1 root root 1.1G Mar 12 15:41 test02.qcow2
-rw-r--r-- 1 root root 1.0G Mar 12 15:26 test03.img
-rw-r--r-- 1 root root 1.1G Mar 12 15:41 test03.qcow2

#查看实际占用空间大小
[root@localhost test_image]# du -h *.qcow2
708K    test01.qcow2
1.1G    test02.qcow2
1.1G    test03.qcow2
6.5 转换磁盘格式
qemu-img -f原格式 -O转换后的格式 源磁盘路径 转换后的磁盘路径
#默认转换为qcow2的分配方式是metadata
[root@localhost test_image]# qemu-img convert -f raw -O qcow2 test03.img convert_test.qcow2
[root@localhost test_image]# du -h convert_test.qcow2
196K    convert_test.qcow2

#可以指定分配方式
[root@localhost test_image]# qemu-img convert -f raw -O qcow2 test03.img convert_test.qcow2 -o preallocation=full
[root@localhost test_image]# du -h convert_test.qcow2
1.1G    convert_test.qcow2
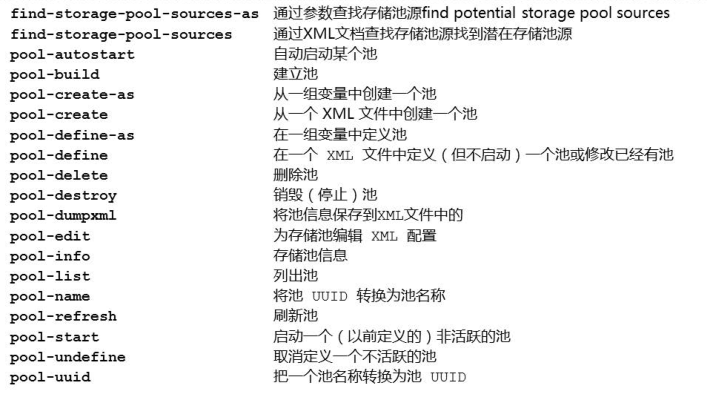
7.存储池管理
存储池相关命令
7.1 基于目录的存储池
#创建目录并授予权限和修改所有者
[root@localhost ~]# mkdir -p /home/kvm/guest_image
[root@localhost ~]# chown root.root /home/kvm/guest_image/
[root@localhost ~]# chmod 700 /home/kvm/guest_image/
#添加存储池
[root@localhost ~]# virsh pool-define-as guest_image dir --target "/home/kvm/guest_image"
Pool guest_image defined
#查看存储池状态
[root@localhost ~]# virsh pool-list --all
Name State Autostart
-------------------------------------------
default active yes
guest_image inactive no
image active yes
iso active yes
storage active yes
#激活该存储池
[root@localhost ~]# virsh pool-start guest_image
Pool guest_image started
[root@localhost ~]# virsh pool-list --all
Name State Autostart
-------------------------------------------
default active yes
guest_image active no
image active yes
iso active yes
storage active yes
#设置存储池开机自激活
[root@localhost ~]# virsh pool-autostart guest_image
Pool guest_image marked as autostarted
[root@localhost ~]# virsh pool-list --all
Name State Autostart
-------------------------------------------
default active yes
guest_image active yes
image active yes
iso active yes
storage active yes
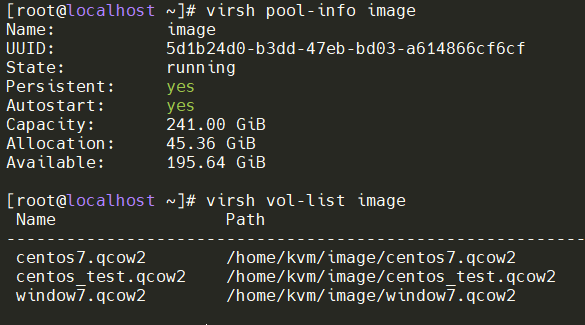
#查看存储池信息
[root@localhost ~]# virsh pool-info guest_image
Name: guest_image
UUID: ccf1aa44-b289-4766-93f1-ff20337a87bb
State: running
Persistent: yes
Autostart: yes
Capacity: 241.00 GiB
Allocation: 45.36 GiB
Available: 195.64 GiB
#停止存储池
[root@localhost ~]# virsh pool-destroy guest_image
Pool guest_image destroyed
[root@localhost ~]# virsh pool-list --all
Name State Autostart
-------------------------------------------
default active yes
guest_image inactive yes
image active yes
iso active yes
storage active yes
#移除存储池
[root@localhost ~]# virsh pool-undefine guest_image
Pool guest_image has been undefined
[root@localhost ~]# virsh pool-list --all
Name State Autostart
-------------------------------------------
default active yes
image active yes
iso active yes
storage active yes
7.2 基于分区的存储池
在宿主机上添加一块20G的磁盘,先查看现在系统的硬盘信息,还是没有新的硬盘信息加入。
[root@localhost ~]# fdisk -l | grep '/dev/*'
Disk /dev/nvme0n1: 322.1 GB, 322122547200 bytes, 629145600 sectors
/dev/nvme0n1p1   *        2048     2099199     1048576   83  Linux
/dev/nvme0n1p2         2099200   629145599   313523200   8e  Linux LVM
Disk /dev/mapper/centos-root: 53.7 GB, 53687091200 bytes, 104857600 sectors
Disk /dev/mapper/centos-swap: 8455 MB, 8455716864 bytes, 16515072 sectors
Disk /dev/mapper/centos-home: 258.9 GB, 258897608704 bytes, 505659392 sectors
查看总线并进行重新扫描SCSI总线,已经添加到了
#查看总线并进行重新扫描SCSI总线
[root@localhost ~]# ls /sys/class/scsi_host/
host0  host1  host2
[root@localhost ~]# echo "- - -" > /sys/class/scsi_host/host0/scan
[root@localhost ~]# echo "- - -" > /sys/class/scsi_host/host1/scan
[root@localhost ~]# echo "- - -" > /sys/class/scsi_host/host2/scan

#查看硬盘信息
[root@localhost ~]# fdisk -l | grep '/dev/*'
Disk /dev/nvme0n1: 322.1 GB, 322122547200 bytes, 629145600 sectors
/dev/nvme0n1p1   *        2048     2099199     1048576   83  Linux
/dev/nvme0n1p2         2099200   629145599   313523200   8e  Linux LVM
Disk /dev/mapper/centos-root: 53.7 GB, 53687091200 bytes, 104857600 sectors
Disk /dev/mapper/centos-swap: 8455 MB, 8455716864 bytes, 16515072 sectors
Disk /dev/mapper/centos-home: 258.9 GB, 258897608704 bytes, 505659392 sectors
Disk /dev/sda: 21.5 GB, 21474836480 bytes, 41943040 sectors
准备分区和创建文件系统
[root@localhost ~]# fdisk /dev/sda
[root@localhost ~]# mkfs.ext4 /dev/sda1
添加存储池
[root@localhost ~]# mkdir -p /home/kvm/guest_image_fs

#添加存储池
[root@localhost ~]# virsh pool-define-as guest_image_fs fs --source-dev "/dev/sda1" --target "/home/kvm/guest_image_fs"
Pool guest_image_fs defined

[root@localhost ~]# virsh pool-list --all
 Name                 State      Autostart
-------------------------------------------
 default              active     yes
 guest_image_fs       inactive   no
 image                active     yes
 iso                  active     yes
 storage              active     yes

#激活该存储池
[root@localhost ~]# virsh pool-start guest_image_fs
Pool guest_image_fs started

#设置开机自动激活存储池
[root@localhost ~]# virsh pool-autostart guest_image_fs
Pool guest_image_fs marked as autostarted

[root@localhost ~]# virsh pool-list --all
 Name                 State      Autostart
-------------------------------------------
 default              active     yes
 guest_image_fs       active     yes
 image                active     yes
 iso                  active     yes
 storage              active     yes

#取消开机自动激活存储池
[root@localhost ~]# virsh pool-autostart --disable guest_image_fs
Pool guest_image_fs unmarked as autostarted

#停止存储池
[root@localhost ~]# virsh pool-destroy guest_image_fs
Pool guest_image_fs destroyed

#移除存储池
[root@localhost ~]# virsh pool-undefine guest_image_fs
Pool guest_image_fs has been undefined
7.3 基于NFS的存储池
先在另外一台主机上安装NFS,修改配置
#1.安装并启动
yum install -y nfs-utils rpcbind
systemctl enable rpcbind
systemctl enable nfs
systemctl start rpcbind
systemctl start nfs

#2.修改配置文件并重新加载
vim /etc/exports
#共享/nfsdata/目录
/nfsdata   192.168.15.0/24(rw)
#192.168.15.0网段对nfs服务端的/nfsdata目录,拥有读写权限。
systemctl reload nfs

#3.创建共享目录、修改所有者
mkdir -p /nfsdata
chown nfsnobody.nfsnobody /nfsdata

#4.显示NFS服务器可供NFS客户端连接的信息内容
showmount -e 10.0.0.31
添加存储池
[root@localhost ~]# mkdir /nfs_image
[root@localhost ~]# virsh pool-define-as --name nfs_image --type netfs --source-host 192.168.15.20 --source-path /nfsdata --target /nfs_image
Pool nfs_image defined

#其余操作与上述两个案例差不多,参考即可。不再赘述!
7.4 基于iscsi的存储池
在存储虚拟机上添加一块15G的硬盘作为存储,首先先查看磁盘信息,目前还没显示出来。
[root@localhost ~]# fdisk -l | grep '/dev/*'
Disk /dev/nvme0n1: 42.9 GB, 42949672960 bytes, 83886080 sectors
/dev/nvme0n1p1   *        2048     2099199     1048576   83  Linux
/dev/nvme0n1p2         2099200    83886079    40893440   8e  Linux LVM
Disk /dev/mapper/centos-root: 37.7 GB, 37706792960 bytes, 73646080 sectors
Disk /dev/mapper/centos-swap: 4160 MB, 4160749568 bytes, 8126464 sectors
查看总线并进行重新扫描SCSI总线,已经添加到了
#查看总线并进行重新扫描SCSI总线
[root@localhost ~]# ls /sys/class/scsi_host/
host0  host1  host2
[root@localhost ~]# echo "- - -" > /sys/class/scsi_host/host0/scan
[root@localhost ~]# echo "- - -" > /sys/class/scsi_host/host1/scan
[root@localhost ~]# echo "- - -" > /sys/class/scsi_host/host2/scan

#查看硬盘信息
[root@localhost ~]# fdisk -l | grep '/dev/*'
Disk /dev/nvme0n1: 42.9 GB, 42949672960 bytes, 83886080 sectors
/dev/nvme0n1p1   *        2048     2099199     1048576   83  Linux
/dev/nvme0n1p2         2099200    83886079    40893440   8e  Linux LVM
Disk /dev/mapper/centos-root: 37.7 GB, 37706792960 bytes, 73646080 sectors
Disk /dev/mapper/centos-swap: 4160 MB, 4160749568 bytes, 8126464 sectors
Disk /dev/sdb: 16.1 GB, 16106127360 bytes, 31457280 sectors
准备分区和创建文件系统
[root@localhost ~]# fdisk /dev/sdb
[root@localhost ~]# mkfs.ext4 /dev/sdb1
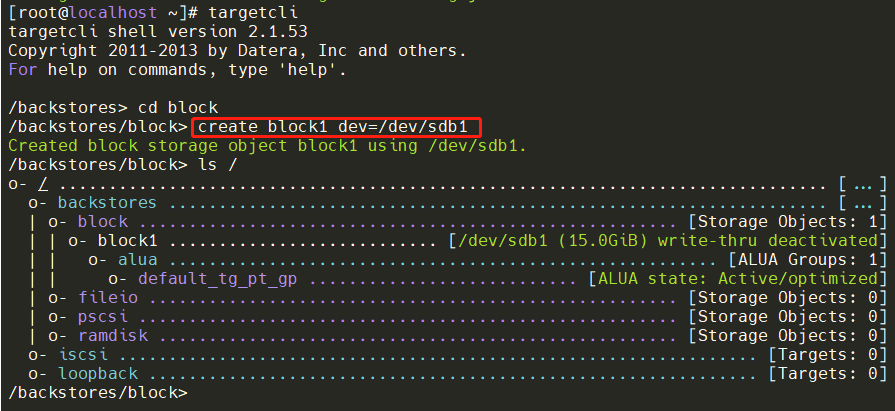
安装targetcli
[root@localhost ~]# yum install targetcli
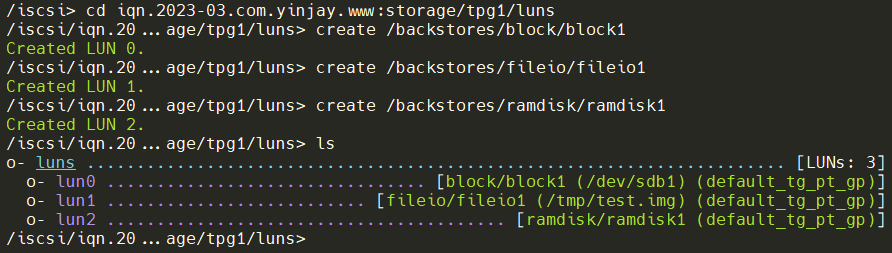
使用targetcli配置存储
1.创建块存储对象
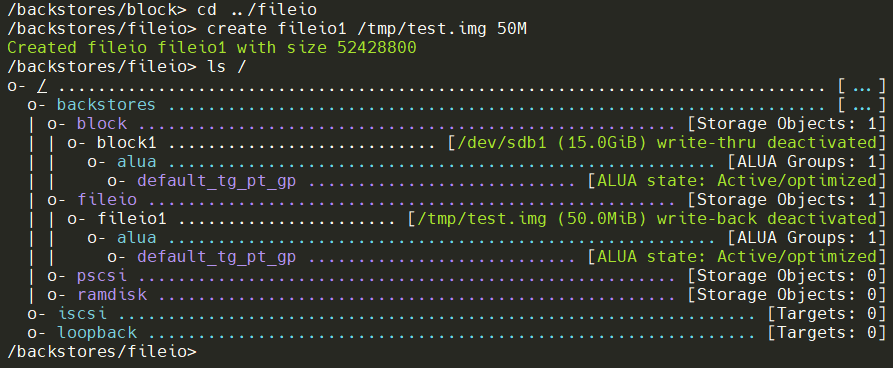
2.创建fileio对象
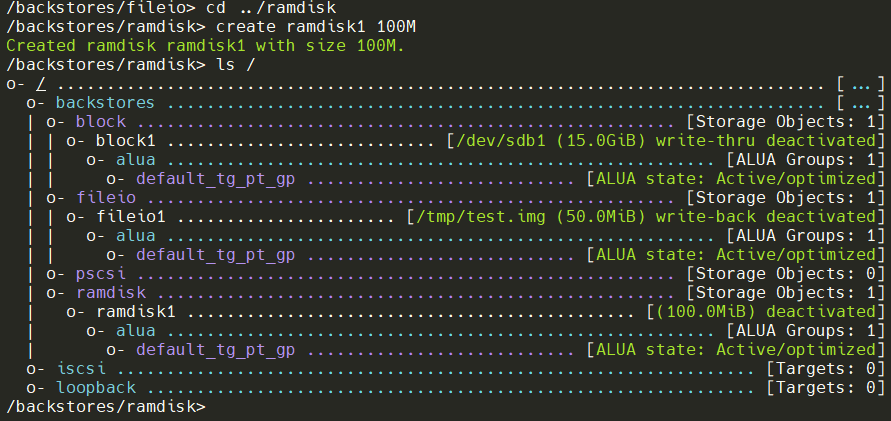
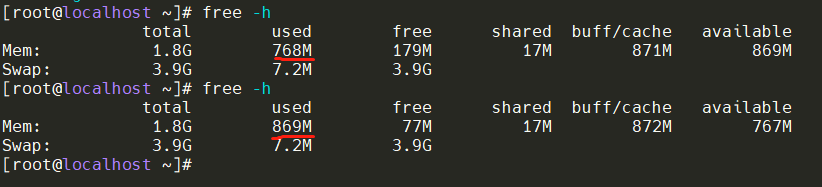
3.创建ramdisk对象
创建iscsi Target

每个iSCSI target需要有一个target portal group (TPG)。默认有一个名为tpg1,要切换到其中创建LUN与块存储对象、fileio对象、ramdisk对象映射。
切换到KVM服务器上,即iSCSI initiator查看其IQN,为了方便查看,修改其名称。

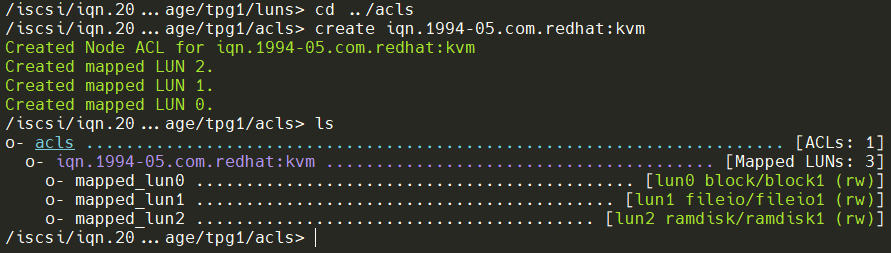
再到存储服务器上,进入到acsl目录中,为每个initiator创建ACL
切换到根,保存配置

启动target服务并设置开机自启

在KVM主机上通过iscsi先发现对端,再进行连接

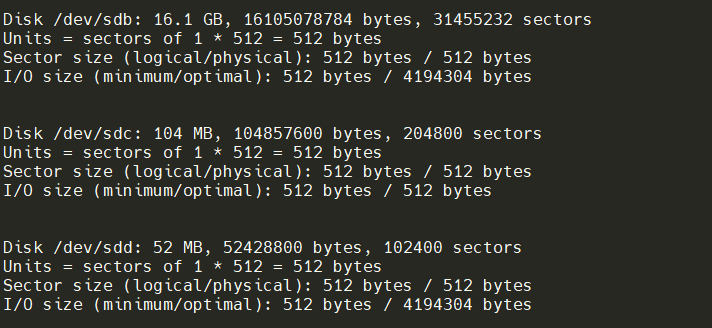
此时fdisk -l就能看到挂载的存储了
退出连接

下面进行kvm添加iscsi存储池(source是对方)

Tips:还有基于LVM的存储池和基于磁盘的存储池(此处不做实验啦)
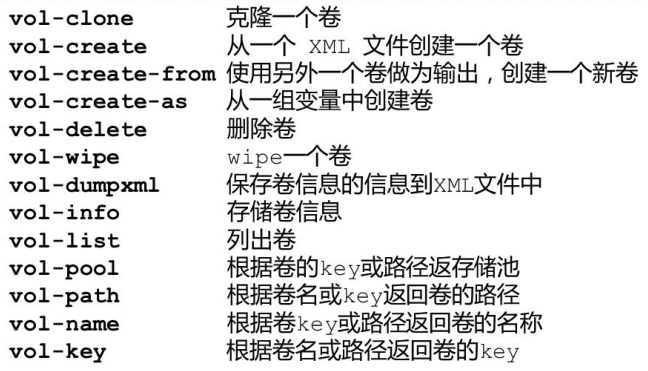
8. 存储卷管理
存储卷相关命令
先添加一个nfs存储池,在存储池里面创建存储卷,在存储主机上进行配置nfs,在KVM主机上添加存储池。
#创建挂载点
[root@localhost ~]# mkdir /home/kvm/guest_image

#添加存储池
[root@localhost ~]# virsh pool-define-as guest_image dir --target "/home/kvm/guest_image"
Pool guest_image defined

#激活存储池
[root@localhost ~]# virsh pool-start guest_image
Pool guest_image started

#自启动存储池
[root@localhost ~]# virsh pool-autostart guest_image
Pool guest_image marked as autostarted

#存储池列表
[root@localhost ~]# virsh pool-list --all
 Name                 State      Autostart
-------------------------------------------
 default              active     yes
 guest_image          active     yes
 image                active     yes
 iso                  active     yes
 storage              active     yes
8.1 显示池与卷的信息
8.2 向虚拟机添加卷
8.2.1 前置准备
先在kvm里面安装一台window虚拟机,后续进行挂载到这台虚拟机进行测试。
下面进行创建卷
#guest_image 指的是存储池,--format 指的是格式
virsh vol-create-as guest_image test1.qcow2 1G --format qcow2
查看卷和存储池的信息,有以下多钟方式
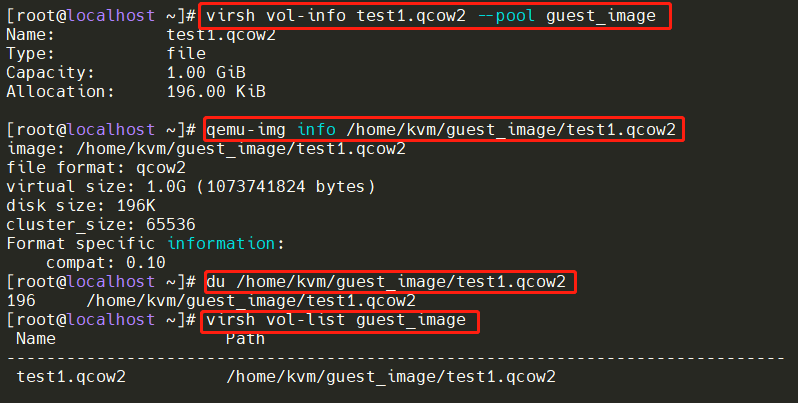
再通过qemu-img创建一个卷
qemu-img create -f qcow2 /home/kvm/guest_image/test2.qcow2 2g
刷新存储池就能看到卷了(virsh vol-create-as方式不需要刷新)

8.2.2 通过attach-device方式
这种方式是通过XML文件进行添加,先创建一个XML,编写下列内容
[root@localhost ~]# vim /tmp/test.xml
[root@localhost ~]# cat /tmp/test.xml
<disk type='file' device='disk'>
      <driver name='qemu' type='qcow2' cache='none'/>
      <source file='/home/kvm/guest_image/test1.qcow2'/>
      <target dev='vdb' bus='virtio'/>
    </disk>
命令详解
[root@localhost ~]# virsh attach-device --help
  NAME
    attach-device - attach device from an XML file

  SYNOPSIS
    attach-device <domain> <file> [--persistent] [--config] [--live] [--current]
     # 需要指定虚拟机和XML文件 最后跟上生效时间
  DESCRIPTION
    Attach device from an XML <file>.

  OPTIONS
    [--domain] <string>  domain name, id or uuid
    [--file] <string>  XML file
    --persistent     make live change persistent  #实时生效并写配置文件
    --config         affect next boot             #写配置文件,下次生效
    --live           affect running domain        #影响正在运行的虚拟机,重启后失效
    --current        affect current domain        #影响正在运行或停止的虚拟机,如果运行的虚拟机,重启后失效。
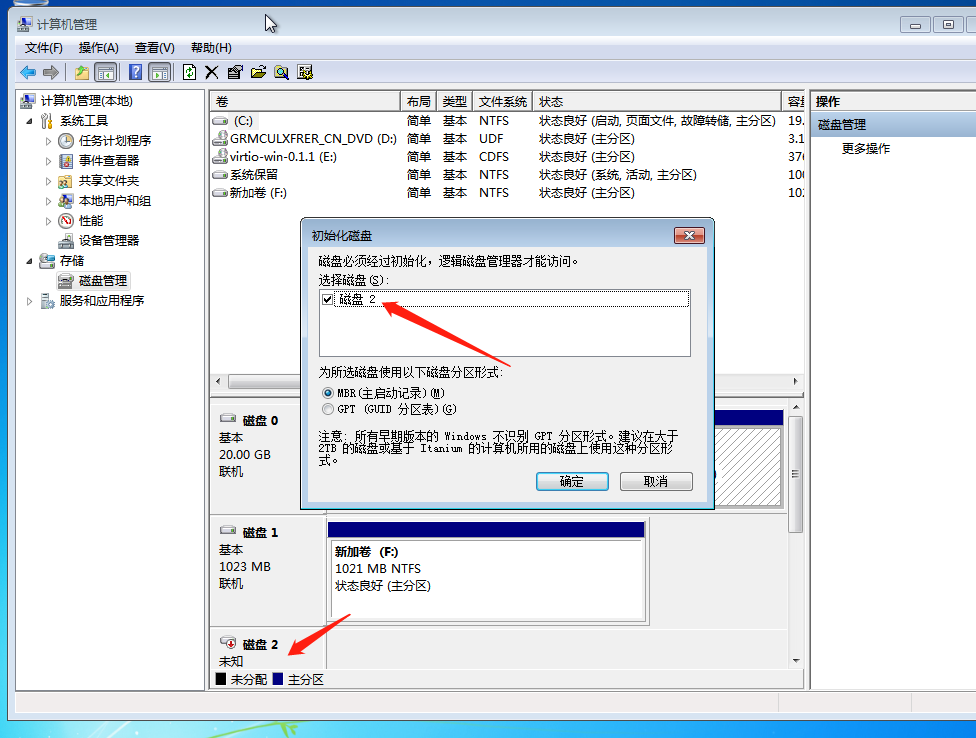
添加卷到虚拟机

已有新加磁盘,可以进行初始化

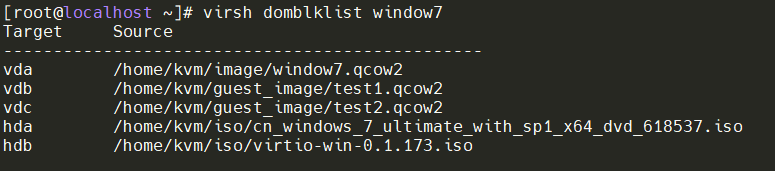
8.2.3 通过attach-disk方式

查看虚拟机的挂载磁盘情况

 浙公网安备 33010602011771号