网站架构之部署LNMP环境
网站架构之部署LNMP环境
一、配置php7.2
1.1 编写php yum仓库文件
[root@web01 ~]# vim /etc/yum.repos.d/php-yum.repo
[webtatic-php]
name = php Repository
baseurl = http://us-east.repo.webtatic.com/yum/el7/x86_64/
enabled = 1
gpgcheck = 0
1.2 更新软件包缓存
yum makecache
1.3 yum下载安装
yum install -y php72w php72w-cli php72w-common php72w-devel php72w-embedded php72w-fpm php72w-gd php72w-mbstring php72w-mysqlnd php72w-opcache php72w-pdo php72w-xml
1.4 修改php运行用户和组
[root@web01 ~]# head -n 10 /etc/php-fpm.d/www.conf
; Start a new pool named 'www'.
[www]

; Unix user/group of processes
; Note: The user is mandatory. If the group is not set, the default user's group
;       will be used.
; RPM: apache Choosed to be able to access some dir as httpd
user = nginx #修改为nginx
; RPM: Keep a group allowed to write in log dir.
group = nginx #修改为nginx
1.5 启动服务
[root@web01 ~]# systemctl start php-fpm
[root@web01 ~]# systemctl enable php-fpm
Created symlink from /etc/systemd/system/multi-user.target.wants/php-fpm.service to /usr/lib/systemd/ystem/php-fpm.service.
[root@web01 ~]# ps -ef | grep php-fpm
root      51316      1  0 04:20 ?        00:00:00 php-fpm: master process (/etc/php-fpm.conf)
nginx     51318  51316  0 04:20 ?        00:00:00 php-fpm: pool www
nginx     51319  51316  0 04:20 ?        00:00:00 php-fpm: pool www
nginx     51320  51316  0 04:20 ?        00:00:00 php-fpm: pool www
nginx     51321  51316  0 04:20 ?        00:00:00 php-fpm: pool www
nginx     51322  51316  0 04:20 ?        00:00:00 php-fpm: pool www
root      51360   2185  0 04:20 pts/0    00:00:00 grep --color=auto php-fpm
二、配置nginx
2.1 yum下载安装
yum install nginx -y
2.2 修改配置文件
[root@web01 ~]# vim /etc/nginx/conf.d/default.conf
server {
   listen 80;
   root /app/code/www;

   location / {
      index index.php;

  }

   location ~ \.php$ {
      fastcgi_pass 127.0.0.1:9000;
      fastcgi_param SCRIPT_FILENAME $document_root$fastcgi_script_name;
      include fastcgi_params;

  }

}
2.4 创建网站目录和测试文件
[root@web01 ~]# mkdir -p /app/code/www
[root@web01 ~]# vim /app/code/www/test.php
<?php
phpinfo();
?>
2.5 启动服务并测试
[root@web01 ~]# systemctl start nginx
[root@web01 ~]# systemctl enable nginx
Created symlink from /etc/systemd/system/multi-user.target.wants/nginx.service to /usr/lib/systemd/system/nginx.service.
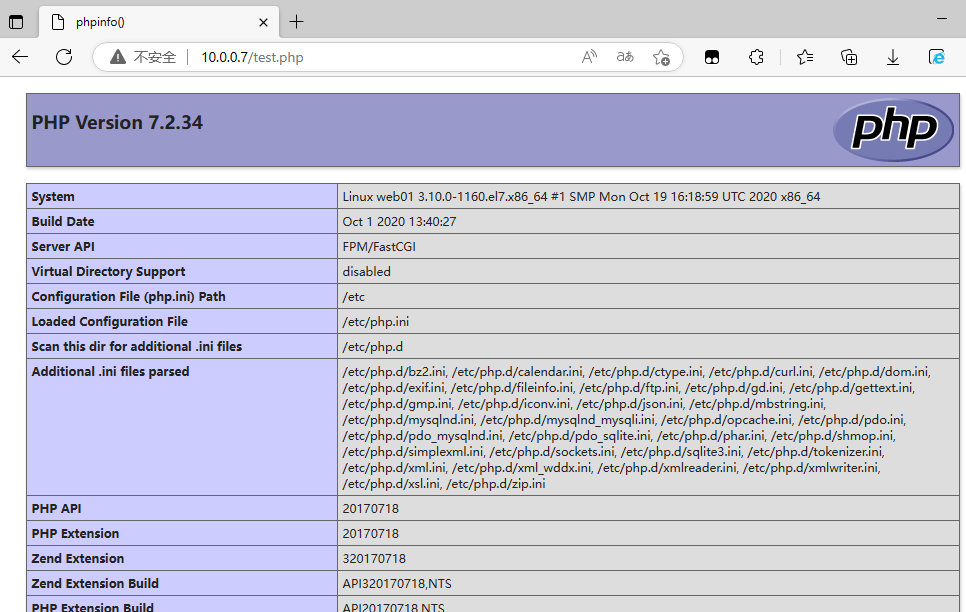
php解析成功
三、配置mariaDB
3.1 安装并启动mariaDB
[root@web01 ~]# yum install -y mariadb-server
[root@web01 ~]# systemctl start mariadb
[root@web01 ~]# systemctl enable mariadb
Created symlink from /etc/systemd/system/multi-user.target.wants/mariadb.service to /usr/lib/systemd/system/mariadb.service.
3.2 初始化配置
[root@web01 ~]# mysql_secure_installation

NOTE: RUNNING ALL PARTS OF THIS SCRIPT IS RECOMMENDED FOR ALL MariaDB
      SERVERS IN PRODUCTION USE!  PLEASE READ EACH STEP CAREFULLY!

In order to log into MariaDB to secure it, we'll need the current
password for the root user.  If you've just installed MariaDB, and
you haven't set the root password yet, the password will be blank,
so you should just press enter here.

Enter current password for root (enter for none):  #输入当前数据库root用户的密码,也就是回车
OK, successfully used password, moving on...

Setting the root password ensures that nobody can log into the MariaDB
root user without the proper authorisation.

Set root password? [Y/n] y   #是否给数据库root用户设置密码
New password:
Re-enter new password:
Password updated successfully!
Reloading privilege tables..
 ... Success!


By default, a MariaDB installation has an anonymous user, allowing anyone
to log into MariaDB without having to have a user account created for
them.  This is intended only for testing, and to make the installation
go a bit smoother.  You should remove them before moving into a
production environment.

Remove anonymous users? [Y/n] y   #删除匿名用户(无用)
 ... Success!

Normally, root should only be allowed to connect from 'localhost'.  This
ensures that someone cannot guess at the root password from the network.

Disallow root login remotely? [Y/n] y  #是否禁止数据库root远程登录
 ... Success!

By default, MariaDB comes with a database named 'test' that anyone can
access.  This is also intended only for testing, and should be removed
before moving into a production environment.

Remove test database and access to it? [Y/n] y  #删除测试用的数据库
 - Dropping test database...
 ... Success!
 - Removing privileges on test database...
 ... Success!

Reloading the privilege tables will ensure that all changes made so far
will take effect immediately.

Reload privilege tables now? [Y/n] y  #重启了下数据库(重新加载权限信息)
 ... Success!

Cleaning up...

All done!  If you've completed all of the above steps, your MariaDB
installation should now be secure.

Thanks for using MariaDB!
3.3 创建数据库用户并授权
#例子
#创建用户 增删改查(all) 在 blog库中的所有表 给谁 '用户名'@'白名单' 密码 'blog' 进行授权
grant all on blog.* to 'blog'@'172.16.1.%' identified by 'blog';

#删除用户
drop user 'blog'@'172.16.1.%';

#创建test这个用户并刷新权限相关表
grant all on *.* to 'test'@'172.16.1.%' identified by '123456';
flush privileges;
3.4 测试php调用mariaDB
编写测试文件
[root@web01 ~]# vim /app/code/www/mysql.php
<?php
//$link_id=mysqli_connect('数据库服务器的ip','用户','密码');
//数据库与php在一起 ip位置写为localhost
//不在一起 ip位置写数据库的ip
$link_id=mysqli_connect('172.16.1.7','test','123456');
if($link_id){
    echo "mysql successful by yinjay ! \n";
   }else{
    echo "you conn is down mysql error \n";
 }
?>
访问测试

作者:YinJay
Email:szgetshell@163.com

 浙公网安备 33010602011771号