Nginx实现session保持(四)
1. cookie与session
- session保存在服务器端(客户端仅保存一个sessionID),Cookie保存在客户端。
- session保存的是对象,Cookie保存的是字符串。cookie的存储限制数据量不大于4KB,而session的容量则是无限量的。
- session不能区分路径,同一个用户在访问同一个Web应用程序期间,所有的session在任何路径都可访问。Cookie中如果设置了路径参数,则在其他路径下无法访问。
- session默认保存SeesionID的方法是Cookie,如果客户端禁用了Cookie,服务器端应采用其他的替代方法替代SessionID。
- session在会话结束后就会关闭,但是Cookie可以经过持久化而长期保存在客户端的本地硬盘上。所以session也更安全。
Tips:cookie在下次请求需携带!
2.会话保持的方法
2.1 简单会话保持(四层)
简单会话保持(也称作基于源地址的会话保持、基于IP的会话保持)是指负载均衡器在作负载均衡时根据访问请求的源地址作为判断关连会话的依据。对来自同一IP地址的所有访问请求在作负载均时都会被保持到一台服务器上去。
简单会话保持中一个很重要的参数就是连接超时值,负载均衡器会为每一个处于保持状态中的会话设定一个时间值。若一个会话从上一次完成到下次再来之间的间隔时间小于超时值时,负载均衡器将会将新的连接进行会话保持;但如果这个间隔大于该超时值,负载均衡器会将新来的连接认为是新的会话然后进行负载平衡。
简单会话保持实现简单,只需要根据数据包三、四层的信息就可以实现,效率比较高。但此种方式存在的问题就在于,当多个客户端通过代理或地址转换的方式访问服务器时,由于来源地址一样,请求都被分配到同一台服务器上,会导致服务器之间的负载严重失衡。
另外一种情况是,同一个客户端产生大量并发,要求分配到多个服务器上处理的同时进行会话保持。这时基于客户端源地址的会话保持方法也会导致负载均衡失效。
Tips:nginx中的upstream模块 ip_hash方式就是这种!
2.2 存会话(session)的会话保持
此种方式通过多个后端服务器共享session的方式,实现与负载均衡同时的会话保持。主要有以下几种形式:
2.2.1 数据库存放
Session信息存储到数据库表以实现不同应用服务器间Session信息的共享。此种方式适合数据库访问量不大的网站。
- 优点:实现简单
- 缺点:由于数据库服务器相对于应用服务器更难扩展且资源更为宝贵,在高并发的Web应用中,最大的性能瓶颈通常出现在数据库服务器。因此如果将 Session存储到数据库表,频繁的数据库操作会影响业务。
2.2.2 文件系统存放
通过文件系统(比如NFS)来实现各台服务器间的Session共享。此种方式适合并发量不大的网站。
- 优点:各台服务器只需要mount存储Session的磁盘即可,实现较为简单。
- 缺点:NFS对高并发读写的性能并不高,在硬盘I/O性能和网络带宽上存在较大瓶颈,尤其是对于Session这样的小文件的频繁读写操作。
2.2.3 Memcached存放
利用Memcached来保存Session数据,直接通过内存的方式读取。
- 优点:效率高,在读写速度上会比存放在文件系统时快很多,而且多个服务器共用Session也更加方便,将这些服务器都配置成使用同一组memcached服务器就可以,减少了额外的工作量。
- 缺点:一旦宕机内存中的数据将会丢失,但对Session数据来说并不是严重的问题。如果网站访问量太大、Session太多的时候memcached会将不常用的部分删除,但是如果用户隔离了一段时间之后继续使用,将会发生读取失败的问题。
2.2.4 Redis存放
利用Redis来保存Session数据,redis的速度比memcached快很多。Memecache把数据全部存在内存之中,断电后会挂掉,数据不能超过内存大小。Redis有部份存在硬盘上,这样能保证数据的持久性。
优点:
- 数据存储在内存, 读写速度快,性能优异
- 支持数据持久化,便于数据备份、恢复
- 支持简单的事务,操作满足原子性
- 支持String、List、Hash、Set、Zset五种数据类型,满足多场景需求
- 支持主从复制,实现读写分离,分担读的压力
- 支持哨兵机制,实现自动故障转移
缺点:
- 数据存储在内存,主机断电则数据丢失
- 存储容量受到物理内存的限制,只能用于小数据量的高性能操作
- 在线扩容比较困难,系统上线时必须确保有足够的空间
- 用于缓存时,易出现’缓存雪崩‘,’缓存击穿‘等问题
2.3 基于cookie的会话保持(七层会话保持)
在基于cookie模式下负载均衡器负责插入cookie,后端服务器无需作出任何修改。当客户端进行第一次请求时,客户端的HTTP request(不带cookie)进入负载均衡器, CLB根据负载平衡算法策略选择后端一台服务器,并将请求发送至该服务器;后端服务器的HTTP response(不带cookie)被发回给负载均衡器。接下来负载均衡器将向该后端服务器插入cookie并将HTTP response返回到客户端。
当客户请求再次发生时,客户HTTP request(带有上次负载均衡器插入的cookie)进入CLB,然后CLB读出cookie里的会话保持数值,将HTTP request(带有与上面同样的cookie)发到指定的服务器,然后后端服务器进行请求回复;由于服务器并不写入cookie,HTTP response将不带cookie,该HTTP response再次经过进入CLB时,CLB将写入更新后的会话保持cookie。
Tips:腾讯云CLB的7层会话保持能力,就是基于这样的cookie插入的方式实现的。
3. 使用session案例
3.1 环境规划
| 主机 | IP | 服务 | 其他 |
|---|---|---|---|
| lb01 | 10.0.0.5 | nginx | 域名:session.yinjay.com |
| web01 | 10.0.0.7 | nginx、php | 网站目录:/app/code/session |
| web02 | 10.0.0.8 | nginx、php | 网站目录:/app/code/session |
| db01 | 10.0.0.51 | mariaDB、redis |
3.2 安装nginx
lb01、web01、web02下进行
#安装nginx
yum install nginx -y

#启动服务并设置开机自启
systemctl start nginx
systemctl enable nginx
web01、web02创建网站目录
mkdir /app/code/session/
web01、web02修改配置文件
vim /etc/nginx/conf.d/default.conf

#配置内容
server {
   listen 80;
   server_name session.yinjay.com;
   root /app/code/session;

   access_log /var/log/nginx/session.yinjay.com-access.log main;
   error_log /var/log/nginx/session.yinjay.com-error.log notice;

   location / {
      index index.php;

  }

   location ~ \.php$ {
      fastcgi_pass 127.0.0.1:9000;
      fastcgi_param SCRIPT_FILENAME $document_root$fastcgi_script_name;
      include fastcgi_params;

  }

}
lb01修改配置文件
upstream session_pools {
    server 10.0.0.7;
    server 10.0.0.8;

}


server {
    listen 80;
    server_name session.yinjay.com;

    location / {
        proxy_pass http://session_pools;
        proxy_set_header X-Forwarded-For $remote_addr;
        proxy_set_header Host $http_host;

  }

}
lb01、web01、web02都需重新加载配置文件
systemctl reload nginx
3.3 安装php
以下操作都在web01、web02下进行
vim /etc/yum.repos.d/php-yum.repo

#配置文件内容
[webtatic-php]
name = php Repository
baseurl = http://us-east.repo.webtatic.com/yum/el7/x86_64/
enabled = 1
gpgcheck = 0
更新软件包缓存
yum makecache
yum下载安装(php72w-pecl-redis很关键)
yum install -y php72w php72w-cli php72w-common php72w-devel php72w-embedded php72w-fpm php72w-gd php72w-mbstring php72w-mysqlnd php72w-opcache php72w-pdo php72w-xml php72w-pecl-redis
修改php运行用户和组
head -n 10 /etc/php-fpm.d/www.conf

#配置文件内容
; Start a new pool named 'www'.
[www]

; Unix user/group of processes
; Note: The user is mandatory. If the group is not set, the default user's group
;       will be used.
; RPM: apache Choosed to be able to access some dir as httpd
user = nginx #修改为nginx
; RPM: Keep a group allowed to write in log dir.
group = nginx #修改为nginx
启动服务并设置自启
systemctl start php-fpm
systemctl enable php-fpm
3.4 安装MariaDB
db01上进行
yum install -y mariadb-server
systemctl start mariadb
systemctl enable mariadb
初始化配置
[root@db01 ~]# mysql_secure_installation

NOTE: RUNNING ALL PARTS OF THIS SCRIPT IS RECOMMENDED FOR ALL MariaDB
      SERVERS IN PRODUCTION USE!  PLEASE READ EACH STEP CAREFULLY!

In order to log into MariaDB to secure it, we'll need the current
password for the root user.  If you've just installed MariaDB, and
you haven't set the root password yet, the password will be blank,
so you should just press enter here.

Enter current password for root (enter for none):  #输入当前数据库root用户的密码,也就是回车
OK, successfully used password, moving on...

Setting the root password ensures that nobody can log into the MariaDB
root user without the proper authorisation.

Set root password? [Y/n] y   #是否给数据库root用户设置密码
New password:
Re-enter new password:
Password updated successfully!
Reloading privilege tables..
 ... Success!


By default, a MariaDB installation has an anonymous user, allowing anyone
to log into MariaDB without having to have a user account created for
them.  This is intended only for testing, and to make the installation
go a bit smoother.  You should remove them before moving into a
production environment.

Remove anonymous users? [Y/n] y   #删除匿名用户(无用)
 ... Success!

Normally, root should only be allowed to connect from 'localhost'.  This
ensures that someone cannot guess at the root password from the network.

Disallow root login remotely? [Y/n] y  #是否禁止数据库root远程登录
 ... Success!

By default, MariaDB comes with a database named 'test' that anyone can
access.  This is also intended only for testing, and should be removed
before moving into a production environment.

Remove test database and access to it? [Y/n] y  #删除测试用的数据库
 - Dropping test database...
 ... Success!
 - Removing privileges on test database...
 ... Success!

Reloading the privilege tables will ensure that all changes made so far
will take effect immediately.

Reload privilege tables now? [Y/n] y  #重启了下数据库(重新加载权限信息)
 ... Success!

Cleaning up...

All done!  If you've completed all of the above steps, your MariaDB
installation should now be secure.

Thanks for using MariaDB!
创建session这个用户并刷新权限相关表
[root@db01 ~]# mysql -uroot -p
Enter password:
Welcome to the MariaDB monitor.  Commands end with ; or \g.
Your MariaDB connection id is 11
Server version: 5.5.68-MariaDB MariaDB Server

Copyright (c) 2000, 2018, Oracle, MariaDB Corporation Ab and others.

Type 'help;' or '\h' for help. Type '\c' to clear the current input statement.

MariaDB [(none)]> grant all on *.* to 'session'@'10.0.0.%' identified by '123456';
Query OK, 0 rows affected (0.01 sec)

MariaDB [(none)]> flush privileges;
Query OK, 0 rows affected (0.00 sec)

MariaDB [(none)]> select host,user from mysql.user;
+-----------+---------+
| host      | user    |
+-----------+---------+
| 10.0.0.%  | session |
| 127.0.0.1 | root    |
| ::1       | root    |
| localhost | root    |
+-----------+---------+
4 rows in set (0.00 sec)
3.5 安装redis
db01下进行
yum install -y redis
更改redis服务监听地址
[root@db01 ~]# grep -n '^bind' /etc/redis.conf
61:bind 127.0.0.1
[root@db01 ~]# sed -i '61s/127.0.0.1/10.0.0.51/' /etc/redis.conf
[root@db01 ~]# grep -n '^bind' /etc/redis.conf
61:bind 10.0.0.51
启动redis服务并设置开机自启
[root@db01 ~]# systemctl start redis
[root@db01 ~]# systemctl enable redis
Created symlink from /etc/systemd/system/multi-user.target.wants/redis.service to /usr/lib/systemd/system/redis.service.
检查服务状态
[root@db01 ~]# ps -ef |grep redis
redis     51278      1  0 08:26 ?        00:00:00 /usr/bin/redis-server 10.0.0.51:6379
root      51285   2533  0 08:26 pts/0    00:00:00 grep --color=auto redis
查询redis中的数据,目前为空
[root@db01 ~]# redis-cli -h 10.0.0.51
10.0.0.51:6379> keys *
(empty list or set)
10.0.0.51:6379>
3.6 安装phpMyAdmin
3.6.1 下载并解压源码包
web01、web02下进行
#下载
wget https://files.phpmyadmin.net/phpMyAdmin/5.2.1/phpMyAdmin-5.2.1-all-languages.zip -O /app/code/session/phpMyAdmin.zip --no-check-certificate

 #解压
cd /app/code/session/
unzip phpMyAdmin.zip
mv phpMyAdmin-5.2.1-all-languages/* .
3.6.2 修改代码连接的数据库
web01、web02下进行
#网站主目录下进行,修改30行的host信息
[root@web01 session]# cp config.sample.inc.php config.inc.php
[root@web01 session]# vim config.inc.php
 30 $cfg['Servers'][$i]['host'] = '10.0.0.51';

[root@web02 session]# cp config.sample.inc.php config.inc.php
[root@web02 session]# vim config.inc.php
 30 $cfg['Servers'][$i]['host'] = '10.0.0.51';
3.6.3 更改session目录所有者权限
因为还没改用为redis存储session,phpMyAdmin默认还是用本地存储。先授予权限,才可以打开phpMyAdmin管理界面。
#tail -n 4 /etc/php-fpm.d/www.conf
php_value[session.save_handler] = files
php_value[session.save_path]    = /var/lib/php/session
php_value[soap.wsdl_cache_dir]  = /var/lib/php/wsdlcache

#web01、web02进行
chown nginx.nginx /var/lib/php/session/
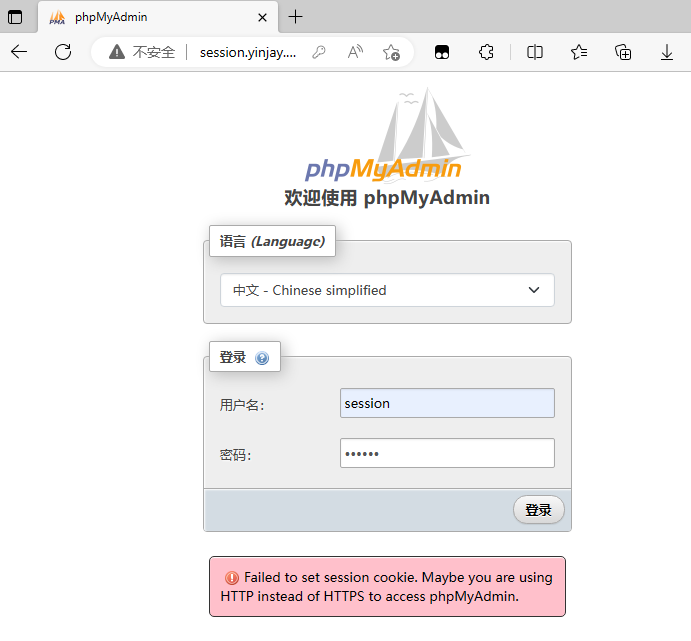
3.6.4 访问测试
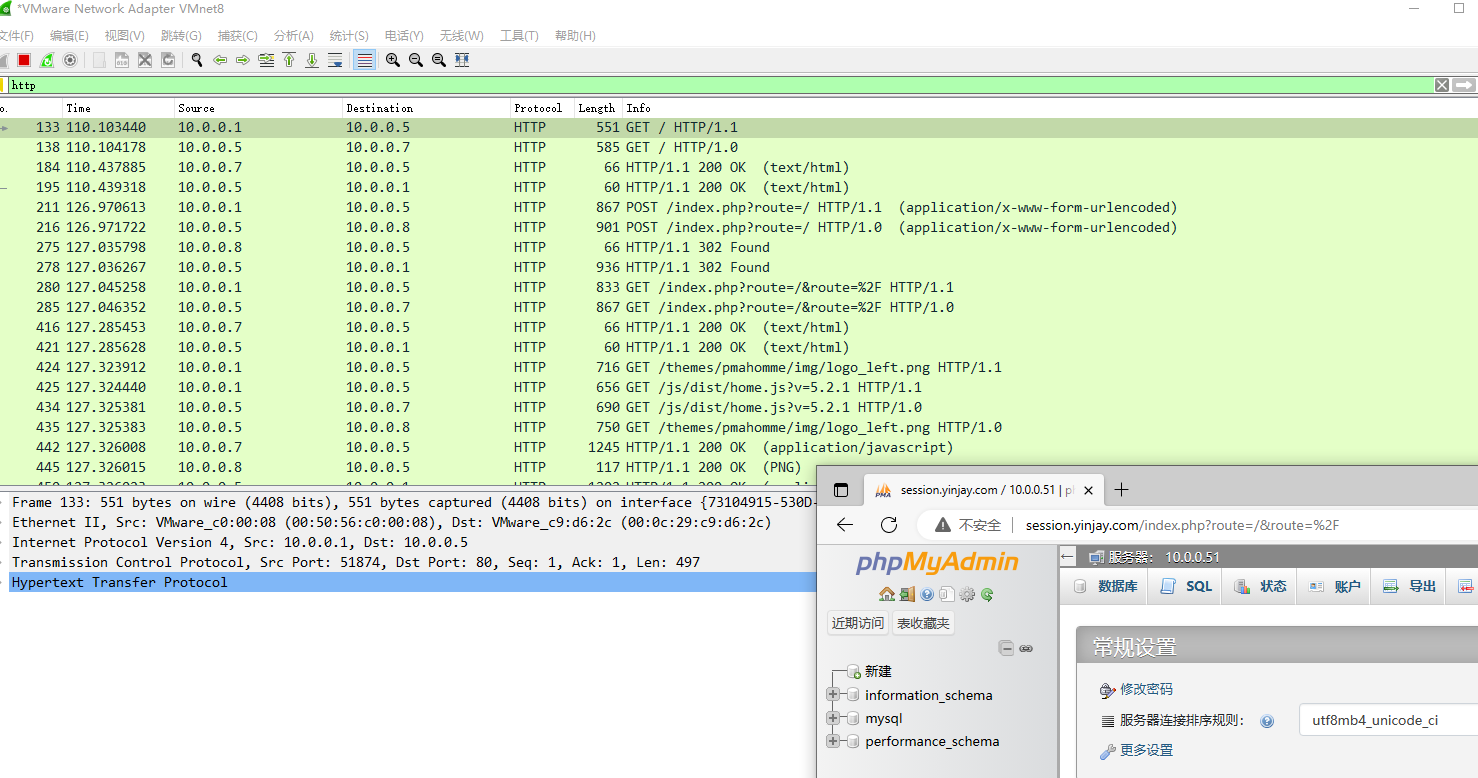
宿主机添加一条host记录10.0.0.5 session.yinjay.com后并访问。这一版比较智能,直接提示没有做会话保持。以前的版本点击登录就会反复进不去,因为在负载均衡的情况下,每一次请求都是不同的后端节点,查不到你的session,自然登录不了。
3.6.5 修改配置支持redis存储
web01、web02下进行
#修改配置
vim /etc/php-fpm.d/www.conf

#修改内容如下
tail -n 5 /etc/php-fpm.d/www.conf
; Set session path to a directory owned by process user
php_value[session.save_handler] = redis
php_value[session.save_path]    = tcp://10.0.0.51:6379
php_value[soap.wsdl_cache_dir]  = /var/lib/php/wsdlcache

#重新加载php配置
systemctl reload php-fpm
3.6.6 再次访问测试
正常负载,同时没有被退出。
查看redis
[root@db01 ~]# redis-cli -h 10.0.0.51
10.0.0.51:6379> keys *
1) "PHPREDIS_SESSION:06a7624baab49b1f405f3044a323f0a0"
删除key,再刷新页面,登陆状态失效
10.0.0.51:6379> FLUSHALL
OK
10.0.0.51:6379> keys *
(empty list or set)
10.0.0.51:6379>

 浙公网安备 33010602011771号