Nginx实现负载均衡、动静分离(三)
1. 环境规划
| 主机 | IP | 作用 | 服务 | 备注 |
|---|---|---|---|---|
| lb01 | 10.0.0.5 | 负载均衡 | nginx | |
| web01 | 10.0.0.7 | web节点 | nginx | 提供静态资源 |
| web02 | 10.0.0.8 | web节点 | nginx | 提供静态资源 |
| web03 | 10.0.0.9 | web节点 | nginx | 动态请求/资源 |
| db01 | 10.0.0.51 | 存放wordpress数据库 | mariaDB | |
| nfs01 | 10.0.0.31 | 存放wordpress博客用户上传的内容 | nfs、rpcbind |
2.web节点部署
2.1 安装nginx环境
web01、web02、web03下进行
#安装nginx
yum install nginx -y

#启动服务并设置开机自启
systemctl start nginx
systemctl enable nginx
2.2 安装php环境
以下操作都在web01、web02、web03下进行
vim /etc/yum.repos.d/php-yum.repo

#配置文件内容
[webtatic-php]
name = php Repository
baseurl = http://us-east.repo.webtatic.com/yum/el7/x86_64/
enabled = 1
gpgcheck = 0
更新软件包缓存
yum makecache
yum下载安装
yum install -y php72w php72w-cli php72w-common php72w-devel php72w-embedded php72w-fpm php72w-gd php72w-mbstring php72w-mysqlnd php72w-opcache php72w-pdo php72w-xml
修改php运行用户和组
head -n 10 /etc/php-fpm.d/www.conf

#配置文件内容
; Start a new pool named 'www'.
[www]

; Unix user/group of processes
; Note: The user is mandatory. If the group is not set, the default user's group
;       will be used.
; RPM: apache Choosed to be able to access some dir as httpd
user = nginx #修改为nginx
; RPM: Keep a group allowed to write in log dir.
group = nginx #修改为nginx
启动服务并设置自启
systemctl start php-fpm
systemctl enable php-fpm
2.3 修改配置文件
web01、web02、web03下进行
vim /etc/nginx/conf.d/default.conf

#配置内容
server {
   listen 80;
   server_name blog.yinjay.com;
   root /app/code/wordpress;

   access_log /var/log/nginx/blog.yinjay.com-access.log main;
   error_log /var/log/nginx/blog.yinjay.com-error.log notice;

   location / {
      index index.php;

  }

   location ~ \.php$ {
      fastcgi_pass 127.0.0.1:9000;
      fastcgi_param SCRIPT_FILENAME $document_root$fastcgi_script_name;
      include fastcgi_params;

  }

}
2.4 创建网站目录和测试文件
#创建目录
mkdir -p /app/code/wordpress
#更改目录所有者
chown nginx.nginx /app/code/wordpress
#创建测试文件
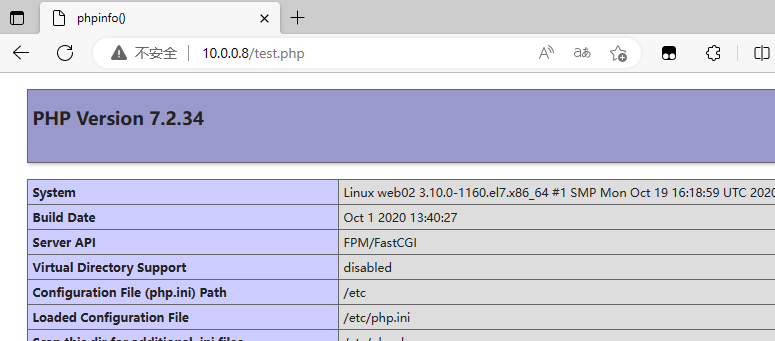
vim /app/code/wordpress/test.php
#配置文件内容如下
<?php
phpinfo();
?>
#重新加载配置文件
systemctl reload nginx
web01、web02、web03均需要出现以下内容
2. NFS存储部署
2.1 安装NFS、RPC服务
[root@nfs01 ~]# yum install -y nfs-utils rpcbind   #如果rpc服务已有安装可以忽略rpc相关步骤
[root@nfs01 ~]# systemctl enable rpcbind
[root@nfs01 ~]# systemctl enable nfs
[root@nfs01 ~]# systemctl start rpcbind
[root@nfs01 ~]# systemctl start nfs

[root@nfs01 ~]# rpcinfo -p  #通过此命令可查看是否有NFS向RPC相关注册信息
2.2 修改配置文件
[root@nfs01 ~]# vim /etc/exports
#共享/nfsdata/目录
/nfsdata   10.0.0.0/24(rw,all_squash,anonuid=982,anongid=982)
#10.0.0.0/24网段对nfs服务端的/nfsdata目录,拥有读写权限。
[root@nfs01 ~]# systemctl reload nfs
2.3 创建用户、共享目录,修改所有者
#创建用户需要跟nginx用户同id
[root@nfs01 ~]# useradd -u 982 -s /sbin/nologin -M nginx

#创建共享目录
[root@nfs01 ~]# mkdir -p /nfsdata

#更改目录所有者
[root@nfs01 ~]# chown nginx.nginx /nfsdata
2.4 显示服务状态
#显示NFS服务器可供NFS客户端连接的信息内容
[root@nfs01 ~]# showmount -e 10.0.0.31
3. mariaDB部署
3.1 安装mariaDB
db01上进行
[root@db01 ~]# yum install -y mariadb-server
[root@db01 ~]# systemctl start mariadb
[root@db01 ~]# systemctl enable mariadb
Created symlink from /etc/systemd/system/multi-user.target.wants/mariadb.service to /usr/lib/systemd/system/mariadb.service.
3.2 初始化配置
[root@db01 ~]# mysql_secure_installation

NOTE: RUNNING ALL PARTS OF THIS SCRIPT IS RECOMMENDED FOR ALL MariaDB
      SERVERS IN PRODUCTION USE!  PLEASE READ EACH STEP CAREFULLY!

In order to log into MariaDB to secure it, we'll need the current
password for the root user.  If you've just installed MariaDB, and
you haven't set the root password yet, the password will be blank,
so you should just press enter here.

Enter current password for root (enter for none):  #输入当前数据库root用户的密码,也就是回车
OK, successfully used password, moving on...

Setting the root password ensures that nobody can log into the MariaDB
root user without the proper authorisation.

Set root password? [Y/n] y   #是否给数据库root用户设置密码
New password:
Re-enter new password:
Password updated successfully!
Reloading privilege tables..
 ... Success!


By default, a MariaDB installation has an anonymous user, allowing anyone
to log into MariaDB without having to have a user account created for
them.  This is intended only for testing, and to make the installation
go a bit smoother.  You should remove them before moving into a
production environment.

Remove anonymous users? [Y/n] y   #删除匿名用户(无用)
 ... Success!

Normally, root should only be allowed to connect from 'localhost'.  This
ensures that someone cannot guess at the root password from the network.

Disallow root login remotely? [Y/n] y  #是否禁止数据库root远程登录
 ... Success!

By default, MariaDB comes with a database named 'test' that anyone can
access.  This is also intended only for testing, and should be removed
before moving into a production environment.

Remove test database and access to it? [Y/n] y  #删除测试用的数据库
 - Dropping test database...
 ... Success!
 - Removing privileges on test database...
 ... Success!

Reloading the privilege tables will ensure that all changes made so far
will take effect immediately.

Reload privilege tables now? [Y/n] y  #重启了下数据库(重新加载权限信息)
 ... Success!

Cleaning up...

All done!  If you've completed all of the above steps, your MariaDB
installation should now be secure.

Thanks for using MariaDB!
3.3 创建数据库和用户并授权
#例子
#创建用户 增删改查(all) 在 wordpress库中的所有表 给谁 '用户名'@'白名单' 密码 'blog' 进行授权
grant all on wordpress.* to 'wordpress'@'10.0.0.%' identified by '123456';
#删除用户
drop user 'wordpress'@'10.0.0.%';
#只执行下列操作
#1.创建wordpress这个数据库
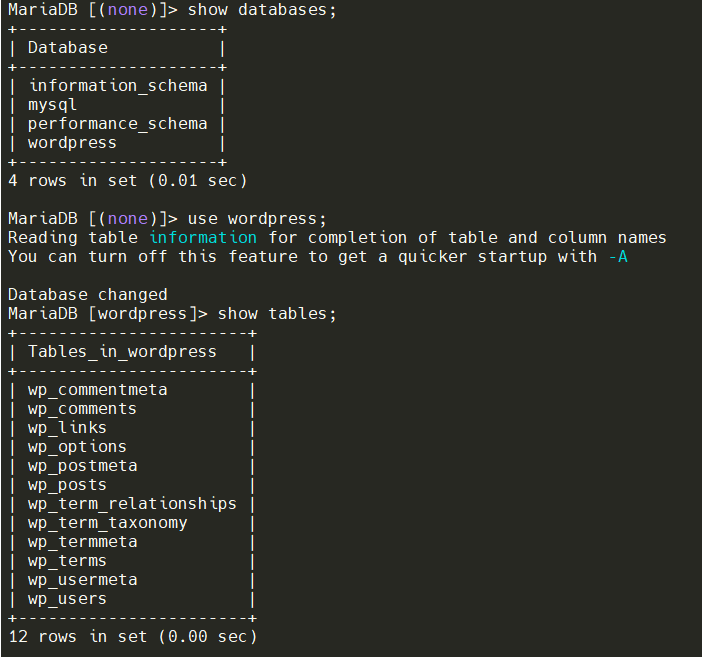
create database wordpress;
#2.创建wordpress这个用户并刷新权限相关表
grant all on wordpress.* to 'wordpress'@'10.0.0.%' identified by '123456';
flush privileges;
3.4 测试php调用mariaDB
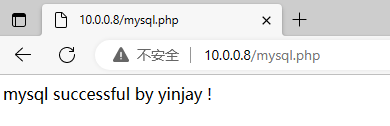
在web01、web02、web03编写测试文件
vim /app/code/wordpress/mysql.php

#配置内容如下:
<?php
//$link_id=mysqli_connect('数据库服务器的ip','用户','密码');
//数据库与php在一起 ip位置写为localhost
//不在一起 ip位置写数据库的ip
$link_id=mysqli_connect('10.0.0.51','wordpress','123456');
if($link_id){
    echo "mysql successful by yinjay ! \n";
   }else{
    echo "you conn is down mysql error \n";
 }
?>
web01、web02、web03均需要出现以下情况
4. lb节点部署
4.1 安装nginx环境
在lb01上进行
#安装nginx
yum install nginx -y

#启动服务并设置开机自启
systemctl start nginx
systemctl enable nginx
4.2 修改配置文件
#先创建一个lb_pools负载池,实现负载均衡,后续动静分离再修改此配置文件
[root@lb01 ~]# cat /etc/nginx/conf.d/blog.yinjay.com.conf
upstream lb_pools {

    server 10.0.0.7:80;
    server 10.0.0.8:80;
    server 10.0.0.9:80;

}

server {
   listen 80;
   server_name blog.yinjay.com;

   access_log /var/log/nginx/blog.yinjay.com-access.log main;
   error_log /var/log/nginx/blog.yinjay.com-error.log notice;

   location / {
      proxy_pass http://lb_pools;
      proxy_set_header X-Forwarded-For $remote_addr;
      proxy_set_header Host $http_host;
  }

}
4.3 重新加载配置
[root@lb01 ~]# systemctl reload nginx
5. wordpress部署
5.1 安装wordpress
在web01上传wordpress程序包进行解压
[root@web01 wordpress]# ll
total 20588
-rw-r--r-- 1 root root      347 Mar  8 01:05 mysql.php
-rw-r--r-- 1 root root       20 Mar  8 00:42 test.php
-rw-r--r-- 1 root root 21069774 Mar  8 01:11 wordpress-5.9.3-zh_CN.zip

#解压
[root@web01 wordpress]# unzip wordpress-5.9.3-zh_CN.zip
[root@web01 wordpress]# mv wordpress/* .
[root@web01 wordpress]# rm -rf wordpress-5.9.3-zh_CN.zip
[root@web01 wordpress]# rm -rf wordpress

#更改文件所有者
[root@web01 wordpress]# chown nginx.nginx /app/code/wordpress/*
在宿主机访问10.0.0.7(即web01)进行安装网站程序(建立数据表等初始化操作)
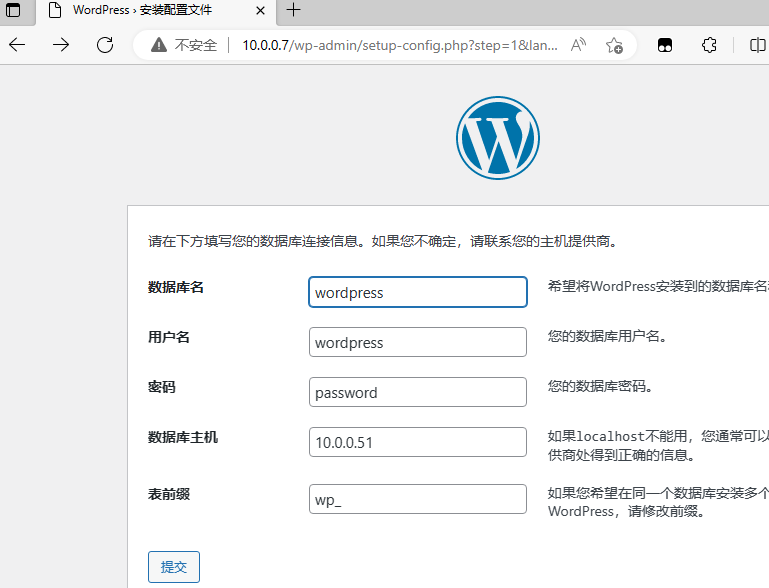
根据指引配置即可
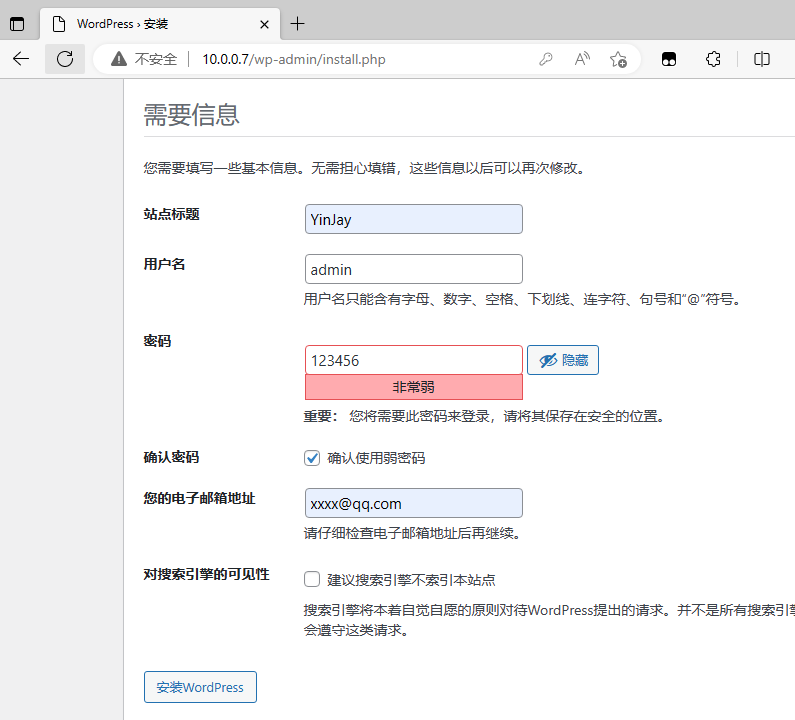
已经建立起数据表
5.2 打包整站传送给其他主机
#打包整站
[root@web01 wordpress]# pwd
/app/code/wordpress
[root@web01 wordpress]# tar zcf wordpress.tar.gz *

#传送到web02、web03
[root@web01 wordpress]# scp wordpress.tar.gz  10.0.0.8:/app/code/wordpress
root@10.0.0.8's password:
wordpress.tar.gz                                                                                 100%   19MB  53.3MB/s   00:00

[root@web01 wordpress]# scp wordpress.tar.gz  10.0.0.9:/app/code/wordpress
root@10.0.0.9's password:
wordpress.tar.gz                                                                                 100%   19MB  58.5MB/s   00:00

#web02、web03解压并删除整站压缩包
[root@web02 wordpress]# tar xf wordpress.tar.gz
[root@web02 wordpress]# rm -rf wordpress.tar.gz

[root@web03 wordpress]# tar xf wordpress.tar.gz
[root@web03 wordpress]# rm -rf wordpress.tar.gz
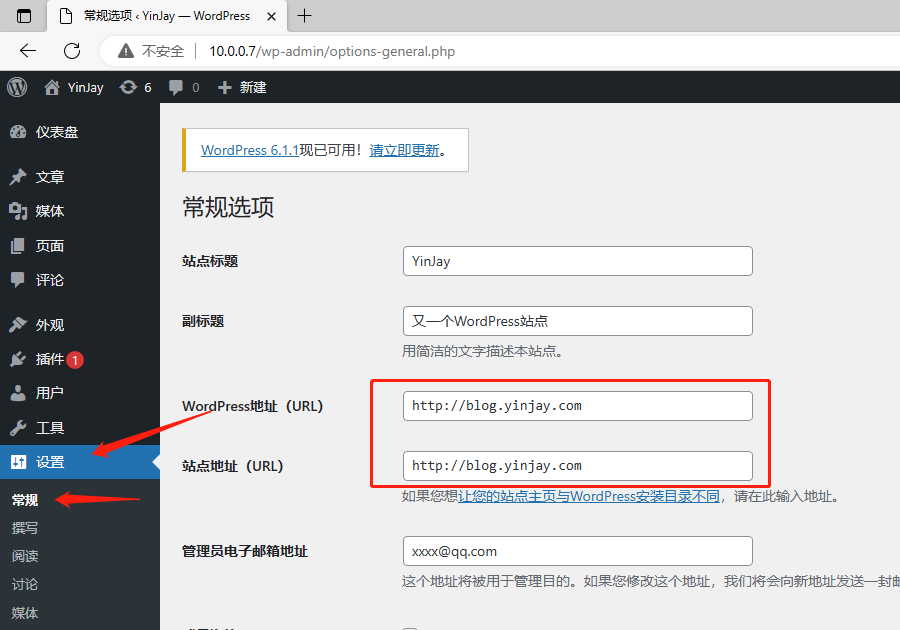
5.3 修改wordpress后台配置
访问10.0.0.7进入后台修改成域名,这样子访问域名就会找到lb01主机,然后进行负载均衡。
5.4 挂载NFS存储
web01、web02、web03上进行
#创建wordpress 图片上传目录
mkdir -p /app/code/wordpress/wp-content/uploads

#挂载nfs存储
mount -t nfs 10.0.0.31:/nfsdata /app/code/wordpress/wp-content/uploads/
6. 负载均衡测试
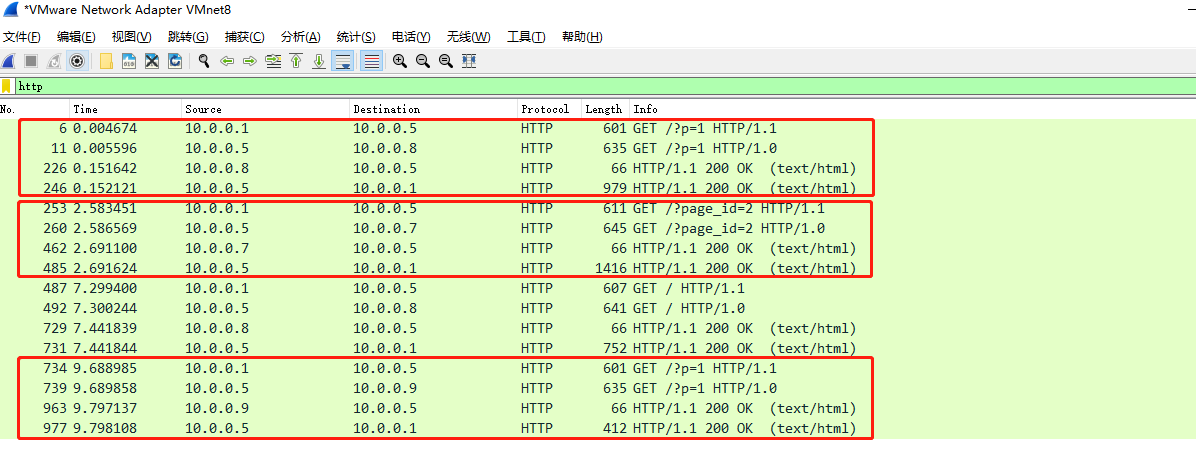
在宿主机上添加10.0.0.5 blog.yinjay.com这样一条host记录,然后开启wireshark抓包并浏览器访问blog.yinjay.com查看情况,不同的后端节点进行响应。
7. 动静分离测试
修改lb的配置,增加一个静态资源请求的负载均衡池(也可以为单一主机)
[root@lb01 ~]# vim /etc/nginx/conf.d/blog.yinjay.com.conf
upstream lb_pools {

    server 10.0.0.7:80;
    server 10.0.0.8:80;

}


upstream static {
    server 10.0.0.9:80;

}

server {
   listen 80;
   server_name blog.yinjay.com;

   access_log /var/log/nginx/blog.yinjay.com-access.log main;
   error_log /var/log/nginx/blog.yinjay.com-error.log notice;

   location / {
      proxy_pass http://lb_pools;
      proxy_set_header X-Forwarded-For $remote_addr;
      proxy_set_header Host $http_host;
  }

   location ~* \.(css|js|png|jpg)$ {
      proxy_pass http://static;
      proxy_set_header X-Forwarded-For $remote_addr;
      proxy_set_header Host $http_host;
  }

}
重新加载配置
[root@lb01 ~]# systemctl reload nginx
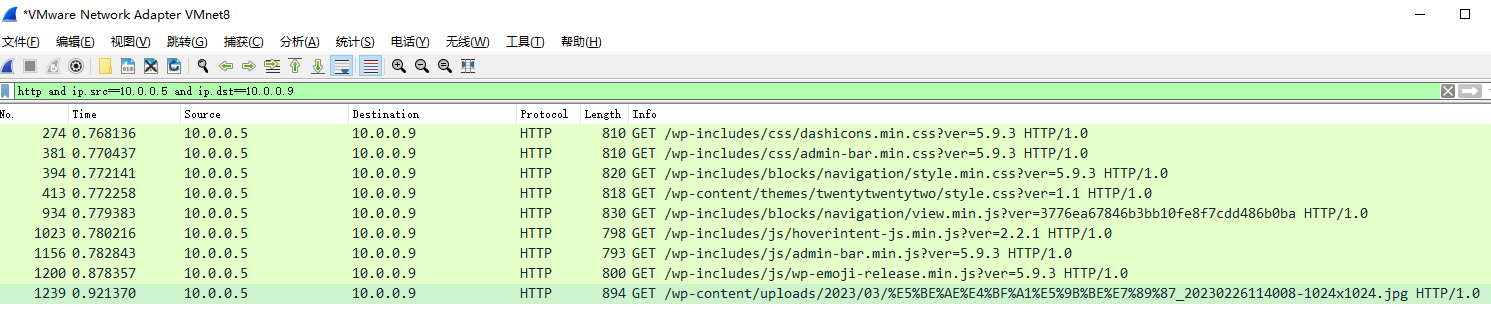
开启wireshark抓包,进行访问测试,通过http and ip.src==10.0.0.5 and ip.dst==10.0.0.9规则过滤,web03(10.0.0.9)承担静态资源的请求。
作者:YinJay
Email:szgetshell@163.com

 浙公网安备 33010602011771号