远程服务-ssh
远程服务-ssh
1. ssh服务概述
SSH是一种协议标准,其目的是实现安全远程登录以及其它安全网络服务,SSH仅仅是一协议标准,其具体的实现有很多,既有开源实现的OpenSSH,也有商业实现方案。使用范围最广泛的当然是开源实现OpenSSH。
2. ssh工作原理
2.1 为什么需要SSH?
SSH和telnet、ftp等协议主要的区别在于安全性。这就引出下一个问题:如何实现数据的安全呢?首先想到的实现方案肯定是对数据进行加密。加密的方式主要有两种:
- 对称加密(也称为秘钥加密)
- 非对称加密(也称公钥加密)
2.2 对称加密原理
加密解密使用同一套秘钥,用同一个密钥通过算法加密,用同一个密钥通过算法解密。对称加密的加密强度高,很难破解。但很难保证哪一个环节没有泄露密钥,一旦泄露,整个环境都使用这套密钥,将会变得不安全。
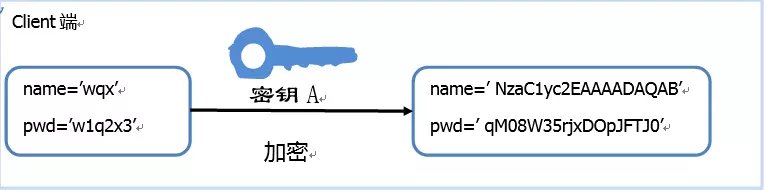
2.3 非对称加密原理
非对称加密有两个密钥:“公钥”和“私钥”。两个密钥的特性:公钥加密后的密文,只能通过对应的私钥进行解密。而通过公钥推理出私钥的可能性微乎其微。

-
远程Server收到Client端用户TopGun的登录请求,Server把自己的公钥发给用户。
-
Client使用这个公钥,将密码进行加密。
-
Client将加密的密码发送给Server端。
-
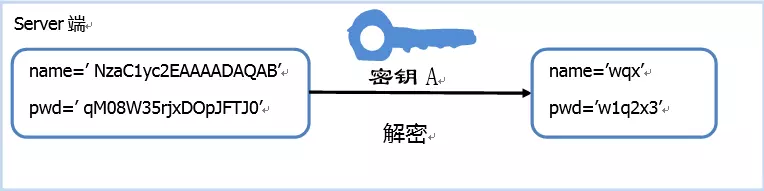
远程Server用自己的私钥,解密登录密码,然后验证其合法性。
-
若验证结果,给Client相应的响应。
私钥是Server端独有,这就保证了Client的登录信息即使在网络传输过程中被窃据,也没有私钥进行解密,保证了数据的安全性,这充分利用了非对称加密的特性。
3. OpenSSH服务端配置
| openssh服务端软件包内容 | |
|---|---|
| /etc/ssh/sshd_config | openssh服务端配置文件 |
| /usr/lib/systemd/system/sshd.service | daemon守护进程/服务 |
| /usr/sbin/sshd | openssh服务启动命令 |
[root@ms01 ~]# rpm -qa openssh*
openssh-clients-7.4p1-21.el7.x86_64   #openssh客户端
openssh-7.4p1-21.el7.x86_64
openssh-server-7.4p1-21.el7.x86_64    #openssh服务端
[root@ms01 ~]# ps -ef | grep sshd     #进程信息的查看
root       1161      1  0 21:21 ?        00:00:00 /usr/sbin/sshd -D
root       3144   1161  0 21:24 ?        00:00:02 sshd: root@pts/0
root       3146   1161  0 21:24 ?        00:00:00 sshd: root@notty
root      17009   3156  0 22:02 pts/0    00:00:00 grep --color=auto sshd
3.1 服务端配置文件详解
| 配置文件 | ||
|---|---|---|
| 性能优化 | UseDNS no | 是否开启DNS反向解析(ip--->域名)这个选项默认开启,会导致远程连接慢。 |
| GSSAPIAuthentication no | 是否开启GSSAPI认证,默认开启,开启后导致远程连接慢。 | |
| 安全配置 | Port 22 | 配置ssh服务端端口号,未来出于安全考虑要修改,默认是22端口。 |
| PermitRootLogin yes | 是否准许root远程登录,默认是yes(ubuntu系统默认是no) | |
| ListenAddress | 配置用户只能通过哪个ip连接进来(网卡),指定的本地网卡的ip地址,默认是: 0.0.0.0 所有用户都可以连接。 | |
| PasswordAuthentication yes | 是否准许通过密码登录(是否开启密码登录) | |
| UsePAM yes | 是否开启PAM认证 |
4. OpenSSH客户端命令
4.1 scp
从本机传输/etc目录到10.0.0.41主机下的/tmp目录
[root@ms01 ~]# scp -r -P 22  /etc/   10.0.0.41:/tmp
-r 递归传输目录
-P 指定ssh端口号,不指定默认是22
4.2 ssh
远程连接 10.0.0.41的22端口
[root@ms01 ~]# ssh -p 22 root@10.0.0.41
远程连接到10.0.0.41的22端口执行命令hostname并返回
[root@ms01 ~]# ssh -p 22 root@10.0.0.41 hostname
root@10.0.0.41's password:
backup
4.3 sftp
现在在10.0.0.61主机,连接10.0.0.41通过sftp
[root@ms01 ~]# sftp root@10.0.0.41
上传 put
put /etc/hostname  #把31的/etc/hostname 上传到41上

下载 get
get /etc/hostname  #把41的/etc/hostname 下载到31上

查看远程目录信息
ls
ls -l

查看本地目录信息
lls  -l  #l是local

删除远程文件/目录
rm
5. OpenSSH密码登陆
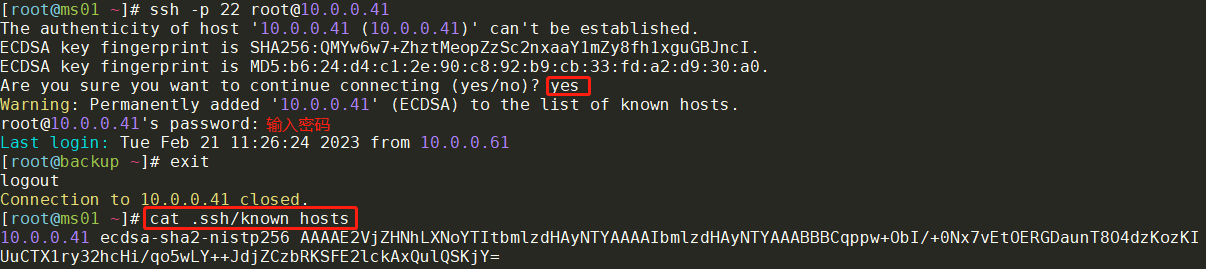
如果你是第一次登录对方主机,系统会出现下面的提示:

这段话的意思是,无法确认host主机的真实性,只知道它的公钥指纹,问你还想继续连接吗?所谓"公钥指纹",是指公钥长度较长(这里采用RSA算法,长达1024位),很难比对,所以对其进行MD5计算,将它变成一个128位的指纹。上例中是b6:24:d4:c1:2e:90:c8:92:b9:cb:33:fd:a2:d9:30:a0
很自然的一个问题就是,用户怎么知道远程主机的公钥指纹应该是多少?回答是没有好办法,远程主机必须在自己的网站上贴出公钥指纹,以便用户自行核对。但是我们平时也没注意那么多,直接输入yes就直接连接了,并输入了密码。
当远程主机的公钥被接受以后,它就会被保存在文件$HOME/.ssh/known_hosts之中。下次再连接这台主机,系统就会认出它的公钥已经保存在本地了,从而跳过警告部分,直接提示输入密码。每个SSH用户都有自己的known_hosts文件,此外系统也有一个这样的文件,通常是/etc/ssh/ssh_known_hosts,保存一些对所有用户都可信赖的远程主机的公钥。
6. OpenSSH密钥登陆
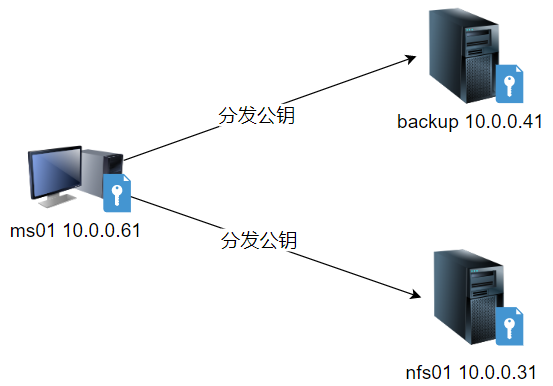
实验拓扑
1.创建密钥对
[root@ms01 ~]# ssh-keygen #生成密钥对
Generating public/private rsa key pair.  #正在创建密钥对
Enter file in which to save the key (/root/.ssh/id_rsa):  #指定存储密钥对的位置
Enter passphrase (empty for no passphrase):  #指定私钥密钥,默认回车
Enter same passphrase again:  #重复输入密码,默认回车
Your identification has been saved in /root/.ssh/id_rsa. #私钥创建在位置和名字
Your public key has been saved in /root/.ssh/id_rsa.pub. #公钥创建的位置和名字
The key fingerprint is:
SHA256:KB9EHBtqSYQiYVejJpDtkXxMVm1EgVczZw8CIvrUeTI root@ms01
The key's randomart image is:
+---[RSA 2048]----+
|o* BB=**=+= +    |
|* B++*+=+  * o   |
|.+.== Eo.     .  |
|  ++ . =         |
|    o o S        |
|     o .         |
|      .          |
|                 |
|                 |
+----[SHA256]-----+

[root@ms01 ~]# ll ~/.ssh/
total 12
-rw------- 1 root root 1675 Feb 20 23:56 id_rsa
-rw-r--r-- 1 root root  391 Feb 20 23:56 id_rsa.pub
-rw-r--r-- 1 root root  171 Feb 20 23:26 known_hosts
2.分发密钥(公钥)
#ssh-copy-id命令详情
[root@ms01 ~]# ssh-copy-id
-i <identity_file>
	指定认证文件(公钥)。
-n
	测试,不实际替换。
-p <port>
	指定端口。

#指定公钥文件,传送到指定主机
[root@ms01 ~]# ssh-copy-id -i ~/.ssh/id_rsa.pub root@10.0.0.41
/usr/bin/ssh-copy-id: INFO: Source of key(s) to be installed: "/root/.ssh/id_rsa.pub"
/usr/bin/ssh-copy-id: INFO: attempting to log in with the new key(s), to filter out any that are already installed
/usr/bin/ssh-copy-id: INFO: 1 key(s) remain to be installed -- if you are prompted now it is to install the new keys
root@10.0.0.41's password:

Number of key(s) added: 1

Now try logging into the machine, with:   "ssh 'root@10.0.0.41'"
and check to make sure that only the key(s) you wanted were added.
3.测试密钥登陆
[root@ms01 ~]# ssh root@10.0.0.41 hostname  #直接测试密钥登陆,不需要输入密码,直接执行
backup
7. OpenSSH密钥认证一键化部署
实现多主机免密登陆,ms01为主控端,其余两台为被控端。
7.1 清理环境(非必要)
ms01上进行
[root@ms01 ~]# rm -f ~/.ssh/*
7.2 编写脚本实现执行分发
先安装sshpass,执行yum install sshpass -y,具体脚本内容如下
#脚本内容
[root@ms01 ~]# cat /server/scripts/fenfa_pub.sh
#!/bin/bash
#desc:一键自动化创建和分发密钥

ip_list="10.0.0.41 10.0.0.31"  #要分发的主机IP
ssh_root_pass= "123456"   #主机密码
echo '-----------------------------------'
echo '1.创建key'
echo '-----------------------------------'

ssh-keygen -f ~/.ssh/id_rsa -P ''  #创建私钥和公钥

echo '-----------------------------------'
echo '2.分发pub key'


for ip in $ip_list  #循环IP_list变量中的IP进行分发公钥  “-o StrictHostKeyChecking=no”为取消首次连接的host检查警告
do
   sshpass -p$ssh_root_pass ssh-copy-id -i ~/.ssh/id_rsa.pub -o StrictHostKeyChecking=no root@$ip
done

echo '-----------------------------------'
echo '3.已完成分发!'


#脚本执行
[root@ms01 ~]# sh /server/scripts/fenfa_pub.sh
-----------------------------------
1.创建key
-----------------------------------
Generating public/private rsa key pair.
Your identification has been saved in /root/.ssh/id_rsa.
Your public key has been saved in /root/.ssh/id_rsa.pub.
The key fingerprint is:
SHA256:K3Optb0mJppnOwR27w0+hblc6m15PeBpRACw3tMPqWQ root@ms01
The key's randomart image is:
+---[RSA 2048]----+
|      ....       |
|       .  .      |
|      .    .     |
|    o... . ..    |
|   . o..Eo+.     |
|      .o==ooo    |
|     .o+*B +.+   |
|     .=*X+= = o  |
|    o+o*o=++   . |
+----[SHA256]-----+
-----------------------------------
2.分发pub key
/usr/bin/ssh-copy-id: INFO: Source of key(s) to be installed: "/root/.ssh/id_rsa.pub"
/usr/bin/ssh-copy-id: INFO: attempting to log in with the new key(s), to filter out any that are already installed
/usr/bin/ssh-copy-id: INFO: 1 key(s) remain to be installed -- if you are prompted now it is to install the new keys

Number of key(s) added: 1

Now try logging into the machine, with:   "ssh -o 'StrictHostKeyChecking=no' 'root@10.0.0.41'"
and check to make sure that only the key(s) you wanted were added.

/usr/bin/ssh-copy-id: INFO: Source of key(s) to be installed: "/root/.ssh/id_rsa.pub"
/usr/bin/ssh-copy-id: INFO: attempting to log in with the new key(s), to filter out any that are already installed
/usr/bin/ssh-copy-id: INFO: 1 key(s) remain to be installed -- if you are prompted now it is to install the new keys

Number of key(s) added: 1

Now try logging into the machine, with:   "ssh -o 'StrictHostKeyChecking=no' 'root@10.0.0.31'"
and check to make sure that only the key(s) you wanted were added.

-----------------------------------
3.已完成分发!
7.3 编写脚本实现一键检查
[root@ms01 ~]# cat /server/scripts/check_ssh.sh
#!/bin/bash
#desc 批量检查脚本

ip_list="10.0.0.31 10.0.0.41"
echo '--------------------------------------------'
echo '执行检查'
echo '--------------------------------------------'
for ip in $ip_list
do
  ssh root@$ip hostname
done

#执行检查脚本
[root@ms01 ~]# sh /server/scripts/check_ssh.sh
--------------------------------------------
执行检查
--------------------------------------------
nfs01
backup
8. 总结
1.known_hosts中存储的内容是什么?
known_hosts中存储是已认证的远程主机host key
2.host key何时加入known_hosts的?
当我们第一次通过SSH登录远程主机的时候,Client端会有如下提示:
此时,如果我们选择yes,那么该host key就会被加入到known_hosts中,格式如下:
[root@ms01 ~]# cat .ssh/known_hosts
10.0.0.41 ecdsa-sha2-nistp256 AAAAE2VjZHNhLXNoYTItbmlzdHAyNTYAAAAIbmlzdHAyNTYAAABBBCqppw+ObI/+0Nx7vEtOERGDaunT8O4dzKozKIUuCTX1ry32hcHi/qo5wLY++JdjZCzbRKSFE2lckAxQulQSKjY=
3.为什么需要known_hosts?
这个文件主要是通过Client和Server的双向认证,从而避免中间人(man-in-the-middle attack)攻击,每次Client向Server发起连接的时候,不仅仅Server要验证Client的合法性,Client同样也需要验证Server的身份,SSH client就是通过known_hosts中的host key来验证Server的身份的。

 浙公网安备 33010602011771号