
PHP编程与系统开发
PHP开发环境配置
一、开发环境
1、XAMPP或LNMP、WNMP,先安装widows版本的XMAPP-5.6版本(PHP 5.6)
2、VSCode:微软开发的集成开发环境(IDE)
二、安装教程
1、安装步骤
https://url.cy/YC70L3
2、部署文件主目录
xampp/htdocs/learn 为文件的主目录,在此创建的文件都可在http://localhost:8081/learn/下看到
3、测试安装是否成功
-
编写HTML代码
<font color="red">Yang</font> 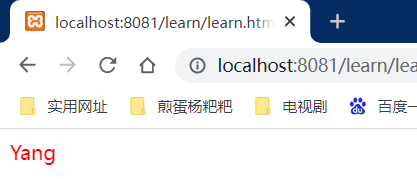
-
编写PHP代码
<?php echo "煎蛋杨粑粑"; ?> 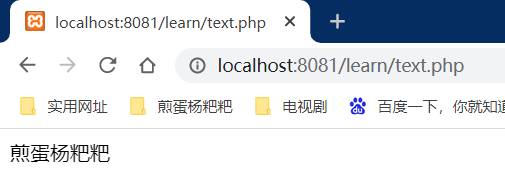
Web前端页面基本元素
一、HTML页面的构成要素
1、HTML(标记语言)
- 文本:字体、颜色、大小
- 图片:边框、大小、位置
- 超链接:图片、文本等均可以添加超链接
- 表格:用于展示行列构成的结构化数据,可以用表格展示,大小、背景,表格里可以放所有元素
- 表单
- 文本框
- 下拉框
- 单选框/复选框
- 按钮
- 文本域
- ………………
2、CSS
- 层叠样式表,用于对页面元素进行布局和美化
3、JavaScript
- 在浏览器中运行的解释型编程语言,用于进行页面的交互
- 前后端交互
- 用户之间的交互
二、HTML的基本元素的使用
<!DOCTYPE html> <html lang="en"> <head> <meta charset="UTF-8"> <meta name="viewport" content="width=device-width, initial-scale=1.0"> <title>这是一个Demo页面!</title> </head> <body> <!-- 常规情况,标记都是成对出现的 --> <!-- 在HTML中,文本内容不再建议使用 font 标签 --> <!-- 通常,文本、图片等元素都会放在容器中 --> <!-- </br> 强制换行 --> <font color = "#99CC33">Hello World!</font></br> <font color = "#0099CC" size = '5'>Yang~</font> <!-- div里可以放任意元素,默认换行 --> <!-- 使用DIV来包裹一段文本,并设置字体大小和颜色 --> <!-- 被style属性指定或包裹的,是css样式 --> <div style="color: aqua;font-size: 30px;">Hello World!</div> <div style="font-family: 幼圆;font-size: 20px; color: cadetblue;">Hello World!</div> <!-- 图片 --> <img src="image/可爱女孩马尾辫 绿色眼睛 脸 好看4k动漫人物壁纸_彼岸图网.jpg" width="500px"></br> <!-- 超链接 --> <!-- 使用target='_blank可以打开新的标签页 --> <a href="http://www.baidu.com" target='_blank'>Go!</a></br> <!-- 表格 --> <!-- 有行和列构成,主要使用三个标签 <table> 定义表格整体属性 <tr> 定义一行 <td> 指定一列 --> <table width="500" height= "300" border="1" > <tr> <td width='50%' bgcolor="#008080">Name</td> <td width='30%'>Snumber</td> <td width='20%'>Phone</td> </tr> <tr> <td>杨宇波</td> <td>2150511032</td> <td>18222362661</td> </tr> <tr> <td>4</td> <td>5</td> <td>6</td> </tr> </table> <!-- 表单 --> <input type="text" value="Hello"/></br> <input type="text" placeholder="请输入账户名"></br> <input type="password" placeholder="请输入密码"/> <input type="button" value="提交"> <!-- 直接的button标签也可以使用 --> <button>登录</button> <select> <option>Lebron</option> <option>Curry</option> <!-- selected 默认显示的选项 --> <option selected>Young</option> </select> </body> </html>
三、设计计算器
1、代码
-
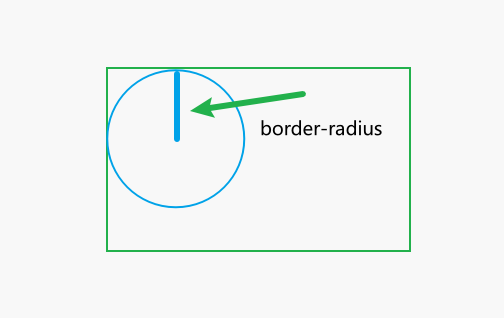
border-radius
2、实例
<!DOCTYPE html> <html lang="en"> <head> <meta charset="UTF-8"> <!--设置字符集--> <meta http-equiv="X-UA-Compatialbe" content="IE=dege"> <!--配置IE和Edge的兼容性--> <meta name="viewport" content="width=device-width, initial-scale=1.0"> <!--设置在手机上显示的效果--> <title>计算器</title> <!-- 定义样式表 --> <style> /* 类选择器 ,以 . 开头+类名*/ .button{ background-color:#928a97 ; /*设置背景色*/ margin: auto; /* 设置容器水平居中*/ border-radius:8px ; } /* 层次选择器,选择 button 类下面的所有标签为td的元素 */ .button tr td{ background-color:#99CCFF; border-radius: 10px; width: 25%; text-align: center; font-size: 30px; color: rgba(255, 255, 255); } .point-red{ width: 20px; height: 20px; background-color: rgb(238, 91, 84); float: left; /* 靠左浮动,不独自占用一行 */ margin-left: 10px; /* 左边间隔10px */ border-radius: 50%; /* 边框的半径 */ } .point-yellow{ width: 20px; height: 20px; background-color:rgb(248, 189, 50); float: left; margin-left: 10px; border-radius: 50%; } .point-green{ width: 20px; height: 20px; background-color:rgb(97, 202, 66); float: left; margin-left: 10px; border-radius: 50%; } .title{ color:white; /*文字颜色*/ font-size: 20px; float: right; margin-right:10px; } .xianshiqi{ border-radius:10px ; } </style> </head> <body> <!-- border常设置三个属性: solid:实线 dashed: 虚线 大小 颜色 --> <!-- bgcolor:背景颜色 cellspacing: 单元格之间的间隔 align='center' 居中显示 --> <table width='450' height='120' border="0" bgcolor=#928a97 cellspacing='4' align="center" class="xianshiqi"> <!-- 两行一列 --> <tr bgcolor='#FBE8D3' "> <td bgcolor="#FBE8D3" height='40'> <!-- 设计小圆点 --> <div class="point-red"></div> <div class="point-yellow"></div> <div class="point-green"></div> <div class="title">YikJiang</div> </td> </tr> <tr bgcolor='white'"> <td bgcolor="white" style="border: solid 2px #6699CC;"</td> </tr> </table> <!-- 五行四列,绘制计算机按钮 --> <!-- shift + alt + ↓ 复制代码到下一行 --> <!-- class :定义类 --> <table width='450' height ='400' border="0" cellspacing='4' class="button"> <tr> <td>AC</td> <td>+/-</td> <td>%</td> <td>÷</td> </tr> <tr> <td>7</td> <td>8</td> <td>9</td> <td>*</td> </tr> <tr> <td>4</td> <td>5</td> <td>6</td> <td>-</td> </tr> <tr> <td>1</td> <td>2</td> <td>3</td> <td>+</td> </tr> <tr> <td>0</td> <td>删除</td> <td >.</td> <td>=</td> </tr> </table> </body> </html>
使用DIV+CSS重构计算器
一、CSS的使用方式
- 要为HTML元素设定样式,有以下三种方式来使用CSS:
1、在元素中指定style属性
<td style="border: solid 2px #6699CC;"</td>
也称为内嵌样式,只针对对应的这个标签生效
2、在页面中嵌入style样式块
<style> td{ background-color:#6699CC width:25% text-align:center } </style>
通常建议将style标签放置于head标签中,可以针对当前页面的所有元素生效
3、在页面中引入外部CSS文件
<link rel="stylesheet" type="text/css" href="/page/css/bootstrap.css"/>
外部CSS文件,可以针对全站的引入这个CSS的多个页面生效,放置于head中
二、CSS选择器
选择器是指CSS如何与元素及样式建立关联关系的一种手段。
1、标签选择器
使用类型选择器,可以向这种元素类型的每个实例上应用的声明
/* 为当前页面中所有的单元格设计统计的样式 */ td{ background-color:#99CCFF; border-radius: 10px; width: 25%; text-align: center; font-size: 30px; color: rgba(255, 255, 255); }
2、类选择器
通过设置元素的class属性定位元素,在同一个页面中,多个元素可以归为同一个类
/*类选择器,以.开头,对元素中指定 class="title" 的元素设计样式*/ .button{ background-color:#928a97 ; /*设置背景色*/ margin: auto; /* 设置容器水平居中*/ border-radius:8px ; }
3、ID选择器
HTML页面的任何一个元素,即任何一个标签,都拥有ID这个属性,我们可以通过为元素设置一个唯一的ID标识符,进而利用CSS的ID选择器对其使用样式。
/*ID选择器,以#开头,对元素中指定 id='title' 的元素设计样式 */ #title{ color:white; font-size:22px; float:right; margin-right:10px; }
4、组合选择器
可以将标签选择器、ID选择器、类选择器和属性选择器等,组合成不同的选择器类型来构成更复杂的选择器,可以更加精确的处理希望赋予某种表示的元素,我们也可以通过指定父子关系来对元素进行选择
/* 组合使用ID和标签选择器,并实现了层次关系*/ #button tr td{ background-color:#99CCFF; border-radius: 10px; width: 25%; text-align: center; font-size: 30px; color: rgba(255, 255, 255); }
5、属性选择器
/*为DIV元素下拥有 type="button" 属性的元素设计样式*/ div [type="button"]{ clolor:white; font-size:22px; }
6、伪类选择器
设计伪类和伪元素可以实现其中的一些效果,使用伪类可以根据一些情况改变文档中链接的样式,如根据链接是否被访问,何时被访问以及用户和文档的交互方式来应用改变。借助于伪元素,可以更改元素的第一个字母和第一行的样式,或者添加源文档中没有出现过的元素
/*使用 hover 伪类设置鼠标滑过时的变换效果 */ #button td:hover{ background-color:red; }
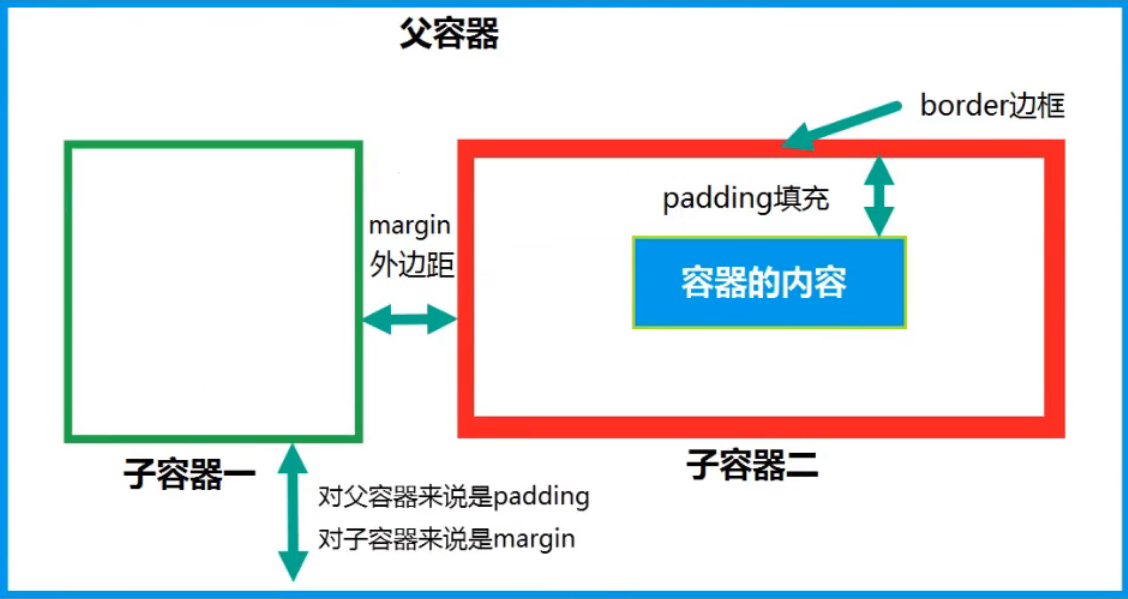
三、DIV盒模型
1、内容(content)就是盒子里装的东西,可多可少,可以是任意类型
2、填充(padding)就是怕盒子里装的东西损坏而添加的泡沫或者其他抗震的材料
3、边框(border)就是盒子本身
4、边界(margin)则说明盒子摆放的时候不能全部堆放在一起
四、DIV实例
<!-- 盒模型及CSS基础样式 --> <!DOCTYPE html> <html lang="en"> <head> <meta charset="UTF-8"> <meta http-equiv="X-UA-Compatible" content="IE=edge"> <meta name="viewport" content="width=device-width, initial-scale=1.0"> <title>Document</title> <style> /* 标签选择器 */ .inner{ width: 450px; /* height: 300px; */ border: solid 2px #0099FF; /* border也是自动设置4条边框 */ /* background:#0099FF; */ /* margin: auto; */ /* margin: auto 包括 margin-top: auto; margin-bottom: auto; margin-left: auto; margin-right: auto; */ margin-top: 100px; /* margin-right: 300px; */ /* 会扩大容器总高度 文字默认情况下为16px */ /* padding-top: 50px; */ /* 设置当前这一行的文本高度为300px2 ,实现单行的垂直居中*/ /* line-height: 300px; */ /* 设计水平居中 */ text-align:center; /* 通过设置 padding-top和padding-bottom实现垂直居中 padding 后两个值:上下 左右 padding 后四个值:上 右 下 左 (顺时针) */ padding: 150px 0px; float: left; /* 设置文本样式 */ font-size: 16px; color: #003366; /* 设置字体 设置多个字体时,会逐一匹配 font-style: italic :设置为斜体 font-weight: bold :文本加粗 text-decoration: underline :设置下划线 */ font-family: 楷体,宋体,黑体; font-style: italic; font-weight: bold; text-decoration: underline; } /* ID选择器 */ #outer{ width: 908px; height:445px; margin: auto; border: solid 0px #0099FF; ; } </style> </head> <body> <!-- 当存在两个DIV的情况,要想实现两个DIV全部居中,可以在创建一个父DIV,包裹两个DIV --> <div id="outer"> <div class="inner"> Hello<br/>YikJiang</div> <div class="inner">青史如镜,鉴照峥嵘岁月;<br/>初心如炬,辉映复兴之路。</div> </div> </body> </html>
五、重构计算器
1、分析页面结构
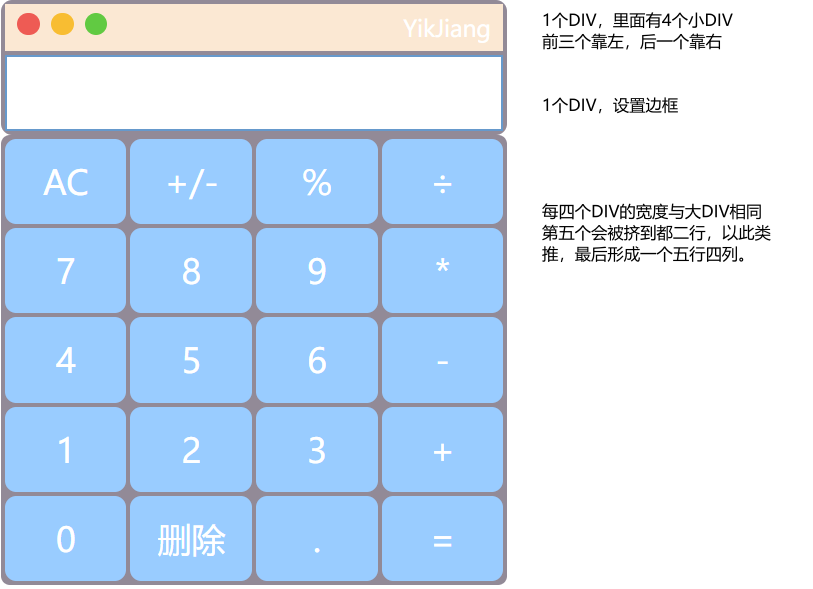
2、布局实现
- 顶部DIV
<!DOCTYPE html> <html lang="en"> <head> <meta charset="UTF-8"> <meta http-equiv="X-UA-Compatible" content="IE=edge"> <meta name="viewport" content="width=device-width, initial-scale=1.0"> <title>Div版计算器</title> <style> #top{ width: 450px; height: 50px; margin: auto; background-color: #FBE8D3; border-radius:10px; } #top .point{ width: 20px; height: 20px; float: left; margin-left: 10px; margin-top: 15px; border-radius: 50%; } #top .red{ background-color: rgb(238, 91, 84); } #top .yellow{ background-color: rgb(248, 189, 50); } #top .green{ background-color: rgb(97, 202, 66); } #top .calc-title{ font-size: 22px; color: rgb(255, 255, 255); float: right; margin-right: 8px; margin-top: 10px; } </style> </head> <body> <div id="top"> <!-- class="point red" : 表示归属于两个类 --> <div class="point red"></div> <div class="point yellow"></div> <div class="point green"></div> <div class="calc-title">YikJiang</div> </div> </body> </html>
- 屏幕显示
#result{ width: 444px; height: 50px; margin: auto; background-color: white; border-radius:10px; border:solid 2px #6699CC; } <div id="result"></div>
JavaScript
一、DOM操作
JavaScript直接操作页面的元素的方法集合,称为DOM,是一套JS代码的接口,还有一套BOM,用于通过JS直接操作浏览,比如前进、后退、历史、导航等~
<div id="top"> <!-- class="point red" : 表示归属于两个类 --> <div class="point red"></div> <div class="point yellow"></div> <div class="point green"></div> <div class="calc-title">YikJiang</div> </div>
- 屏幕显示
#result{ width: 444px; height: 50px; margin: auto; background-color: white; border-radius:10px; border:solid 2px #6699CC; } <div id="result"></div>
JavaScript
一、DOM操作
JavaScript直接操作页面的元素的方法集合,称为DOM,是一套JS代码的接口,还有一套BOM,用于通过JS直接操作浏览,比如前进、后退、历史、导航等~
本文作者:YikJiang
本文链接:https://www.cnblogs.com/YikJiang/p/17266029.html
版权声明:本作品采用知识共享署名-非商业性使用-禁止演绎 2.5 中国大陆许可协议进行许可。


【推荐】国内首个AI IDE,深度理解中文开发场景,立即下载体验Trae
【推荐】编程新体验,更懂你的AI,立即体验豆包MarsCode编程助手
【推荐】抖音旗下AI助手豆包,你的智能百科全书,全免费不限次数
【推荐】轻量又高性能的 SSH 工具 IShell:AI 加持,快人一步
· 分享一个免费、快速、无限量使用的满血 DeepSeek R1 模型,支持深度思考和联网搜索!
· 基于 Docker 搭建 FRP 内网穿透开源项目(很简单哒)
· ollama系列01:轻松3步本地部署deepseek,普通电脑可用
· 按钮权限的设计及实现
· 25岁的心里话