爬虫基础二
import requests
data = {
    'cname': '',
    'pid': '',
    'keyword': '500',
    'pageIndex': 1,
    'pageSize': 10,
}
res = requests.post('http://www.kfc.com.cn/kfccda/ashx/GetStoreList.ashx?op=keyword',data=data)
# print(res.text)  # json 格式字符串---》json.cn
print(type(res.json()))  # 转成对象  字典对象
respone=requests.get('https://www.12306.cn',verify=False) #不验证证书,报警告,返回200
print(respone.status_code)
2、关闭警告
import requests
    from requests.packages import urllib3
    urllib3.disable_warnings() #关闭警告
    respone=requests.get('https://www.12306.cn',verify=False)
    print(respone.status_code)
3 、手动携带证书(了解)
 import requests
    respone=requests.get('https://www.12306.cn',
                         cert=('/path/server.crt',
                               '/path/key'))
    print(respone.status_code)
proxies
x-forword-for
-获得HTTP请求端真实的IP
requests 发送请求使用代理
代理从哪来
公司花钱买
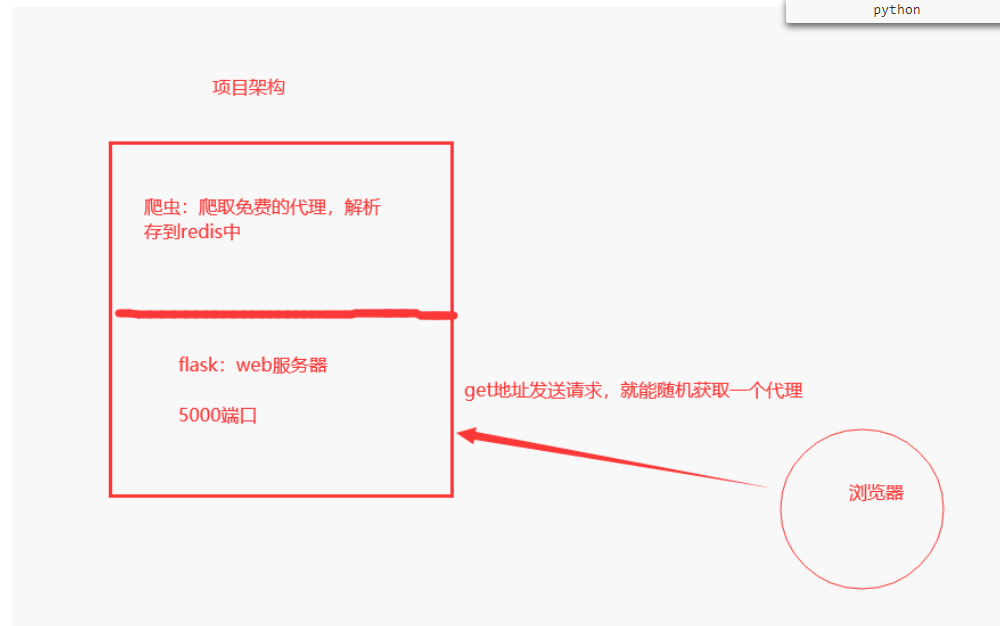
搭建免费的代理池:https://github.com/jhao104/proxy_pool
python:爬虫+flask写的
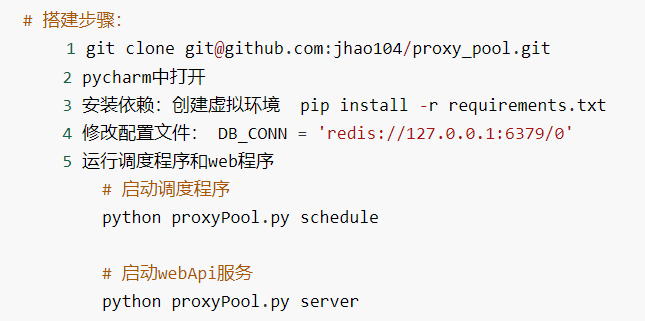
搭建步骤:
1 git clone https://github.com/jhao104/proxy_pool.git
2 使用pycharm打开
3 安装依赖:pip install -r requirements.txt
4 修改配置文件(redis地址即可)
HOST = "0.0.0.0"
PORT = 5010
DB_CONN = 'redis://127.0.0.1:6379/0'
PROXY_FETCHER #爬取哪些免费代理网站
5 启动爬虫程序
python proxyPool.py schedule
6 启动服务端
python proxyPool.py server
7 使用随机一个免费代理
地址栏中输入:http://127.0.0.1:5010/get/
api介绍
/ GET api介绍 None
/get GET 随机获取一个代理 可选参数: ?type=https 过滤支持https的代理
/pop GET 获取并删除一个代理 可选参数: ?type=https 过滤支持https的代理
/all GET 获取所有代理 可选参数: ?type=https 过滤支持https的代理
/count GET 查看代理数量 None
/delete GET 删除代理 ?proxy=host:ip
使用随机代理发送请求
import requests
from requests.packages import urllib3
urllib3.disable_warnings() #关闭警告
# 获取代理
res = requests.get('http://127.0.0.1:5010/get/').json()
proxies = {}
if res['https']:
    proxies['https'] = res['proxy']
else:
    proxies['http'] = res['proxy']
print(proxies)
res = requests.post('https://www.cnblogs.com', proxies=proxies,verify=False)
# res = requests.post('https://www.cnblogs.com')
print(res)
http和https代理
以后使用http代理访问http的地址
使用https的代理访问https的地址
代理池的使用
建立django后端---》index地址---》访问就返回访问者的ip
django代码---》不要忘记改配置文件
路由:path('', index),
视图函数:
def index(request):
ip = request.META.get('REMOTE_ADDR')
print('ip地址是', ip)
return HttpResponse(ip)
测试端
# import requests
# from requests.packages import urllib3
# urllib3.disable_warnings() #关闭警告
# # 获取代理
# res = requests.get('http://127.0.0.1:5010/get/').json()
# proxies = {}
# if res['https']:
#     proxies['https'] = res['proxy']
# else:
#     proxies['http'] = res['proxy']
#
# print(proxies)
# res=requests.get('http://101.43.19.239/', proxies=proxies,verify=False)
# print(res.text)
from threading import Thread
import requests


def task():
    res = requests.get('http://101.43.19.239/')
    print(res.text)


for i in range(10000000):
    t = Thread(target=task)
    t.start()
底部加载更多之后获取url
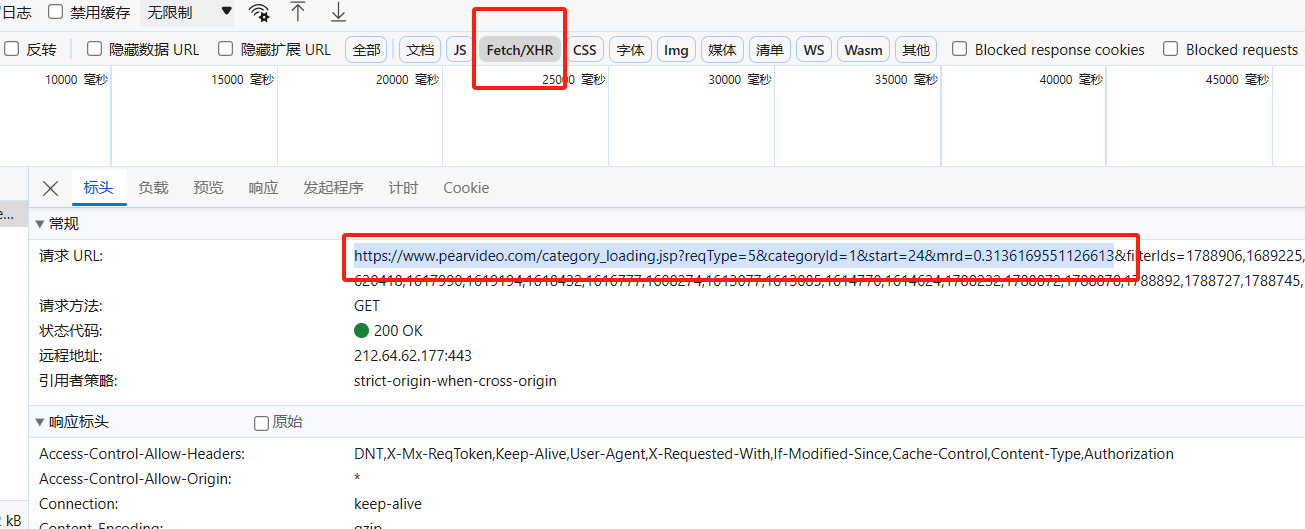
res = requests.get('https://www.pearvideo.com/category_loading.jsp?reqType=5&categoryId=1&start=24')   #视频下滑后的地址
# # print(res.text)
# # 用正则解析出地址
import re
#
video_list = re.findall('<a href="(.*?)" class="vervideo-lilink actplay">', res.text)
# # print(video_list)
for video in video_list:
    # print(video)
    video_id = video.split('_')[-1]
    # print(video_id)
    url = 'https://www.pearvideo.com/' + video
    # print(url)
    header = {'Referer': url}
    res_json = requests.get(f'https://www.pearvideo.com/videoStatus.jsp?contId={video_id}&mrd=0.9242679656276704', headers=header).json() #这个地址是点开视频的地址
    # print(res_json.text)
    mp4=res_json['videoInfo']['videos']['srcUrl']
    # print(mp4)
    # src = "https://video.pearvideo.com/mp4/third/20231101/cont-1788778-10701394-164954-hd.mp4"
    # https: // video.pearvideo.com / mp4 / third / 20231101 / 1699258935207 - 10701394 - 164954 - hd.mp4
    mp4_url = mp4.replace(mp4.split('/')[-1].split('-')[0],'cont-%s' % video_id)
    print(mp4_url)
保存本地
# 把视频保存到本地
    res_video = requests.get(real_mp4_url)
    with open('./video/%s.mp4' % video_id, 'wb') as f:
        for line in res_video.iter_content(1024):
            f.write(line)
关于其中用到的反扒
# 第一层反扒:需要携带referfer
# header = {'Referer': 'https://www.pearvideo.com/video_1527879'}
# res = requests.get('https://www.pearvideo.com/videoStatus.jsp?contId=1527879&mrd=0.14435938848299434', headers=header)
# print(res.text)


# 反扒二:
# https://video.pearvideo.com/mp4/adshort/20190311/   1698982998222  -13675354_adpkg-ad_hd.mp4  返回的
# https://video.pearvideo.com/mp4/adshort/20190311/   cont-1527879   -13675354_adpkg-ad_hd.mp4   能播的
# s = 'https://video.pearvideo.com/mp4/adshort/20190311/1698982998222-13675354_adpkg-ad_hd.mp4'
# print(s.replace(s.split('/')[-1].split('-')[0], 'cont-1527879'))
爬取新闻
没有一个解析库---》用正则---》解析库--》html/xml
import requests
from bs4 import BeautifulSoup

res = requests.get('https://www.autohome.com.cn/news/1/#liststart')
soup = BeautifulSoup(res.text, 'html.parser')  # 指定解析库,这里用到html.parser
ul_list = soup.find_all(class_='article', name='ul')
for ul in ul_list:
    li_list = ul.find_all(name='li')
    for li in li_list:
        h3 = li.find(name='h3')
        if h3:
            title = h3.text
            url = 'https' + li.find(name='a')['href']
            desc = li.find(name='p').text
            reade_count = li.find(name='em').text
            img = li.find(name='img')['src']
            print(f'''
                        文章标题:{title}
                        文章地址:{url}
                        文章摘要:{desc}
                        文章阅读数:{reade_count}
                        文章图片:{img}
                        ''')
bs4介绍和遍历文档树
BeautifulSoup 是一个可以从HTML或XML文件中提取数据的Python库,解析库
pip install beautifulsoup4
### 重点:遍历文档树
#遍历文档树:即直接通过标签名字选择,特点是选择速度快,但如果存在多个相同的标签则只返回第一个
#1、用法  通过  .  遍历
# res=soup.html.head.title
# res=soup.p
# print(res)
#2、获取标签的名称
# res=soup.html.head.title.name
# res=soup.p.name
# print(res)
#3、获取标签的属性
# res=soup.body.a.attrs  # 所有属性放到字典中 :{'href': 'http://example.com/elsie', 'class': ['sister'], 'id': 'link1'}
# res=soup.body.a.attrs.get('href')
# res=soup.body.a.attrs['href']
# res=soup.body.a['href']
# print(res)

#4、获取标签的内容
# res=soup.body.a.text  #子子孙孙文本内容拼到一起
# res=soup.p.text
# res=soup.a.string  # 这个标签有且只有文本,才取出来,如果有子孙,就是None
# res=soup.p.strings
# print(list(res))

#5、嵌套选择


# 下面了解
#6、子节点、子孙节点
# print(soup.p.contents) #p下所有子节点
# print(list(soup.p.children)) #得到一个迭代器,包含p下所有子节点
# print(list(soup.p.descendants)) #获取子子孙节点,p下所有的标签都会选择出来

#7、父节点、祖先节点
# print(soup.a.parent) #获取a标签的父节点
# print(list(soup.a.parents) )#找到a标签所有的祖先节点,父亲的父亲,父亲的父亲的父亲...
#8、兄弟节点
# print(soup.a.next_sibling) #下一个兄弟
# print(soup.a.previous_sibling) #上一个兄弟
#
print(list(soup.a.next_siblings)) #下面的兄弟们=>生成器对象
# print(soup.a.previous_siblings) #上面的兄弟们=>生成器对象
from bs4 import BeautifulSoup

html_doc = """
<html><head><title>The Dormouse's story</title></head>
<body>
<p class="title"><b>The Dormouse's story</b><span>lqz</span></p>

<p class="story">Once upon a time there were three little sisters; and their names were
<a href="http://example.com/elsie" class="sister" id="link1">Elsie</a>,
<a href="http://example.com/lacie" class="sister" id="link2">Lacie</a> and
<a href="http://example.com/tillie" class="sister" id="link3">Tillie</a>;
and they lived at the bottom of a well.</p>

<p class="story">...</p>
"""
soup = BeautifulSoup(html_doc, 'html.parser')  # 解析库可以使用 lxml,速度快(必须安装)   可以使用python内置的 html.parser

# print(soup.prettify())

 浙公网安备 33010602011771号