ClipDrawable
ClipDrawable代表从其他位图上截取一个“图片片段”
在XML文件中定义ClipDrawable对象使用<clip.../>元素,该元素的语法为:

以上语法格式中可指定如下三个属性:
1.android:drawable:指定截取的源Drawable对象
2.android:clipOrientaton:指定截取方向,可设置水平或垂直截取
3.android:gravity:指定截取时的对齐方式
注:使用ClipDrawable对象是可调用setLevel(int levle)方法设置截取的区域大小,当level为0时,截取的图片片段为空;当level为10000时,截取整张图片。
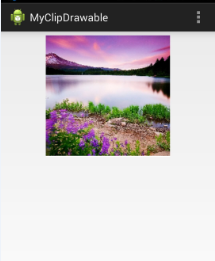
实例如下:徐徐展开的风景

![]()
注意:实际开发中,可采用该种方式完成进度显示控制。
1 2 3 4 5 6 7 8 9 10 11 12 13 14 15 16 17 18 19 20 21 22 23 24 25 26 27 28 29 30 31 32 33 34 35 36 37 38 39 40 41 42 43 44 45 46 47 48 49 50 51 52 53 54 55 56 57 58 59 60 61 62 63 64 65 66 67 68 69 70 71 72 73 74 75 76 77 78 79 80 81 82 83 84 85 86 87 88 89 90 | 资源文件==》drawable文件夹下<?xml version="1.0" encoding="utf-8"?><clip xmlns:android="http://schemas.android.com/apk/res/android" android:clipOrientation="horizontal" android:drawable="@drawable/people" android:gravity="center" ></clip>布局文件==》<LinearLayout xmlns:android="http://schemas.android.com/apk/res/android" xmlns:tools="http://schemas.android.com/tools" android:layout_width="match_parent" android:layout_height="match_parent" android:orientation="vertical" tools:context=".MainActivity" > <ImageView android:id="@+id/image" android:layout_width="wrap_content" android:layout_height="wrap_content" android:src="@drawable/myclip" /> </LinearLayout>代码实现==》package com.example.myclipdrawable;import java.util.Timer;import java.util.TimerTask;import android.os.Bundle;import android.os.Handler;import android.os.Message;import android.annotation.SuppressLint;import android.app.Activity;import android.graphics.drawable.ClipDrawable;import android.view.Menu;import android.widget.ImageView;@SuppressLint("HandlerLeak")public class MainActivity extends Activity{ @Override protected void onCreate(Bundle savedInstanceState) { super.onCreate(savedInstanceState); setContentView(R.layout.activity_main); ImageView img = (ImageView) this.findViewById(R.id.image); final ClipDrawable drawable = (ClipDrawable) img.getDrawable(); final Handler hanler = new Handler() { @Override public void handleMessage(Message msg) { if (msg.what == 1) { int value=drawable.getLevel() + 200; drawable.setLevel(value); } } }; final Timer timer = new Timer(); timer.schedule(new TimerTask() { @Override public void run() { Message msg = new Message(); msg.what = 1; hanler.sendMessage(msg); // 取消定时器 if (drawable.getLevel() >= 10000) { timer.cancel(); } } }, 0, 300); } @Override public boolean onCreateOptionsMenu(Menu menu) { // Inflate the menu; this adds items to the action bar if it is present. getMenuInflater().inflate(R.menu.main, menu); return true; }} |
运行效果:随着时间的变化,图片逐渐被截取完成


博客内容主要用于日常学习记录,内容比较随意,如有问题,还需谅解!!!
分类:
005 Android学习笔记


【推荐】国内首个AI IDE,深度理解中文开发场景,立即下载体验Trae
【推荐】编程新体验,更懂你的AI,立即体验豆包MarsCode编程助手
【推荐】抖音旗下AI助手豆包,你的智能百科全书,全免费不限次数
【推荐】轻量又高性能的 SSH 工具 IShell:AI 加持,快人一步
· Linux系列:如何用heaptrack跟踪.NET程序的非托管内存泄露
· 开发者必知的日志记录最佳实践
· SQL Server 2025 AI相关能力初探
· Linux系列:如何用 C#调用 C方法造成内存泄露
· AI与.NET技术实操系列(二):开始使用ML.NET
· 被坑几百块钱后,我竟然真的恢复了删除的微信聊天记录!
· 【自荐】一款简洁、开源的在线白板工具 Drawnix
· 没有Manus邀请码?试试免邀请码的MGX或者开源的OpenManus吧
· 园子的第一款AI主题卫衣上架——"HELLO! HOW CAN I ASSIST YOU TODAY
· 无需6万激活码!GitHub神秘组织3小时极速复刻Manus,手把手教你使用OpenManus搭建本