
props--将子组件的信息传递给父组件
<!-- 通过父组件给子组件传递函数类型的props实现:子给父传递数据 -->
<School :getShcoolName="getShcoolName"></School>
示例一:
App.vue
<template>
<div class="app">
<!-- <img src="./assets/logo.png"> -->
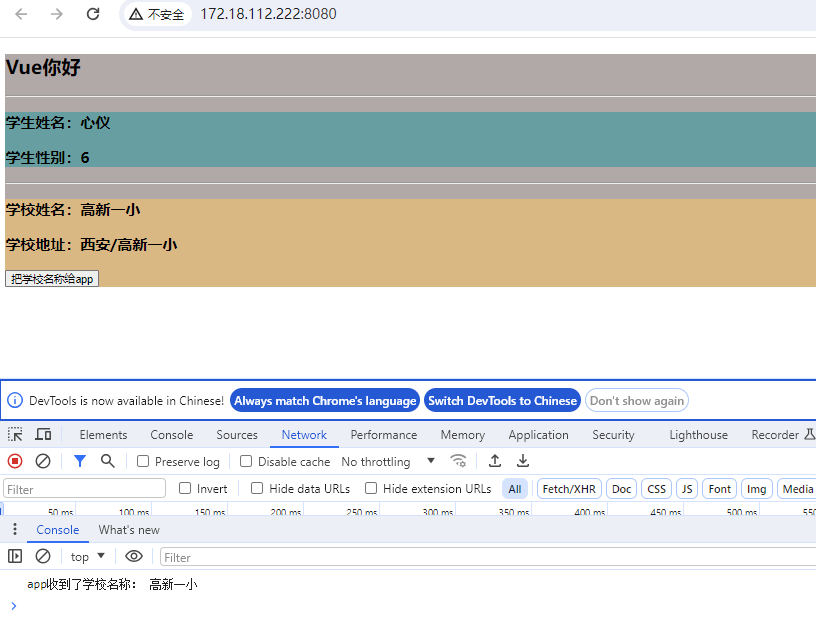
<h2>{{msg}}</h2>
<hr>
<Student></Student>
<hr>
<!-- 通过父组件给子组件传递函数类型的props实现:子给父传递数据 -->
    <School :getShcoolName="getShcoolName"></School>

  </div>
</template>

<script>
// 引入组件
import Student from './components/Student.vue';
import School from './components/School.vue';
export default {
  name: 'App',
  components: {
    Student,
    School
  },
  data () {
    return {
      msg: 'Vue你好'
    }
  },
  methods: {
    getShcoolName (name) {
      console.log('app收到了学校名称:', name)
    }
  }
}
</script>

<style scoped>
.app {
  background-color: rgb(178, 168, 168);
}
</style>
School.vue
<!-- 组件的结构 -->
<template>
  <div class="school">
    <h3>学校姓名:{{name}}</h3>
    <h3>学校地址:{{ address }}</h3>
    <button @click="sendSchoolName">把学校名称给app</button>

  </div>
</template>

<!-- 组件交互相关的代码(数据、方法等) -->
<script>
export default ({
  // eslint-disable-next-line vue/multi-word-component-names
  name: 'School',
  props: ['getShcoolName'],
  data () {
    return {
      name: '高新一小',
      address: '西安/高新一小'
    }
  },
  methods: {
    sendSchoolName () {
      this.getShcoolName(this.name)
    }
  }

})
</script>

<!-- 组件的样式 scoped局部样式,否则多个vue组件中同名会导致样式覆盖(将使用最后一个引入的组件样式)-->
<style scoped>
.school {
  background-color: burlywood;
}
</style>
main.js
// 引入Vue
import Vue from 'vue'
// 引入App
import App from './App.vue'
// 配置提示
Vue.config.productionTip = false

new Vue({
  render: h => h(App),
}).$mount('#app')
index.html
<!DOCTYPE html>
<html lang="">

<head>
  <meta charset="utf-8">
  <!-- 针对IE浏览器的一个特殊配置,含义是让IE浏览器以最高的渲染基本渲染页面(ie8以上版本) -->
  <meta http-equiv="X-UA-Compatible" content="IE=edge">
  <!-- 开启移动端的理想视口 -->
  <meta name="viewport" content="width=device-width,initial-scale=1.0">
  <!-- 配置页签图标 -->
  <link rel="icon" href="<%= BASE_URL %>favicon.ico">
  <!-- 配置网页标题(package.json文件中name属性) webpack插件完成 -->

  <title>
    <%= htmlWebpackPlugin.options.title %>
  </title>

</head>

<body>
  <!-- 当浏览器不支持js时,<noscript></noscript>标签中的元素就会被渲染 -->
  <noscript>
    <strong>We're sorry but <%= htmlWebpackPlugin.options.title %> doesn't work properly without JavaScript enabled.
        Please enable it to continue.</strong>
  </noscript>

  <!-- 容器 -->
  <div id="app">

  </div>
</body>

</html>
组件自定义事件
总结说明:
- 一种组件之间通信的方式,适用于子组件==》父组件
- 使用场景:A是父组件,B是子组件,B想给A传数据,那么就需要再A中给B绑定自定义事件(事件的回调在A中)
- 绑定自定义事件
- 方式一:在父组件中,<Demo @myDefineEvent='test'> 或 <Demo v-on:myDefineEvent='test'>
- 方式二:在父组件中,
- <Demo ref="demo">
- ......
- mounted(){this.$refs.$on('myDefineEvent',this.test)}
- 若想让自定义事件只触发一次,则可以使用once修饰符,或$once方法,eg:
<Student @defineMyEvent.once="getStudentName"></Student>、this.$refs.student.$once('defineMyEvent', this.getStudentName)
- 触发自定义事件: this.$emit('defineMyEvent', this.name)、 this.$emit('demoEvent')——在子组件中
- 解绑自定义事件:
-
解绑一个自定义事件:this.$off('defineMyEvent')
- 解绑多个自定义事件:this.$off(['defineMyEvent', 'demoEvent'])
- 解绑所有自定义的事件:this.$off()
-
- 组件上也可以绑定原生DOM事件,需要使用native修饰符,eg: <Student ref="student" @click.native="showMsg" />
- 注意:通过this.$refs.$on('自定义事件名称','回调')绑定自定义事件时,回调要么配置在methods中,要么使用箭头函数(否则this指向会出问题)
App.vue
<!-- 第一种写法:
使用v-on: 或@
通过父组件给子组件绑定一个自定义事件实现:子给父传递数据
-->
<!-- <Student v-on:defineMyEvent="getStudentName"></Student> -->
<!-- <Student @defineMyEvent="getStudentName"></Student> -->
<template>
  <div class="app">
    <!-- <img src="./assets/logo.png"> -->
    <h2>{{msg}}</h2>
    <hr>
    <!-- 通过父组件给子组件绑定一个自定义事件实现:子给父传递数据 -->
    <Student v-on:defineMyEvent="getStudentName"></Student>
    <hr>
    <!-- 通过父组件给子组件传递函数类型的props实现:子给父传递数据 -->
    <School :getShcoolName="getShcoolName"></School>

  </div>
</template>

<script>
// 引入组件
import Student from './components/Student.vue';
import School from './components/School.vue';
export default {
  name: 'App',
  components: {
    Student,
    School
  },
  data () {
    return {
      msg: 'Vue你好'
    }
  },
  methods: {
    getShcoolName (name) {
      console.log('app收到了学校名称:', name)
    },
    getStudentName (name) {
      console.log('App接收到了学生姓名:', name)
    }
  }
}
</script>

<style scoped>
.app {
  background-color: rgb(178, 168, 168);
}
</style>
Student.vue
<!-- 组件的结构 -->
<template>
  <div class="student">
    <h3>学生姓名:{{name}}</h3>
    <h3>学生性别:{{ age }}</h3>
    <button @click="sendStudentName">把学生姓名给app</button>
  </div>
</template>

<!-- 组件交互相关的代码(数据、方法等) -->
<script>
export default ({
  // eslint-disable-next-line vue/multi-word-component-names
  name: 'Student',
  data () {
    return {
      msg: '我正在学习 Vue',
      name: '心仪',
      age: 6
    }
  },
  methods: {
    sendStudentName () {
      // 触发Student组件实例身上的自定义事件
      this.$emit('defineMyEvent', this.name)
    }
  }

})
</script>

<!-- 组件的默认样式 css写法 -->
<!-- <style scoped>
.demo {
  background-color: cadetblue;
}
</style> -->

<style lang="less" scoped>
.student {
  background-color: cadetblue;
  .myfontsize {
    font-size: 40px;
  }
}
</style>
注意:事件只执行一次:<Student @defineMyEvent.once="getStudentName"></Student>
示例三:
App.vue
<!-- 第二种写法
通过父组件给子组件绑定一个自定义事件实现--子给父传递数据,使用ref
-->
<Student ref="student" />
// 挂载完毕
mounted () {
this.$refs.student.$on('defineMyEvent', this.getStudentName)
}
建议使用该方法,比较灵活,例如方便实现延迟效果
// 挂载完毕
mounted () {
// this.$refs.student.$on('defineMyEvent', this.getStudentName)
// 延迟执行
setTimeout(() => {
this.$refs.student.$on('defineMyEvent', this.getStudentName)
}, 3000)
}
<template>
  <div class="app">
    <!-- <img src="./assets/logo.png"> -->
    <h2>{{msg}}</h2>
    <hr>
    <!-- 通过父组件给子组件绑定一个自定义事件实现:子给父传递数据 -->
    <!-- <Student v-on:defineMyEvent="getStudentName"></Student> -->
    <!-- <Student @defineMyEvent="getStudentName"></Student> -->
    <hr>

    <Student ref="student" />

    <hr>
    <!-- 通过父组件给子组件传递函数类型的props实现:子给父传递数据 -->
    <School :getShcoolName="getShcoolName"></School>

  </div>
</template>

<script>
// 引入组件
import Student from './components/Student.vue';
import School from './components/School.vue';
export default {
  name: 'App',
  components: {
    Student,
    School
  },
  data () {
    return {
      msg: 'Vue你好'
    }
  },
  methods: {
    getShcoolName (name) {
      console.log('app收到了学校名称:', name)
    },
    getStudentName (name) {
      console.log('App接收到了学生姓名:', name)
    }
  },
  // 挂载完毕
  mounted () {
    this.$refs.student.$on('defineMyEvent', this.getStudentName)
  }
}
</script>

<style scoped>
.app {
  background-color: rgb(178, 168, 168);
}
</style>
mounted中自定义事件的另一种写法:了解即可
// 方式二:挂载完毕  回调 替代getStudentName 函数
  /*   mounted () {
      //绑定自定义事件
      this.$refs.student.$on('defineMyEvent', (name) => {
        console.log('mounted中回调函数被调用了')
        this.studentName = name
      })
    }, */
注意:如果需要实现事件只触发一次后失效,则可使用$once
 // this.$refs.student.$on('defineMyEvent', this.getStudentName)

    this.$refs.student.$once('defineMyEvent', this.getStudentName)
Student.vue
<!-- 组件的结构 -->
<template>
  <div class="student">
    <h3>学生姓名:{{name}}</h3>
    <h3>学生性别:{{ age }}</h3>
    <button @click="sendStudentName">把学生姓名给app</button>
  </div>
</template>

<!-- 组件交互相关的代码(数据、方法等) -->
<script>
export default ({
  // eslint-disable-next-line vue/multi-word-component-names
  name: 'Student',
  data () {
    return {
      msg: '我正在学习 Vue',
      name: '心仪',
      age: 6
    }
  },
  methods: {
    sendStudentName () {
      // 触发Student组件实例身上的自定义事件
      this.$emit('defineMyEvent', this.name)
    }
  }

})
</script>

<!-- 组件的默认样式 css写法 -->
<!-- <style scoped>
.demo {
  background-color: cadetblue;
}
</style> -->

<style lang="less" scoped>
.student {
  background-color: cadetblue;
  .myfontsize {
    font-size: 40px;
  }
}
</style>
博客内容主要用于日常学习记录,内容比较随意,如有问题,还需谅解!!!

 浙公网安备 33010602011771号