前端色环制作的方式
需求背景
最近有个项目中有个功能需要在浏览器上实现图片颜色任意变化,并且不会出现卡顿,要像德芙一样的丝滑
思路
最开始的思路
使用canvas+js的方式实现
github地址:https://github.com/miniflycn/JsCV
这个方式好处就是canvase绘制的图片不会失真,缺点就是图像越精细,变动越大,canvase渲染就越慢
优化思路
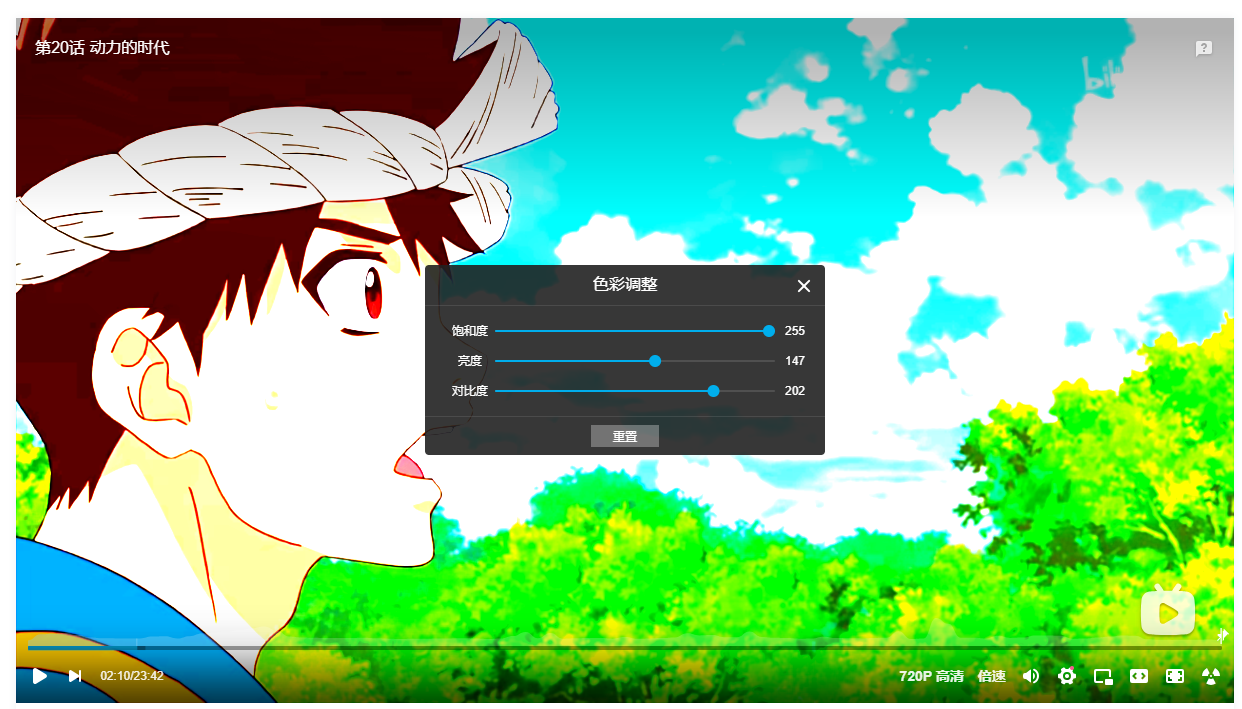
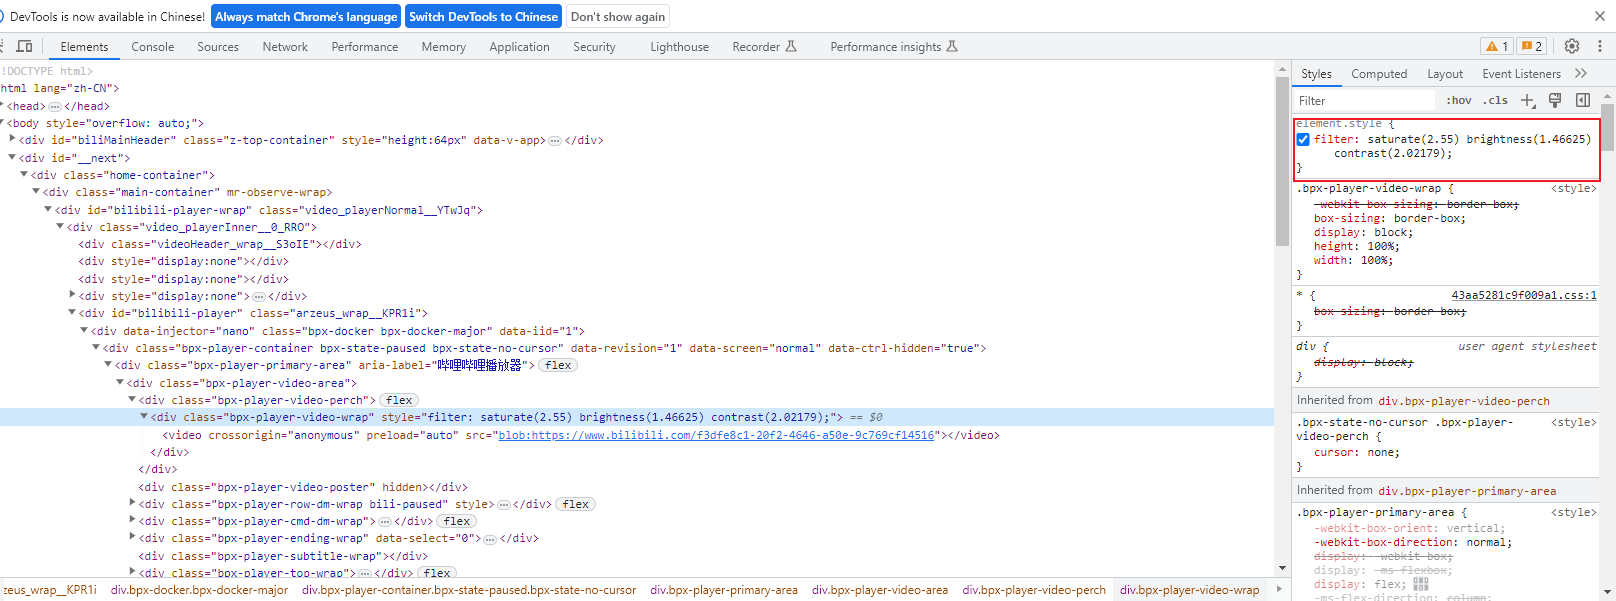
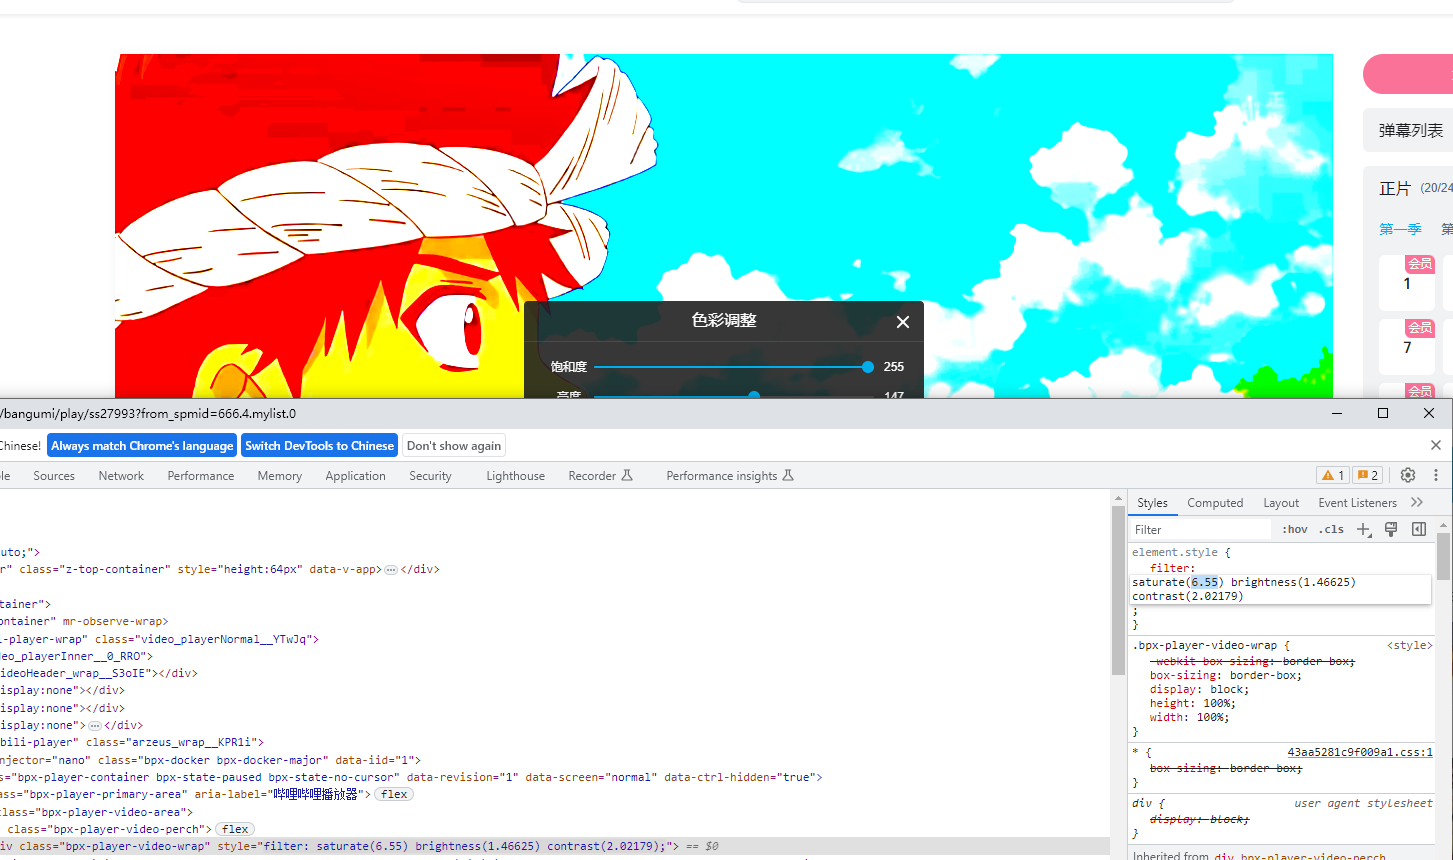
发现b站的视频饱和度,亮度,对比度是可以手动变化的,很丝滑,所以又研究了半天这玩意儿,然后我就找到了filter属性。
既然视频都可以这样,那么就搜索一样这个css属性看看它的介绍
关于filter的介绍链接:
http://www.ecomcn.com/Website/show_id465.html
https://www.runoob.com/cssref/css3-pr-filter.html
https://codepen.io/qwguo88/pen/XWbNLmx
其中的filter的hue-rotate(色环)属性可以完美解决jpg等图片的变色问题,因为有这个属性存在,所以不用把图片转换成svg图片格式即可改变颜色
实验代码:
<!DOCTYPE html>
<html>
  <head>
    <meta charset="UTF-8">
    <title>3D Canvas Example</title>
    <style>
      #img1 {
        filter:hue-rotate(0deg) brightness(100%) saturate(100%) contrast(100%) grayscale(0%);
      }
    </style>
  </head>
  <body>
    <img id="img1" src="./imges/3.jpeg" alt="" width="800px" height="800px">
    <img id="img2" src="./imges/3.jpeg" alt="" width="800px" height="800px">
  </body>
</html>
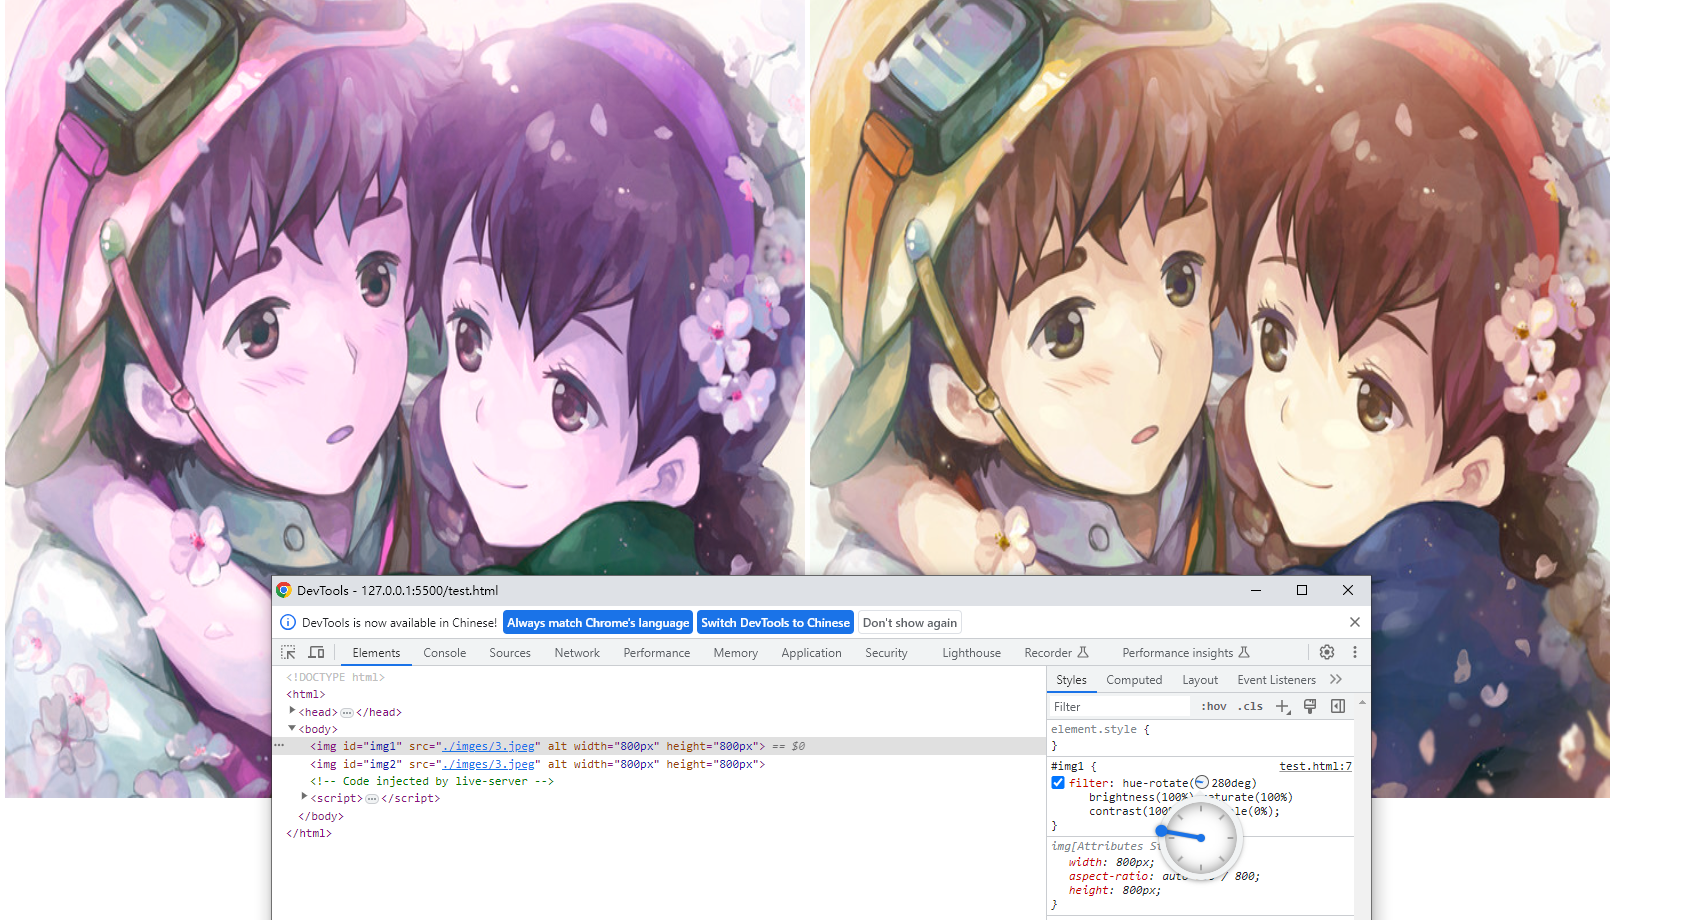
以上代码中,filter属性分别为:色环,明度,饱和度,对比度,灰度
具体的可以实验去尝试更改,效果如下图所示
关于色环的操作的方式的额外衍生思路
以上我们已经知道怎么更改图片颜色了,在使用canvas+js方式更改图片颜色的时候,我是通过rgb调整的方式更改的。最开始我本想把rgb保留,然后根据rgb值计算出色环角度值(如上图那个如同时钟一样的东西)
但是如果做成时钟一样的东西,那么我需要实现一个真的色环,思路方式先是生成一个直线形式的过渡的颜色,如下代码:
<!DOCTYPE html>
<html lang="en">

<head>
    <meta charset="UTF-8">
    <meta http-equiv="X-UA-Compatible" content="IE=edge">
    <meta name="viewport" content="width=device-width, initial-scale=1.0">
    <title>Document</title>
    <style>
        [class|=linear] {
            width: 300px;
            height: 50px;
            margin: 20px auto;
            font-size: 2rem;
            color: #fff;
        }

        .linear-1 {
            background-image: linear-gradient(red, blue, green);
            background-image: -webkit-linear-gradient(red, blue, green);
            background-image: -ms-linear-gradient(red, blue, green);
            background-image: -o-linear-gradient(red, blue, green);
            background-image: -moz-linear-gradient(red, blue, green);
        }

        .linear-2 {
            background-image: linear-gradient(90deg, green, blue, red);
        }

        .linear-3 {
            background-image: linear-gradient(to bottom, red 25%, green 25%, green 50%, green 50%, green 75%, hotpink 75%, hotpink 100%);
        }
    </style>
</head>

<body>
    <div class="linear-1"></div>
    <div class="linear-2"></div>
    <div class="linear-3"></div>
</body>

</html>
效果如图所示:
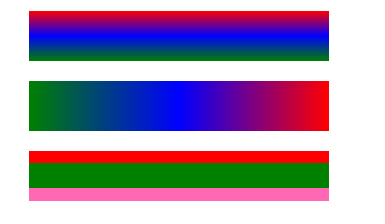
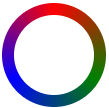
中间那种是比较复合要求的,但是我应该如何把这个直线型的弄成圆环形的呢?后面我朋友告诉我background: conic-gradient属性可以做到
实现代码如下:
<!DOCTYPE html>
<html lang="en">
<head>
    <meta charset="UTF-8">
    <meta http-equiv="X-UA-Compatible" content="IE=edge">
    <meta name="viewport" content="width=device-width, initial-scale=1.0">
    <title>Document</title>
    <style>
        .circle1{
            position: relative;
            width: 80px;
            height: 80px;
            margin: 20px auto;
            border-radius: 50%;
            background: white;
            text-align: center;
        }
        .circle1::after {
            position: absolute;
            content: '';
            /*  linear-gradient:线性渲染,conic-gradient:环形渲染*/
            /* background: linear-gradient(180deg, red 0%, green 34%, blue 100%);*/
            background: conic-gradient(red, green, blue, red);
            bottom: 0;
            right: 0;
            left: 0;
            top: 0;
            z-index: -1;
            transform: scale(1.3);
            border-radius: 50%;
        }

    </style>
</head>
<body>
    <div class="circle1"></div>
</body>
</html>
效果如图所示:
关于其他的参考资料的链接
https://www.cnblogs.com/coco1s/p/8080211.html
https://juejin.cn/post/7019665955093479431
https://aihongxin.com/7900.html
好了,现在环结构有了,那么指针咋搞呢?算了好麻烦啊,还是用直线型的吧→_→,记录到此结束,拜拜了您嘞
对了,这里顺带记录一个图片拖拽,放大缩小的功能代码,别误会,我只是为了方便我以后使用:
<!DOCTYPE html>
<html lang="en">
<head>
    <meta charset="UTF-8">
    <meta http-equiv="X-UA-Compatible" content="IE=edge">
    <meta name="viewport" content="width=device-width, initial-scale=1.0">
    <title>Document</title>
    <style type="text/css">

        body{

            margin: 0;

            background: pink;

        }

        .imgWrap{
            width: 500px;
            margin: 50px auto;

        }

        .imgWrap img{
            width:100%;

        }

        #mask{
            display: block;
            position: absolute;
            top:0;
            bottom:0;
            left:0;
            right:0;
            background-color:rgba(0,0,0,.9);

        }

        #box_tk{
            width: 500px;
            height: 500px;
            margin:50px auto;
            position: absolute;
            left: 50%;
            top: 50%;
            transform: translate(-50%,-50%);
            overflow: hidden;
        }

        #tk{
            width: 500px;
            height: 500px;
            box-shadow: 0 0 20px #ffffff;
            position: relative;
        }

        #tkImg{
            position: absolute;
            left: 0;
            top: 0;
        }

    </style>
    <script>
        window.onload = function(){

            let mask = document.getElementById("mask");

            let tk = document.getElementById("tk");

            let tkImg = document.getElementById("tkImg");

            let boxTk = document.getElementById("box_tk");


            tkImg.style.zoom = 20+'%';

            tkImg.setAttribute("src",tkImg.src);

            dragTool(tkImg);


            function dragTool(node) {
                console.log("移动函数触发")

                node.onmousedown = function (ev) {
                    console.log("onmousedown事件监听成功")
                    tkImg.style.cursor="move"

                    // 去除h5的默认事件,不然可能会造成onmouseup方法失效
                    document.ondragstart = function(ev) {
                        ev.preventDefault();
                      };
                      document.ondragend = function(ev) {
                        ev.preventDefault();
                      };

                    // 浏览器兼容处理
                    var e = ev || window.event;
                    // 鼠标按下记录相对位置
                    // 水平方向都距离 = 当前鼠标左边的距离 - 被拖拽元素距离左边的距离
                    var offsetX = e.clientX;
                    // 垂直方向都距离 = 当前鼠标都上边的距离 - 被拖拽元素距离距离的距离
                    var offsetY = e.clientY;
                    // 鼠标移动和被拖拽的元素是相对的 这里是鼠标拖拽的物体在整个页面上移动 所以
                    // move加在document上
                    document.onmousemove = function (ev) {
                        console.log("onmousemove事件监听成功")
                        // 当前鼠标的事件对象
                        var e = ev || window.event;
                        // 定义 currentLeft  = 当前鼠标位置 - 距离左边的距离
                        var currentLeft = e.clientX - offsetX;
                        // 定义 currentTop = 当前鼠标上边位置 - 距离上边的距离
                        var currentTop = e.clientY - offsetY
                        // 限制左出界 最左是 0
                        /*
                        if (currentLeft <= 0) {
                            currentLeft = 0;
                        }
                        */
                        // 当前窗口的宽 浏览器兼容
                        // var windowWidth = document.documentElement.clientWidth || document.body.clientWidth;
                        // 限制右边出界 如果大于当前窗口的宽 那么就让它等于当前窗口的宽减去当前元素的offsetWidth 也就是留在原地
                        if (currentLeft >= boxTk.width) {
                            currentLeft = boxTk.width;
                        }
                        // 设置上出界 最上边是 0
                        /*
                        if (currentTop <= 0) {
                            currentTop = 0;
                        }
                        */
                        // 当前窗口的高 浏览器兼容
                        // var windowHeight = document.documentElement.clientHeight || document.body.clientHeight;
                        // 限制下边出界 如果大于当前窗口的高 减去 本身的高 那么就让它等于 当前窗口的高减去本身的高
                        if (currentTop >= boxTk.height) {
                            currentTop = boxTk.height;
                        }
                        // 当前被拖拽元素的 left 值 等于上面计算出的 currentLeft
                        node.style.left = currentLeft + 'px';
                        // 当前被拖拽元素的 top 值 等于上面计算出的 currentTop
                        node.style.top = currentTop + 'px';
                    }
                }
                // 鼠标弹起取消拖拽 这里添加到 node 元素对象也可以的
                document.onmouseup = function () {
                    document.onmousemove = null;
                    console.log("onmouseup事件监听成功")
                    tkImg.style.cursor="default"
                }
            }


        }

        function zoomImg(obj){

            var zoom = parseInt(obj.style.zoom, 10) || 100;//zoom属性用于设置或检索对象的缩放比例

            zoom += event.wheelDelta/12;

            if(zoom>0){
                obj.style.zoom = zoom + '%';

                document.body.style.position = "fixed";
            }

            document.body.style.height=100+"%";

            document.body.style.width=100+"%";

        }

        function tkImgClick(){
            event.stopPropagation();

        }
    </script>
</head>
<body>

    <div id="mask">
        <div id="box_tk">
            <div id="tk" onclick="tkImgClick()">
                <img id="tkImg" src="./imges/3.jpeg" alt="" onmousewheel="zoomImg(tkImg)"/>
            </div>
        </div>

    </div>
</body>
</html>
好啦,别看下去了,这里真的是最后一个了,溜了

---------------------修复图片移动bug--------------------------
<!DOCTYPE html>
<html lang="en">
<head>
    <meta charset="UTF-8">
    <meta http-equiv="X-UA-Compatible" content="IE=edge">
    <meta name="viewport" content="width=device-width, initial-scale=1.0">
    <title>Document</title>
    <style type="text/css">

        body{

            margin: 0;

            background: pink;

        }

        .imgWrap{
            width: 500px;
            margin: 50px auto;

        }

        .imgWrap img{
            width:100%;

        }

        #mask{
            display: block;
            position: absolute;
            top:0;
            bottom:0;
            left:0;
            right:0;
            background-color:rgba(0,0,0,.9);

        }

        #box_tk{
            width: 500px;
            height: 500px;
            margin:50px auto;
            position: absolute;
            left: 50%;
            top: 50%;
            transform: translate(-50%,-50%);
            overflow: hidden;
        }

        #tk{
            width: 500px;
            height: 500px;
            box-shadow: 0 0 20px #ffffff;
            position: relative;
        }

        #tkImg{
            position: absolute;
            left: 0;
            top: 0;
        }

    </style>
    <script>
        window.onload = function(){

            let mask = document.getElementById("mask");

            let tk = document.getElementById("tk");

            let tkImg = document.getElementById("tkImg");

            let boxTk = document.getElementById("box_tk");


            tkImg.style.zoom = 20+'%';

            tkImg.setAttribute("src",tkImg.src);

            var currentLeft = 0;
            var currentTop = 0;
            var offsetX = 0;
            var offsetY = 0;
            var currentLeft_back = 0;
            var currentTop_back = 0;

            dragTool(tkImg);


            function dragTool(node) {
                console.log("移动函数触发")

                node.onmousedown = function (ev) {
                    console.log("onmousedown事件监听成功")
                    tkImg.style.cursor="move"

                    // 去除h5的默认事件,不然可能会造成onmouseup方法失效
                    document.ondragstart = function(ev) {
                        ev.preventDefault();
                      };
                      document.ondragend = function(ev) {
                        ev.preventDefault();
                      };

                    // 浏览器兼容处理
                    var e = ev || window.event;
                    // 鼠标按下记录相对位置
                    // 水平方向都距离 = 当前鼠标左边的距离 - 被拖拽元素距离左边的距离
                    offsetX = e.clientX;
                    // 垂直方向都距离 = 当前鼠标都上边的距离 - 被拖拽元素距离距离的距离
                    offsetY = e.clientY;
                    // 鼠标移动和被拖拽的元素是相对的 这里是鼠标拖拽的物体在整个页面上移动 所以
                    // move加在document上
                    document.onmousemove = function (ev) {
                        console.log("onmousemove事件监听成功")
                        // 当前鼠标的事件对象
                        var e = ev || window.event;
                        // 定义 currentLeft  = 当前鼠标位置 - 距离左边的距离
                        currentLeft = e.clientX - offsetX;
                        // 定义 currentTop = 当前鼠标上边位置 - 距离上边的距离
                        currentTop = e.clientY - offsetY;
                        console.log(offsetX, offsetY)
                        // 限制左出界 最左是 0
                        /*
                        if (currentLeft <= 0) {
                            currentLeft = 0;
                        }
                        */
                        // 当前窗口的宽 浏览器兼容
                        // var windowWidth = document.documentElement.clientWidth || document.body.clientWidth;
                        // 限制右边出界 如果大于当前窗口的宽 那么就让它等于当前窗口的宽减去当前元素的offsetWidth 也就是留在原地
                        if (currentLeft >= boxTk.width) {
                            currentLeft = boxTk.width;
                        }
                        // 设置上出界 最上边是 0
                        /*
                        if (currentTop <= 0) {
                            currentTop = 0;
                        }
                        */
                        // 当前窗口的高 浏览器兼容
                        // var windowHeight = document.documentElement.clientHeight || document.body.clientHeight;
                        // 限制下边出界 如果大于当前窗口的高 减去 本身的高 那么就让它等于 当前窗口的高减去本身的高
                        if (currentTop >= boxTk.height) {
                            currentTop = boxTk.height;
                        }
                        // 当前被拖拽元素的 left 值 等于上面计算出的 currentLeft
                        node.style.left = currentLeft + currentLeft_back + 'px';
                        // 当前被拖拽元素的 top 值 等于上面计算出的 currentTop
                        node.style.top = currentTop + currentTop_back + 'px';
                    }
                }
                // 鼠标弹起取消拖拽 这里添加到 node 元素对象也可以的
                document.onmouseup = function (ev) {
                    var e = ev || window.event;
                    document.onmousemove = null;
                    console.log("onmouseup事件监听成功");
                    tkImg.style.cursor="default";
                    currentLeft_back = currentLeft + currentLeft_back;
                    currentTop_back = currentTop + currentTop_back;
                }
            }


        }

        function zoomImg(obj){

            var zoom = parseInt(obj.style.zoom, 10) || 100;//zoom属性用于设置或检索对象的缩放比例

            zoom += event.wheelDelta/12;

            if(zoom>0){
                obj.style.zoom = zoom + '%';

                document.body.style.position = "fixed";
            }

            document.body.style.height=100+"%";

            document.body.style.width=100+"%";

        }

        function tkImgClick(){
            event.stopPropagation();

        }
    </script>
</head>
<body>

    <div id="mask">
        <div id="box_tk">
            <div id="tk" onclick="tkImgClick()">
                <img id="tkImg" src="./imges/11111.jpg" alt="" onmousewheel="zoomImg(tkImg)"/>
            </div>
        </div>

    </div>
</body>
</html>


 浙公网安备 33010602011771号