flask-上下文管理
- threading.local
- Flask的Local类
- 偏函数
1.threading.local
在多线程中,同一个进程中的多个线程是共享一个内存地址的,多个线程操作数据时,就会造成数据的不安全,所以我们要加锁。但是,每个线程想拥有一些属于自己的变量,怎么办?
方法一:可以通过维护一个全局字典来实现,字典的key为线程ID,value就存线程自己的变量。
方法二:就是threading.local
threading.local在多线程操作时,会为每一个线程创建一个只属于属于它自己的内存空间,使得线程之间各自操作自己的数据,互相隔离。


import time
import threading

local = threading.local()

def func(n):
    local.val = n
    time.sleep(5)
    print(n)

for i in range(10):
    t = threading.Thread(target=func,args=(i,))
    t.start()

# 结果输出    0--9
自定义一个Local类,参照threading.local原理
class Local(object):

    def __init__(self):
        object.__setattr__(self, "_storage", {})

    def __setattr__(self, key, value):
        ident = threading.get_ident()
        if ident in self._storage:
            self._storage[ident][key] = value
        else:
            self._storage[ident] = {key: value}

    def __getattr__(self, item):
        ident = threading.get_ident()
        return self._storage[ident][item]


local = Local()


def func(n):
    local.val = n
    time.sleep(2)
    print(local.val)


for i in range(10):
    t = threading.Thread(target=func, args=(i,))
    t.start()
2.Flask中的Local
在Flask中也参照threading.local原理 实现了一个Local类,为什么Flask不直接用threading.local呢?
因为Flask要支持到协程级别的内存隔离。
class Local(object):
    __slots__ = ("__storage__", "__ident_func__")

    def __init__(self):
        object.__setattr__(self, "__storage__", {})
        object.__setattr__(self, "__ident_func__", get_ident)

    def __iter__(self):
        return iter(self.__storage__.items())

    def __call__(self, proxy):
        """Create a proxy for a name."""
        return LocalProxy(self, proxy)

    def __release_local__(self):
        self.__storage__.pop(self.__ident_func__(), None)

    def __getattr__(self, name):
        try:
            return self.__storage__[self.__ident_func__()][name]
        except KeyError:
            raise AttributeError(name)

    def __setattr__(self, name, value):
        ident = self.__ident_func__()
        storage = self.__storage__
        try:
            storage[ident][name] = value
        except KeyError:
            storage[ident] = {name: value}

    def __delattr__(self, name):
        try:
            del self.__storage__[self.__ident_func__()][name]
        except KeyError:
            raise AttributeError(name)
3.偏函数
partial是functools下面的一个很有用的小功能,作用:固定函数中的一些参数,返回一个新的函数,方便调用。
from functools import partial

class Foo(object):

    def __init__(self):
        self.request = "request"
        self.session = "session"

foo = Foo()

def func(args):
    return getattr(foo,args)

re_func = partial(func,'request')
se_func = partial(func,'session')

print(re_func())
在flask中的应用
from functools import partial


class HttpRequest(object):

    def __init__(self):
        self.method = "GET"
        self.body = b"name=abc@age=123"


class Foo(object):

    def __init__(self):
        self.request = HttpRequest()
        self.session = {"login":True,"is_super":False}

foo = Foo()

def func(args):
    return getattr(foo,args)

re_func = partial(func,'request')
se_func = partial(func,'session')


class LocalProxy(object):

    def __init__(self,local):
        self._local = local

    def _get_current_object(self):
        return self._local()

    def __getitem__(self, item):
        return getattr(self._get_current_object(),item)

request = LocalProxy(re_func)
ret = request._get_current_object().method
print(ret)

ret = request['method']
print(ret)

session = LocalProxy(se_func)
print(session._get_current_object())
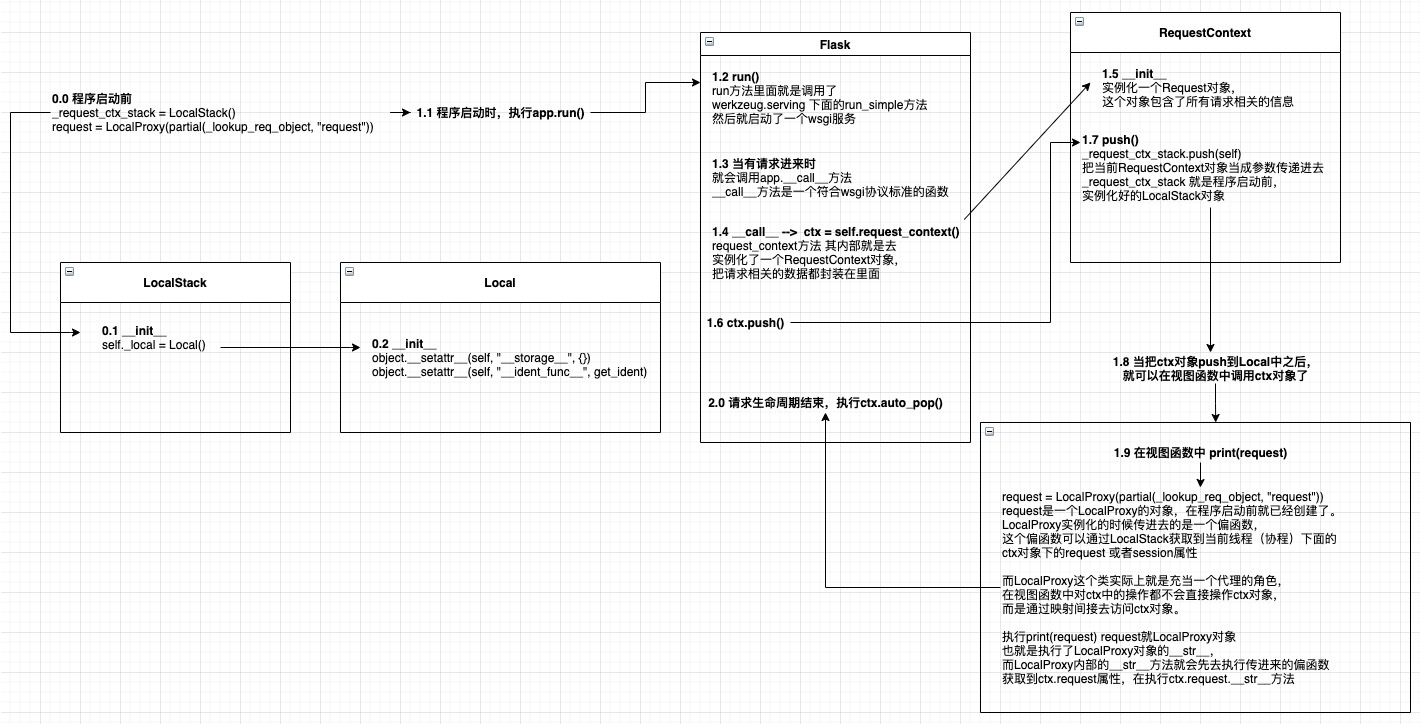
4.Flask-请求上下文机制
flask的请求上下文机制,可以从一下3个方面来分析
- 请求进来时
- 执行视图函数
- 请求结束前
启动一个flask项目时,会先执行app.run()方法,这是整个项目的入口。
app.run() --> 执行werkzeug.run_simple --> ... --> 最后调用的是app.__call__方法
请求进来时
执行app.__call__方法,__call__方法很简单,直接执行app.wsgi_app,将包含所有请求相关的数据和一个响应函数穿进去。
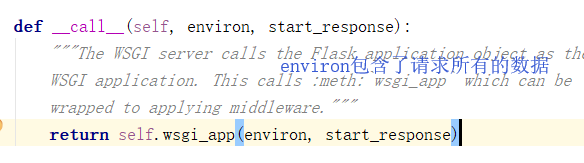
def application(environ, start_response):
    start_response('200 OK', [('Content-Type', 'text/html')])
    return '<h1>Hello, web!</h1>'

上面的application()函数就是符合WSGI标准的一个HTTP处理函数,它接收两个参数:

    environ:一个包含所有HTTP请求信息的dict对象;

    start_response:一个发送HTTP响应的函数。

在application()函数中,调用:

start_response('200 OK', [('Content-Type', 'text/html')])
明显,app.__call__是一个符合wsgi标准的函数
然后执行app.wsgi_app方法
def wsgi_app(self, environ, start_response):

        ctx = self.request_context(environ)
        error = None
        try:
            try:
                ctx.push()
                response = self.full_dispatch_request()
            except Exception as e:
                error = e
                response = self.handle_exception(e)
            except:
                error = sys.exc_info()[1]
                raise
            return response(environ, start_response)
        finally:
            if self.should_ignore_error(error):
                error = None
            ctx.auto_pop(error)
第一步先执行了一个request_context的方法,将environ传进去,最后返回一个RequestContext类的对象(里面封装了请求相关的信息)
 def request_context(self, environ):
        """Create a :class:`~flask.ctx.RequestContext` representing a
        WSGI environment. Use a ``with`` block to push the context,
        which will make :data:`request` point at this request.

        See :doc:`/reqcontext`.

        Typically you should not call this from your own code. A request
        context is automatically pushed by the :meth:`wsgi_app` when
        handling a request. Use :meth:`test_request_context` to create
        an environment and context instead of this method.

        :param environ: a WSGI environment
        """
        return RequestContext(self, environ)
这个RequestContext对象中封装了两个非常有用的属性,一个是request,一个是session
def __init__(self, app, environ, request=None):
    self.app = app
    if request is None:
        request = app.request_class(environ)
    self.request = request
    self.url_adapter = app.create_url_adapter(self.request)
    self.flashes = None
    self.session = None
这两个属性中request是一个Request对象,这个对象就是我们在flask中使用的request对象,提供了很多便捷的属性和方法,比如:request.method,request.form等。另一个属性是session,初始为None,但是在执行完ctx.push方法之后,session就会被赋值了。
在ctx.push方法中,在执行请求上下文对象ctx之前先实例化了一个app_context对象,先执行了app_context的push方法,然后才执行_request_ctx_stack对象中的top和_request_ctx_stack.push(self),最后对ctx中的session进行处理。
所以,flask中的应用上下文发生在请求上下文之前。
ctx是一个RequestContext对象,所以ctx.push() 就是执行RequestContext下面的push方法。
def push(self):

        top = _request_ctx_stack.top
        if top is not None and top.preserved:
            top.pop(top._preserved_exc)

        # 在执行request_context请求上下文的push方法时,先执行了app_context应用上下文的push方法
        app_ctx = _app_ctx_stack.top
        if app_ctx is None or app_ctx.app != self.app:
            app_ctx = self.app.app_context()
            app_ctx.push()
            self._implicit_app_ctx_stack.append(app_ctx)
        else:
            self._implicit_app_ctx_stack.append(None)

        if hasattr(sys, 'exc_clear'):
            sys.exc_clear()

        # 然后执行请求上下文对象中LocalStack对象的push方法
        _request_ctx_stack.push(self)

        # 最后处理session
        if self.session is None:
            session_interface = self.app.session_interface
            self.session = session_interface.open_session(
                self.app, self.request
            )

            if self.session is None:
                self.session = session_interface.make_null_session(self.app)
先忽略app应用上下文那部分,在处理完应用上下文的push方法后,紧接着执行了_request_ctx_stack.push(self) --> 把RequestContext对象传进去。
而_request_ctx_stack就是LocalStack这个类的对象。 _request_ctx_stack = LocalStack()
LocalStack是一个向外提供push, pop, top三个接口来间接操作Local类里面自己上下文信息的组合类。(self._local = Local()),push,pop是通过反射 来操作当前线程(协程)在Local中的__storage__中自己的上下文信息中的"stack"属性。
当_request_ctx_stack.push(self)完成之后,就处理session了。
session会先执行session_interface对象的open_session方法,这个方法会先从用户请求的cookie中获取sessionid,获取该用户之前设置的session值,然后将值复制到ctx.session中。此时Local中该线程(协程)中已压入stack中的ctx对象中也有session的信息了(一开始push进去的时候是没有值的)。
处理完session后,ctx.push方法就执行完了,返回到最开始的app.wsgi_app方法中,执行完push方法后,接着执行full_dispatch_request方法,从这个名字中我们也能猜到,这个方法只要是负责请求的分发。
执行视图函数时
视图函数主要处理业务逻辑。在视图函数中可以调用request对象,进行取值,可以调用session对象,进行取值。
在整个请求的生命周期中,获取请求的数据直接调用request即可,对session进行操作直接调用session即可。request和session都是LocalProxy对象,借助偏函数(固定参数"request" or "session")将对于的值传入_lookup_req_object函数。
def _lookup_req_object(name):
    top = _request_ctx_stack.top
    if top is None:
        raise RuntimeError(_request_ctx_err_msg)
    return getattr(top, name)
request = LocalProxy(partial(_lookup_req_object, 'request'))
session = LocalProxy(partial(_lookup_req_object, 'session'))
先通过_request_ctx_stack(LocalStack对象)的top操作获取ctx(请求上下文对象),再通过反射分别获取request,session属性。整个过程中LocalStack扮演了一个全局仓库的角色,请求进来将数据存取,需要时即去即用。所以,flask实现了在整个请求的生命周期中哪儿需要就直接调用的特色。
请求结束时
自动调用ctx.auto_pop(),将Local中当前线程(协程)存储的ctx对象pop掉,整个请求声明周期结束。
问题:
1. 既然在一个线程(协程)的请求生命周期中,只会存在一个ctx, 和一个app_context,那为何要在Local中要用stack来存储呢?
在测试的时候,可能会出现嵌套使用多个app的情况(一般测试需要手动把app_context压入栈中,启动app的时候,请求一进来执行app.__call__方法会把ctx和app_context压入栈中)
with app1.app_context():
    with app2.app_context():
        print(_app_ctx_stack._local.__storage__)
        print(current_app.config['DEBUG'])
    print(_app_ctx_stack._local.__storage__)
    print(current_app.config['DEBUG'])
上面那段代码中,正是因为Flask在Local用栈存储了上下文信息 这一巧妙之处,所以app1, app2都能拿到自己的app_context。
执行 with app1.app_context()的时候,把app1推入了当前线程(协程)的stack中。
Local.__storage__ = {
_ident: {
"stack": [app1, ]
}
}
执行 with app2.app_context()的时候,把app2推入了当前线程(协程)的stack中。
Local.__storage__ = {
_ident: {
"stack": [app1, app2, ]
}
}
然后在app2的上下文环境中,使用current_app的时候,根据stack的后进先出特性,stack.pop的就是app2
这样就不会乱套了。
最后配个自作的陋图