


Spring依赖注入之@Lookup注解
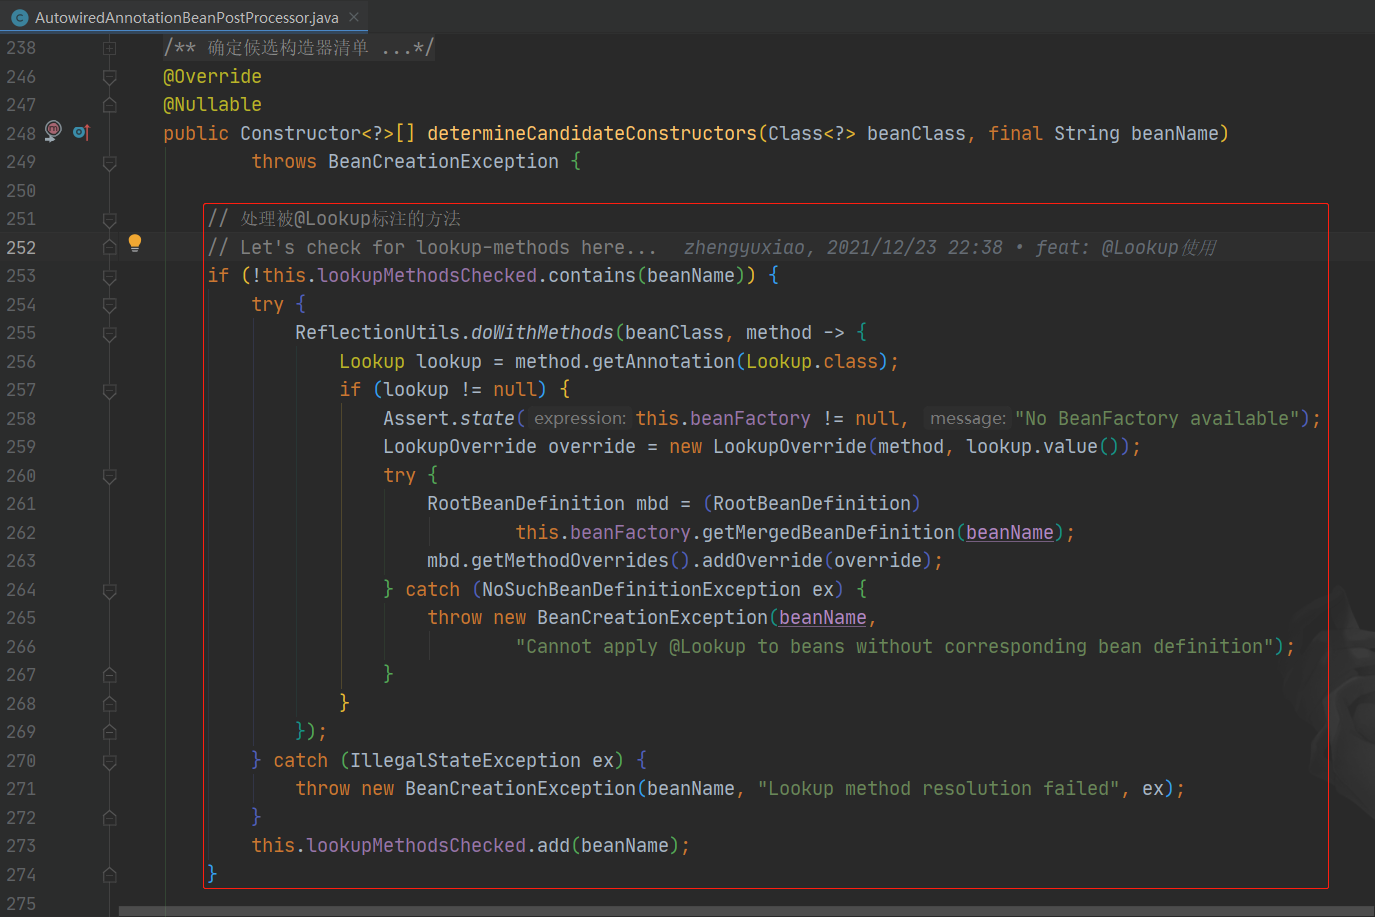
在了解Spring构造器推断时看到了下列源码:
问题分析
一般我们会使用@Autowired注解来实现依赖的自动注入:
-
属性注入
@Component public class Xxx{ @Autowired private Aaa aaa; } -
构造器注入
@Component public class Xxx{ private final Aaa aaa; @Autowired public Xxx(Aaa aaa){ this.aaa = aaa; } } -
普通方法注入
@Component public class Xxx{ private final Aaa aaa; @Autowired public void SetAaa(Aaa aaa){ this.aaa = aaa; } }
上述依赖注入的方式能够应付绝大多数使用场景,但一种特殊的使用场景除外:一个单例Bean需要依赖一个原型Bean
@Component public class SingletonBean{ @Autowired private PrototypeBean prototype; public void usePrototype(){ // use prototype bean do something } }
在上面的代码中,SingletonBean是一个单例Bean,它依赖的PrototypeBean是一个原型Bean。因为PrototypeBean在SingletonBean的生命周期中只有一次注入的机会,所以后续usePrototype()方法使用的实际上是同一个PrototypeBean实例,显然这是有问题的:虽然我们将PrototypeBean设置成了原型Bean,但是在当前的情况下,PrototypeBean变成的事实上的单例Bean。
对于上述问题,一般有两种解决方案:
-
在Bean中引入ApplicationContext依赖,然后调用getBean()方法获取原型Bean
@Component public class SingletonBean{ @Autowired private ApplicationContext applicationContext; public void usePrototype(){ PrototypeBean prototype = applicationContext.getBean(PrototypeBean.class); // use prototype bean do something } } -
使用@Lookup注解
@Component public class SingletonBean{ public void usePrototype(){ PrototypeBean prototype = getPrototypeBean(); // use prototype bean do something } @Lookup public PrototypeBean getPrototypeBean(){ return null; } } 使用方法注入的方法需要满足以下语法要求:
<public|protected> [abstract] <return-type> theMethodName(no-arguments); - 方法访问权限必须为public或protected:这与@Lookup的底层原理有关——动态代理
- abstract(可选):如果是抽象方法,代理类会实现这方法;如果不是抽象方法,代理类会覆盖这方法
- return-type:原型Bean的类型
- no-arguments:参数列表必须为空
代码验证
声明原型Bean:
public class LookupConfig { @Bean @Scope(value = BeanDefinition.SCOPE_PROTOTYPE) public PrototypeService prototypeService() { return new PrototypeServiceImpl(); } }
依赖原型Bean的单例Bean:
public class SingletonServiceImpl implements SingletonService { private final PrototypeService prototypeBean; private final ApplicationContext applicationContext; @Autowired public SingletonServiceImpl(PrototypeService prototypeBean, ApplicationContext applicationContext) { this.prototypeBean = prototypeBean; this.applicationContext = applicationContext; } /** * 获取原型Bean * * @return 通过@Autowired获取的原型Bean */ @Override public PrototypeService getPrototypeBeanThroughAutowiredAnnotation() { return this.prototypeBean; } /** * 获取原型Bean * * @return 通过ApplicationContext获取的原型Bean */ @Override public PrototypeService getPrototypeBeanThroughApplicationContext() { return this.applicationContext.getBean(PrototypeService.class); } /** * 获取原型Bean * * @return 通过@Lookup获取的原型Bean */ @Lookup @Override public PrototypeService getPrototypeBeanThroughLookupAnnotation() { return null; } }
测试代码:
@Slf4j public class Main { public static void main(String[] args) { AnnotationConfigApplicationContext applicationContext = new AnnotationConfigApplicationContext(LookupConfig.class); applicationContext.register(SingletonServiceImpl.class); SingletonService singletonService = applicationContext.getBean(SingletonService.class); log.info("单例Bean:{}", singletonService.toString()); for (int i = 0; i < 3; i++) { log.info("通过@Autowire获取的原型Bean:{}", singletonService.getPrototypeBeanThroughAutowiredAnnotation().toString()); } for (int i = 0; i < 3; i++) { log.info("通过ApplicationContext获取的原型Bean:{}", singletonService.getPrototypeBeanThroughApplicationContext().toString()); } for (int i = 0; i < 3; i++) { log.info("通过@Lookup获取的原型Bean:{}", singletonService.getPrototypeBeanThroughLookupAnnotation().toString()); } } }
测试代码执行结果:

[main] INFO com.xzy.test.lookup.Main - 单例Bean:com.xzy.service.impl.SingletonServiceImpl$$EnhancerBySpringCGLIB$$a5fddad5@6f96c77 [main] INFO com.xzy.test.lookup.Main - 通过@Autowire获取的原型Bean:com.xzy.service.impl.PrototypeServiceImpl@61230f6a [main] INFO com.xzy.test.lookup.Main - 通过@Autowire获取的原型Bean:com.xzy.service.impl.PrototypeServiceImpl@61230f6a [main] INFO com.xzy.test.lookup.Main - 通过@Autowire获取的原型Bean:com.xzy.service.impl.PrototypeServiceImpl@61230f6a [main] INFO com.xzy.test.lookup.Main - 通过ApplicationContext获取的原型Bean:com.xzy.service.impl.PrototypeServiceImpl@3c130745 [main] INFO com.xzy.test.lookup.Main - 通过ApplicationContext获取的原型Bean:com.xzy.service.impl.PrototypeServiceImpl@cd3fee8 [main] INFO com.xzy.test.lookup.Main - 通过ApplicationContext获取的原型Bean:com.xzy.service.impl.PrototypeServiceImpl@3e2e18f2 [main] INFO com.xzy.test.lookup.Main - 通过@Lookup获取的原型Bean:com.xzy.service.impl.PrototypeServiceImpl@470f1802 [main] INFO com.xzy.test.lookup.Main - 通过@Lookup获取的原型Bean:com.xzy.service.impl.PrototypeServiceImpl@63021689 [main] INFO com.xzy.test.lookup.Main - 通过@Lookup获取的原型Bean:com.xzy.service.impl.PrototypeServiceImpl@703580bf
从执行结果可以看出:Spring使用CGLIB创建了SingletonServiceImpl的代理类
注意事项
-
Spring会通过CGLIB创建代理对象,然后实现或覆盖@Lookup标注的方法,因此@Lookup标注的方法内部是什么逻辑不重要,直接 return null 就行
-
回到本文最开始的地方,处理@Lookup的代码存在于Spring推断构造器的方法中:

这意味着,如果以手动方式声明Bean,@Lookup就不会生效: ```java @Bean @Scope(value = BeanDefinition.SCOPE_SINGLETON) public SingletonService singletonService(PrototypeService prototypeService, ApplicationContext applicationContext) { return new SingletonServiceImpl(prototypeService, applicationContext); } ``` 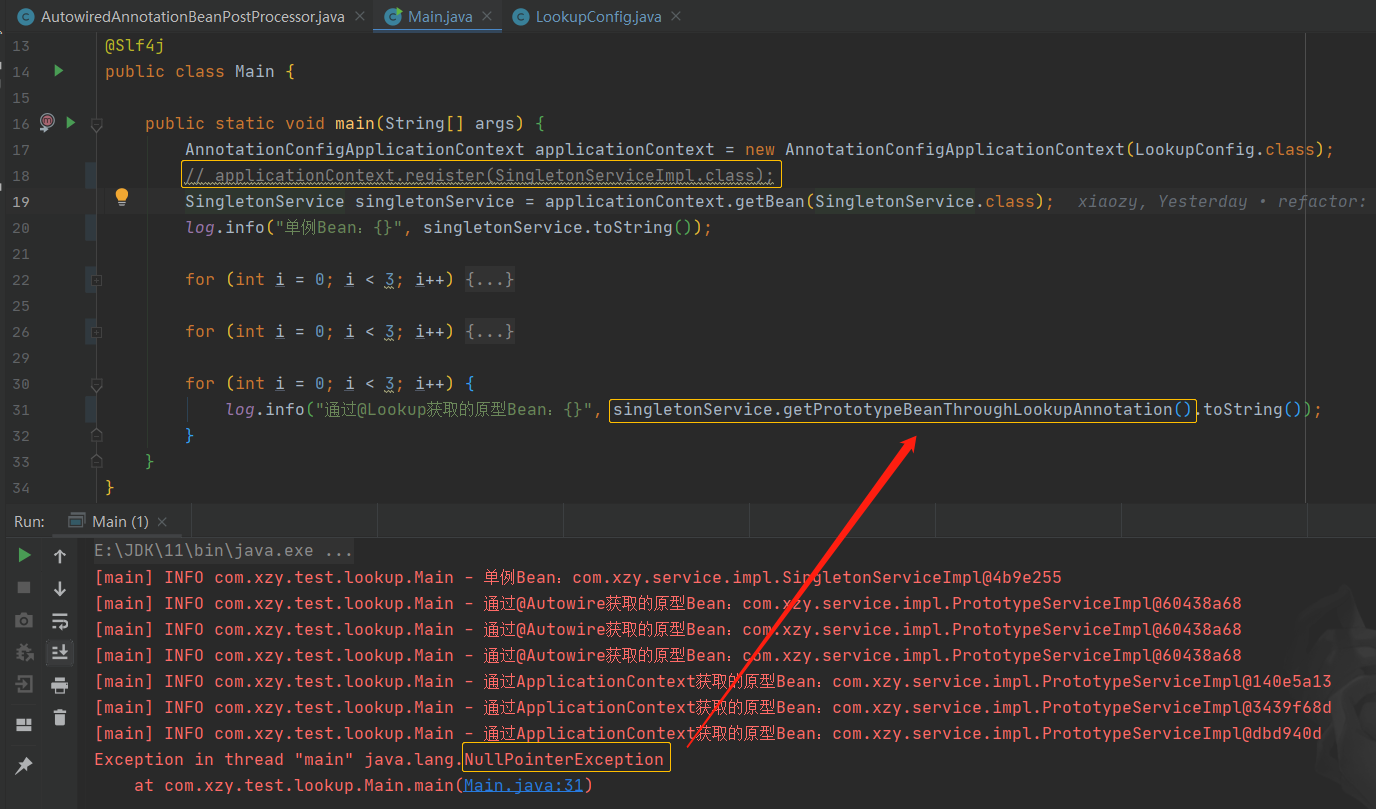 (由于手动声明的方式已经告诉了Spring使用哪个构造方法实例化Bean,所以Spring就不需要再进行构造器推断,所以处理@Lookup的代码就不会执行,所有就不会创建代理类,所以实际调用的就是SingleServiceImple中的那个返回null的方法,所以NPE了) ---
参考文章:spring中@Lookup的作用
地势坤,君子以厚德载物。


【推荐】国内首个AI IDE,深度理解中文开发场景,立即下载体验Trae
【推荐】编程新体验,更懂你的AI,立即体验豆包MarsCode编程助手
【推荐】抖音旗下AI助手豆包,你的智能百科全书,全免费不限次数
【推荐】轻量又高性能的 SSH 工具 IShell:AI 加持,快人一步
· Linux系列:如何用heaptrack跟踪.NET程序的非托管内存泄露
· 开发者必知的日志记录最佳实践
· SQL Server 2025 AI相关能力初探
· Linux系列:如何用 C#调用 C方法造成内存泄露
· AI与.NET技术实操系列(二):开始使用ML.NET
· 无需6万激活码!GitHub神秘组织3小时极速复刻Manus,手把手教你使用OpenManus搭建本
· C#/.NET/.NET Core优秀项目和框架2025年2月简报
· Manus爆火,是硬核还是营销?
· 一文读懂知识蒸馏
· 终于写完轮子一部分:tcp代理 了,记录一下