Web前端(十六)-首页瀑布流展示、作品详情页、过滤器Filter、监听器Listener、读取配置文件、删除轮播图和作品对应磁盘文件、删除分类及对应作品、Vue自定义组件、网站图标问题
-
创建grid.js并在index.html页面中引入
-
-
在index.html页面中 删除.grid元素里面的假数据, 通过v-for遍历数组 把作品的图片显示在img标签中
-
把index.js中 初始化瀑布流的代码注释掉, 在grid.js中的updated方法中添加瀑布流初始化代码
蓝条及动画
-
在index.html页面中 瀑布流里面图片的下面添加蓝条div
-
通过css样式代码控制蓝条的各种样式
-
在grid.js中 给瀑布流中元素添加鼠标移入移出事件 ,控制蓝条淡入淡出
-
index.html页面中 通过css样式代码给图片img标签添加鼠标移入移出缩放动画
浏览最多和最受欢迎步骤:
-
在product.js里面的data里声明两个数组分别为 view_arr和 like_arr
-
在product.js里面的created方法里面向/viewlist发出异步请求 同时也要向/likelist发出异步请求
-
在ProductController里面添加 viewList方法和likeList方法 分别处理 /viewlist和/likelist 两个路径 ,在方法里面分别调用 mapper里面的viewList方法和likeList方法 两个方法的范围值同为List集合 把集合直接返回给客户端
-
实现mapper中调用的两个方法, 查询数据时 分别按照浏览量降序排序和点赞量降序排序 取前四条数据
-
在home.html页面中通过Vue中的v-for指令 将查询到的数据显示到页面
作品详情介绍:创建时间、浏览量、点赞量、显示图片
 <!--详情开始-->
 <!--显示作品标题-->
 <h2 class="page-header">{{product.title}}</h2>
 <!--显示作品创建时间、浏览量、点赞量-->
 <div>
     <!--创建时间,默认靠左-->
     <span>{{product.author}}发布于{{product.created}}</span>
     <!--浏览量、点赞量:pull-right:让元素显示到右侧-->
     <span class="pull-right">
         <span class="fa fa-eye">{{product.viewCount}}</span>
         <span class="fa fa-thumbs-o-up">{{product.likeCount}}</span>
     </span>
     </div>
     <!--给作品点赞按钮,添加点赞事件
         bootstrap中提供的居中写法text-center,使用css样式也可以-->
     <div class="text-center">
         <button class="btn btn-info" @click="like()">给作品点赞</button>
     </div>
     <!--显示作品图片,图片居中,设置外边距离按钮一段距离,超出范围不显示-->
     <div class="text-center" style="margin: 30px 0;overflow: hidden">
         <!--center-block让块级元素自身居中,text-center是让元素内容居中
             img-responsive此样式导致图片显示方式发生改变,所以text-center失效-->
         <img :src="product.url" class="img-responsive center-block" alt="">
     </div>
     <!--作品详情介绍-->
     <p class="text-center">{{product.intro}}</p>
     <!--详情结束-->
 </div>
通过moment.js实现日期格式化
在detail.html页面中引入moment.js 文件
下载地址:Moment.js 中文网 http://momentjs.cn/
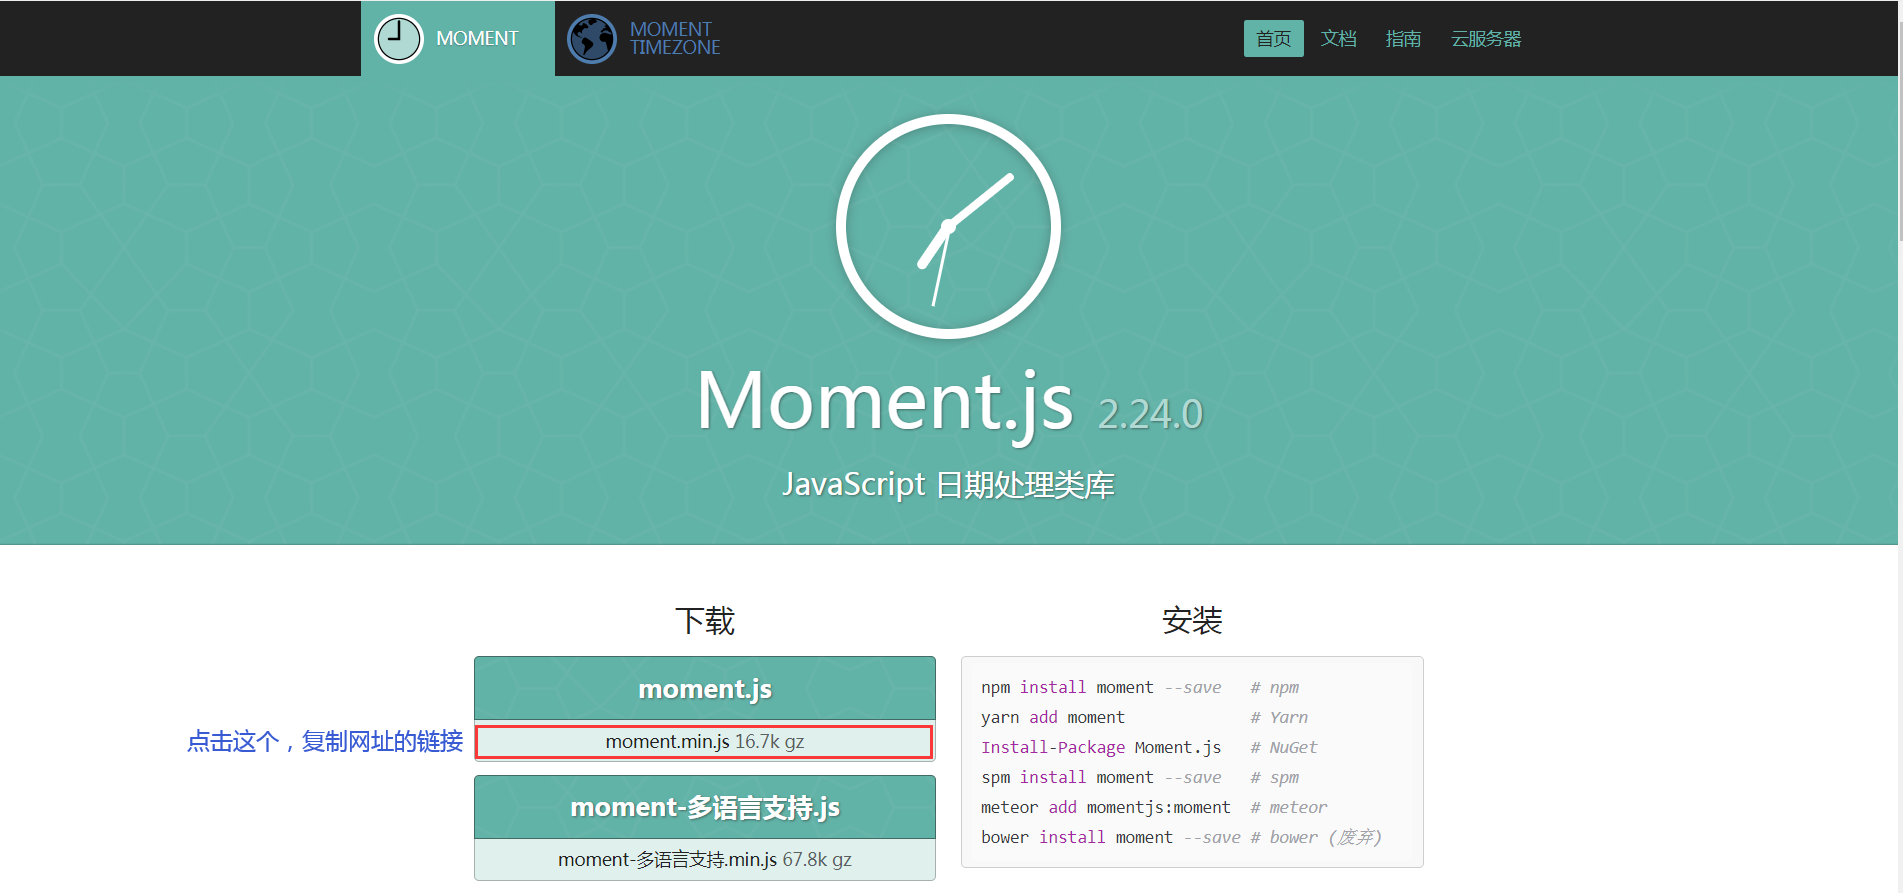
<!--引入moment框架,专门处理日期-->
<script src="http://cdn.staticfile.org/moment.js/2.24.0/moment.min.js"></script>
created: function () {
//从地址栏中得到作品id ?id=1
let id = location.search.split("=")[1];
//发请求,请求路径为/product/selectbyid?id=xxx
axios.get("/product/selectbyid?id=" + id).then(function (response) {
//把查询得到的数据给到vue中product对象 页面自动改变
detail_vm.product = response.data;
//修改时间格式 detail_vm.product.created表示product的原始创建时间 按照指定格式修改,英文名称不可变,位置可变
detail_vm.product.created = moment(detail_vm.product.created).format("YYYY年MM月DD日 HH:mm:ss");
}).catch(function (err) {
alert(err);
})
},
timestamp字段类型相关问题
-
此类型的字段表示时间, 默认状态是当数据发生改变时此字段的数据会自动变成当前时间, 默认自动更改
例如:当进入作品详情页面时,时间自动变成当前时间
-
可以通过以下SQL语句禁止自动更改 ,在数据库中执行下列语句:
alter table product change created created timestamp not null default current_timestamp; -
打开自动更改
alter table product change created created timestamp not null default current_timestamp on update current_timestamp;
详情页删除作品
-
在detail.js文件中的created方法里面发请求询问服务器是否登录过, 把得到的布尔值赋值给vue里面的isLogin变量
-
在detail.html页面中给作品点赞按钮的下面添加删除按钮 并且通过v-if判断只有当登录的情况下才能显示
-
给删除按钮添加点击事件 点击时向/deleteproduct?id=xxx地址发出请求,删除完之后显示到首页
给作品点赞
-
给点赞按钮添加点击事件
-
在事件方法中向/like?id=xxx发出请求, Controller中处理此请求, 调用mapper中的likeById方法
-
实现mapper中的likeById方法, 修改数据库中likeCount数量+1
-
为了解决重复点赞的问题, 通过Session保存点过赞的id信息, 点赞之前先判断点过赞
浏览量
-
在ProductController的detail方法中,当通过id查询作品信息时,认为用户浏览过作品一次, 所以把代码写在此方法中
-
通过禁止重复点赞的模式, 禁止重复添加浏览量
浏览量和点赞量
methods:{
like:function() {
//发出点赞请求
axios.get("/like?id="+detail_vm.product.id).then(function (response) {
//根据获取返回的数据判断是否点过赞
if (response.data==1){
alert("点赞成功!");
//location.reload();//这种方法也能实现页面点赞次数+1,但是会多一次请求
//让vue中变量的属性发生改变,页面自动改变
detail_vm.product.likeCount++;
}else {
alert("不能重复点赞!");
}
});
}
}
ProductController添加请求方法
/**
* 查询浏览量最多的作品
* @return
*/
@RequestMapping("/product/select/view")
public List<Product> selectView(){
return mapper.selectView();
}
/**
* 查询点赞量最多的作品
* @return
*/
@RequestMapping("/product/select/like")
public List<Product> selectLike(){
return mapper.selectLike();
}
ProductMapper添加映射关系
/**
* 根据id给对应作品点赞
* @param id
*/
@Update("update product set like_count=like_count+1 where id=#{id}")
void like(int id);
/**
* 根据id给对应作品浏览量+1
* @param id
*/
@Update("update product set view_count=view_count+1 where id=#{id}")
void view(int id);
过滤器Filter
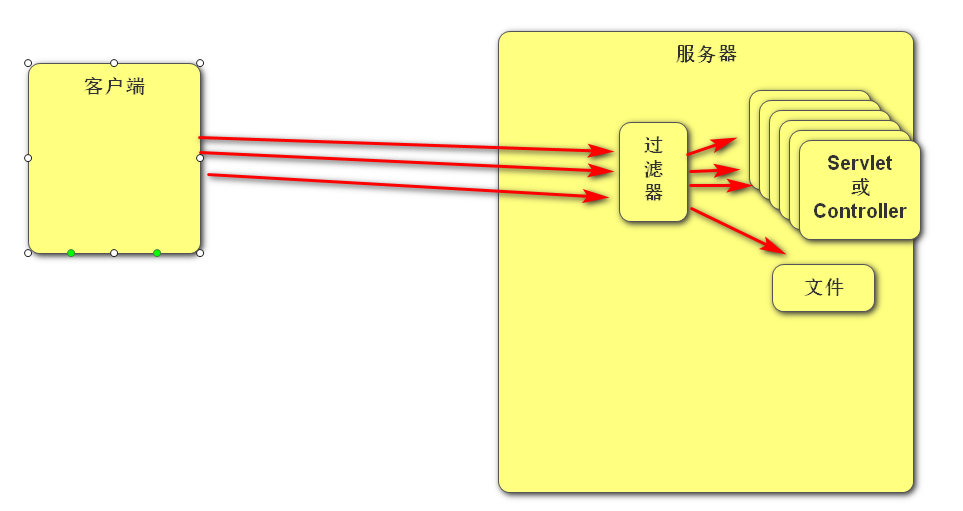
1.什么是过滤器?
-
过滤器和Servlet一样是Web容器(Tomcat)中的组件,可以在客户端请求资源之前或之后触发的代码,可以将请求多个资源时做的重复工作放在过滤器中执行,这样只需要写一遍, 从而提高开发效率。
例如:访问后台管理页面时必须处于登录状态,需要提前判断是否处于登录状态,单独一个个设置比较麻烦,可以使用过滤器完成。即:将要请求的页面放在过滤器前,根据具体情况允许其是否放行。
2.如何使用过滤器?
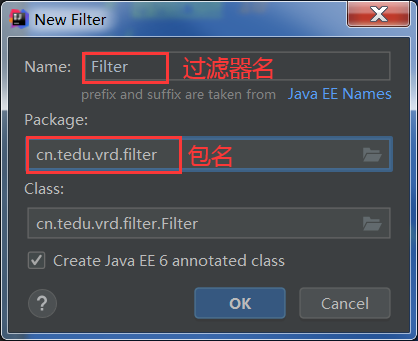
1. 创建Filter类
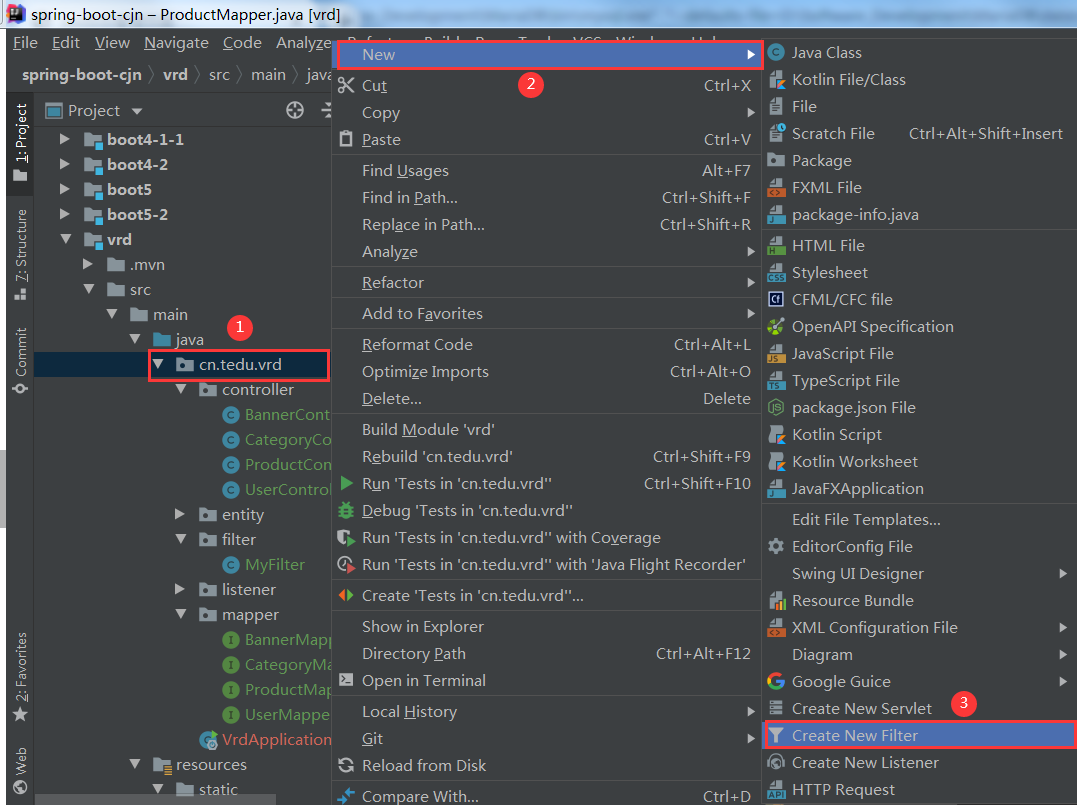
2.在XXXApplication.java中添加注解:@ServletComponentScan
package cn.tedu.vrd;
import org.springframework.boot.SpringApplication;
import org.springframework.boot.autoconfigure.SpringBootApplication;
import org.springframework.boot.web.servlet.ServletComponentScan;
//Web容器组件扫描,作用:就是为了找到刚刚创建的MyFilter过滤器并加载
3.过滤器文件相关代码
package cn.tedu.tvrd.filter;
import cn.tedu.tvrd.entity.User;
import javax.servlet.*;
import javax.servlet.annotation.WebFilter;
import javax.servlet.http.HttpServletRequest;
import javax.servlet.http.HttpServletResponse;
import javax.servlet.http.HttpSession;
import java.io.IOException;
/*告诉编译器这个类是一个过滤器,urlPatterns里面写匹配路径:
urlParttens几种匹配路径的方式:
- 精确匹配: /send.html、/admin.html
- 后缀匹配: *.jpg、*.png、*.html
- 路径匹配: /banner/*、/product/*
- 全部匹配: /* 客户端发出的任何请求都会被过滤器处理
*/
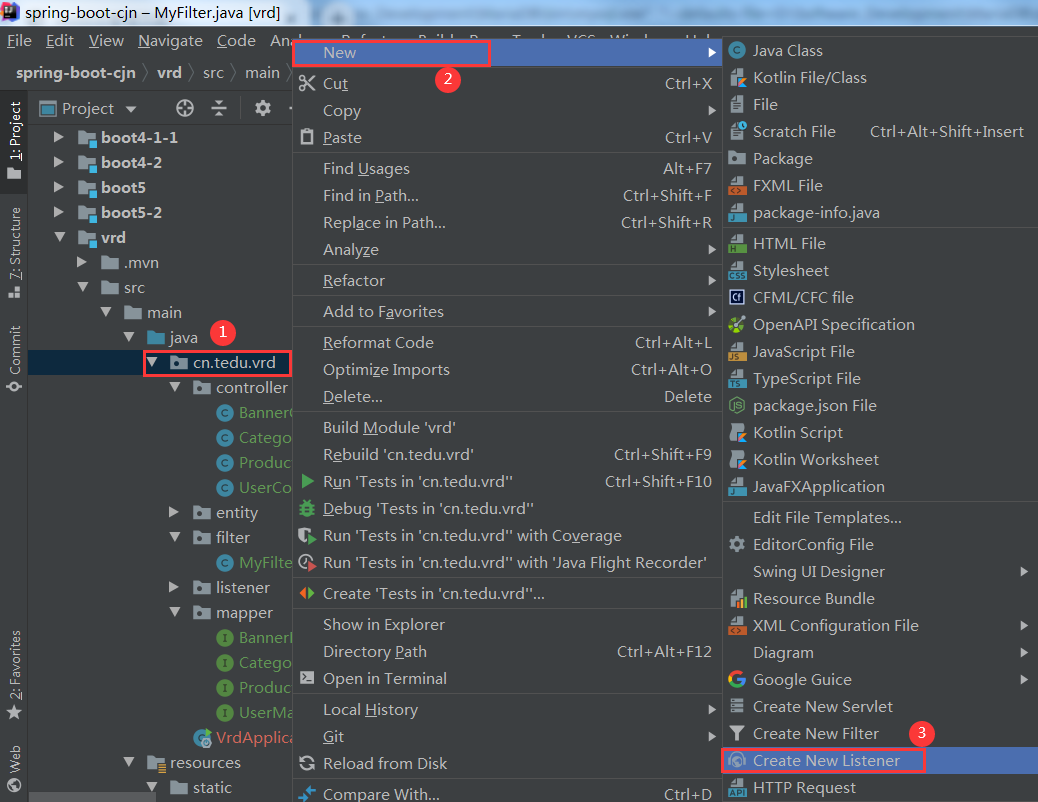
监听器Listener
-
监听器也是Web容器中的组件
-
作用:类似Web前端开发过程中的事件,监听器监听的是工程运行过程中的一些时间点,包括:工程启动,工程停止,Session创建和销毁等。
-
如何使用监听器?
-
创建Listener
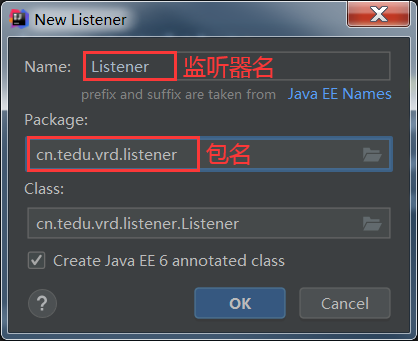
-
在Application.java中添加注解:@ServletComponentScan
package cn.tedu.vrd;
import org.springframework.boot.SpringApplication;
import org.springframework.boot.autoconfigure.SpringBootApplication;
import org.springframework.boot.web.servlet.ServletComponentScan;
//Web容器组件扫描,作用:就是为了找到刚刚创建的MyFilter过滤器并加载、监听器并加载
-
相关代码:
package cn.tedu.vrd.listener;
import javax.servlet.ServletContextEvent;
import javax.servlet.ServletContextListener;
import javax.servlet.annotation.WebListener;
import javax.servlet.http.HttpSessionAttributeListener;
import javax.servlet.http.HttpSessionEvent;
import javax.servlet.http.HttpSessionListener;
import javax.servlet.http.HttpSessionBindingEvent;
-
读取application.properties配置文件数据
-
application.properties相关代码
#测试:配置自己项目中用到的数据
name=tom
job=teacher
#配置保存上传文件的路径
dirPath=D:/upload -
如何读取?
//此注解会自动找到application.properties配置文件中的name、job对应的值
//赋值给此变量,内容不能是中文
对应项目中的优化:
//读取配置文件里面的数据
删除轮播图和作品时删除磁盘对应文件
-
new File("图片路径").delete()
/**
* 删除轮播图图片
* @param id
* 注意:可以先删除磁盘中对应文件,不能先删除数据库中对应的数据,否则查询不到
*/
删除当前分类时同时删除该类别所对应作品
CategoryController:
/**
* 删除分类
* @param id
*/
Vue自定义组件
-
当项目中多个页面需要显示相同的内容时,可以将这部分标签内容封装成一个自定义组件,从而提高开发效率
-
如何使用?
-
新建一个v.js文件,声明自定义组件
//声明一个自定义组件,名为myview
Vue.component('myview',{
props:["arr","fn","isShow"],/*声明下面的变量名、方法名*/
template:`
<div id="mydiv">
<!--在自定义的组件中,是不能直接访问Vue对象中的变量的,
只能访问props中声明的变量,同理,方法也不能访问-->
<ul>
<!--遍历数组,添加点击事件-->
<li v-for="name in arr" @click="fn(name)">{{name}}</li>
</ul>
<h1 v-if="isShow">看不见我!</h1>
</div>
`
})
/*创建vue对象*/
let vm = new Vue({
el:"myview",/*与上面的组件名一致*/
data:{
arr:["张三","李四","王五"], /*要显示的内容,对应props里面的属性*/
isShow:false
},
methods:{
/*点击事件*/
fn:function (name) {
alert(name);//在name上点击显示name
}
}
}) -
新建v1.html,调用v.js文件
注意事项:
-
自定义组件中不能直接访问vue对象中的属性或者方法, 需要在props里面进行传值
-
变量和方法的传值方式是一样的
-
如果props里面定义的变量是驼峰命名传值时需要改成:xxx-xxx
-
myNames -> :my-names
-
网站图标问题
-
准备一个文件名为favicon.ico 的图片
附:favicon制作 - 在线工具 https://tool.lu/favicon/
-
把图片放到工程的根路径 也就是static文件夹下面
-
ReBuild工程并重新启动, shift+f5刷新页面
