
iOS: 悬浮的条件筛选框使用二
一、介绍:
在前面已经介绍了一种条件悬浮框,使用的是tableView的Plain分组样式实现的,因为这是tableView本身就具备的功能,分组悬浮效果。这次我来介绍第二种更加简单的方法,采用两个ScrollView来实现。
二、实现技术:
(1)两个ScrollView,一个是左右滚动,成为内容视图,另一个是上下滚动,作为容器视图;
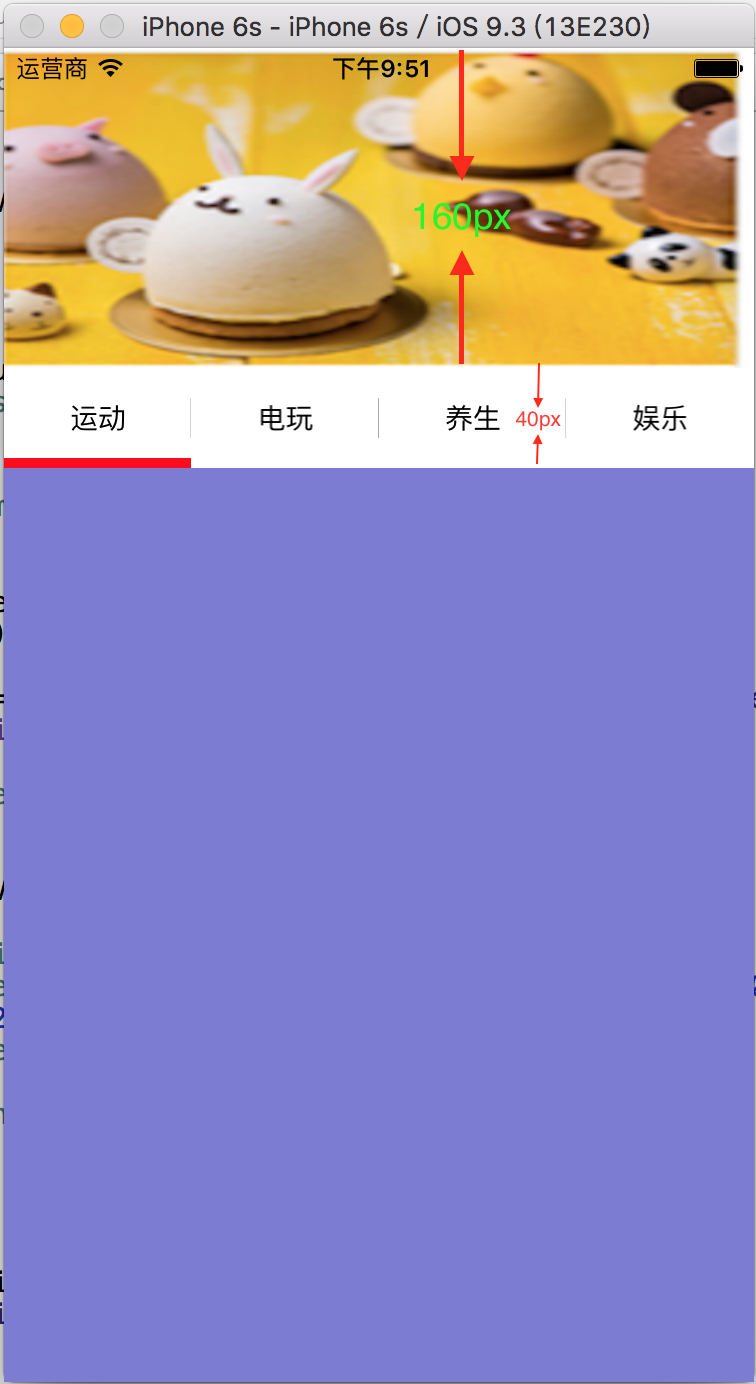
(2) 创建头视图,头视图中有banner图和条件筛选框,标记banner图的高;
(3)合理设置上下滚动的容器视图的frame,它承载头视图和内容视图,不过需要禁止它的弹簧效果,实现悬浮框功能。
三、代码如下:
HeadView.h
//  HeadView.h
//  SuspensionViewDemo
//
//  Created by 夏远全 on 16/11/25.
//  Copyright © 2016年 广州市东德网络科技有限公司. All rights reserved.
//

#import <UIKit/UIKit.h>

@interface HeadView : UIView
/**
 *  类方法创建头视图
 */
+(instancetype)createHeadView:(CGRect)frame;
@property (strong,nonatomic)UIView *animationView;          //下划线动画视图
@end
HeadView.m


//  HeadView.m
//  SuspensionViewDemo
//
//  Created by 夏远全 on 16/11/25.
//  Copyright © 2016年 广州市东德网络科技有限公司. All rights reserved.
//

#import "HeadView.h"
#import "ViewController.h"

#define padding 10
#define Width       [[UIScreen mainScreen] bounds].size.width
#define Height      [[UIScreen mainScreen] bounds].size.height

@interface HeadView ()
@property (strong,nonatomic)UIImageView  *bannerView;       //banner图
@property (strong,nonatomic)NSMutableArray *buttonNames;    //标题按钮数组
@end

@implementation HeadView

/**
 *  懒加载
 */
-(NSMutableArray *)buttonNames{
    if (!_buttonNames) {
        _buttonNames = [NSMutableArray arrayWithObjects:@"运动",@"电玩",@"养生",@"娱乐",nil];
    }
    return _buttonNames;
}

-(UIImageView *)bannerView{
    if (!_bannerView) {

        _bannerView = [[UIImageView alloc]initWithFrame:CGRectMake(0,0,Width,160)];
        _bannerView.image = [UIImage imageNamed:@"demo"];
    }
    return _bannerView;
}

-(UIView *)animationView{

    if (!_animationView) {
        _animationView = [[UIView alloc]initWithFrame:CGRectMake(0, CGRectGetMaxY(self.bannerView.frame)+40+padding/2, Width/4, padding/2)];
        _animationView.backgroundColor = [UIColor redColor];
    }
    return _animationView;
}


//重写初始化方法
-(instancetype)initWithFrame:(CGRect)frame{
    self = [super initWithFrame:frame];
    if (self) {

        //1.创建轮播图
        [self addSubview:self.bannerView];

        //2.创建标题
        for (int i=0; i<4; i++) {

            //按钮
            UIButton *btn = [[UIButton alloc]init];
            [btn setTitle:self.buttonNames[i] forState:UIControlStateNormal];
            [btn setTitleColor:[UIColor blackColor] forState:UIControlStateNormal];
            [btn addTarget:self action:@selector(buttonClick:) forControlEvents:UIControlEventTouchUpInside];
            btn.tag = i;
            btn.backgroundColor = [UIColor whiteColor];
            btn.titleLabel.font = [UIFont systemFontOfSize:14];

            //分割线
            UILabel *line = [[UILabel alloc]init];
            line.tag = i;
            line.backgroundColor = [UIColor lightGrayColor];

            //添加
            [self addSubview:line];
            [self addSubview:btn];
        }

        //3.创建动画视图
        [self addSubview:self.animationView];
    }
    return self;
}


//类方法
+(instancetype)createHeadView:(CGRect)frame{

    HeadView *headView = [[self alloc]initWithFrame:frame];
    return headView;
}


#pragma mark - 按钮被点击
//点击按钮
-(void)buttonClick:(UIButton *)btn{

    [UIView animateWithDuration:0.2 animations:^{

        //移动动画视图的frame
        CGRect frame = self.animationView.frame;
        frame = CGRectMake(Width/4*btn.tag,frame.origin.y,frame.size.width,frame.size.height);
        self.animationView.frame = frame;

        //移动scrollView的偏移位置
        ViewController *currentVC = (ViewController*)[self viewController];
        [currentVC.contentView setContentOffset:CGPointMake(Width*btn.tag, 0) animated:NO];
    }];
}

//获取当前视图所在的控制器
- (UIViewController*)viewController {
    for (UIView* next = [self superview]; next; next = next.superview) {
        UIResponder* nextResponder = [next nextResponder];
        if ([nextResponder isKindOfClass:[UIViewController class]]) {
            return (UIViewController*)nextResponder;
        }
    }
    return nil;
}


//设置frame
-(void)layoutSubviews{
    [super layoutSubviews];

    for (UIView *mysubView in self.subviews) {
        if ([mysubView isKindOfClass:[UIButton class]]) {

            //按钮
            UIButton *button = (UIButton *)mysubView;
            CGFloat X = (Width/4) * button.tag;
            button.frame = CGRectMake(X, CGRectGetMaxY(self.bannerView.frame)+padding/2, (Width/4), 40);
        }
        if ([mysubView isKindOfClass:[UILabel class]]) {

            //分割线
            UILabel *line = (UILabel *)mysubView;
            CGFloat X = (Width/4) * line.tag - 0.5;
            line.frame = CGRectMake(X, CGRectGetMaxY(self.bannerView.frame)+1.5*padding,1,20);
        }
    }
}

@end
ContentView.h
//  ContentView.h
//  SuspensionViewDemo
//
//  Created by 夏远全 on 16/11/25.
//  Copyright © 2016年 广州市东德网络科技有限公司. All rights reserved.
//

#import <UIKit/UIKit.h>

@interface ContentView : UIScrollView

//类方法创建
+(instancetype)shareWithFrame:(CGRect)frame;
@end
ContentView.m
//  ContentView.m
//  SuspensionViewDemo
//
//  Created by 夏远全 on 16/11/25.
//  Copyright © 2016年 广州市东德网络科技有限公司. All rights reserved.
//

#import "ContentView.h"

#define XYQColor(r, g, b)   [UIColor colorWithRed:(r)/255.0 green:(g)/255.0 blue:(b)/255.0 alpha:1.0]
#define XYQRandomColor      XYQColor(arc4random_uniform(256), arc4random_uniform(256), arc4random_uniform(256))
#define SCREEN_W            [[UIScreen mainScreen] bounds].size.width
#define SCREEN_H            [[UIScreen mainScreen] bounds].size.height

@implementation ContentView

//初始化
-(instancetype)initWithFrame:(CGRect)frame{
    self = [super initWithFrame:frame];
    if (self) {

        //放tableView
        for (int i=0; i<4; i++) {
            UIImageView *imgViw = [[UIImageView alloc]init];
            imgViw.backgroundColor = XYQRandomColor;
            imgViw.frame = CGRectMake(SCREEN_W*i, 0, SCREEN_W, SCREEN_H-110);
            [self addSubview:imgViw];
        }
    }
    return self;
}

//类方法创建
+(instancetype)shareWithFrame:(CGRect)frame{

    ContentView *contentView = [[self alloc]initWithFrame:frame];
    contentView.contentSize = CGSizeMake(SCREEN_W*4,frame.size.height);
    contentView.pagingEnabled = YES;
    contentView.bounces = NO;
    return contentView;
}
@end
ViewController.h
//  ViewController.h
//  SuspensionViewDemo
//
//  Created by 夏远全 on 16/11/25.
//  Copyright © 2016年 广州市东德网络科技有限公司. All rights reserved.
//

#import <UIKit/UIKit.h>
#import "ContentView.h"

@interface ViewController : UIViewController

/**
 *  内容视图
 */
@property (strong,nonatomic)ContentView *contentView;

@end
ViewController.m
//  ViewController.m
//  SuspensionViewDemo
//
//  Created by 夏远全 on 16/11/25.
//  Copyright © 2016年 广州市东德网络科技有限公司. All rights reserved.
//

#import "ViewController.h"
#import "HeadView.h"

#define SCREEN_WIDTH  [[UIScreen mainScreen] bounds].size.width
#define SCREEN_HEIGHT [[UIScreen mainScreen] bounds].size.height

@interface ViewController ()<UIScrollViewDelegate>{

    UIScrollView *_containView; //大容器视图(存放头视图和内容视图)
}
/**
 *  头视图
 */
@property (strong,nonatomic)HeadView *headView;

@end

@implementation ViewController

/**
 *  给定头视图的高
 */
static NSInteger const headHeight = 210;

- (void)viewDidLoad {
    [super viewDidLoad];
    [self.view setBackgroundColor:[UIColor whiteColor]];

    //创建控件
    [self setupControl];
}

//创建控件
-(void)setupControl{

    //1.设置容器视图
    _containView = [[UIScrollView alloc] initWithFrame:self.view.bounds];
    _containView.tag = -1;
    _containView.delegate = self;
    _containView.bounces = NO; //禁止它的弹簧效果
    _containView.contentSize = CGSizeMake(SCREEN_WIDTH, SCREEN_HEIGHT+160);
    [self.view addSubview:_containView];

    //2.创建头视图
    _headView = [HeadView createHeadView:CGRectMake(0,0,SCREEN_WIDTH,headHeight)];
    [_containView addSubview:_headView];

    //3.创建内容视图
    _contentView = [ContentView shareWithFrame:CGRectMake(0, headHeight, SCREEN_WIDTH, SCREEN_HEIGHT-110)];
    _contentView.tag = -2;
    _contentView.delegate = self;
    [_containView addSubview:_contentView];
}

#pragma mark - <UIScrollViewDeleagte>
//设置下划动画视图的frame
-(void)scrollViewDidScroll:(UIScrollView *)scrollView{

    if (scrollView.tag == -2) { //横向的滚动内容视图
        NSInteger page = scrollView.contentOffset.x/SCREEN_WIDTH;
        [UIView animateWithDuration:0.2 animations:^{
            CGRect frame = self.headView.animationView.frame;
            frame = CGRectMake(SCREEN_WIDTH/4*page,frame.origin.y,frame.size.width,frame.size.height);
            self.headView.animationView.frame = frame;
        }];
    }
}
@end
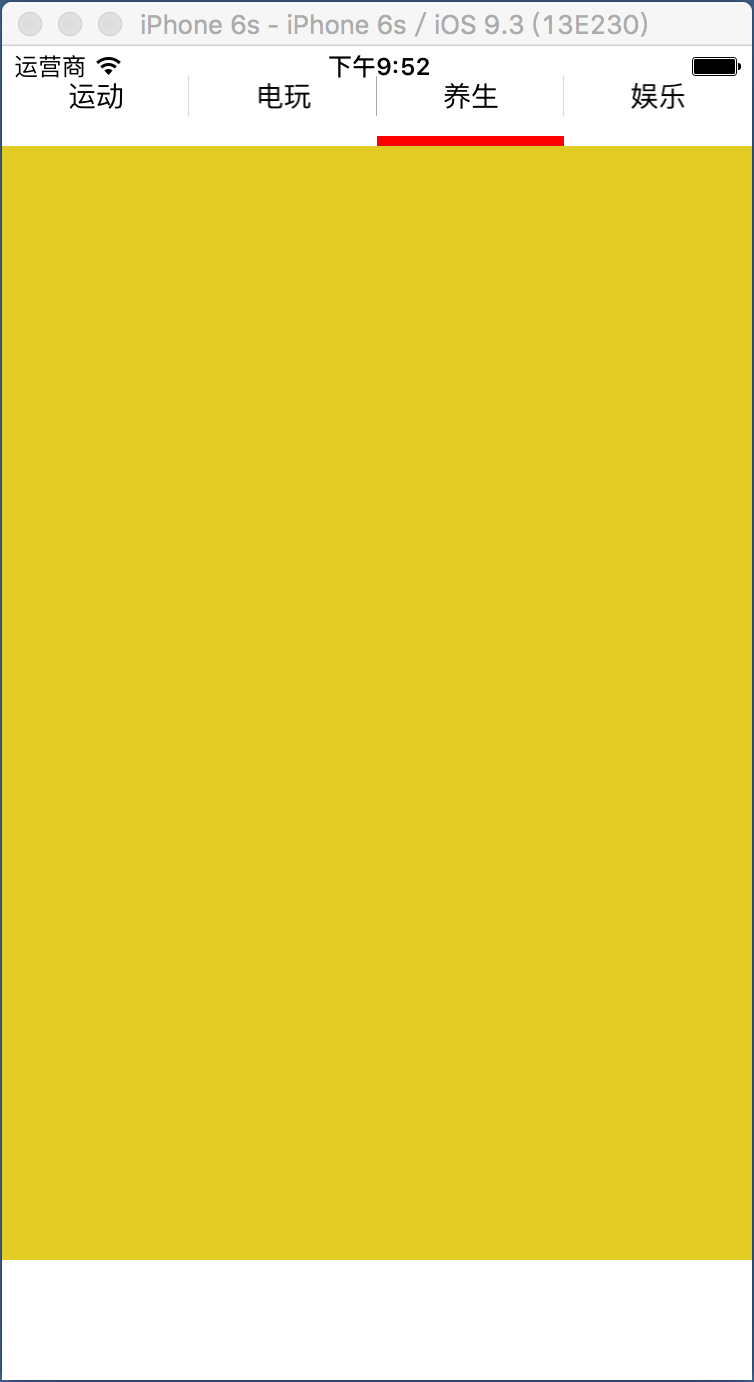
四、演示截图:(上拉到顶就悬浮了不能在上拉,下拉可以继续),点击按钮来回切换tableView
程序猿神奇的手,每时每刻,这双手都在改变着世界的交互方式!
