iOS:抽屉侧滑动画两种形式(1、UIView侧滑 2、ViewController侧滑)
前言:
在iOS中抽屉动画是很常用的一种技术,使用它有很炫的体验效果,为app增添特色,形式就两种,一个是UIView的侧滑,另一个就是ViewController的侧滑。
实现方式:
抽屉侧滑动画有三种方式,一种是设置UIView的frame实现动画侧滑;一种是使用MMDrawerController框架实现控制器的侧滑;最后一种使用系统的UIScreenEdgePanGestureRecognizer实现侧滑。
第一种方式:
UIView的侧滑动画,分别为leftView、mainView、rightView,主要给这三个view做处理。
例如,我们在用QQ时都会发现,消息列表向左滑动时,左侧的功能界面被显示出来,消息列表会拉到最右侧, 就像一个抽屉拉出来一样。除了QQ, 还有网易新闻等应用都采用了这样的交互。本文就以此介绍简易版的抽屉效果.
实现代码如下:
(1)声明三个View属性
@interface ViewController ()
@property (nonatomic, strong) UIView *mainView;
@property (nonatomic, strong) UIView *leftView;
@property (nonatomic, strong) UIView *rightView;
@end

- (void)viewDidLoad {
    [super viewDidLoad];
    [self creatChildView];
    [self addGesture];
    // 通过KVO来监听mainView的frame的变化,从而判断maimView是左滑还是右滑。
    [_mainView addObserver:self forKeyPath:@"frame" options:NSKeyValueObservingOptionNew context:nil];
}
(2)创建View,在这注意view的添加顺序, 我们想要让最初显示的view为mainView
- (void)creatChildView
{
    self.leftView = [[UIView alloc] initWithFrame:self.view.bounds];
    _leftView.backgroundColor = [UIColor greenColor];
    [self.view addSubview:_leftView];

    _rightView = [[UIView alloc] initWithFrame:self.view.bounds];
    _rightView.backgroundColor = [UIColor blueColor];
    [self.view addSubview:_rightView];

    self.mainView = [[UIView alloc] initWithFrame:self.view.bounds];
    _mainView.backgroundColor = [UIColor redColor];
    [self.view addSubview:_mainView];
}
(3)给self.view添加一个平移手势
- (void)addGesture
{
       // 创建手势
    UIPanGestureRecognizer *pan = [[UIPanGestureRecognizer alloc] initWithTarget:self action:@selector(panAction:)];
    [self.view addGestureRecognizer:pan];
}
(4)手势触发方法
- (void)panAction:(UIPanGestureRecognizer *)panGesture
{
// 获取平移手势移动后, 在相对坐标中的偏移量
    CGPoint point = [panGesture translationInView:self.view];
// 声明xNew变量用point.x赋值
    CGFloat xNew = point.x;
    // 改变mainView的frame
    _mainView.frame = CGRectMake(xNew + self.mainView.frame.origin.x, 0, self.view.frame.size.width, self.view.frame.size.height);
    // 设置手势移动后的point
    [panGesture setTranslation:CGPointZero inView:panGesture.view];
}
(5)只要被监听的属性发生变化, 就会触发这个方法
- (void)observeValueForKeyPath:(NSString *)keyPath ofObject:(id)object change:(NSDictionary<NSString *,id> *)change context:(void *)context
{
    // 如果往右侧移动, 显示左边,隐藏右边
    if (_mainView.frame.origin.x > 0) {
        _rightView.hidden = YES;
    // 往左移动,显示右边
    } else if (_mainView.frame.origin.x < 0) {
        _rightView.hidden = NO;
    }
}
实现效果如下:

结果总结:
这次实现的是简易版的抽屉效果, 仅仅是用了三个view, 但在开发中一般为几个不同的VC, 通过手势实现抽屉效果, 同时还能设置一些动画效果, 比如比较有名的MMDrawerController框架.要是项目有需要, 可以参考这个第三方. 如何实现几个控制器间的抽屉效果, 下面接着就与大家分享.
第二种方式:
控制器抽屉侧滑,左中右三个控制器,这里使用上面提到的MMDrawerController框架。

实现代码如下:
1、首先创建三个控制器为center、left、right(我这里就简写了,具体的话大家可以下载Demo),创建完成之后,我们来到我们的AppDelegate,开始编写我们的代码了
- 1.1多话不说,先导入头文件,并且添加一个MMDrawerController的属性
 //为MMDrawerController框架中
  #import "MMDrawerController.h"
  #import "UIViewController+MMDrawerController.h"

  //为自己创建的三个控制器
  #import "LitterLCenterViewController.h"
  #import "LitterLLeftViewController.h"
  #import "LitterLRightViewController.h"

  @interface LitterLAppDelegate ()
  /**
   *  MMDrawerController属性
   */
  @property(nonatomic,strong) MMDrawerController * drawerController;
  @end
- 1.2 上面的做完后,我们便要显示我们的窗口到设备上,接下来来到这里
- (BOOL)application:(UIApplication *)application didFinishLaunchingWithOptions:(NSDictionary *)launchOptions {

  //1、初始化控制器
  UIViewController *centerVC = [[LitterLCenterViewController alloc]init];
  UIViewController *leftVC = [[LitterLLeftViewController alloc]init];
  UIViewController *rightVC = [[LitterLRightViewController alloc]init];
  //2、初始化导航控制器
  UINavigationController *centerNvaVC = [[UINavigationController alloc]initWithRootViewController:centerVC];
  UINavigationController *leftNvaVC = [[UINavigationController alloc]initWithRootViewController:leftVC];
  UINavigationController *rightNvaVC = [[UINavigationController alloc]initWithRootViewController:rightVC];

  //3、使用MMDrawerController
  self.drawerController = [[MMDrawerController alloc]initWithCenterViewController:centerNvaVC leftDrawerViewController:leftNvaVC rightDrawerViewController:rightNvaVC];

  //4、设置打开/关闭抽屉的手势
  self.drawerController.openDrawerGestureModeMask = MMOpenDrawerGestureModeAll;
  self.drawerController.closeDrawerGestureModeMask =MMCloseDrawerGestureModeAll;
  //5、设置左右两边抽屉显示的多少
  self.drawerController.maximumLeftDrawerWidth = 200.0;
  self.drawerController.maximumRightDrawerWidth = 200.0;

  //6、初始化窗口、设置根控制器、显示窗口
  self.window = [[UIWindow alloc]initWithFrame:[UIScreen mainScreen].bounds];
  [self.window setRootViewController:self.drawerController];
  [self.window makeKeyAndVisible];
  return YES;
}
2、完成上面后基本的抽屉效果就已经实现了,在这里的话,我们将要实现导航栏上面的按钮,以及一些效果。
-
2.1、这里的话我们先实现导航栏的效果吧:
- 2.1.1、这里的话我用的是通过UIBarButtonItem的方法去实现的
//设置导航栏左右按钮
self.navigationItem.leftBarButtonItem = [[UIBarButtonItem alloc]initWithImage:[UIImage imageNamed:@"menu"] style:UIBarButtonItemStylePlain target:self action:@selector(leftBtn)];
self.navigationItem.rightBarButtonItem = [[UIBarButtonItem alloc]initWithImage:[UIImage imageNamed:@"navigationbar_friendattention"] style:UIBarButtonItemStylePlain target:self action:@selector(rightBtn)];
- 2.1.2、然而我们的作者给了我们一个类,里面有他通过QuartzCore绘制出来的按钮,你们想看的话可以去看看
//首先得导入头文件
#import "MMDrawerBarButtonItem.h"
//----------------------------
self.navigationItem.leftBarButtonItem = [[MMDrawerBarButtonItem alloc]initWithTarget:self action:@selector(leftBtn)];
self.navigationItem.rightBarButtonItem = [[MMDrawerBarButtonItem alloc]initWithTarget:self action:@selector(rightBtn)];
- 2.1.3、这里的话就是我们的方法,其实很简单(就一行代码)但是过程很迷茫
//首先得导入头文件
#import "UIViewController+MMDrawerController.h"
//----------------------------
-(void)leftBtn{
//这里的话是通过遍历循环拿到之前在AppDelegate中声明的那个MMDrawerController属性,然后判断是否为打开状态,如果是就关闭,否就是打开(初略解释,里面还有一些条件)
  [self.mm_drawerController toggleDrawerSide:MMDrawerSideLeft animated:YES completion:nil];
}
-(void)rightBtn{
  [self.mm_drawerController toggleDrawerSide:MMDrawerSideRight animated:YES completion:nil];
}
- 2.2、完成上面后,导航栏的点击就能切换,那么我们就来实现一个效果吧,所谓的弹簧效果,也就几句代码
 //2、添加双击手势
  UITapGestureRecognizer * doubleTap = [[UITapGestureRecognizer alloc] initWithTarget:self action:@selector(doubleTap:)];
  //2.1、双击
  [doubleTap setNumberOfTapsRequired:2];
  [self.view addGestureRecognizer:doubleTap];

  //3、添加两个手指双击手势
  UITapGestureRecognizer * twoFingerDoubleTap = [[UITapGestureRecognizer alloc] initWithTarget:self action:@selector(twoFingerDoubleTap:)];
  //3.1、双击
  [twoFingerDoubleTap setNumberOfTapsRequired:2];
  //3.2、两个手指  默认为一个
  [twoFingerDoubleTap setNumberOfTouchesRequired:2];
  [self.view addGestureRecognizer:twoFingerDoubleTap];

  //----------------------------
  /**
   *  添加点击手势  一个手指双击
   */
  -(void)doubleTap:(UITapGestureRecognizer*)gesture{
      [self.mm_drawerController bouncePreviewForDrawerSide:MMDrawerSideLeft completion:nil];
  }

  /**
   *  添加点击手势  两个个手指双击
   */
  -(void)twoFingerDoubleTap:(UITapGestureRecognizer*)gesture{
      [self.mm_drawerController bouncePreviewForDrawerSide:MMDrawerSideRight completion:nil];
  }
3、到这里的话就是最后一步了,第一设置数据源,第二实现协议了。
- 3.1、数据源的编写,这里的话我用的都是静态数据,就不做解释了,右侧和左侧抽屉都为一样的,你们自行查看吧
#pragma mark - UITableViewDataSource
- (NSInteger)tableView:(UITableView *)tableView numberOfRowsInSection:(NSInteger)section {
    return 10;
}

- (UITableViewCell *)tableView:(UITableView *)tableView cellForRowAtIndexPath:(NSIndexPath *)indexPath {
        static NSString *CellIdentifier = @"Cell";
    UITableViewCell *cell = [tableView dequeueReusableCellWithIdentifier:CellIdentifier];
    if (!cell) {
        cell = [[UITableViewCell alloc]initWithStyle:UITableViewCellStyleDefault reuseIdentifier:CellIdentifier];
    }
    cell.textLabel.text =[NSString stringWithFormat:@"Left-Demo%ld",indexPath.row];
    return cell;
}
- 3.2、这里就是我们的最后一步,点击Cell跳转控制器了,那么我们的有一个控制器取名去:
LitterLShowViewController
#pragma mark - UITableViewDelegate
-(void)tableView:(UITableView *)tableView didSelectRowAtIndexPath:(NSIndexPath *)indexPath{
    LitterLShowViewController *showVC = [[LitterLShowViewController alloc]init];
    showVC.title = [NSString stringWithFormat:@"Left-Demo%ld",indexPath.row];

    //拿到我们的LitterLCenterViewController,让它去push
    UINavigationController* nav = (UINavigationController*)self.mm_drawerController.centerViewController;
    [nav pushViewController:showVC animated:NO];
    //当我们push成功之后,关闭我们的抽屉
    [self.mm_drawerController closeDrawerAnimated:YES completion:^(BOOL finished) {
        //设置打开抽屉模式为MMOpenDrawerGestureModeNone,也就是没有任何效果。
        [self.mm_drawerController setOpenDrawerGestureModeMask:MMOpenDrawerGestureModeNone];
    }];
}
4、当我们的LitterLShowViewController退出后,我们的把打开抽屉模式在切换过来,当然这个是在中间控制器里面去写,因为LitterLShowViewController退出后会呈现中间控制器
/**
 *  加载控制器的时候设置打开抽屉模式  (因为在后面会关闭)
 */
-(void)viewWillAppear:(BOOL)animated{
    [super viewWillAppear:animated];
    //设置打开抽屉模式
    [self.mm_drawerController setOpenDrawerGestureModeMask:MMOpenDrawerGestureModeAll];
}
Demo地址:MMDrawerControllerDemo
gihub框架地址:https://github.com/mutualmobile/MMDrawerController
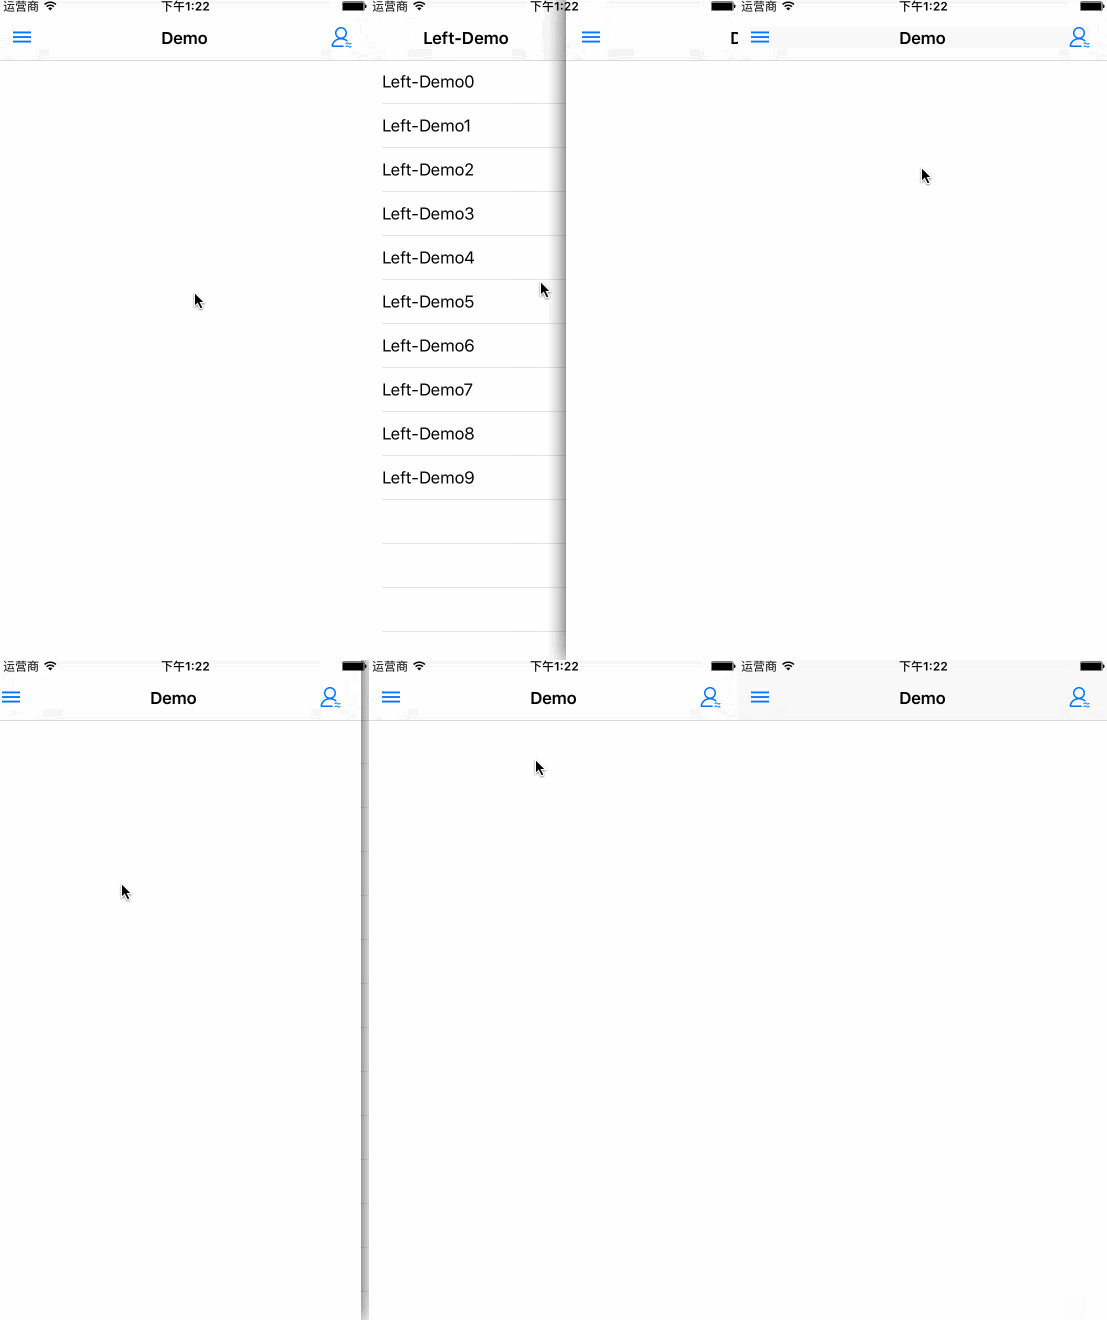
实现效果如下:

第三种方式:
使用UIScreenEdgePanGestureRecognizer写侧边栏。
UIScreenEdgePanGestureRecognizer看起来像pan手势,它是检测屏幕边缘的pan手势的。系统在某些controller转场的时候会使用这个手势。你也可以使用这个手势做其他的事情。
实现代码如下:
#import "RootViewController.h"
@interface RootViewController ()<UIGestureRecognizerDelegate>

{
    CGFloat  _centerX;
    CGFloat  _centerY;
    UIView  *_backgroundView;
}
@end
@implementation RootViewController

- (void)viewDidLoad
{
    [super viewDidLoad];

    // 存储坐标
    _centerX = self.view.bounds.size.width / 2;
    _centerY = self.view.bounds.size.height / 2;
    self.view.backgroundColor = [UIColor blackColor];

    // 屏幕边缘pan手势(优先级高于其他手势)
    UIScreenEdgePanGestureRecognizer *leftEdgeGesture = \
    [[UIScreenEdgePanGestureRecognizer alloc] initWithTarget:self
                                                      action:@selector(handleLeftEdgeGesture:)];
    leftEdgeGesture.edges = UIRectEdgeLeft;           // 屏幕左侧边缘响应
    [self.view addGestureRecognizer:leftEdgeGesture]; // 给self.view添加上

    // 设置一个UIView用来替换self.view,self.view用来当做背景使用
    _backgroundView = [[UIView alloc] initWithFrame:self.view.bounds];
    _backgroundView.backgroundColor = [UIColor yellowColor];
    [self.view addSubview:_backgroundView];

    // 展示的view
    UIView *showView_01 = [[UIView alloc] initWithFrame:CGRectMake(0, 0, 320, 200)];
    showView_01.tag = 0x1;
    showView_01.backgroundColor = [UIColor redColor];
    [_backgroundView addSubview:showView_01];
}
// 手势处理
- (void)handleLeftEdgeGesture:(UIScreenEdgePanGestureRecognizer *)gesture
{
    // 获取到当前被触摸的view
    UIView *view = [self.view hitTest:[gesture locationInView:gesture.view]
                            withEvent:nil];

    NSLog(@"tag = %ld", (long)view.tag);

    if(UIGestureRecognizerStateBegan == gesture.state ||
       UIGestureRecognizerStateChanged == gesture.state)
    {
        // 根据被触摸手势的view计算得出坐标值
        CGPoint translation = [gesture translationInView:gesture.view];
        NSLog(@"%@", NSStringFromCGPoint(translation));

        NSLog(@"进行中");

        // 进行设置
        _backgroundView.center = CGPointMake(_centerX + translation.x, _centerY);
    }
    else
    {
        // 恢复设置
        [UIView animateWithDuration:.3 animations:^{
            _backgroundView.center = CGPointMake(_centerX, _centerY);

        }];
    }
}
@end
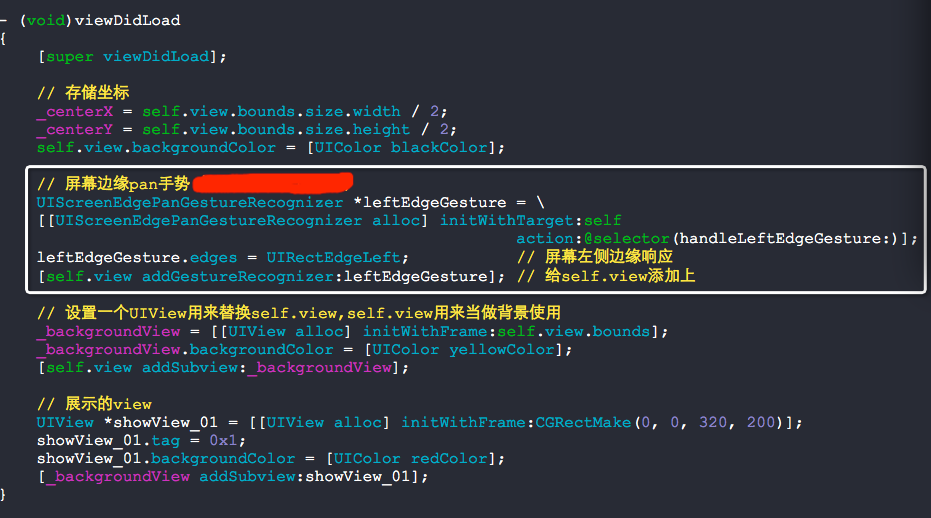
代码截图如下:


效果图如下:

提示如果想与其他手势并发操作,实现如下代理即可:
- (BOOL)gestureRecognizer:(UIGestureRecognizer *)gestureRecognizer shouldRecognizeSimultaneouslyWithGestureRecognizer:(UIGestureRecognizer *)otherGestureRecognizer {
    return YES;
}
为原博主点赞吧:
http://www.jianshu.com/p/fd911eeda3a1
http://www.jianshu.com/p/9e55cbf7d5ab
https://yq.aliyun.com/articles/30676


【推荐】编程新体验,更懂你的AI,立即体验豆包MarsCode编程助手
【推荐】凌霞软件回馈社区,博客园 & 1Panel & Halo 联合会员上线
【推荐】抖音旗下AI助手豆包,你的智能百科全书,全免费不限次数
【推荐】博客园社区专享云产品让利特惠,阿里云新客6.5折上折
【推荐】轻量又高性能的 SSH 工具 IShell:AI 加持,快人一步