iOS:CALayer核心动画层上绘图
在CALayer上绘图:
•要在CALayer上绘图,有两种方法:
1.创建一个CALayer的子类,然后覆盖drawInContext:方法,可以使用Quartz2D API在其中进行绘图
2.设置CALayer的delegate,然后让delegate实现drawLayer:inContext:方法进行绘图
•注意:
–不能再将UIView设置为这个CALayer的delegate,因为UIView对象已经是内部层的delegate,再次设置会出问题
–无论使用哪种方法,都必须向层发送setNeedsDisplay消息,以触发相应绘图方法的调用
CALayer、UIView以及上下文之间的关系 :
•当UIView收到setNeedsDisplay消息时,CALayer会准备好一个CGContextRef,然后向它的delegate即UIView,发送消息,并且传入已经准备好的CGContextRef对象。UIView在drawLayer:inContext:方法中会调用自己的drawRect:方法
•平时在drawRect:中通过UIGraphicsGetCurrentContext()获取的就是由CALayer传入的CGContextRef对象,在drawRect:中完成的所有绘图都会填入CALayer的CGContextRef中,然后被拷贝至屏幕
•CALayer的CGContextRef用的是位图上下文(Bitmap Graphics Context)
下面我们就对这两种绘图方式都进行具体的实例演示:
方式一:通过设置CALayer的代理,并实现代理方法drawLayer:inContext:的形式进行绘图
//在-(void)viewDidLoad{[super viewDidLoad];.......}的代码为:
创建子层:
    //创建子层(使用默认的锚点)
    CALayer *subLayer = [[CALayer alloc]init];

    subLayer.bounds = CGRectMake(0,0,100, 100);

    subLayer.position = self.view.center;

    subLayer.backgroundColor = [[UIColor redColor]CGColor];

    //设置圆角半径,设置为50,此时的子层为圆形
    subLayer.cornerRadius = 50;

    [self.view.layer addSublayer:subLayer];
设置代理
    //设置层的代理
    subLayer.delegate = self;
发送重绘消息
    //只有发送setNeedsDisplay这个消息时才会调用代理方法
    [subLayer setNeedsDisplay];
//实现代理的drawLayer:inContext:方法代码为:
#pragma mark -CALayer的代理方法
-(void)drawLayer:(CALayer *)layer inContext:(CGContextRef)ctx
{
    //画矩形
    CGContextAddRect(ctx, CGRectMake(0, 0, 50, 50));

    //设置颜色
    CGFloat components[4] = {0.0,1.0,0.0,1.0};
    CGContextSetStrokeColor(ctx, components);

    //这种方式也可以设置颜色
    //CGContextSetStrokeColorWithColor(ctx,[[UIColor greenColor]CGColor]);

    //旋转坐标系
    CGContextScaleCTM(ctx, 1, -1);
    CGContextTranslateCTM(ctx, 0, -100);

    //画笑脸图像
    UIImage *image = [UIImage imageNamed:@"1.png"];
    CGContextDrawImage(ctx, CGRectMake(0, 0, 100, 100), [image CGImage]);

    //画路径
    CGContextDrawPath(ctx, kCGPathStroke);
}
演示结果如下:在子层中画了一个笑脸图像,同时左上角画了一个描绿边的矩形

方式二:通过创建CALayer的子类,并重写drawInContext:方法进行绘图

//首先在控制器类的-(void)viewDidLoad{[super viewDidLoad];.......}方法中创建子层的代码为:
#import "ViewController.h"
#import "MyLayer.h"

@interface ViewController ()

@end

@implementation ViewController

- (void)viewDidLoad {
    [super viewDidLoad];

    //创建子层
    MyLayer *myLayer = [[MyLayer alloc]init];
    myLayer.bounds = CGRectMake(0, 0, 100, 100);

    myLayer.position = CGPointMake(100, 100);

    //设置子层背景色为灰色
    myLayer.backgroundColor = [[UIColor grayColor]CGColor];

    [self.view.layer addSublayer:myLayer];

    [myLayer setNeedsDisplay];
}
@end
//然后创建一个CALayer的子类,在类中冲重写drawInContext:方法,代码如下:
#import "MyLayer.h"
#import <UIKit/UIKit.h>

@implementation MyLayer
//重写这个方法
-(void)drawInContext:(CGContextRef)ctx
{

    //绘制矩形
    CGContextAddRect(ctx, CGRectMake(0, 0, 50, 50));


    //第一种设置颜色方式:
    //设置颜色空间(选择配色方案:RGB,红、绿、蓝)
    CGColorSpaceRef colorspace = CGColorSpaceCreateDeviceRGB();
    CGContextSetStrokeColorSpace(ctx, colorspace);

    //数组中四个内容:前三个分别为红绿蓝颜色值,后一个为透明度
    CGFloat components[4] = {0.0,1.0,0.0,1.0};
    CGContextSetStrokeColor(ctx, components);


    //这是另一种比较简单的设置颜色的方式
    //CGContextSetStrokeColorWithColor(ctx, [[UIColor greenColor]CGColor]);


    //绘制描边路径
    CGContextDrawPath(ctx, kCGPathStroke);

    //释放create出的属性,防止内存泄露
    CGColorSpaceRelease(colorspace);
}
@end
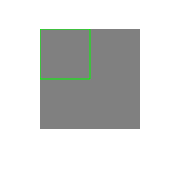
演示结果如下:产生了一个灰色的layer子层,在上面画了一个只描可绿边的矩形

程序猿神奇的手,每时每刻,这双手都在改变着世界的交互方式!

