SpringMVC中的generator
引言
今天在做一个原生的spring项目的时候碰到一个非常好用的代码自动生成器,叫做generator,主要是运用于mybatis中的代码生成,它可以生成mapper的映射xml,model中的实体类、以及dao中的各种方法等等。
具体操作
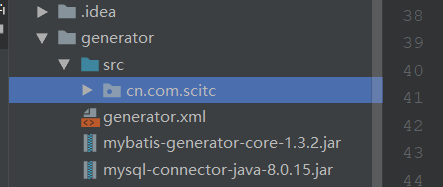
1.首先这个是一个插件的存在,需要把插件引入到你的项目中。

2.由于我这里只需要生成mybatis相关的代码,我就只引入了两个jar包,如果有其他需要,根据自己的项目需求来。

3.创建一个generator.xml,我们需要在里面配置自己项目相关的东西,由于我只配置mybatis相关的东西,我就着重讲一下mybatis相关的配置。
<?xml version="1.0" encoding="UTF-8"?>
				<!DOCTYPE generatorConfiguration PUBLIC "-//mybatis.org//DTD MyBatis Generator Configuration 1.0//EN" "http://mybatis.org/dtd/mybatis-generator-config_1_0.dtd">
				<generatorConfiguration>
					<!-- 数据库驱动包位置 -->
					<classPathEntry location="E:/Java.work/Spring.work/authorization/generator/mysql-connector-java-8.0.15.jar" />
					<context id="DB2Tables" targetRuntime="MyBatis3">
						<commentGenerator>
							<property name="suppressAllComments" value="true" />
						</commentGenerator>
						<!-- 数据库链接URL、用户名、密码 -->
						<jdbcConnection driverClass="com.mysql.cj.jdbc.Driver" connectionURL="jdbc:mysql://localhost:3306/security?serverTimezone=GMT%2B8" userId="root" password="root">
						</jdbcConnection>
						<javaTypeResolver>
							<property name="forceBigDecimals" value="false" />
						</javaTypeResolver>
						<!-- 生成模型的包名和位置 -->
						<javaModelGenerator targetPackage="cn.com.scitc.model" targetProject="E:/Java.work/Spring.work/authorization/generator/src">
							<property name="enableSubPackages" value="true" />
							<property name="trimStrings" value="true" />
						</javaModelGenerator>
						<!-- 生成的映射文件包名和位置 -->
						<sqlMapGenerator targetPackage="cn.com.scitc.mapper" targetProject="E:/Java.work/Spring.work/authorization/generator/src">
							<property name="enableSubPackages" value="true" />
						</sqlMapGenerator>
						<!-- 生成DAO的包名和位置 -->
						<javaClientGenerator type="XMLMAPPER" targetPackage="cn.com.scitc.dao" targetProject="E:/Java.work/Spring.work/authorization/generator/src">
							<property name="enableSubPackages" value="true" />
						</javaClientGenerator>
						<!-- 要生成那些表(更改tableName和domainObjectName就可以) --><!-- 6 -->
						<table tableName="sys_user" domainObjectName="SysUser" enableCountByExample="false" enableUpdateByExample="false" enableDeleteByExample="false" enableSelectByExample="false" selectByExampleQueryId="false" />
						<table tableName="sys_dept" domainObjectName="SysDept" enableCountByExample="false" enableUpdateByExample="false" enableDeleteByExample="false" enableSelectByExample="false" selectByExampleQueryId="false" />
						<table tableName="sys_acl" domainObjectName="SysAcl" enableCountByExample="false" enableUpdateByExample="false" enableDeleteByExample="false" enableSelectByExample="false" selectByExampleQueryId="false" />
						<table tableName="sys_acl_module" domainObjectName="SysAclModule" enableCountByExample="false" enableUpdateByExample="false" enableDeleteByExample="false" enableSelectByExample="false" selectByExampleQueryId="false" />
						<table tableName="sys_role" domainObjectName="SysRole" enableCountByExample="false" enableUpdateByExample="false" enableDeleteByExample="false" enableSelectByExample="false" selectByExampleQueryId="false" />
						<table tableName="sys_role_acl" domainObjectName="SysRoleAcl" enableCountByExample="false" enableUpdateByExample="false" enableDeleteByExample="false" enableSelectByExample="false" selectByExampleQueryId="false" />
						<table tableName="sys_role_user" domainObjectName="SysRoleUser" enableCountByExample="false" enableUpdateByExample="false" enableDeleteByExample="false" enableSelectByExample="false" selectByExampleQueryId="false" />
						<table tableName="sys_log" domainObjectName="SysLog" enableCountByExample="false" enableUpdateByExample="false" enableDeleteByExample="false" enableSelectByExample="false" selectByExampleQueryId="false" />
					</context>
				</generatorConfiguration>
如果有相同需求的大佬,可以直接修改相应的数据库驱动包位置、数据库链接URL、用户名、密码、生成DAO的包名和位置、生成的映射文件包名和位置、生成模型的包名和位置、表名字...就可以了.。
4.最后需要一个src的包来接收我们生成的源代码以及配置文件
5.接下来就是运行自动生成的命令:
在idea里面直接运行:
首次先打开

cd进入到generator里面
在里面输入:
java -jar mybatis-generator-core-1.3.2.jar -configfile generator.xml -overwrite
出现:

就表示成功了。
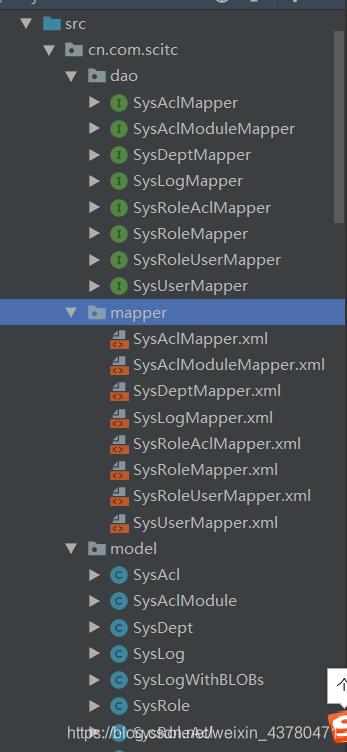
成果展示


