商铺项目(主从同步和读写分离的实现(一))
下面来学习:1、数据库层面的主从配置实现
2、代码层面的读写分离实现
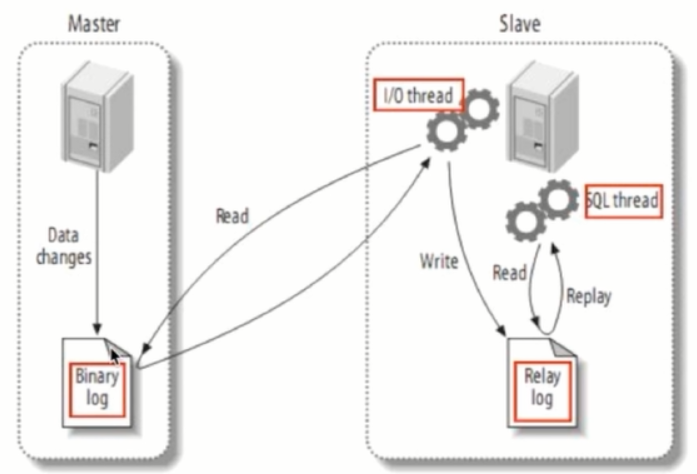
主从同步工作原理:

先去阿里云买两个云服务器,然后重置密码,重启服务器,接着用Xshell远程连接。

下面介绍阿里云Centos7使用yum安装MySQL5.6(这里也介绍另外一个博客:http://blog.csdn.net/u011627980/article/details/52691799):
[root@izwz99cwe60vsuzvi7ucuez ~]# rpm -Uvh http://dev.mysql.com/get/mysql-community-release-el7-5.noarch.rpm

[root@izwz99cwe60vsuzvi7ucuez ~]# yum repolist enabled | grep "mysql.*-community.*"

[root@izwz99cwe60vsuzvi7ucuez ~]# yum -y install mysql-community-server

[root@izwz99cwe60vsuzvi7ucuez ~]# systemctl enable mysqld
[root@izwz99cwe60vsuzvi7ucuez ~]# systemctl start mysqld
[root@izwz99cwe60vsuzvi7ucuez ~]# mysql_secure_installation

Enter current password for root (enter for none):
OK, successfully used password, moving on...

Setting the root password ensures that nobody can log into the MySQL
root user without the proper authorisation.

Set root password? [Y/n] y
New password:
Re-enter new password:
Password updated successfully!
Reloading privilege tables..
... Success!


By default, a MySQL installation has an anonymous user, allowing anyone
to log into MySQL without having to have a user account created for
them. This is intended only for testing, and to make the installation
go a bit smoother. You should remove them before moving into a
production environment.

Remove anonymous users? [Y/n] y
... Success!

Normally, root should only be allowed to connect from 'localhost'. This
ensures that someone cannot guess at the root password from the network.

Disallow root login remotely? [Y/n] n
... skipping.

By default, MySQL comes with a database named 'test' that anyone can
access. This is also intended only for testing, and should be removed
before moving into a production environment.

Remove test database and access to it? [Y/n] y
- Dropping test database...
ERROR 1008 (HY000) at line 1: Can't drop database 'test'; database doesn't exist
... Failed! Not critical, keep moving...
- Removing privileges on test database...
... Success!

Reloading the privilege tables will ensure that all changes made so far
will take effect immediately.

Reload privilege tables now? [Y/n] y
... Success!
OK,下面我已经弄好了两台服务器:120.78.146.32:22(从)和39.108.63.239:22(主)
接下来继续在主服务器中:
[root@izuct94rafpg7bz ~]# mysql -uroot -p
mysql> show databases;
mysql> exit
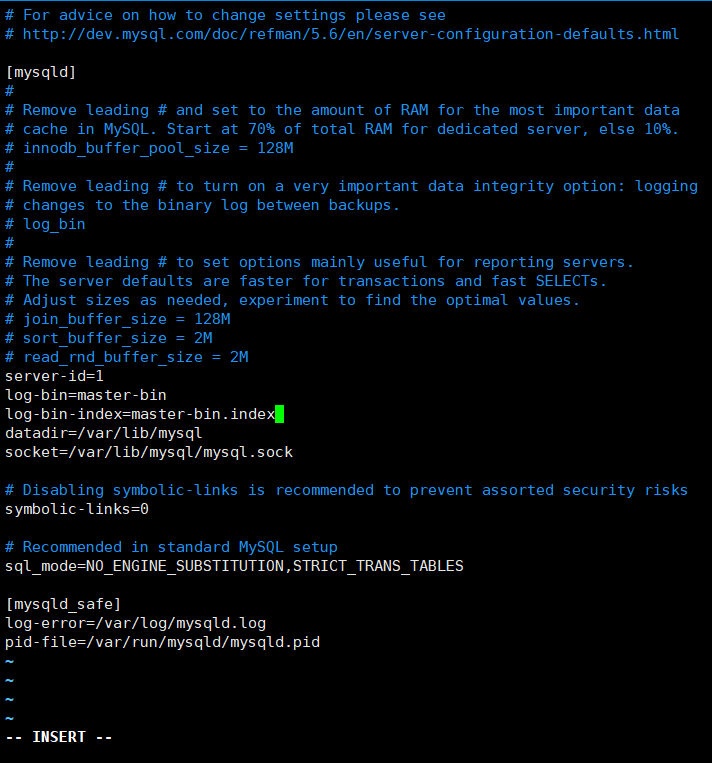
[root@izuct94rafpg7bz ~]# vim /etc/my.cnf
敲击键盘i,表示输入模式:

加入三行即可:
server-id=1
log-bin=master-bin
log-bin-index=master-bin.index
然后ctrl+c退出编辑模式,输入:wq保存退出。
接着重启mysql服务:
[root@izuct94rafpg7bz ~]# service mysqld restart
下面验证看有没有生效:
[root@izuct94rafpg7bz ~]# mysql -uroot -p
mysql> show databases;
mysql> show master status;
在从服务器中:

加入三行:
server-id=2
relay-log=slave-relay-bin
relay-log-index=slave-relay-bin.index
另外一种重启方式(centos):
[root@izwz99cwe60vsuzvi7ucuez ~]#  service mysqld stop
[root@izwz99cwe60vsuzvi7ucuez ~]#  service mysqld start
[root@izwz99cwe60vsuzvi7ucuez ~]# mysql -uroot -p
先在主库中创建user,授权并刷新:
mysql> create user repl;
mysql> grant replication slave on *.* to 'repl'@'120.78.146.32' identified by '你数据库的密码';
mysql> flush privileges;
从库:
mysql> change master to master_host='39.108.63.239',master_port=3306,master_user='repl',master_password='你数据库的密码',master_log_file='master-bin.000001',master_log_pos=0;
(注意这里master_log_file需要在主库中输入mysql> show master status)
mysql> start slave;
mysql> show slave status\G
如果发现有问题的话:
![]()
mysql> stop slave
mysql> exit
[root@izwz99cwe60vsuzvi7ucuez ~]# start slave
[root@izwz99cwe60vsuzvi7ucuez ~]# mysql -uroot -p
show slave status\G
再看看是不是好了,如果还是不行,那就是防火墙端口没有开放的问题,这个问题很坑,不要踩。
以下这种就证明成功了:

下面来试验一下:
在主库中:
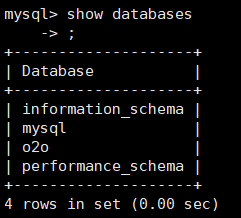
mysql> create database o2o;
mysql> show databases;
在从库中:
mysql> show databases

这里要注意不要在从库写数据,因为不能同步到主库中,从库是用来读数据的,另外从库的mysql版本要比主库高,因为Mysql向后兼容,也就是说低版本语句的可以在高版本执行。
接下来我们把数据库的sql从本地导出,注意我本地是windows系统:
首先配置环境变量:http://jingyan.baidu.com/article/f7ff0bfc169a2a2e27bb1365.html 这里介绍的很清楚了
然后打开cmd,输入命令mysqldump -uroot -p o2o > o2o.sql,找到对应的目录下的文件o2o.sql
接下来使用Xftp5来传输文件上去。
mysql> show databases;
mysql> use o2o
mysql> source ~/o2o.sql
mysql> show tables;
在主库和从库中分别执行:
mysql> grant select, insert, update,delete on *.* to 'work' identified by '230230' with grant option;
mysql> flush privileges;
接下来改动项目的配置文件:
jdbc.driver=com.mysql.jdbc.Driver
jdbc.url=jdbc:mysql://39.108.63.239:3306/o2o?useUnicode=true&characterEncoding=utf8
jdbc.username=work
jdbc.password=230230
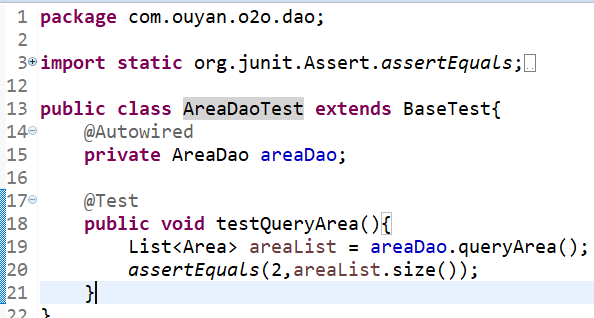
再运行测试方法:

成功。


