| 这个作业属于哪个课程 | https://edu.cnblogs.com/campus/fzu/SE2020 |
|---|---|
| 这个作业要求在哪里 | https://edu.cnblogs.com/campus/fzu/SE2020/homework/11277 |
| 这个作业的目标 | 熟悉前端的开发流程,熟悉HTML、CSS、JAVASCRIPT语言以及部分框架 |
| 学号 | 031802420刘任世麒 031802424史金易 |
一、PSP表格
| PSP2.1 | Personal Software Process Stages | 预估耗时(分钟) | 实际耗时(分钟) |
|---|---|---|---|
| Planning | 计划 | 20 | 20 |
| Estimate | 估计这个任务需要多少时间 | 30 | 30 |
| Development | 开发 | 120 | 180 |
| Analysis | 需求分析 (包括学习新技术) | 100 | 120 |
| Design Spec | 生成设计文档 | 60 | 60 |
| Design Review | 设计复审 | 40 | 40 |
| Coding Standard | 代码规范 (为目前的开发制定合适的规范) | 20 | 20 |
| Design | 具体设计 | 120 | 150 |
| Coding | 具体编码 | 120 | 150 |
| Code Review | 代码复审 | 120 | 150 |
| Test | 测试(自我测试,修改代码,提交修改) | 60 | 70 |
| Reporting | 报告 | 30 | 40 |
| Test Report | 测试报告 | 20 | 20 |
| Size Measurement | 计算工作量 | 20 | * * 20 |
| Postmortem & Process Improvement Plan | 事后总结, 并提出过程改进计划 | 60 | 70 |
| 合计 | 940 | 1140 |
二、设计思路
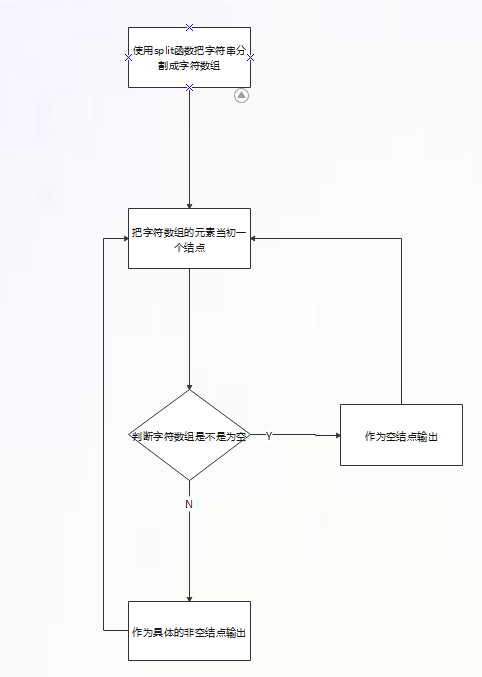
在进行本次作业的网络页面设计进行之前,首先去学习了一下网页开发的有关知识,比如HTML,JavaScript之类的,然后有看了一下作业的要求,明确了主要的任务是进行树的生成和输出,然后接着,就去查了一下有关的知识,以及一些网络上的代码,有点晕。之后有看了一下其他同学写的博客,然后知道了split函数,和循环生成树的算法,然后就又去看了一下原来来的代码,大概就得到了这样的一个思路:
1,用split把输入的字符串分分割为字符串数组,并且返回此数组
2,在把数组的每一元素当成一个结点
3,通过循环来进行树的生成,如果结点是空的则生成空结点不输出反之,如果不是空的,则作为树的结点生成

三、代码和运行结果展示
(1)对输入的数据进行处理
for (const lab of labs) {
        const lines = lab.trim().split('\n')//用split函数对输入的字符串分割成字符数组
        const mentorRegex = /导师:(.+)/
        const mentor = lines[0].match(mentorRegex)[1]//用match找出导师所在的字符串
        const labData = {
            id: mentor,
            children: []
        }//生成导师的头节点的子节点
        const tmp = {}
        for (let line of lines) {
            line = line.trim()
            if (line.includes('导师')) {
                continue//如果含有“导师”的关键字,则继续
            }//生成导师的头节点
            const kv = line.split(':')
            const key = kv[0]
            const students = kv[1].split('、')
            for (let i in students) {
                students[i] = {
                    id: students[i]
                }
            }
            const year = key.match(/[0-9]+/)[0]//找出含有数字的字符元素
            const type = key.split('级')[1]//加上“级”,生成年级的结点
            if (tmp[year] === undefined) {
                tmp[year] = {}
            }//如果字符元素为空,则生成空结点
            tmp[year][type] = students
        }
        for (const key of Object.keys(tmp)) {
            const yearStds = tmp[key]
            console.log(yearStds)//使用console.log把年级数字
            const types = ['本科生', '硕士生', '博士生']
            const yearChildren = []
            types.forEach(type => {
                console.log(yearStds[type])//把“级”关键字输出
                console.log(type)//把学位输出
                if (yearStds[type] !== undefined) {
                    console.log(1)
                    yearChildren.push({
                        id: type,
                        children: yearStds[type]
                    })//形成学位的子节点
                }
            })
            console.log(yearChildren)//输出学位的子节点,名字
            const yearData = {
                id: key,
                children: yearChildren
            }
            labData.children.push(yearData)
        }
        data.push(labData)
        console.log(labData)//输出起始结点,导师名字
    }
(2)树形结构的实现
这个代码主要是对树的形状做出一定的描述
const generateGraph = (container, data) => {
    var graph = new G6.TreeGraph({
        container: container,
        width: 800,
        height: 500,
        pixelRatio: 2,
        modes: {
            default: [{
                type: "collapse-expand",
                onChange: function onChange(item, collapsed) {
                    var data = item.get("model").data;
                    data.collapsed = collapsed;
                    return true;
                }
            }
            ]
        },
        defaultNode: {
            size: 16,
            anchorPoints: [
                [0, 0.5],
                [1, 0.5]
            ],
            style: {
                fill: "#ff408c",
                stroke: "#d90909"
            }
        },
        defaultEdge: {
            shape: "cubic-horizontal",
            style: {
                stroke: "#babfa3"
            }
        },
        layout: {
            type: "compactBox",
            direction: "LR",
            getId: function getId(d) {
                return d.id;
            },
            getHeight: function getHeight() {
                return 16;
            },
            getWidth: function getWidth() {
                return 16;
            },
            getVGap: function getVGap() {
                return 10;
            },
            getHGap: function getHGap() {
                return 100;
            }
        }
    });

    graph.node(function (node) {
        return {
            size: 26,
            style: {
                fill: "#ff408c",
                stroke: "#d90909"
            },
            label: node.id,
            labelCfg: {
                position: node.children && node.children.length > 0 ? "left" : "right"
            }
        };
    });

    graph.data(data);
    graph.render();
    graph.fitView();
(3)页面设计部分
::-webkit-scrollbar {
            display: none;
        }
        html,
        body {
            overflow: scroll;
            margin: 0;
            background-image: url("img/timg1.jpg");
        }
        textarea {
            display:block;
            margin-left:auto;
            margin-right:auto;
        }
        button {
            display:block;
            margin-left:auto;
            margin-right:auto;
        }
        #input{
            width: 600px;
            min-height: 200px;
            background-color: aquamarine;
        }
        h1 {
            text-align: center;
            color: blueviolet;
        }
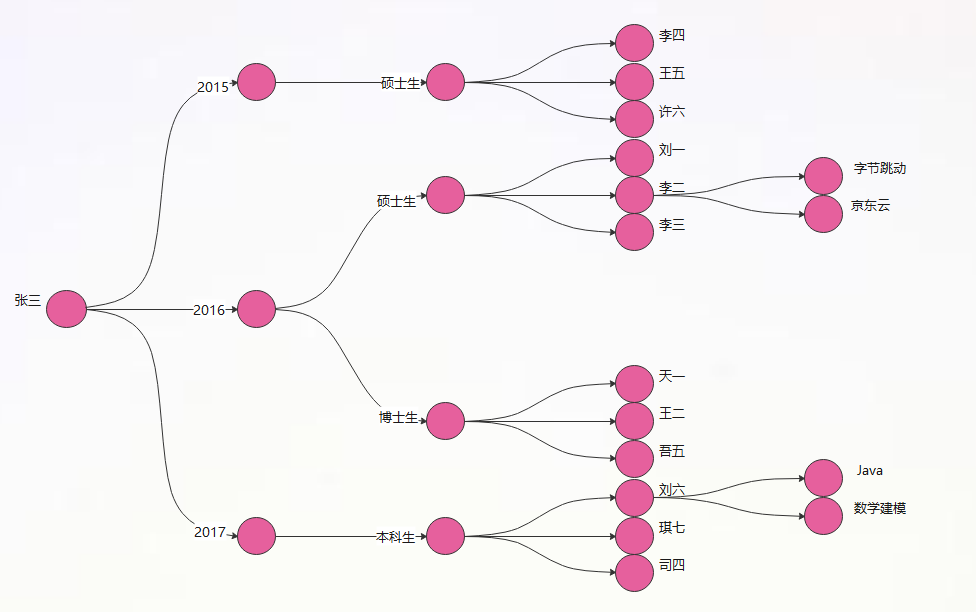
运行展示截图

目录说明与使用方法
- 点击github上的“Clone or download”按钮后,将上述文件打包下载,解压后即可使用,需保证上述所有文件在同一个文件夹下。
- 使用时直接用Chrome打开师门树.html文件即可,输入格式按照作业要求即可。
- 在出现的文本框输入数据,点击生成师门树按钮,将会在下方生成一棵以导师为根节点的树,然后点击刷新按钮可以刷新页面重新输入。


