task4
Vector_int.hpp
#pragma once
#include <iostream>
class vector_int
{
public:
    vector_int(int);
    vector_int(int, int);
    vector_int(const vector_int&);
    int& at(int);
    ~vector_int();

private:
    int* p;
    int len;
};

vector_int::vector_int(int n) :len{n} {
    p = new int[n];
    std::cout << "constructor is called"<<std::endl;
}
vector_int::vector_int(int n, int val) : len{n} {
    p = new int[n];
    for (int i=0; i < len; i++)
        p[i] = val;
    std::cout << "constructor is called" << std::endl;
}
vector_int::vector_int(const vector_int& other) :len{ other.len } {
    p = new int[len];
    for (int i = 0; i < len; i++)
        p[i] = (other.p)[i];
    std::cout << "copy constructor is called" << std::endl;
}

int& vector_int::at(int pos) {
    int& ans = p[pos];
    return ans;
}

vector_int::~vector_int() {
    delete []p;
    p = NULL;
    std::cout << "destructor is called" << std::endl;
}
测试用源代码
#include <iostream>
#include "Vector_int.hpp"
#include <iomanip>
int main()
{
    int n;
    n = 10;

    vector_int x(n);
    for (int i = 0; i < n; i++)
        std::cout <<std::setw(5)<< x.at(i);
    std::cout << std::endl;
    vector_int y(n, 6);
    for (int i = 0; i < n; i++)
        std::cout <<std::setw(5)<< y.at(i);
    std::cout <<std::setw(5)<< std::endl;
    vector_int z(y);
    for (int i = 0; i < n; i++)
        std::cout <<std::setw(5)<< z.at(i);
    std::cout << std::endl;
    z.at(0) = 123;
    for (int i = 0; i < n; i++)
        std::cout <<std::setw(5)<< z.at(i);
    std::cout << std::endl;
}
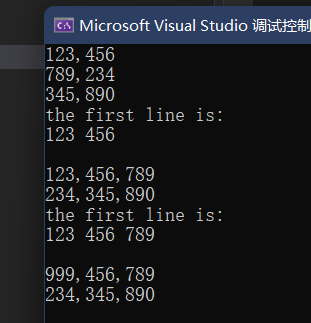
输出结果

Task 5
Matrix.hpp
#ifndef MATRIX_H
#define MATRIX_H

#include <iostream>
#include <cassert>
#include <iomanip>

class Matrix
{
public:
    Matrix(int n);                     // 构造函数,构造一个n*n的矩阵
    Matrix(int n, int m);              // 构造函数,构造一个n*m的矩阵
    Matrix(const Matrix &X);           // 复制构造函数,使用已有的矩阵X构造
    ~Matrix();                         //析构函数
    void set(const double *pvalue);     // 用pvalue指向的连续内存块数据为矩阵赋值
    void set(int i, int j, int value); //设置矩阵第i行第j列元素值为value
    double &at(int i, int j);          //返回矩阵第i行第j列元素的引用
    double at(int i, int j) const;     // 返回矩阵第i行第j列元素的值
    int get_lines() const;             //返回矩阵行数
    int get_cols() const;              //返回矩列数
    void print() const;                // 按行打印输出矩阵
private:
    int lines; // 矩阵行数
    int cols;  // 矩阵列数
    double *p; // 指向存放矩阵数据的内存块的首地址
};


// 类Matrix的实现:待补足
// ×××
Matrix::Matrix(int n) :lines(n),cols(n)
{
    p = new double[n * n];
}

Matrix::Matrix(int n, int m) : lines(n), cols(m)
{
    p = new double[n*m];
}

Matrix::Matrix(const Matrix& X) : lines(X.lines), cols(X.cols)
{
    p = new double[lines * cols];
    for (int i = 0; i < lines * cols; i++)
        p[i] = X.p[i];
}

Matrix::~Matrix()
{
    delete[]p;
    p = NULL;
}

void Matrix::set(const double* pvalue)
{
    for (int i = 0; i < lines * cols; i++)
        p[i] = pvalue[i];
}

void Matrix::set(int i, int j, int value)
{
    int pos = i * cols + j;
        p[pos] = value;
}

double& Matrix::at(int i, int j)
{
    int pos = i * cols + j;
    return p[pos];
}

double Matrix::at(int i, int j) const
{
    int pos = i * cols + j;
    return p[pos];
}

int Matrix::get_lines() const
{
    return lines;
}

int Matrix::get_cols() const
{
    return cols;
}

void Matrix::print() const
{
    int i, j,t=0;
    for (i = 0; i < lines; i++)
    {
        for (j = 0; j < cols; j++)
            std::cout <<std::setw(3)<< p[t++]<<",";
        std::cout <<"\b "<< std::endl;
    }
}
#endif
task5.cpp
#include <iostream>
#include "matrix.hpp"

int main()
{
    using namespace std;

    double x[] = {1, 2, 3, 4, 5, 6};

    Matrix m1(3, 2);    // 创建一个3×2的矩阵
    m1.set(x);          // 用一维数组x的值按行为矩阵m1赋值
    m1.print();         // 打印矩阵m1的值
    cout << "the first line is: " << endl;
    cout << m1.at(0, 0) << " " << m1.at(0, 1) << endl;
    cout << endl;

    Matrix m2(2, 3);
    m2.set(x);
    m2.print();
    cout << "the first line is: " << endl;
    cout << m2.at(0, 0) << " " << m2.at(0, 1) << " " << m2.at(0, 2) << endl;
    cout << endl;

    Matrix m3(m2);
    m3.set(0, 0, 999);
    m3.print();
}
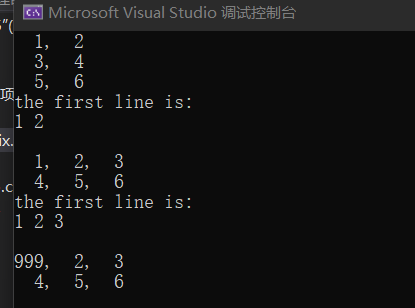
输出结果:

改变值后输出

实验总结
为什么要使用深复制?
当一个类涉及了动态内存分配,普通的浅复制无法将这片被动态分配的内存空间也复制一份,因此需要手动复制。
如果不进行深复制,被复制的对象和复制对象调用析构函数时,会delete()同一片空间,导致报错。
一些问题
一开始在完成Task4时,把复制构造函数
vector_int::vector_int(const vector_int& other)
的取地址符打成了星号,导致了重复delete()一片内存空间的问题。


Task5中,我是通过数学计算的方式将i行j列的下标计算出来,本质上我的二位矩阵是一个一维数组。
后来在网上找到了用vector()容器直接显式的构造二维数组的办法。
具体实现如下:
vector<vector<int> > a3(rows,vector<int>(columns));
    for(int i=0;i<rows;i++){//初始化
         for(int j=0;j<columns;j++){
            a3[i][j] = a1[i][j];
         }
}
略微改进的Task3
这个小球移动的任务引起了我的兴趣,我将它改造变得可以随时根据键盘按键实时移动。
#include<windows.h>

while (1)
    {
        if (GetKeyState(65)<0)
            ball1.left(1);
        else if (GetKeyState(68)<0)
            ball1.right(1);
        else if (GetKeyState(87)<0)
            ball1.up(1);
        else if (GetKeyState(83)<0)
            ball1.down(1);
    }
例如这样一个代码块就可以是实现根据用户输入wasd移动小球。
同时,我还加入了一个延时函数,因为我发现可能是由于键盘输入过于连续,小球移动速度很块且闪烁,延时函数可以使每次对小球进行操作后,使其停滞一会。
#include <ctime>

void   Delay(int   time)//time*1000为秒数
{
    clock_t   now = clock();

    while (clock() - now < time);
}


 浙公网安备 33010602011771号