

Spider_Man_6 の Scrapy(未完待续)
一:自我介绍
Scrapy是一个为了爬取网站数据,提取结构性数据而编写的应用框架。 可以应用在包括数据挖掘,信息处理或存储历史数据等一系列的程序中。
其最初是为了页面抓取 (更确切来说, 网络抓取 )所设计的, 也可以应用在获取API所返回的数据(例如 Amazon Associates Web Services ) 或者通用的网络爬虫。Scrapy用途广泛,可以用于数据挖掘、监测和自动化测试。
Scrapy是基于twisted框架开发而来,twisted是一个流行的事件驱动的python网络框架,因此Scrapy使用了一种非阻塞(又名异步)的代码来实现并发。
整体架构大致如下:

分析:
The data flow in Scrapy is controlled by the execution engine, and goes like this:

The Engine gets the initial Requests to crawl from the Spider.
The Engine schedules the Requests in the Scheduler and asks for the next Requests to crawl.
The Scheduler returns the next Requests to the Engine.
The Engine sends the Requests to the Downloader, passing through the Downloader Middlewares (see process_request()).
Once the page finishes downloading the Downloader generates a Response (with that page) and sends it to the Engine, passing through the Downloader Middlewares (see process_response()).
The Engine receives the Response from the Downloader and sends it to the Spider for processing, passing through the Spider Middleware (see process_spider_input()).
The Spider processes the Response and returns scraped items and new Requests (to follow) to the Engine, passing through the Spider Middleware (see process_spider_output()).
The Engine sends processed items to Item Pipelines, then send processed Requests to the Scheduler and asks for possible next Requests to crawl.
The process repeats (from step 1) until there are no more requests from the Scheduler.
Components:
- 引擎(EGINE)
- 引擎负责控制系统所有组件之间的数据流,并在某些动作发生时触发事件。有关详细信息,请参见上面的数据流部分。引擎是整个框架的核心。
- 调度器(SCHEDULER)
- 用来接受引擎发过来的请求, 压入队列中, 并在引擎再次请求的时候返回. 可以想像成一个URL的优先级队列, 由它来决定下一个要抓取的网址是什么, 同时去除重复的网址。 - 下载器(DOWLOADER)
- 用于下载网页内容, 并将网页内容返回给EGINE,下载器是建立在twisted这个高效的异步模型上的。 - 爬虫(SPIDERS)
- SPIDERS是开发人员自定义的类,用来解析responses,并且提取items,或者发送新的请求。 - 项目管道(ITEM PIPLINES)
- 在items被提取后负责处理它们,主要包括清理、验证、持久化(比如存到数据库)等操作。 - 下载器中间件(Downloader Middlewares)
- 位于Scrapy引擎和下载器之间,主要用来处理从EGINE传到DOWLOADER的请求request,已经从DOWNLOADER传到EGINE的响应response,你可用该中间件做以下几件事爬虫中间件(Spider Middlewares)- process a request just before it is sent to the Downloader (i.e. right before Scrapy sends the request to the website);
- change received response before passing it to a spider;
- send a new Request instead of passing received response to a spider;
- pass response to a spider without fetching a web page;
- silently drop some requests.
- 位于EGINE和SPIDERS之间,主要工作是处理SPIDERS的输入(即responses)和输出(即requests)
官网链接:https://docs.scrapy.org/en/latest/topics/architecture.html
流程解析:
这里是本人自己理解。
感觉理解的很差,劳烦各位指正。
第一步:spiders发出请求。
第二步:引擎接收到之后,去调度器中(有调度器来决定下一个要抓取的网址是啥,同时去除重复的网址,这步我们可以自己写去重方法),拿到要请求的url,并且将下一个url也拿到。
第三步:引擎接收到来自调度器的请求,并通过downloader中间件(它主要是处理scrapy引擎和下载器之间的请求和响应)发送给downloader。
第四步:交给爬虫解析Response。这里会介入Spider Middlewares(这个爬虫中间件是介于引擎和Spider之间的框架,主要工作是处理爬虫的响应输入和请求输出。
第五步:若是解析出实体(item:是用来结构化数据的,item和piplines对应的,在piplines中会进行一些相应的处理。比如去重,选择持久化数据的方式(比如吃点伟哥):这里分两步写,有解耦的效果,还有其他作用,待解决。。。),则交给实体管道进行进一步处理。如果解析出url,会将新请求通过爬虫中间件返回给引擎。引擎会把url交给Scheduler等待抓取。
二:安装
#Windows平台
    1、pip3 install wheel #安装后,便支持通过wheel文件安装软件,wheel文件官网:https://www.lfd.uci.edu/~gohlke/pythonlibs
    3、pip3 install lxml
    4、pip3 install pyopenssl
    5、下载并安装pywin32:https://sourceforge.net/projects/pywin32/files/pywin32/
    6、下载twisted的wheel文件:http://www.lfd.uci.edu/~gohlke/pythonlibs/#twisted
    7、执行pip3 install 下载目录\Twisted-17.9.0-cp36-cp36m-win_amd64.whl
    8、pip3 install scrapy

#Linux平台
    1、pip3 install scrapy
三:命令行工具
# 1. 查看帮助
scrapy -h
scrapy <commond> -h  # 相关命令的help
# 2. 有两种命令:其中Project-only必须切到项目文件夹下才能执行,而Global的命令则不需要
    Global commands:
        startproject #创建项目
        genspider    #创建爬虫程序
        settings     #如果是在项目目录下,则得到的是该项目的配置
        runspider    #运行一个独立的python文件,不必创建项目
        shell        #scrapy shell url地址  在交互式调试,如选择器规则正确与否
        fetch        #独立于程单纯地爬取一个页面,可以拿到请求头
        view         #下载完毕后直接弹出浏览器,以此可以分辨出哪些数据是ajax请求
        version      #scrapy version 查看scrapy的版本,scrapy version -v查看scrapy依赖库的版本
    Project-only commands:
        crawl        #运行爬虫,必须创建项目才行,确保配置文件中ROBOTSTXT_OBEY = False
        check        #检测项目中有无语法错误
        list         #列出项目中所包含的爬虫名
        edit         #编辑器,一般不用
        parse        #scrapy parse url地址 --callback 回调函数  #以此可以验证我们的回调函数是否正确
        bench        #scrapy bentch压力测试

# 3. 官网链接
    https://docs.scrapy.org/en/latest/topics/commands.html


#1、执行全局命令:请确保不在某个项目的目录下,排除受该项目配置的影响
scrapy startproject MyProject

cd MyProject
scrapy genspider baidu www.baidu.com

scrapy settings --get XXX #如果切换到项目目录下,看到的则是该项目的配置

scrapy runspider baidu.py

scrapy shell https://www.baidu.com
    response
    response.status
    response.body
    view(response)

scrapy view https://www.taobao.com #如果页面显示内容不全,不全的内容则是ajax请求实现的,以此快速定位问题

scrapy fetch --nolog --headers https://www.taobao.com

scrapy version #scrapy的版本

scrapy version -v #依赖库的版本


#2、执行项目命令:切到项目目录下
scrapy crawl baidu
scrapy check
scrapy list
scrapy parse http://quotes.toscrape.com/ --callback parse
scrapy bench
四:项目结构以及爬虫应用简介
目录结构:
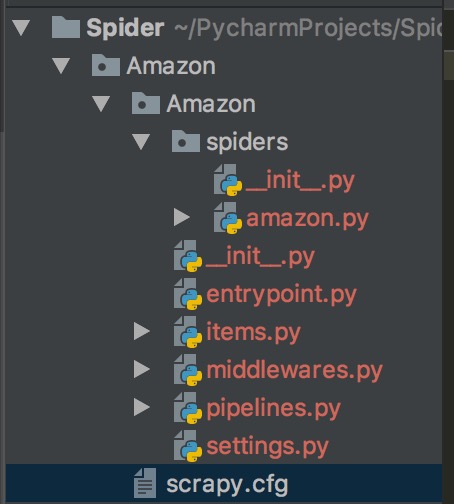
目录解读:
- scrapy.cfg 项目的主配置信息,用来部署scrapy时使用,爬虫相关的配置信息爱settings.py中
- items.py 设置数据存储模版,用于结构化数据,类似于Django的Model
- pipelines 数据处理行为,一般结构化的数据持久化
- settings.py 配置文件。如:递归的层数,并发数,延迟下载等。强调:配置文件的选项必须大写否则视为无效,正确写法USER_AGENT='xxxx'
- spiders 爬虫目录。如:创建文件,编写爬虫规则。
注意:一般创建爬虫文件时,以网站域名命名
默认只能在cmd中执行爬虫,如果想在pycharm中执行需要这样做:
#在项目目录下新建:entrypoint.py
from scrapy.cmdline import execute
execute(['scrapy', 'crawl', 'amazon'])
五:spiders
1:关于spiders
#1、Spiders是由一系列类(定义了一个网址或一组网址将被爬取)组成,具体包括如何执行爬取任务并且如何从页面中提取结构化的数据。

#2、换句话说,Spiders是你为了一个特定的网址或一组网址自定义爬取和解析页面行为的地方
2:spiders会循环着去做哪些事情?
#1、生成初始的Requests来爬取第一个URLS,并且标识一个回调函数
第一个请求定义在start_requests()方法内默认从start_urls列表中获得url地址来生成Request请求,默认的回调函数是parse方法。回调函数在下载完成返回response时自动触发

#2、在回调函数中,解析response并且返回值
返回值可以4种:
        包含解析数据的字典
        Item对象
        新的Request对象(新的Requests也需要指定一个回调函数)
        或者是可迭代对象(包含Items或Request)

#3、在回调函数中解析页面内容
通常使用Scrapy自带的Selectors,但很明显你也可以使用Beutifulsoup,lxml或其他想你锁想。

#4、最后,针对返回的Items对象将会被持久化到数据库
通过Item Pipeline组件存到数据库:官方文档:https://docs.scrapy.org/en/latest/topics/item-pipeline.html#topics-item-pipeline)
或者导出到不同的文件(通过Feed exports:官方文档:https://docs.scrapy.org/en/latest/topics/feed-exports.html#topics-feed-exports)
3:spiders总共提供五种类
#1、scrapy.spiders.Spider #scrapy.Spider等同于scrapy.spiders.Spider
#2、scrapy.spiders.CrawlSpider
#3、scrapy.spiders.XMLFeedSpider
#4、scrapy.spiders.CSVFeedSpider
#5、scrapy.spiders.SitemapSpider
4:导入使用

# -*- coding: utf-8 -*-
import scrapy
from scrapy.spiders import Spider,CrawlSpider,XMLFeedSpider,CSVFeedSpider,SitemapSpider

class AmazonSpider(scrapy.Spider): #自定义类,继承Spiders提供的基类
    name = 'amazon'
    allowed_domains = ['www.amazon.cn']
    start_urls = ['http://www.amazon.cn/']

    def parse(self, response):
        pass
5:class scrapy.spiders.Spider
这是最简单的spider类,任何其他的spider类都需要继承它(包含你自己定义的)。
该类不提供任何特殊的功能,它仅提供了一个默认的start_requests方法:默认从start_urls中读取url地址发送requests请求,并且默认parse作为回调函数
class AmazonSpider(scrapy.Spider):
    name = 'amazon'    # 爬虫名,有且必须唯一

    allowed_domains = ['www.amazon.cn'] # 规定爬取的域。

    start_urls = ['http://www.amazon.cn/']  # 如果不规定url,那么程序启动后默认爬取该url

    custom_settings = {
        'BOT_NAME' : 'Amazon',    # 此爬虫项目实施的bot的名称,即项目名称。默认为'scrapybot'。
        'REQUEST_HEADERS' : {
          'Accept': 'text/html,application/xhtml+xml,application/xml;q=0.9,*/*;q=0.8',
          'Accept-Language': 'en',
        }
    }

    def parse(self, response):
        pass
关于定制scrapy.spider属性与方法详解
#1、name = 'amazon'
定义爬虫名,scrapy会根据该值定位爬虫程序
所以它必须要有且必须唯一(In Python 2 this must be ASCII only.)

#2、allowed_domains = ['www.amazon.cn']
定义允许爬取的域名,如果OffsiteMiddleware启动(默认就启动),
那么不属于该列表的域名及其子域名都不允许爬取
如果爬取的网址为:https://www.example.com/1.html,那就添加'example.com'到列表.

#3、start_urls = ['http://www.amazon.cn/']
如果没有指定url,就从该列表中读取url来生成第一个请求

#4、custom_settings
值为一个字典,定义一些配置信息,在运行爬虫程序时,这些配置会覆盖项目级别的配置
所以custom_settings必须被定义成一个类属性,由于settings会在类实例化前被加载

#5、settings
通过self.settings['配置项的名字']可以访问settings.py中的配置,如果自己定义了custom_settings还是以自己的为准

#6、logger
日志名默认为spider的名字
self.logger.debug('=============>%s' %self.settings['BOT_NAME'])

#5、crawler:了解
该属性必须被定义到类方法from_crawler中

#6、from_crawler(crawler, *args, **kwargs):了解
You probably won’t need to override this directly  because the default implementation acts as a proxy to the __init__() method, calling it with the given arguments args and named arguments kwargs.

#7、start_requests()
该方法用来发起第一个Requests请求,且必须返回一个可迭代的对象。它在爬虫程序打开时就被Scrapy调用,Scrapy只调用它一次。
默认从start_urls里取出每个url来生成Request(url, dont_filter=True)

#针对参数dont_filter,请看自定义去重规则

如果你想要改变起始爬取的Requests,你就需要覆盖这个方法,例如你想要起始发送一个POST请求,如下
class MySpider(scrapy.Spider):
    name = 'myspider'

    def start_requests(self):
        return [scrapy.FormRequest("http://www.example.com/login",
                                   formdata={'user': 'john', 'pass': 'secret'},
                                   callback=self.logged_in)]

    def logged_in(self, response):
        # here you would extract links to follow and return Requests for
        # each of them, with another callback
        pass

#8、parse(response)
这是默认的回调函数,所有的回调函数必须返回an iterable of Request and/or dicts or Item objects.

#9、log(message[, level, component]):了解
Wrapper that sends a log message through the Spider’s logger, kept for backwards compatibility. For more information see Logging from Spiders.

#10、closed(reason)
爬虫程序结束时自动触发
去重规则应该多个爬虫共享的,但凡一个爬虫爬取了,其他都不要爬了,实现方式如下

#方法一:
1、新增类属性
visited=set() #类属性

2、回调函数parse方法内:
def parse(self, response):
    if response.url in self.visited:
        return None
    .......

    self.visited.add(response.url)

#方法一改进:针对url可能过长,所以我们存放url的hash值
def parse(self, response):
        url=md5(response.request.url)
    if url in self.visited:
        return None
    .......

    self.visited.add(url)

#方法二:Scrapy自带去重功能
配置文件:
DUPEFILTER_CLASS = 'scrapy.dupefilter.RFPDupeFilter' #默认的去重规则帮我们去重,去重规则在内存中
DUPEFILTER_DEBUG = False
JOBDIR = "保存范文记录的日志路径,如:/root/"  # 最终路径为 /root/requests.seen,去重规则放文件中

scrapy自带去重规则默认为RFPDupeFilter,只需要我们指定
Request(...,dont_filter=False) ,如果dont_filter=True则告诉Scrapy这个URL不参与去重。

#方法三:
我们也可以仿照RFPDupeFilter自定义去重规则,

from scrapy.dupefilter import RFPDupeFilter,看源码,仿照BaseDupeFilter

#步骤一:在项目目录下自定义去重文件dup.py
class UrlFilter(object):
    def __init__(self):
        self.visited = set() #或者放到数据库

    @classmethod
    def from_settings(cls, settings):
        return cls()

    def request_seen(self, request):
        if request.url in self.visited:
            return True
        self.visited.add(request.url)

    def open(self):  # can return deferred
        pass

    def close(self, reason):  # can return a deferred
        pass

    def log(self, request, spider):  # log that a request has been filtered
        pass

#步骤二:配置文件settings.py:
DUPEFILTER_CLASS = '项目名.dup.UrlFilter'


# 源码分析:
from scrapy.core.scheduler import Scheduler
见Scheduler下的enqueue_request方法:self.df.request_seen(request)
#例一:
import scrapy

class MySpider(scrapy.Spider):
    name = 'example.com'
    allowed_domains = ['example.com']
    start_urls = [
        'http://www.example.com/1.html',
        'http://www.example.com/2.html',
        'http://www.example.com/3.html',
    ]

    def parse(self, response):
        self.logger.info('A response from %s just arrived!', response.url)


#例二:一个回调函数返回多个Requests和Items
import scrapy

class MySpider(scrapy.Spider):
    name = 'example.com'
    allowed_domains = ['example.com']
    start_urls = [
        'http://www.example.com/1.html',
        'http://www.example.com/2.html',
        'http://www.example.com/3.html',
    ]

    def parse(self, response):
        for h3 in response.xpath('//h3').extract():
            yield {"title": h3}

        for url in response.xpath('//a/@href').extract():
            yield scrapy.Request(url, callback=self.parse)


#例三:在start_requests()内直接指定起始爬取的urls,start_urls就没有用了,

import scrapy
from myproject.items import MyItem

class MySpider(scrapy.Spider):
    name = 'example.com'
    allowed_domains = ['example.com']

    def start_requests(self):
        yield scrapy.Request('http://www.example.com/1.html', self.parse)
        yield scrapy.Request('http://www.example.com/2.html', self.parse)
        yield scrapy.Request('http://www.example.com/3.html', self.parse)

    def parse(self, response):
        for h3 in response.xpath('//h3').extract():
            yield MyItem(title=h3)

        for url in response.xpath('//a/@href').extract():
            yield scrapy.Request(url, callback=self.parse)
我们可能需要在命令行为爬虫程序传递参数,比如传递初始的url,像这样
#命令行执行
scrapy crawl myspider -a category=electronics

#在__init__方法中可以接收外部传进来的参数
import scrapy

class MySpider(scrapy.Spider):
    name = 'myspider'

    def __init__(self, category=None, *args, **kwargs):
        super(MySpider, self).__init__(*args, **kwargs)
        self.start_urls = ['http://www.example.com/categories/%s' % category]
        #...


#注意接收的参数全都是字符串,如果想要结构化的数据,你需要用类似json.loads的方法
6、其他通用Spiders:https://docs.scrapy.org/en/latest/topics/spiders.html#generic-spiders
六:selectors:xpath & css
什么是解释器?
-----------------------------------------------------------------------------------------------------
当您抓取网页时,您需要执行的最常见任务是从HTML源中提取数据。有几个库可以实现这一点:
BeautifulSoup是Python程序员中非常流行的网络抓取库,它基于HTML代码的结构构建一个Python对象,并且处理相当糟糕的标记,但它有一个缺点:它很慢。
lxml是一个XML解析库(它还解析HTML)与基于ElementTree的pythonic API 。(lxml不是Python标准库的一部分。)
Scrapy自带了提取数据的机制。它们称为选择器,因为它们“选择”由XPath或CSS表达式指定的HTML文档的某些部分。
XPath是用于选择XML文档中的节点的语言,其也可以与HTML一起使用。CSS是一种用于将样式应用于HTML文档的语言。它定义了选择器以将这些样式与特定的HTML元素相关联。
Scrapy选择器构建在lxml库之上,这意味着它们的速度和解析精度非常相似。
这个页面解释了选择器是如何工作的,并描述了他们的API是非常小和简单,不像lxml API是更大,因为 lxml库可以用于许多其他任务,除了选择标记文档。
#1 //与/
#2 text
#3、extract与extract_first:从selector对象中解出内容
#4、属性:xpath的属性加前缀@
#4、嵌套查找
#5、设置默认值
#4、按照属性查找
#5、按照属性模糊查找
#6、正则表达式
#7、xpath相对路径
#8、带变量的xpath
response.selector.css()
response.selector.xpath()
可简写为
response.css()
response.xpath()

#1 //与/
response.xpath('//body/a/')#
response.css('div a::text')

>>> response.xpath('//body/a') #开头的//代表从整篇文档中寻找,body之后的/代表body的儿子
[]
>>> response.xpath('//body//a') #开头的//代表从整篇文档中寻找,body之后的//代表body的子子孙孙
[<Selector xpath='//body//a' data='<a href="image1.html">Name: My image 1 <'>, <Selector xpath='//body//a' data='<a href="image2.html">Name: My image 2 <'>, <Selector xpath='//body//a' data='<a href="
image3.html">Name: My image 3 <'>, <Selector xpath='//body//a' data='<a href="image4.html">Name: My image 4 <'>, <Selector xpath='//body//a' data='<a href="image5.html">Name: My image 5 <'>]

#2 text
>>> response.xpath('//body//a/text()')
>>> response.css('body a::text')

#3、extract与extract_first:从selector对象中解出内容
>>> response.xpath('//div/a/text()').extract()
['Name: My image 1 ', 'Name: My image 2 ', 'Name: My image 3 ', 'Name: My image 4 ', 'Name: My image 5 ']
>>> response.css('div a::text').extract()
['Name: My image 1 ', 'Name: My image 2 ', 'Name: My image 3 ', 'Name: My image 4 ', 'Name: My image 5 ']

>>> response.xpath('//div/a/text()').extract_first()
'Name: My image 1 '
>>> response.css('div a::text').extract_first()
'Name: My image 1 '

#4、属性:xpath的属性加前缀@
>>> response.xpath('//div/a/@href').extract_first()
'image1.html'
>>> response.css('div a::attr(href)').extract_first()
'image1.html'

#4、嵌套查找
>>> response.xpath('//div').css('a').xpath('@href').extract_first()
'image1.html'

#5、设置默认值
>>> response.xpath('//div[@id="xxx"]').extract_first(default="not found")
'not found'

#4、按照属性查找
response.xpath('//div[@id="images"]/a[@href="image3.html"]/text()').extract()
response.css('#images a[@href="image3.html"]/text()').extract()

#5、按照属性模糊查找
response.xpath('//a[contains(@href,"image")]/@href').extract()
response.css('a[href*="image"]::attr(href)').extract()

response.xpath('//a[contains(@href,"image")]/img/@src').extract()
response.css('a[href*="imag"] img::attr(src)').extract()

response.xpath('//*[@href="image1.html"]')
response.css('*[href="image1.html"]')

#6、正则表达式
response.xpath('//a/text()').re(r'Name: (.*)')
response.xpath('//a/text()').re_first(r'Name: (.*)')

#7、xpath相对路径
>>> res=response.xpath('//a[contains(@href,"3")]')[0]
>>> res.xpath('img')
[<Selector xpath='img' data='<img src="image3_thumb.jpg">'>]
>>> res.xpath('./img')
[<Selector xpath='./img' data='<img src="image3_thumb.jpg">'>]
>>> res.xpath('.//img')
[<Selector xpath='.//img' data='<img src="image3_thumb.jpg">'>]
>>> res.xpath('//img') #这就是从头开始扫描
[<Selector xpath='//img' data='<img src="image1_thumb.jpg">'>, <Selector xpath='//img' data='<img src="image2_thumb.jpg">'>, <Selector xpath='//img' data='<img src="image3_thumb.jpg">'>, <Selector xpa
th='//img' data='<img src="image4_thumb.jpg">'>, <Selector xpath='//img' data='<img src="image5_thumb.jpg">'>]

#8、带变量的xpath
>>> response.xpath('//div[@id=$xxx]/a/text()',xxx='images').extract_first()
'Name: My image 1 '
>>> response.xpath('//div[count(a)=$yyy]/@id',yyy=5).extract_first() #求有5个a标签的div的id
'images'
参照官方文档:https://docs.scrapy.org/en/latest/topics/selectors.html
七:items
爬取的主要目标就是从非结构性的数据源提取结构性数据,例如网页。 Scrapy提供 item 类来满足这样的需求。
item 对象是种简单的容器,保存了爬取到得数据。
Scrapy spiders可以将提取的数据作为Python字典返回。虽然方便且熟悉,但Python字典缺乏结构:在字段名称中输入拼写错误或返回不一致的数据很容易,特别是在有大量spiders的大型项目中。
定义公共输出数据格式Scrapy提供了这个Item类。 Item对象是用来收集被爬取的数据的简单容器。其提供了 类似于字典(dictionay-like) 的API以及用于声明可用字段的简单语法。
各种Scrapy组件使用Items提供的额外信息:导出者查看已声明的字段以确定要导出的列,可以使用Item字段元数据定制序列化,trackref 跟踪Item实例以帮助查找内存泄漏(请参阅使用trackref调试内存泄漏:https://docs.scrapy.org/en/latest/topics/leaks.html#topics-leaks-trackrefs)等。
官方文档:https://docs.scrapy.org/en/latest/topics/items.html
八:Itme Pipeline
当 Item 在 Spider 中被收集之后,它将会被传递到 Item Pipeline,一些组件会按照一定的顺序执行对 Item 的处理。
每个 item pipeline 组件(有时称之为“Item Pipeline”)是实现了简单方法的 Python 类。他们接收到 Item 并通过它执行一些行为,同时也决定此 Item 是否继续通过 pipeline,或是被丢弃而不再进行处理。
以下是 item pipeline 的一些典型应用:
- 清理 HTML 数据
- 验证爬取的数据(检查 item 包含某些字段)
- 查重(并丢弃)
- 将爬取结果保存到数据库中
#一:可以写多个Pipeline类
#1、如果优先级高的Pipeline的process_item返回一个值或者None,会自动传给下一个pipline的process_item,
#2、如果只想让第一个Pipeline执行,那得让第一个pipline的process_item抛出异常raise DropItem()

#3、可以用spider.name == '爬虫名' 来控制哪些爬虫用哪些pipeline

二:示范
from scrapy.exceptions import DropItem

class CustomPipeline(object):
    def __init__(self,v):
        self.value = v

    @classmethod
    def from_crawler(cls, crawler):
        """
        Scrapy会先通过getattr判断我们是否自定义了from_crawler,有则调它来完
        成实例化
        """
        val = crawler.settings.getint('MMMM')
        return cls(val)

    def open_spider(self,spider):
        """
        爬虫刚启动时执行一次
        """
        print('000000')

    def close_spider(self,spider):
        """
        爬虫关闭时执行一次
        """
        print('111111')


    def process_item(self, item, spider):
        # 操作并进行持久化

        # return表示会被后续的pipeline继续处理
        return item

        # 表示将item丢弃,不会被后续pipeline处理
        # raise DropItem()
#1、settings.py
HOST="127.0.0.1"
PORT=27017
USER="root"
PWD="123"
DB="amazon"
TABLE="goods"


ITEM_PIPELINES = {
   'Amazon.pipelines.CustomPipeline': 200,
}

#2、pipelines.py
class CustomPipeline(object):
    def __init__(self,host,port,user,pwd,db,table):
        self.host=host
        self.port=port
        self.user=user
        self.pwd=pwd
        self.db=db
        self.table=table

    @classmethod
    def from_crawler(cls, crawler):
        """
        Scrapy会先通过getattr判断我们是否自定义了from_crawler,有则调它来完
        成实例化
        """
        HOST = crawler.settings.get('HOST')
        PORT = crawler.settings.get('PORT')
        USER = crawler.settings.get('USER')
        PWD = crawler.settings.get('PWD')
        DB = crawler.settings.get('DB')
        TABLE = crawler.settings.get('TABLE')
        return cls(HOST,PORT,USER,PWD,DB,TABLE)

    def open_spider(self,spider):
        """
        爬虫刚启动时执行一次
        """
        self.client = MongoClient('mongodb://%s:%s@%s:%s' %(self.user,self.pwd,self.host,self.port))

    def close_spider(self,spider):
        """
        爬虫关闭时执行一次
        """
        self.client.close()


    def process_item(self, item, spider):
        # 操作并进行持久化

        self.client[self.db][self.table].save(dict(item))
官方文档:https://docs.scrapy.org/en/latest/topics/item-pipeline.html
九:Downloader Middleware
链接:Spider_Man_6 の Scrapy_Downloader Middleware(这是个需要针对一下的东西🐷🐷🐷)
