
Spring-Core
什么是Spring
Spring为基于java的企业级应用提供全面的编程和配置模型,在所有部署平台。Spring的重要元素是底层的支持在应用水平上,专注于企业应用的"plumbing(建筑物中的各种管道吗,我这里理解为各种类之间的相互依赖)"以致于队伍可以专注于应用层的业务逻辑不用被特殊的部署环境给束缚住。
Spring的提供的组件:
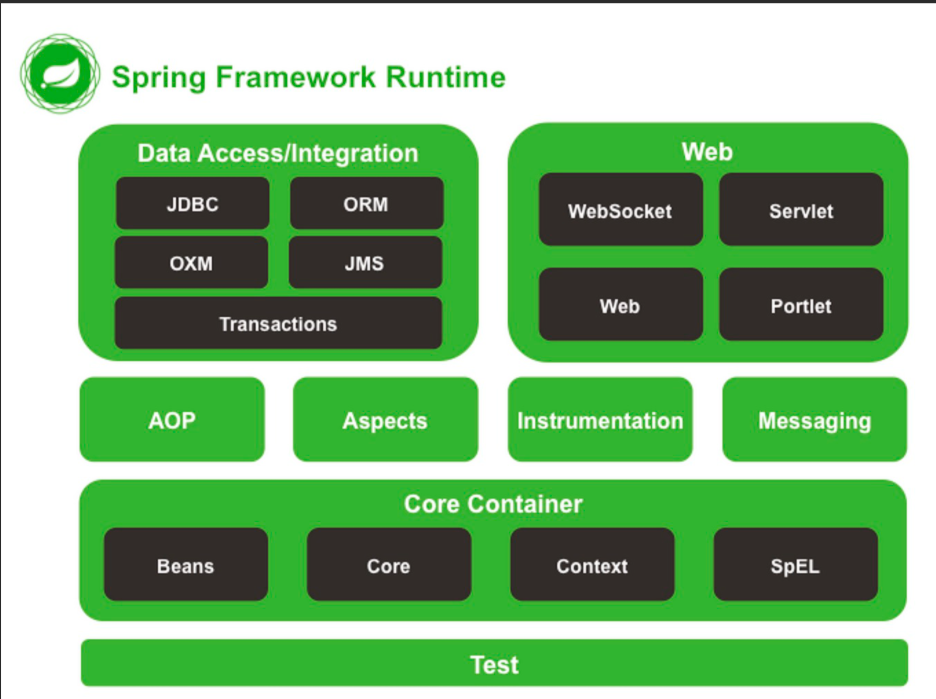
IoC容器
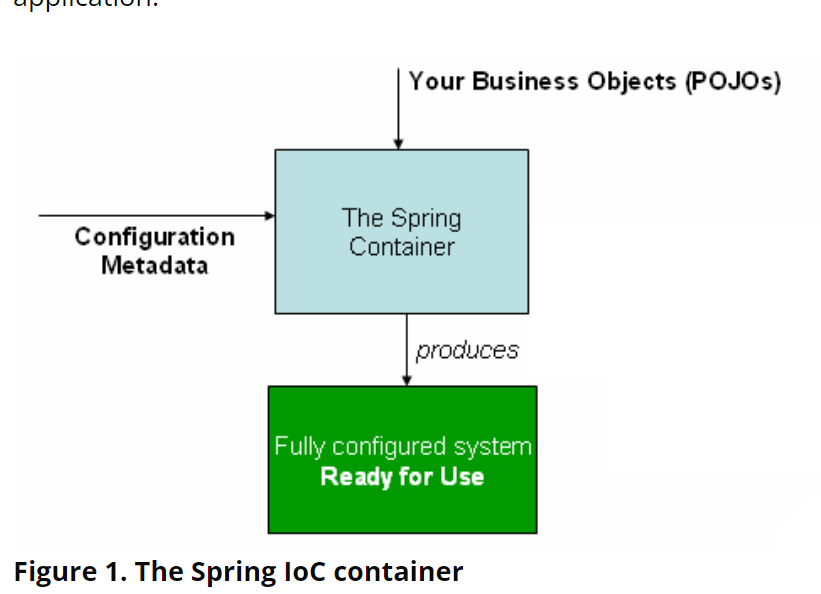
IoC的概念
IOC容器(ApplicationContext)是用来装Bean的,要获取Bean就要从IOC容器中获取。

IOC(inversion of Control)控制反转的过程:对象通过构造器的参数、工厂方法的参数、或者实例化对象后通过setter方法来实例化依赖项。然后当容器创建bean时就注入它们所需要的依赖。这个过程就是IOC也叫做DI(dependency injection)

IOC就是不让bean自己装配它自己的依赖,而是被动的方式就是IOC容器来装配Bean所需要的依赖,这就是控制反转。
在Spring中, org.springframework.beans 和 org.springframework.context 包提供了IoC容器的基础。其中BeanFactory提供了先进的配置机制,能够管理任何类型的对象。而ApplicationContext是一个BeanFactory的子接口,提供了其他一些企业级专用的功能。
而bean就是对象,是你应用的结构被IoC容器管理,你只要为IoC容器提供构建这些对象的元数据,就是初始对象里的域的数据,IoC容器就可以帮助你初始化和装配他们。
IoC容器的OverView
前面说过BeanFactory提供基础的IoC容器功能, 而ApplicationContext除了基础功能还提供了其他一些企业级专用的功能.因此我们几乎都是用ApplicationContext接口,Spring也提供了额外的实现这个接口的实现了类,我我们可以通过这个类来构建ApplicationContext对象,只需要给它们提供构建bean的元数据就好。

这两个是基于XML的
1.ClassPathXmlApplicationContext
2.FileSystemXmlApplicationContext
这个是继续Java-based
3.AnnotationAnnotationConfigApplicationContext
IoC容器的使用
IOC容器就是一个ApplicationContext对象。我们要使用IOC容器就要创建出这个对象,创建这个对象我们要给一个或多个xml配置文件(xml配置文件,是我们配置bean元数据的地方,IOC容器通过我们给他提供的元数据装配我们的bean)。
//基于XML的配置方式
ApplicationContext context = new ClassPathXmlApplicationContext("services.xml", "daos.xml");
//基于注解的配置方式
 ApplicationContext context = new AnnotationConfigApplicationContext(cn.wangmyi.IOC.configuration.class);
基于XML的配置
XML构造元数据的基本格式:
<?xml version="1.0" encoding="UTF-8"?>
<beans xmlns="http://www.springframework.org/schema/beans"
    xmlns:xsi="http://www.w3.org/2001/XMLSchema-instance"
    xsi:schemaLocation="http://www.springframework.org/schema/beans
        https://www.springframework.org/schema/beans/spring-beans.xsd">

    <bean id="..." class="...">
        <!-- collaborators and configuration for this bean go here -->
    </bean>

    <bean id="..." class="...">
        <!-- collaborators and configuration for this bean go here -->
    </bean>

    <!-- more bean definitions go here -->
</beans>
XML-based自动装配的基本格式:
<?xml version="1.0" encoding="UTF-8"?>
<beans xmlns="http://www.springframework.org/schema/beans"
    xmlns:xsi="http://www.w3.org/2001/XMLSchema-instance"
    xmlns:context="http://www.springframework.org/schema/context"
    xsi:schemaLocation="http://www.springframework.org/schema/beans
        https://www.springframework.org/schema/beans/spring-beans.xsd
        http://www.springframework.org/schema/context
        https://www.springframework.org/schema/context/spring-context.xsd">

    <context:annotation-config/>

</beans>
DI的注入方法,Bean的依赖配置
DI的注入方法
一般使用构造器注入,因为通过构造器注入后的对象,它确保所有必须初始化的依赖不为null,也可以初始化不可以变的字段,例如String,一旦初始化,就不可改变。减少代码的冗余,因为如果不适用构造器注入来初始化String类型的字段,那么,Setter方法只用一次就用了,即使不用Setter方法也会一直存在。其余一些可选的依赖,可以使用setter方法注入。
-
Setter方法
就是IOC容器使用类的默认构造器创建一个对象后,使用类的Setter方法设置字段值。
在xml配置文件中只使用
标签就是使用setter方法注入 <bean id="myDataSource" class="org.apache.commons.dbcp.BasicDataSource" destroy-method="close"> <!-- results in a setDriverClassName(String) call --> <property name="driverClassName" value="com.mysql.jdbc.Driver"/> <property name="url" value="jdbc:mysql://localhost:3306/mydb"/> <property name="username" value="root"/> <property name="password" value="misterkaoli"/> </bean> -
构造器注入
IOC创建对象的时候,会使用类的构造器来创建兑现,构造器的值就是我们给IOC容器提供的元数据。
构造器注入的三种形式:
<!--第一种 使用构造器的参数名来消除多类型相同的歧义 --> <bean id="exampleBean" class="examples.ExampleBean"> <constructor-arg name="years" value="7500000"/> <constructor-arg name="ultimateAnswer" value="42"/> </bean> <!--第二种 也可以使用index属性显示的指出是构造器的第几个参数位置。来消除歧义 (位置从0开始) --> <bean id="exampleBean" class="examples.ExampleBean"> <constructor-arg index="0" value="7500000"/> <constructor-arg index="1" value="42"/> </bean> <!--第三种 如果构造器里的参数没有继承关系,不存在歧义。 通过注入参数的类型来寻找注入的位置。 --> <beans> <bean id="beanOne" class="x.y.ThingOne"> <constructor-arg ref="beanTwo"/> <constructor-arg ref="beanThree"/> </bean> <bean id="beanTwo" class="x.y.ThingTwo"/> <bean id="beanThree" class="x.y.ThingThree"/> </beans> <!--注意点 如果构造器参数中有基本值类型,那么容器没有帮助的情况下无法推断出值的类型, 所以我们要给容器一点帮助, 标明值的具体类型。 --> <bean id="exampleBean" class="examples.ExampleBean"> <constructor-arg type="int" value="7500000"/> <constructor-arg type="java.lang.String" value="42"/> </bean> -
factory方法
和构造器注入差不多,只不过要指定工厂方法的bean和使用哪个工厂方法。
<bean id="serviceLocator" class="examples.DefaultServiceLocator">
    <!-- inject any dependencies required by this locator bean -->
</bean>

<bean id="clientService"
    factory-bean="serviceLocator"
    factory-method="createClientServiceInstance"/>

<bean id="accountService"
    factory-bean="serviceLocator"
    factory-method="createAccountServiceInstance"/>
Bean的依赖配置
-
String和基本值类型直接赋值
使用
<bean id="myDataSource" class="org.apache.commons.dbcp.BasicDataSource" destroy-method="close"> <!-- results in a setDriverClassName(String) call --> <property name="driverClassName" value="com.mysql.jdbc.Driver"/> <property name="url" value="jdbc:mysql://localhost:3306/mydb"/> <property name="username" value="root"/> <property name="password" value="misterkaoli"/></bean>使用p-namespace(这个要用特定的头文件)
<beans xmlns="http://www.springframework.org/schema/beans" xmlns:xsi="http://www.w3.org/2001/XMLSchema-instance" xmlns:p="http://www.springframework.org/schema/p" xsi:schemaLocation="http://www.springframework.org/schema/beans https://www.springframework.org/schema/beans/spring-beans.xsd"> <bean id="myDataSource" class="org.apache.commons.dbcp.BasicDataSource" destroy-method="close" p:driverClassName="com.mysql.jdbc.Driver" p:url="jdbc:mysql://localhost:3306/mydb" p:username="root" p:password="misterkaoli"/></beans> -
引用类型的配置
-
idref:
是一个防错的标签,就是id来引用其他bean,来装配这个bean。
可以将property和constructor-arg标签下的id子标签替换成idref标签。
<bean id="theTargetBean" class="..."/><bean id="theClientBean" class="..."> <property name="targetName"> <idref bean="theTargetBean"/> </property></bean> -
集合类的配置
- 内联bean
<bean id="outer" class="..."> <!-- instead of using a reference to a target bean, simply define the target bean inline --> <property name="target"> <bean class="com.example.Person"> <!-- this is the inner bean --> <property name="name" value="Fiona Apple"/> <property name="age" value="25"/> </bean> </property></bean>- 数组
<constructor-arg name="books" > <array> <value>tian</value> <value>di</value> <value>shang</value> </array></constructor-arg>- List
<constructor-arg name="hobbies"> <list> <value>wan</value> <value>moyu</value> </list></constructor-arg>- map
<constructor-arg name="cart"> <map> <entry key="identity" value="123456789" /> <entry key="worth" value="987654321" /> </map></constructor-arg>- set
<property name="someSet"> <set> <value>just some string</value> <ref bean="myDataSource" /> </set> </property>- properties
<constructor-arg name="properties" > <props> <prop key="high">179</prop> <prop key="weight">128</prop> </props> </constructor-arg> -
Null 和 空值 String
<bean class="ExampleBean"> <property name="email"> <null/> </property> <property name="email" value="" /></bean>- c-namepace(这个要用特定的头文件)
<beans xmlns="http://www.springframework.org/schema/beans" xmlns:xsi="http://www.w3.org/2001/XMLSchema-instance" xmlns:c="http://www.springframework.org/schema/c" xsi:schemaLocation="http://www.springframework.org/schema/beans https://www.springframework.org/schema/beans/spring-beans.xsd"> <bean id="beanTwo" class="x.y.ThingTwo"/> <bean id="beanThree" class="x.y.ThingThree"/> <!-- traditional declaration with optional argument names --> <bean id="beanOne" class="x.y.ThingOne"> <constructor-arg name="thingTwo" ref="beanTwo"/> <constructor-arg name="thingThree" ref="beanThree"/> <constructor-arg name="email" value="something@somewhere.com"/> </bean> <!-- c-namespace declaration with argument names --> <bean id="beanOne" class="x.y.ThingOne" c:thingTwo-ref="beanTwo" c:thingThree-ref="beanThree" c:email="something@somewhere.com"/></beans> -
-
其他的一些点
-
Lazy-initialized Beans
就是当一个IOC容器被创建的时候,IOC容器就生成和配置所有的bean,这样的话就可以在创建IOC容器的时候知道哪些bean的配置是有问题的,如果不想要在IOC容器被创建的是时候,就配置Bean的话,那么可以在
lazy-init属性设置为true;<bean id="lazy" class="com.something.ExpensiveToCreateBean" lazy-init="true"/><bean name="not.lazy" class="com.something.AnotherBean"/>
-
自动装配(Autowired)
让spring自动的处理相互依赖的bean,就是让spring自动装配相互依赖的bean,通过检查IOC容器(ApplicationContext).
自动装配的优势:
-
Autowiring can significantly reduce the need to specify properties or constructor arguments.
自动装配可以显示的减少需要去指定properties或者构造器的参数
-
Autowiring can update a configuration as your objects evolve.
自动装配当你对象发生变化的时候会更新你的配置.
自动装配的四种模式:
| Mode | Explanation |
|---|---|
no |
没有设置自动装配(IOC容器默认的选项) |
byName |
就是用类的一个字段名去IOC容器中找有没有一个bean的名字id或者别名和这个类的字段名是一致的,如果有就用这个名字去设置这个字段. |
byType |
这个类的字段类型在IOC容器中唯一存在,就用这个bean设置这个属性.如果存在多个就报错,如果没有找到这个bean,那这个属性就不去设置 |
constructor |
和byType一样,不过是提交给构造器参数的,如果IOC没有一个精确的参数类型,那就会报错 |
基于注解的自动装配
- @Requered
- @Autowired @Inject (第三方的注解)
- @Order @Priority(这个目前不太明白是什么意识)
- @Resource(第三方的)
- @Value
- @primary与@Qualifier
- @Component
@Requered(已废弃)
@Required(被弃用了)如果有属性必须要值的话,跟青睐用构造器注入来配置bean。
使用在Bean的Setter方法上
这个注解说的是,当IOC容器配置这个bean时,这个属性必须要有值,就是这个属性字段不能为空,如果为空,就抛出异常。使用@Required 时候要将 RequiredAnnotationBeanPostProcessor注册为一个bean来支持@Required。
public class SimpleMovieLister { private MovieFinder movieFinder; @Required public void setMovieFinder(MovieFinder movieFinder) { this.movieFinder = movieFinder; }}
@Autowired @Inject
@Autowired是类型驱动,但是如果有多个类型相同的bean可以注入,并且没有使用Primaty或者qualifier标注的话,也没关系,Spring会注入与域名或者参数名相同的bean的id.就是说,byType找不到Spring就用ByName
使用在构造器上,也可以用在Setter方法上,任意一个方法,字段上。
@Autowired的使用注意点:
-
如果要用byName驱动的自动注入的话,就不要用Autowird的即使它有能力可以在候选人中用byName找到一个最适合的bean进行注入.
-
一定要确保你要注入的bean的字段类型与被注入的类型保持一致。如果没有教报错
-
如果bean只有唯一一个构造器,就不用使用@Autowired。
-
如果有多个构造器,就要使用@Autowired的去告诉IOC应该首先使用哪个构造器
<!--构造器方法-->public class MovieRecommender { private final CustomerPreferenceDao customerPreferenceDao; @Autowired public MovieRecommender(CustomerPreferenceDao customerPreferenceDao) { this.customerPreferenceDao = customerPreferenceDao; } // ...}<!--Setter方法-->public class SimpleMovieLister { private MovieFinder movieFinder; @Autowired public void setMovieFinder(MovieFinder movieFinder) { this.movieFinder = movieFinder; } // ...}<!--任意一个方法-->public class MovieRecommender { private MovieCatalog movieCatalog; private CustomerPreferenceDao customerPreferenceDao; @Autowired public void prepare(MovieCatalog movieCatalog, CustomerPreferenceDao customerPreferenceDao) { this.movieCatalog = movieCatalog; this.customerPreferenceDao = customerPreferenceDao; } // ...} <!--字段和构造器的混用-->public class MovieRecommender { private final CustomerPreferenceDao customerPreferenceDao; @Autowired private MovieCatalog movieCatalog; @Autowired public MovieRecommender(CustomerPreferenceDao customerPreferenceDao) { this.customerPreferenceDao = customerPreferenceDao; }}
@primary与@Qualifier
这两个是解决多个相同类型注入的方法之二。
-
Primary,
Autowired是byType的可能存在很多个bean注入一个值的情况,这样就是通过@primary告诉IOC容器,应该偏爱哪个Bean
<?xml version="1.0" encoding="UTF-8"?><beans xmlns="http://www.springframework.org/schema/beans" xmlns:xsi="http://www.w3.org/2001/XMLSchema-instance" xmlns:context="http://www.springframework.org/schema/context" xsi:schemaLocation="http://www.springframework.org/schema/beans https://www.springframework.org/schema/beans/spring-beans.xsd http://www.springframework.org/schema/context https://www.springframework.org/schema/context/spring-context.xsd"> <context:annotation-config/> <bean class="example.SimpleMovieCatalog" primary="true"> <!-- inject any dependencies required by this bean --> </bean> <bean class="example.SimpleMovieCatalog"> <!-- inject any dependencies required by this bean --> </bean> <bean id="movieRecommender" class="example.MovieRecommender"/></beans> -
@Qualifier
也是减少自动装配带来的歧义。可以使用bean的qualifier子标签也可以是id,效果是一样的,但是自动装配依旧是类型驱动的注入。
@Qualifier可以用于构造器参数或者方法参数,也可以用于字段
<?xml version="1.0" encoding="UTF-8"?><beans xmlns="http://www.springframework.org/schema/beans" xmlns:xsi="http://www.w3.org/2001/XMLSchema-instance" xmlns:context="http://www.springframework.org/schema/context" xsi:schemaLocation="http://www.springframework.org/schema/beans https://www.springframework.org/schema/beans/spring-beans.xsd http://www.springframework.org/schema/context https://www.springframework.org/schema/context/spring-context.xsd"> <context:annotation-config/> <bean class="example.SimpleMovieCatalog"> <qualifier value="main"/> <!-- inject any dependencies required by this bean --> </bean> <bean class="example.SimpleMovieCatalog"> <qualifier value="action"/> <!-- inject any dependencies required by this bean --> </bean> <bean id="movieRecommender" class="example.MovieRecommender"/></beans>@Qualifier也可以指定一组bean注入集合。那一组bean具有相同的quilifier子标签
@Resource(第三方的)
在字段上或者在setter方法上, byName注入
如果Resource有设置属性,就用属性值去IOC容器中查找对应的bean,如果没有就用字段名的值去查找(如果@Resource被标注在域上,如 果被标注在setter方法上,那么就用参数名的值去查找).
如果byName没找到bean,Spring就会通过byType找Bean.
@Value
@Componentpublic class MovieRecommender { private final String catalog; public MovieRecommender(@Value("${catalog.name}") String catalog) { this.catalog = catalog; }}//还可以提供默认值,此时就是defaultCatalog@Componentpublic class MovieRecommender { private final String catalog; public MovieRecommender(@Value("${catalog.name:defaultCatalog}") String catalog) { this.catalog = catalog; }}
@Configuration@PropertySource("classpath:application.properties")public class AppConfig { }
catalog.name=MovieCatalog
这个可以给基本值类型直接赋值和String类型,也可以解析properties文件赋值,也可以解析SPEL表达式。
如果Spring没有解析出这个值话,那么catalog.name就会是catalog的值.
这个就是将@value里显示表明的值注入到bean中去.Spring有自动转换功能,就是说如果注入的属性是int类型的话,@Value会将值转化为
int类型.
解析形式:
- ${}解析properties对象的.
-
{}解析的SPEL表达式的.
@Component
就是标识一个Pojo类要注册到IOC容器,通过配置文件的扫描元素,或者是@ComponentScan注解。
基于Java的配置
首先一点是,Java配置和xml配置是同一个东西,都是给IOC容器注册bean的方法,但是通过不同方式的。自动装配是单独拎出来的一个东西。它不同于java配置和xml配置。自动装配只是一个减轻bean配置压力的一个方法。自动装配也有两种途径去实现,一个是基于注解的,还有一个是基于xml的(这个没学)。
然后就是如何使用Java代码的方式去注册bean:
这个过程就和平常创建java对象的方式是一样的。不过要用@Configuration标注配置类,用@Bean标注生成bean的方法。例如:
package cn.wangmyi.IOC;@Configurationpublic class configuration { @Bean(value = "student") public Student getStudent(){ Student student = new Student("wangmyi", "男", 17); student.setHobbies(new String[]{"唱","跳","rap"}); ArrayList<String> objects = new ArrayList<>(); objects.add("西厢记"); objects.add("金"); objects.add("源氏物语"); student.setBooks(objects); HashMap<String, String> map = new HashMap<>(); map.put("idcart","12345678"); map.put("mastercart","12345678"); student.setCart(map); Properties properties = new Properties(); properties.setProperty("heigh","178"); properties.setProperty("weight","128"); student.setProperties(properties); student.setTeacher(this.getTeacher()); return student; } @Bean(value = "teacher") public Teacher getTeacher(){ Teacher teacher = new Teacher("minyiwang"); return teacher; }}
AOP面向切面编程
AOP原理:
代理的概念:
动态代理技术是整个java技术中最重要的一个技术,它是学习java框架的基础,不会动态代理技术,那么在学习Spring这些框架时是学不明白的。 动态代理技术就是用来产生一个对象的代理对象的。在开发中为什么需要为一个对象产生代理对象呢? 举一个现实生活中的例子:歌星或者明星都有一个自己的经纪人,这个经纪人就是他们的代理人,当我们需要找明星表演时,不能直接找到该明星,只能是找明星的代理人。比如刘德华在现实生活中非常有名,会唱歌,会跳舞,会拍戏,刘德华在没有出名之前,我们可以直接找他唱歌,跳舞,拍戏,刘德华出名之后,他干的第一件事就是找一个经纪人,这个经纪人就是刘德华的代理人(代理),当我们需要找刘德华表演时,不能直接找到刘德华了(刘德华说,你找我代理人商谈具体事宜吧!),只能是找刘德华的代理人,因此刘德华这个代理人存在的价值就是拦截我们对刘德华的直接访问! 这个现实中的例子和我们在开发中是一样的,我们在开发中之所以要产生一个对象的代理对象,主要用于拦截对真实业务对象的访问。那么代理对象应该具有什么方法呢?代理对象应该具有和目标对象相同的方法 所以在这里明确代理对象的两个概念: 1、代理对象存在的价值主要用于拦截对真实业务对象的访问。 2、代理对象应该具有和目标对象(真实业务对象)相同的方法。 刘德华(真实业务对象)会唱歌,会跳舞,会拍戏,我们现在不能直接找他唱歌,跳舞,拍戏了,只能找他的代理人(代理对象)唱歌,跳舞,拍戏,一个人要想成为刘德华的代理人,那么他必须具有和刘德华一样的行为(会唱歌,会跳舞,会拍戏),刘德华有什么方法,他(代理人)就要有什么方法,我们找刘德华的代理人唱歌,跳舞,拍戏,但是代理人不是真的懂得唱歌,跳舞,拍戏的,真正懂得唱歌,跳舞,拍戏的是刘德华,在现实中的例子就是我们要找刘德华唱歌,跳舞,拍戏,那么只能先找他的经纪人,交钱给他的经纪人,然后经纪人再让刘德华去唱歌,跳舞,拍戏。
静态代理
缺点:
- 繁琐,要为每个被代理类编写一个代理对象。有些代买还会被重复编写,造成代买的冗余。
优点:
- 更灵活,为不同的方法进行不同的扩展。
静态代理就是为每个被代理类实现一个代理类。
/* 接口: 定义刘德华作为明星的所有行为.*/public interface Starter { public String sing(String song); public String dance(String dancing); public String rap(String song);}
刘德华实现类(被代理类):
public class LDH implements Starter{ @Override public String sing(String song) { System.out.println("MD,我开始唱"+song); return "我唱完了"; } @Override public String dance(String dancing) { System.out.println("MD,我开始跳这个"+dancing); return "我跳完了"; } @Override public String rap(String song) { System.out.println("MD,我开始rap这个"+song); return "我rap完了"; }
刘德华的代理:
public class LDHProxy implements Starter{ private Starter LDH; public LDHProxy(Starter LDH){ this.LDH = LDH; } @Override public String sing(String song) { System.out.println("要LDH唱歌得给钱"); return LDH.sing(song); } @Override public String dance(String dancing) { System.out.println("要LDH跳舞得给钱"); return LDH.sing(dancing); } @Override public String rap(String song) { System.out.println("要LDHrap得给钱"); return LDH.sing(song); }}
客户通过ldh代理让执行刘德华的才艺:
public class Client { public static void main(String[] args) { LDH ldh = new LDH(); LDHProxy ldhProxy = new LDHProxy(ldh); System.out.println(ldhProxy.dance("霹雳舞")); }}
动态代理:
实现动态代理的方法:
- JDK的Proxy类+InvocationHandler接口。
- cglib
- Jboss的javasist
基于JDK的学习
首先就是客户端通过调用Proxy.newProxyInstance()静态方法动态生成的一个代理类。
public static Object newProxyInstance(ClassLoader loader, //类加载器 Class<?>[] interfaces,//需要实现的被代理对象所实现的接口 InvocationHandler h //调用处理器,代理类调用去调用被代理类的方法。)
然后获得代理类对象,代理类就可以去调用被代理类的对象,通过InvovationHandler对象。
InvocationHandler对象就是实现InvocationHandler接口的类。
注意点就是:
代理类并没有真正的实现接口,接口的实现还是由被代理来完成,而InvocationHandler实现类只是对被代理类进行方法的扩展并调用被代理类的方法。
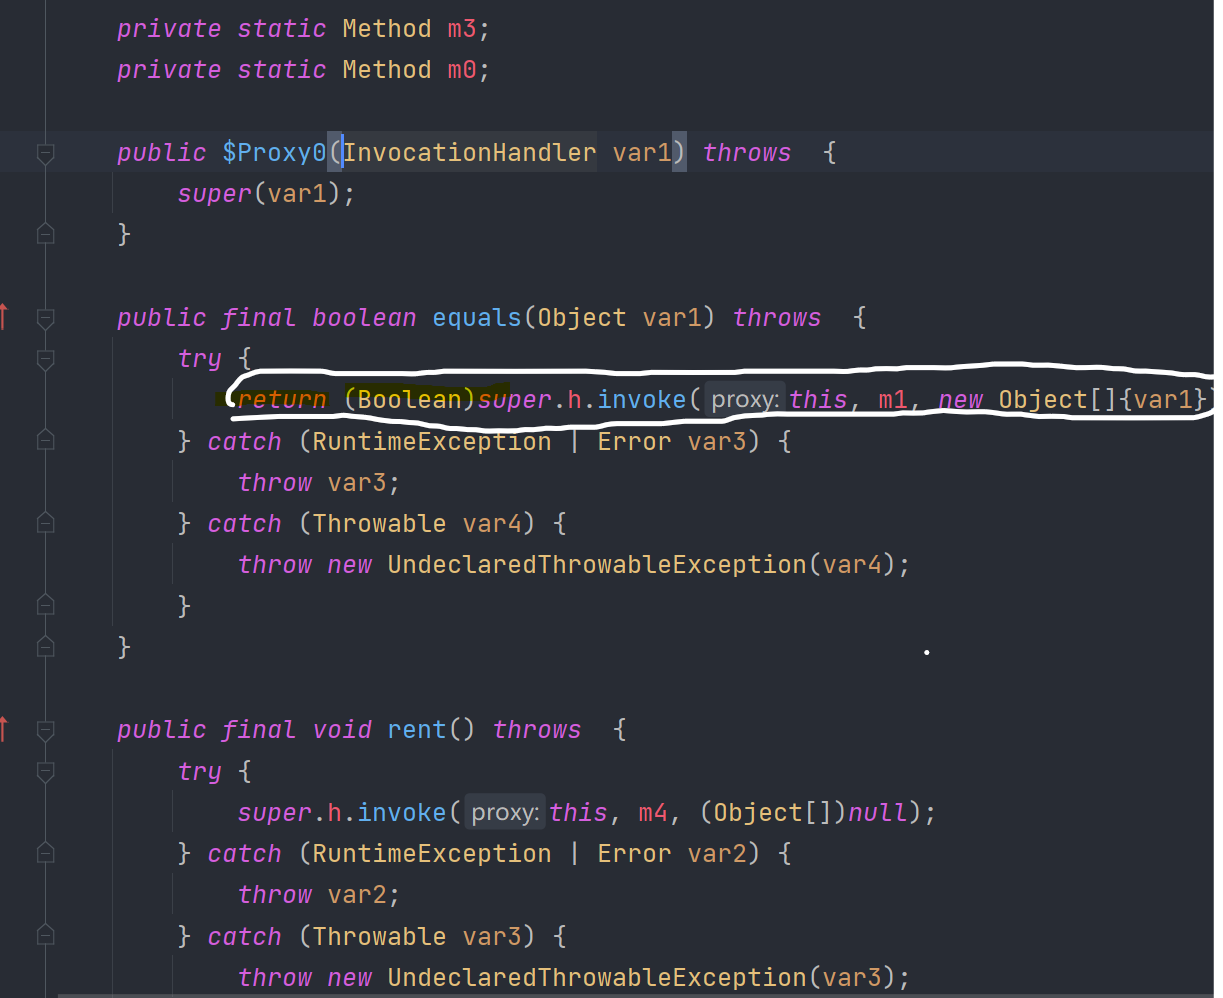
动态生成代理类的类模板
package com.sun.proxy;import base.InterfaceLambdaInnerclass.proxyTest.ProxyAtRuntime.Rent;import java.lang.reflect.InvocationHandler;import java.lang.reflect.Method;import java.lang.reflect.Proxy;import java.lang.reflect.UndeclaredThrowableException;public final class $Proxy0 extends Proxy implements Rent { private static Method m4; private static Method m3; static { try { m4 = Class.forName("base.InterfaceLambdaInnerclass.proxyTest.ProxyAtRuntime.Rent").getMethod("rent"); m3 = Class.forName("base.InterfaceLambdaInnerclass.proxyTest.ProxyAtRuntime.Rent").getMethod("drawback"); } catch (NoSuchMethodException var2) { throw new NoSuchMethodError(var2.getMessage()); } catch (ClassNotFoundException var3) { throw new NoClassDefFoundError(var3.getMessage()); } } public $Proxy0(InvocationHandler var1) throws { super(var1); } public final void rent() throws { try { super.h.invoke(this, m4, (Object[])null); } catch (RuntimeException | Error var2) { throw var2; } catch (Throwable var3) { throw new UndeclaredThrowableException(var3); } } public final int drawback() throws { try { return (Integer)super.h.invoke(this, m3, (Object[])null); } catch (RuntimeException | Error var2) { throw var2; } catch (Throwable var3) { throw new UndeclaredThrowableException(var3); } }}

动态代理的实现过程:
//接口:被代理类和代理类均要实现的方法public interface Rent { public void rent(); //出租房子 public int drawback(); //退租金}
//被代理类实现public class Houseowner implements Rent{ private String name; public Houseowner(String name){ this.name = name; } public void rent(){ System.out.println("我叫" + name.toString()+"我rent了house"); } @Override public int drawback() { return 1024; }}
//InvocationHandler实现类public class HouseownerPoxy implements InvocationHandler { private Rent rent; public HouseownerPoxy(Rent rent){ this.rent = rent; } public Rent getRentProxy() { return (Rent) Proxy.newProxyInstance(rent.getClass().getClassLoader(), rent.getClass().getInterfaces(), this); } @Override public Object invoke(Object proxy, Method method, Object[] args) throws Throwable { return method.invoke(rent, args); }}
//用户访问代理public class Client { public static void main(String[] args) { Houseowner houseowner = new Houseowner("wang"); HouseownerPoxy houseownerPoxy = new HouseownerPoxy(houseowner); Rent rent = houseownerPoxy.getRentProxy(); System.out.println(rent.drawback()); rent.rent(); }}
AOP的概念:
AOP的专业术语
| 术语 | 概念 |
|---|---|
Aspect |
(通知和切点的结合)何时何处完成他的功能。Advice代表要给被代理类拓展的功能,Pointcut就是在哪里拓展功能。 |
Join point |
在Spring AOP中,一个连接点就是方法被执行的时候。 |
Advice |
Advice就是用来给拓展被代理类的方法,通知定义了切面是什么(就是要给被代理类拓展什么样的功能)、什么时候使用?(在pointcut之前还是之后执行,还是环绕执行) |
Pointcut |
切点匹配通知所要织入的连接点。就是告诉通知再哪里执行切面的模块。 |
Introduction |
就是不修改源代码的情况下,扩张类的功能。 |
Target object |
被通知切面通知执行的对象,被代理的对象。 |
AOP proxy |
AOP框架去创建一个对象去执行契约(通知方法执行)。AOP proxy is a JDK dynamic proxy or a CGLIB proxy. |
Weaving |
就是创建一个代理对象,把切面的功能织入到被代理对象中去 |
Spring的Advice
| Advice | Advice执行时机 |
|---|---|
Before advice |
再连接点被执行之前通知功能 |
After returning advice |
在连接点完成之后通知功能,关心返回结果 |
After throwing advice |
在连接点抛出异常的时候通知功能 |
After (finally) advice |
在连接点完成之后通知功能,不关心返回结果 |
Around advice |
通知包裹连接点,在连接点前后执行自定义的行为. |
Aop的使用:
导入一个依赖:
<!-- https://mvnrepository.com/artifact/org.aspectj/aspectjweaver --><dependency> <groupId>org.aspectj</groupId> <artifactId>aspectjweaver</artifactId> <version>1.9.7</version></dependency>
基于xml的Aop配置
<?xml version="1.0" encoding="UTF-8"?><beans xmlns="http://www.springframework.org/schema/beans" xmlns:xsi="http://www.w3.org/2001/XMLSchema-instance" xmlns:aop="http://www.springframework.org/schema/aop" xmlns:context="http://www.springframework.org/schema/context" xsi:schemaLocation="http://www.springframework.org/schema/beans https://www.springframework.org/schema/beans/spring-beans.xsd http://www.springframework.org/schema/aop https://www.springframework.org/schema/aop/spring-aop.xsd http://www.springframework.org/schema/context https://www.springframework.org/schema/context/spring-context.xsd"> <!--让xml支持自动装配--> <context:annotation-config/> <bean id="houseOwner" class="cn.wangmyi.aop.houseOwner"/> <bean id="houserProxy" class="cn.wangmyi.aop.houseProxy" /> <aop:config> <!--定义一个切面, 切面是id为houserProxy的bean--> <aop:aspect id="first" ref="houserProxy"> <!--定义一个切入点,切入点是,cn.wangmyi.aop.houserOwner类下的所有方法无论返回值是什么--> <aop:pointcut id="firstPointcut" expression="execution(* cn.wangmyi.aop.houseOwner.*(..))"/> <!--定义一个通知,调用bean的id为houserProxy下的getConstract方法,在切入点之前调用--> <aop:before method="getContract" pointcut-ref="firstPointcut"/> </aop:aspect> </aop:config></beans>
基于注解的配置
配置文件:
<?xml version="1.0" encoding="UTF-8"?>
<beans xmlns="http://www.springframework.org/schema/beans"
       xmlns:xsi="http://www.w3.org/2001/XMLSchema-instance"
       xmlns:context="http://www.springframework.org/schema/context"
       xsi:schemaLocation="http://www.springframework.org/schema/beans
        https://www.springframework.org/schema/beans/spring-beans.xsd
        http://www.springframework.org/schema/context
        https://www.springframework.org/schema/context/spring-context.xsd">
        <context:annotation-config/>
		<!--对@AspectJ的支持-->
        <aop:aspectj-autoproxy/>
        <bean id="houseOwner" class="cn.wangmyi.aop.houseOwner"/>
        <bean id="houserProxy" class="cn.wangmyi.aop.houseProxy" />
</beans>
@Aspect
public class houseProxy {
    private String name;

    public houseProxy() {
    }
    @Autowired
    public houseProxy(@Value("mingyiwang") String name) {
        this.name = name;
    }

    @Before(value = "execution(* cn.wangmyi.aop.houseOwner.*(..))")
    public void getContract(){
        System.out.println("我是" + name + "我我们来签合同");
    }
}
基于Java的配置
@Configuration@EnableAspectJAutoProxypublic class configuration { @Bean(value = "houseOwner") public houseOwner gethouseOwner(){ return new houseOwner(); } @Bean(value = "anotherHouseOwner") public anotherHouseOnwer getAnotherHouseOwner(){ return new anotherHouseOnwer(); } @Bean(value = "houseProxy") public houseProxy getHouseProxy(){ return new houseProxy(); }}
自己的一些理解
1、IOC容器创建一个实体类,是一个这样的过程,我们给IOC容器提供一个模板,然后预设一些值,这些值是IOC容器要注入我们给它提供的模板的值,这些值设置模板的字段名,通过构造器或者setter方法或者而是工厂类。生成一个对象。
2、Aop和动态代理的的比较:
Aop最主要的是两个东西:
-
Pointcut(切入点)
Pointcut是指明,切面要在哪里切入,定义切入的点是通过execution表达式来做匹配的,就是说,被execution表达式匹配的类,当我们要从IOC容器中取出这个类对象的时候,我们必须取出的是他的代理类(如果该类被切面切入的话)。
-
Advice(通知)
通知我们要拓展的功能,就是一些代码,跑在被代理类的方法前面或者后面或者放回值的时候。
所以Aop实际上就是动态代理的一个实现。
动态代理也可以实现,也可以实现一些方法通知,一些方法不通知。

