
Java 系列之spring学习--spring搭建(一)
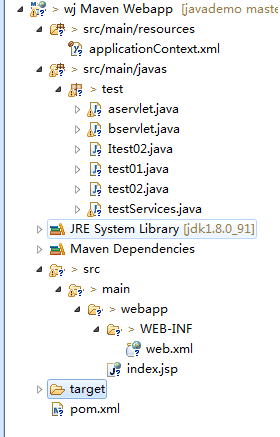
一、新建maven项目
二、引入spring jar包
1 2 3 4 5 6 7 8 9 10 11 12 13 14 15 16 17 18 19 20 21 22 23 24 25 26 27 28 29 30 31 32 33 34 35 36 | <project xmlns="http://maven.apache.org/POM/4.0.0" xmlns:xsi="http://www.w3.org/2001/XMLSchema-instance" xsi:schemaLocation="http://maven.apache.org/POM/4.0.0 http://maven.apache.org/maven-v4_0_0.xsd"> <modelVersion>4.0.0</modelVersion> <groupId>wjxiaoqiao</groupId> <artifactId>wj</artifactId> <packaging>war</packaging> <version>0.0.1-SNAPSHOT</version> <name>wj Maven Webapp</name> <url>http://maven.apache.org</url> <dependencies> <!-- https://mvnrepository.com/artifact/org.springframework/spring-context --><dependency> <groupId>org.springframework</groupId> <artifactId>spring-context</artifactId> <version>5.0.2.RELEASE</version></dependency> <!-- https://mvnrepository.com/artifact/javax.servlet/javax.servlet-api --><dependency> <groupId>javax.servlet</groupId> <artifactId>javax.servlet-api</artifactId> <version>4.0.0</version> <scope>provided</scope></dependency> <dependency> <groupId>junit</groupId> <artifactId>junit</artifactId> <version>3.8.1</version> <scope>test</scope> </dependency> </dependencies> <build> <finalName>wj</finalName> </build></project> |
三、编写配置文件
1 2 3 4 5 6 7 8 9 10 11 12 13 14 15 16 17 | <?xml version="1.0" encoding="UTF-8"?><beans xmlns="http://www.springframework.org/schema/beans" xmlns:xsi="http://www.w3.org/2001/XMLSchema-instance" xmlns:context="http://www.springframework.org/schema/context" xsi:schemaLocation="http://www.springframework.org/schema/beans http://www.springframework.org/schema/beans/spring-beans.xsd http://www.springframework.org/schema/mvc http://www.springframework.org/schema/mvc/spring-mvc.xsd http://www.springframework.org/schema/context http://www.springframework.org/schema/context/spring-context.xsd http://www.springframework.org/schema/aop http://www.springframework.org/schema/aop/spring-aop.xsd http://www.springframework.org/schema/tx http://www.springframework.org/schema/tx/spring-tx.xsd "> <bean id="test01" class="test.test01" /> </beans> |
四、测试类
1 2 3 4 5 6 7 8 9 10 11 12 13 14 15 | package test;public class test01 { public test01() { System.out.println("test01"); } public void prints() { System.out.println("prints"); }} |
1 2 3 4 5 6 7 8 9 10 11 12 13 14 15 16 17 18 19 20 21 22 23 24 | package test;import java.io.IOException;import java.io.PrintWriter;import javax.servlet.ServletException;import javax.servlet.http.HttpServlet;import javax.servlet.http.HttpServletRequest;import javax.servlet.http.HttpServletResponse;import org.springframework.context.ApplicationContext;import org.springframework.context.support.ClassPathXmlApplicationContext;public class aservlet extends HttpServlet { public void doGet(HttpServletRequest request, HttpServletResponse response) throws ServletException, IOException { ApplicationContext context=new ClassPathXmlApplicationContext("applicationContext.xml"); test01 test01=(test01)context.getBean("test01"); test01.prints(); }} |
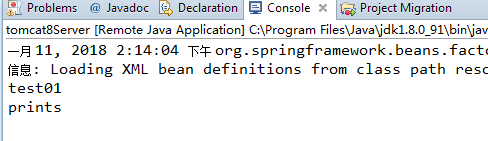
五、测试是否成功
本文作者:WangJunZzz
本文链接:https://www.cnblogs.com/WangJunZzz/p/8268174.html
版权声明:本作品采用知识共享署名-非商业性使用-禁止演绎 2.5 中国大陆许可协议进行许可。


【推荐】国内首个AI IDE,深度理解中文开发场景,立即下载体验Trae
【推荐】编程新体验,更懂你的AI,立即体验豆包MarsCode编程助手
【推荐】抖音旗下AI助手豆包,你的智能百科全书,全免费不限次数
【推荐】轻量又高性能的 SSH 工具 IShell:AI 加持,快人一步