
Vue构建项目-开发必要插件
第一个:引入axios
1、下载依赖: npm install axios --save
npm install --save vue-axios
2、在main。js里面声明:
import axios from 'axios'
import VueAxios from 'vue-axios'
Vue.use(VueAxios,axios);
3、在项目的根目录下面的 config 文件下 index.js 中
将这段代码替换掉
dev: {
    env: require('./dev.env'),
    assetsSubDirectory: 'static',
    assetsPublicPath: '/',
    proxyTable: {
      '/api': {
            target: '后台接口地址',
            changeOrigin: true,
            pathRewrite: {
                '^/api': ''
            }
        }
    },
    host: 'localhost',//本地IP地址
    port: 8080,
    autoOpenBrowser: true,
    errorOverlay: true,
    notifyOnErrors: true,
    poll: false,
    cacheBusting: true,
    cssSourceMap: false
}
4、在需要使用的页面上引用以下代码(也可封装成函数在调用)
//以下代码也可以封装在函数中,在其他地方调用
this.$axios.get('后台接口链接地址', {
    params: {
        ‘传递的参数’
    }
  })
  .then(function (response) {
    console.log(response);
  });
第二个:引入qs
1、下载依赖: npm install qs --save
2、在main。js里面声明:
import qs from 'qs’
Vue.use(VueAxios,axios,qs);
3、具体的方法有 qs.parse()和qs.stringify()
4、将传递的参数修改
this.$axios.get('后台接口链接地址',qs.stringify(params)}) .then(res => {
    console.log(res)
});
第三个:有需要的话还需要引入jq
1、下载依赖: npm install jquery --save
2、在项目的根目录下面的 build 文件下 webpack.base.conf.js 中
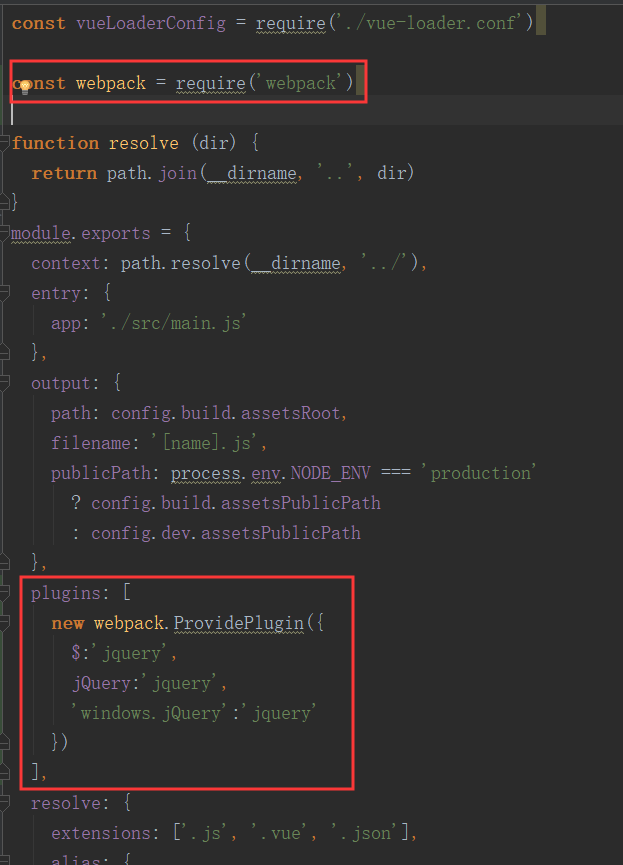
3、在组件中引入jquery,进行使用
import $ from 'jquery'
  export default {
    components: {},
    data: function () {
      return {}
    },
    created:function(){
      console.log($('#app'));
    }
  }
第四个:有需要的话还需要引入MD5
1、下载依赖: npm install --save js-md5
2、在需要使用的项目文件中引入: import md5 from 'js-md5';
使用:
md5('hello world') // 5eb63bbbe01eeed093cb22bb8f5acdc3
借鉴的链接:https://blog.csdn.net/marslover521/article/details/86593440
https://blog.csdn.net/weixin_43851769/article/details/86505164

