「Android 开发」入门笔记

「Android 开发」入门笔记(界面编程篇)
——————每日摘要——————
-
- 学习笔记:
- Android应用结构分析
- 界面编程与视图(View)组件
- 布局管理器
- 问题整理:
- Android官方API文档
- 如何设置Android中的颜色
- Android Studio如何进行调试
- 每日体会
- 参考资料
- 学习笔记:
-
- 学习笔记:
- TextView及其子类
- 问题整理:
- 关于API版本的一点疑问及解决
- 如何实现按钮按下和松开时为不同的图片
- 关于如何实现文本域中灰色的提示文本的一点思考
- 每日体会
- 参考资料
- 学习笔记:
-
- 学习笔记:
- AdapterView及其子类
- ProgressBar及其子类
- 问题整理:
- Android中xml的控件属性
app:与Android:有什么区别 - PNG、JPEG、GIF三种图片格式的特性
- 如何实现自动完成文本框
- Android中xml的控件属性
- 每日体会
- 参考资料
- 学习笔记:
Day-1
一、学习笔记
Android应用结构分析
- 进入到一个Android项目,我们可以看到以下目录结构
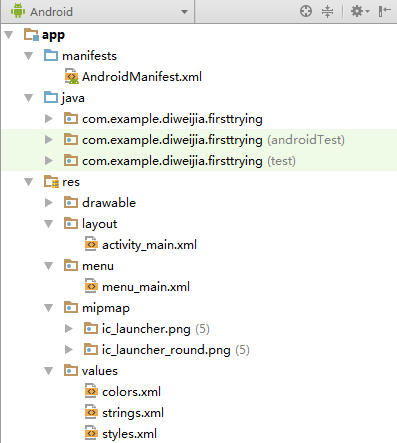
在上面的文件结构中,res目录、src目录、AndroidManifest.xml文件是Android项目必需的。其他目录、文件都是可选的。
- res:存放Android项目的各种资源文件,比如layout存放界面布局文件,values目录下则存放各种xml格式的资源文件,例如字符串资源文件:strings.xml;颜色资源文件:colors.xml;尺寸资源文件:dimens.xml。
- src:保存Java源文件的目录。
- AndroidManifest.xml:Android项目的系统清单文件,它用于控制Android应用的名称、图标、访问权限等整体属性。
1、自动生成的R.java:
- 随意打开一个项目的R.java类,可以看到以下代码:
/* AUTO-GENERATED FILE.  DO NOT MODIFY.
 *
 * This class was automatically generated by the
 * aapt tool from the resource data it found.  It
 * should not be modified by hand.
 */

public final class R {
    public static final class attr {
    }
    public static final class drawable {
        public static final int ic\_launcher=0x7f020000;
    }
    public static final class id {
        public static final int show=0x7f050000;
    }
    public static final class layout {
        public static final int main=0x7f030000;
    }
    public static final class string {
        public static final int app_name=0x7f040000;
    }
}
R.java文件是由AAPT工具根据应用中的资源文件自动生成的,因此可以把R.java理解成Android应用的资源字典。
-
AAPT生成R.java文件的规则主要是:
- 每类资源都对应于R类的一个内部类。比如界面布局资源对应于layout内部类;字符串资源对应于string内部类;标识符资源对应于id内部类。
- 每个具体的资源项都对应于内部类的一个public static final int类型的Field。比如在界面布局文件中用到了show标识符,因此R.id类里就包含了这个Field。
-
随着我们不断向Android项目中添加资源,R.java文件的内容也会越来越多。如果遇到R文件丢失的情况(红R),大多数情况下是res资源文件的错误导致的。基于上述原理,可以尝试Build->Clean Project并Build->Rebuild Project,再重新打开项目。
2、Android应用的清单文件AndroidManifest.xml:
- AndroidManifest.xml清单文件说明了该应用的名称、所使用的图标以及包含的组件等等。
- 例如以下AndroidManifest.xml清单文件:
<?xml version="1.0" encoding="utf-8"?>
<!\--指定该Android应用的包名,该包名可用于唯一地标识该应用-->
<manifest xmlns:android="http://schemas.android.com/apk/res/android"
	  package="com.example.diweijia.HelloWorld"
	  android:versionCode="1"
	  android:versionName="1.0">
	<!\--指定Android应用标签、图标-->
	<application android:label="@string/app_name" android:icon="@drawable/ic_launcher">
		<!\--定义Android应用的一个组件:Activity,该Activity的类为HelloWorld,并指定该Activity的标签-->
		<activity android:name="HelloWorld"
				  android:label="@string/app_name">
			<intent-filter>
				<!\--指定该Activity是程序的入口-->
				<action android:name="android.intent.action.MAIN" />
				<!\--指定加载该应用时运行该Activity-->
				<category android:name="android.intent.category.LAUNCHER" />
			</intent-filter>
		</activity>
	</application>
</manifest>
3、应用程序权限说明:
- 在元素里添加以下代码:
<!\--声明该应用本身需要的权限(如发短信)-->
<uses-permission android:name="android.permission.SEND_SMS">
- Android系统常用的权限
| 权限 | 说明 |
|---|---|
| ACCESS_NETWORK_STATE | 允许应用程序获取网络状态信息的权限 |
| ACCESS_WIFI_STATE | 允许应用程序获取WI-FI网络状态信息的权限 |
| BATTERY_STATES | 允许应用程序获取电池状态信息的权限 |
| BLUETOOTH | 允许应用程序链接匹配的蓝牙设备的权限 |
| BLUETOOTH_ADMIN | 允许应用程序发现匹配的蓝牙设备的权限 |
| BROADCAST_SMS | 允许应用程序广播收到短信提醒的权限 |
| CALL_PHONE | 允许应用程序拨打电话的权限 |
| CAMERA | 允许应用程序使用照相机的权限 |
| CHANGE_NETWORK_STATE | 允许应用程序改变网络连接状态的权限 |
| CHANGE_WIFI_STATE | 允许应用程序改变WIFI网络连接状态的权限 |
| DELETE_CACHE_FILES | 允许应用程序删除缓存文件的权限 |
| DELETE_PACKAGES | 允许应用程序删除安装包的权限 |
| FLASHLIGHT | 允许应用程序访问闪光灯的权限 |
| INTERNET | 允许应用程序打开网络Socket的权限 |
| MODIFY_AUDIO_SETTINGS | 允许应用程序修改全局声音设置的权限 |
| PROCESS_OUTGOING_CALLS | 允许应用程序监听、控制、取消呼出电话的权限 |
| READ_CONTACTS | 允许应用程序读取用户的联系人数据的权限 |
| READ_HISTORY_BOOKMARKS | 允许应用程序读取历史书签的权限 |
| READ_OWNER_DATA | 允许应用程序读取用户数据的权限 |
| READ_PHONE_STATE | 允许应用程序读取电话状态的权限 |
| READ_PHONE_SMS | 允许应用程序读取短信的权限 |
| REBOOT | 允许应用程序重启系统的权限 |
| RECEIVE_MMS | 允许应用程序接受、监控、处理彩信的权限 |
| RECEIVE_SMS | 允许应用程序接受、监控、处理短信的权限 |
| RECORD_AUDIO | 允许应用程序录音的权限 |
| SEND_SMS | 允许应用程序发送短信的权限 |
| SET_ORIENTATION | 允许应用程序旋转屏幕的权限 |
| SET_TIME | 允许应用程序设置时间的权限 |
| SET_TIME_ZONE | 允许应用程序设置时区的权限 |
| SET_WALLPAPER | 允许应用程序设置桌面壁纸的权限 |
| VIBRATE | 允许应用程序控制震动器的权限 |
| WRITE_CONTACTS | 允许应用程序写入用户联系人的权限 |
| WRITE_HISTORY_BOOKMARKS | 允许应用程序写入历史书签的权限 |
| WRITE_OWNER_DATA | 允许应用程序写入用户数据的权限 |
| WRITE_SMS | 允许应用程序写短信的权限 |
界面编程与视图(View)组件
- Android应用的绝大部分UI组件都放在android.widget包及其子包、android.view包及其子包中,Android应用的所有UI组件都继承了View类,View组件非常类似于Swing编程的JPanel,它代表一个空白的矩形区域。
- Android推荐使用XML布局文件来控制视图,这样不仅简单明了,而且可以将应用的视图控制逻辑从Java代码中分离出来,放入XML文件中控制,从而更好地实现MVC原则。
布局管理器
为了更好地管理Android应用的用户界面里的各组件,Android提供了布局管理器。通过使用布局管理器,Android应用的图形用户界面具有良好的平台无关性。与Swing界面编程不同的是,Android的布局管理器本身就是一个UI组件,所有的布局管理器都是ViewGroup的子类。下面将介绍以ViewGroup为基类派生的布局管理器。
1、线性布局(LinearLayout):
- 类似于Swing编程里的Box,它们会将容器里的组件一个挨着一个排列起来。LinearLayout不会换行,当组件一个挨着一个排列到头之后,剩下的组件将不会被显示出来。
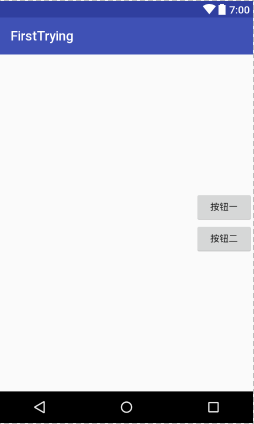
- 通过改变android:gravity属性,可以改变它所包含的子元素的对齐方式,如以下XML布局管理器:
<?xml version="1.0" encoding="utf-8"?>
<LinearLayout xmlns:android="http://schemas.android.com/apk/res/android"
    android:orientation="vertical"
    android:layout_width="match_parent"
    android:layout_height="match_parent"
    android:gravity= "bottom|center_horizontal">
    <Button
        android:id="@+id/bn1"
        android:layout_width="wrap_content"
        android:layout_height="wrap_content"
        android:text="@string/bn1"/>
    <Button
        android:id="@+id/bn2"
        android:layout_width="wrap_content"
        android:layout_height="wrap_content"
        android:text="@string/bn2"/>
</LinearLayout>
得到的界面如下:
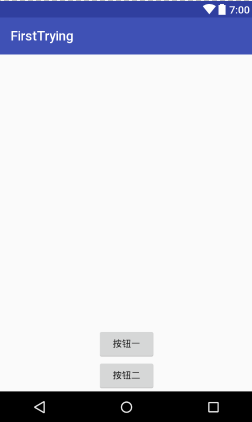
如果将android:gravity的属性"bottom|center_horizontal"(底部,居中)改为right|center_vertical(水平右对齐,垂直居中),则得到以下界面:
2、表格布局(TableLayout):
-
表格布局由TableLayout所代表,TableLayout继承了LinearLayout,因此他的本质仍是线性布局。表格布局采用行、列的形式来管理UI组件,每次向TableLayout中添加一个TableRow,该TableRow就是一个表格行。
-
在表格布局中,列的宽度由该列中最宽的那个单元格决定,整个表格布局的宽度则取决于父容器的宽度(默认总是占满父容器本身)。
-
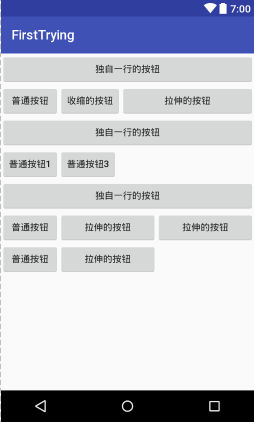
在表格布局管理器中,可以为单元格设置如下3种行为方式:
- Shrinkable:该列所有单元格的宽度均可以被收缩,以保证该表格能适应父容器的宽度。
- Stretchable:该列所有单元格的宽度均可以被拉伸,以保证组件能完全填满表格空余空间。
- Collapsed:该列所有单元格都会被隐藏。
-
如以下布局文件:
<?xml version="1.0" encoding="utf-8"?>
<LinearLayout xmlns:android="http://schemas.android.com/apk/res/android"
	android:orientation="vertical"
	android:layout_width="match_parent"
	android:layout_height="match_parent">
	<!-- 定义第一个表格布局,指定第2列允许收缩,第3列允许拉伸 -->
	<TableLayout android:id="@+id/TableLayout01"
		android:layout_width="match_parent"
		android:layout_height="wrap_content"
		android:shrinkColumns="1"
		android:stretchColumns="2">
		<!-- 直接添加按钮,它自己会占一行 -->
		<Button android:id="@+id/ok1"
			android:layout_width="wrap_content"
			android:layout_height="wrap_content"
			android:text="独自一行的按钮"/>
		<!-- 添加一个表格行 -->
		<TableRow>
			<!-- 为该表格行添加三个按钮 -->
			<Button android:id="@+id/ok2"
				android:layout_width="wrap_content"
				android:layout_height="wrap_content"
				android:text="普通按钮"/>
			<Button android:id="@+id/ok3"
				android:layout_width="wrap_content"
				android:layout_height="wrap_content"
				android:text="收缩的按钮"/>
			<Button android:id="@+id/ok4"
				android:layout_width="wrap_content"
				android:layout_height="wrap_content"
				android:text="拉伸的按钮"/>
		</TableRow>
	</TableLayout>
	<!-- 定义第2个表格布局 ,指定第2列隐藏-->
	<TableLayout android:id="@+id/TableLayout02"
		android:layout_width="match_parent"
		android:layout_height="wrap_content"
		android:collapseColumns="1">
		<!-- 直接添加按钮,它自己会占一行 -->
		<Button android:id="@+id/ok5"
				android:layout_width="wrap_content"
				android:layout_height="wrap_content"
				android:text="独自一行的按钮"/>
		<!-- 添加一个表格行 -->
		<TableRow>
			<!-- 为该表格行添加三个按钮 -->
			<Button android:id="@+id/ok6"
					android:layout_width="wrap_content"
					android:layout_height="wrap_content"
					android:text="普通按钮1"/>
			<Button android:id="@+id/ok7"
					android:layout_width="wrap_content"
					android:layout_height="wrap_content"
					android:text="普通按钮2"/>
			<Button android:id="@+id/ok8"
					android:layout_width="wrap_content"
					android:layout_height="wrap_content"
					android:text="普通按钮3"/>
		</TableRow>
	</TableLayout>
	<!-- 定义第3个表格布局,指定第2列和第3列可以被拉伸-->
	<TableLayout
		android:id="@+id/TableLayout03"
		android:layout_width="match_parent"
		android:layout_height="wrap_content"
		android:stretchColumns="1,2">
		<!-- 直接添加按钮,它自己会占一行 -->
		<Button
			android:id="@+id/ok9"
			android:layout_width="wrap_content"
			android:layout_height="wrap_content"
			android:text="独自一行的按钮"
			/>
		<!--定义一个表格行-->
		<TableRow>
		<!-- 为该表格行添加三个按钮 -->
		<Button
			android:id="@+id/ok10"
			android:layout_width="wrap_content"
			android:layout_height="wrap_content"
			android:text="普通按钮"
			/>
		<Button
			android:id="@+id/ok11"
			android:layout_width="wrap_content"
			android:layout_height="wrap_content"
			android:text="拉伸的按钮"
			/>
		<Button
			android:id="@+id/ok12"
			android:layout_width="wrap_content"
			android:layout_height="wrap_content"
			android:text="拉伸的按钮"
			/>
		</TableRow>
		<!--定义一个表格行-->
		<TableRow>
			<!-- 为该表格行添加两个按钮 -->
			<Button
				android:id="@+id/ok13"
				android:layout_width="wrap_content"
				android:layout_height="wrap_content"
				android:text="普通按钮"
				/>
			<Button
				android:id="@+id/ok14"
				android:layout_width="wrap_content"
				android:layout_height="wrap_content"
				android:text="拉伸的按钮"
				/>
		</TableRow>
	</TableLayout>
</LinearLayout>
使用Activity显示上面的布局,将会看到如下界面:
- 需要注意,以上我们将按钮的文本写在了布局文件中,但正确的做法是将字符串放到XML文件中管理。
3、帧布局(FrameLayout):
- 帧布局容器为每个加入其中的组件创建一个空白的区域(称为一帧),每个子组件占据一帧,这些帧会根据gravity属性执行自动对齐。
- 如以下布局文件:
<?xml version="1.0" encoding="utf-8"?>
<FrameLayout xmlns:android="http://schemas.android.com/apk/res/android"
    android:layout_width="match_parent"
    android:layout_height="match_parent">
    <!-- 依次定义6个TextView,先定义的TextView位于底层
        后定义的TextView位于上层 -->
    <TextView
        android:id="@+id/view03"
        android:layout_width="wrap_content"
        android:layout_height="wrap_content"
        android:layout_gravity="center"
        android:width="120pt"
        android:height="120pt"
        android:background="#00f"/>
    <TextView
        android:id="@+id/view04"
        android:layout_width="wrap_content"
        android:layout_height="wrap_content"
        android:layout_gravity="center"
        android:width="100pt"
        android:height="100pt"
        android:background="#ff0"/>
    <TextView
        android:id="@+id/view05"
        android:layout_width="wrap_content"
        android:layout_height="wrap_content"
        android:layout_gravity="center"
        android:width="80pt"
        android:height="80pt"
        android:background="#f0f"/>
    <TextView
        android:id="@+id/view06"
        android:layout_width="wrap_content"
        android:layout_height="wrap_content"
        android:layout_gravity="center"
        android:width="60pt"
        android:height="60pt"
        android:background="#0ff"/>
</FrameLayout>
使用Activity显示上面的布局,将会看到如下界面:
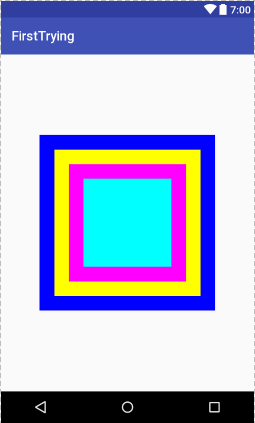
- 以上界面布局向容器中添加了4个TextView,高度、宽度逐渐减少,以保证最先添加的不会被遮挡。
4、相对布局(RelativeLayout):
- 相对布局容器内子组件的位置总是相对兄弟组件、父容器来决定的,如果A组件的位置是由B组件的位置来决定的,Android要求先定义B组件,再定义A组件。
- 如以下布局文件:
<?xml version="1.0" encoding="utf-8"?>
<RelativeLayout xmlns:android="http://schemas.android.com/apk/res/android"
				android:layout_width="match_parent"
				android:layout_height="match_parent">
	<!-- 定义该组件位于父容器中间 -->
	<TextView
		android:id="@+id/view01"
		android:layout_width="wrap_content"
		android:layout_height="wrap_content"
		android:background="@drawable/leaf"
		android:layout_centerInParent="true"/>
	<!-- 定义该组件位于view01组件的上方 -->
	<TextView
		android:id="@+id/view02"
		android:layout_width="wrap_content"
		android:layout_height="wrap_content"
		android:background="@drawable/leaf"
		android:layout_above="@id/view01"
		android:layout_alignLeft="@id/view01"/>
	<!-- 定义该组件位于view01组件的下方 -->
	<TextView
		android:id="@+id/view03"
		android:layout_width="wrap_content"
		android:layout_height="wrap_content"
		android:background="@drawable/leaf"
		android:layout_below="@id/view01"
		android:layout_alignLeft="@id/view01"/>
	<!-- 定义该组件位于view01组件的左边 -->
	<TextView
		android:id="@+id/view04"
		android:layout_width="wrap_content"
		android:layout_height="wrap_content"
		android:background="@drawable/leaf"
		android:layout_toLeftOf="@id/view01"
		android:layout_alignTop="@id/view01"/>
	<!-- 定义该组件位于view01组件的右边 -->
	<TextView
		android:id="@+id/view05"
		android:layout_width="wrap_content"
		android:layout_height="wrap_content"
		android:background="@drawable/leaf"
		android:layout_toRightOf="@id/view01"
		android:layout_alignTop="@id/view01"/>
</RelativeLayout>
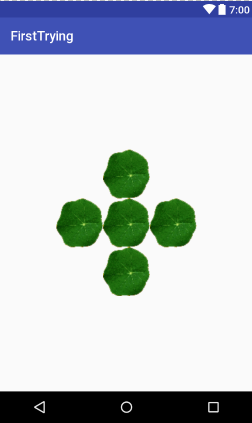
上面程序中先将第一个组件放在父容器中央,再将接下来定义的4个组件依次环绕在第一个组件周围。使用Activity显示上面的布局,将会看到如下界面:
5、网格布局(GridLayout):
- GridLayout的作用类似于HTML中的table标签,它把整个容器划分成rows*columns个网格,每个网格可以放置一个组件。
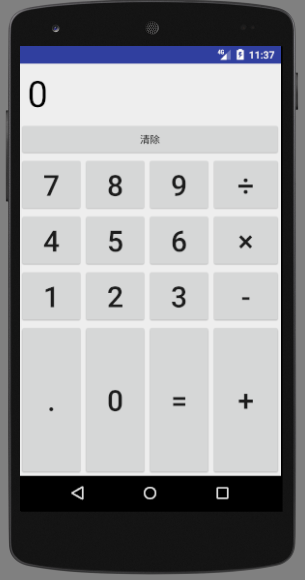
- 如下计算器界面示例,在布局管理器中定义一个GridLayout,并在该GridLayout中依次定义文本框、按钮。
<?xml version="1.0" encoding="utf-8" ?>
<GridLayout xmlns:android="http://schemas.android.com/apk/res/android"
			android:layout_width="match_parent"
			android:layout_height="match_parent"
			android:rowCount="6"
			android:columnCount="4"
			android:id="@+id/root">
	<!-- 定义一个横跨4列的文本框,
	并设置该文本框的前景色、背景色等属性  -->
	<TextView
		android:layout_width="match_parent"
		android:layout_height="wrap_content"
		android:layout_columnSpan="4"
		android:textSize="50sp"
		android:layout_marginLeft="2pt"
		android:layout_marginRight="2pt"
		android:padding="3pt"
		android:layout_gravity="right"
		android:background="#eee"
		android:textColor="#000"
		android:text="0"/>
	<!-- 定义一个横跨4列的按钮 -->
	<Button
		android:layout_width="match_parent"
		android:layout_height="wrap_content"
		android:layout_columnSpan="4"
		android:text="清除"/>
</GridLayout>
- 在Java代码中循环16次,依次添加16个按钮:
public class MainActivity extends Activity
{
	GridLayout gridLayout;
	// 定义16个按钮的文本
	String[] chars = new String[]
			{
					"7" , "8" , "9" , "÷",
					"4" , "5" , "6" , "×",
					"1" , "2" , "3" , "-",
					"." , "0" , "=" , "+"
			};
	@Override
	public void onCreate(Bundle savedInstanceState)
	{
		super.onCreate(savedInstanceState);
		setContentView(R.layout.main);
		gridLayout = (GridLayout) findViewById(R.id.root);
		for(int i = 0 ; i < chars.length ; i++)
		{
			Button bn = new Button(this);
			bn.setText(chars[i]);
			// 设置该按钮的字号大小
			bn.setTextSize(40);
			// 设置按钮四周的空白区域
			bn.setPadding(5 , 35 , 5 , 35);
			// 指定该组件所在的行
			GridLayout.Spec rowSpec = GridLayout.spec(i / 4 + 2);
			// 指定该组件所在的列
			GridLayout.Spec columnSpec = GridLayout.spec(i % 4);
			GridLayout.LayoutParams params = new GridLayout.LayoutParams(
					rowSpec , columnSpec);
			// 指定该组件占满父容器
			params.setGravity(Gravity.FILL);
			gridLayout.addView(bn , params);
		}
	}
}
添加按钮时指定了每个按钮所在的行号、列号,并指定这些按钮将会自动填充单元格所有空间。运行程序,得到以下界面:
6、绝对布局(AbsoluteLayout):
- 绝对布局就像Java AWT编程中的空布局,Android不提供任何布局控制,而是由开发人员自己通过X坐标、Y坐标来控制组件的位置。
- 由于运行Android应用的手机往往千差万别,屏幕大小、分辨率等都会存在较大差异,使用绝对布局会很难兼顾不同屏幕大小、分辨率的问题。因此,AbsoluteLayout已过时,不建议使用。
二、问题整理
『问题一』Android官方API文档的获取和使用
对于每一个语言学习者而言,官方文档是必看的。就像之前学习Java一样,学习过程基本是以查询API为基础。如何查看官方文档是一种能力,我认为这比单单记住几个知识点更重要。
『问题二』如何设置Android中的颜色
在android中经常看到设置的颜色为八位的十六进制的颜色值:
public static final class color {
    public static final int lightblue=0x7f040000;
}
0xffff00ff是int类型的数据,分组一下0x|ff|ff00ff,0x表示颜色整数的标记,ff表示透明度,f00f表示色值,注意:0x后面ffff00ff必须是8位的颜色表示。
颜色和不透明度 (alpha) 值以十六进制表示法表示。任何一种颜色的值范围都是 0到 255(00到 ff)。
对于 alpha,00表示完全透明,ff表示完全不透明。
表达式顺序是“aabbggrr”,其中“aa=alpha”(00到ff);“bb=blue”(00到ff);“gg=green”(00到ff);“rr=red”(00到ff)。
- Android中设置文本颜色的方法:
- 利用系统自带的颜色类:
tx.setTextColor(android.graphics.Color.RED); - 数字颜色表示:
tx.setTextColor(0xffff00f); - 直接在xml的TextView中设置:
android:textColor="#F8F8FF00" - 在工程目录values文件夹下新建一个color.xml,可以根据自己的需要添加颜色,内容如下:
- 利用系统自带的颜色类:
<?xml version="1.0" encoding="utf-8"?>
<resources>
<drawable name="dkgray">#80808FF0</drawable>
<drawable name="yello">#F8F8FF00</drawable>
<drawable name="white">#FFFFFF</drawable>
<drawable name="darkgray">#938192</drawable>
......
</resources>
- Android中146种颜色对应的xml值可以参考:Android中的颜色设置
『问题三』Android Studio如何进行调试
Android Studio提供的调试版面如下:

由于Android Studio是基于IntelliJ IDEA的一款开放工具,所以其调试方法与IDEA基本相同,可以参考IDEA调试方法:使用IDEA编辑、编译、运行、调试Java程序
三、每日体会
Android开发的学习是我认为非常必要且有意义的,无论做项目还是参加竞赛都能派上用场。正好趁暑假这个机会学习相关内容,希望能与我的队友们自主开发出来一个(有趣的)APP。之前在一次Java实验中接触了Android开发的一点皮毛,如今开始系统地学习,对Android也不断有了新的认识,当时困扰我的很多难题也就迎刃而解了。计算机实习期间由于项目需要,自学了GUI编程,现在看来Android的界面编程在很多方面与其有异曲同工之妙,这样一来理解时也容易许多。不过Android使用XML布局文件来控制视图,不仅简单明了,也更能体现MVC模式。
不得不说,玩儿Android是一件挺有意思的事,死气沉沉的代码竟然能将人的脑海中浮现的各种有趣的创意一一实现,实在是神奇。所以说,拥有高超编程能力的人,不仅拥有缜密的思维方式,也掌握着创造艺术品的本领:)
四、参考资料
- Android中RelativeLayout各个属性
- AndroidStudio使用过程中遇到的bug
- Android官方API文档完整版中文版chm
- Android中的颜色设置
- Android Studio代码调试大全
- 最全最好用的Android Studio插件整理
Day-2
###一、学习笔记 ####TextView及其子类 - 文本框(TextView)与编辑框(EditText)的用法: - TextView用于在界面上显示文本,Android关闭了它的文本编辑功能。如果需要定义可编辑文本框,可以使用它的子类EditText。 - 文本框(TextView) - TextView指定`android:password="true"`,即指定了该文本框会用点来代替所有字符。 - `android:autoLink="email|phone"`,即对邮件、电话增加超链接。(通过正则表达式判断是否为邮件或电话) - 编辑框(EditText) - EditText组件最重要的属性是inputType,用于将EditText设置为指定类型的输入组件。比如:`android:inputType="numbewPassword"`表明只能接受数字密码。常用的inputType参考:[android EditText inputType说明](http://www.cnblogs.com/zxjyuan/p/3788286.html) - 可以通过android:hint指定文本框的提示信息。当用户还没有输入时,该文本框内默认显示这段信息,如:`android:hint="请填写登录账号"`。效果为: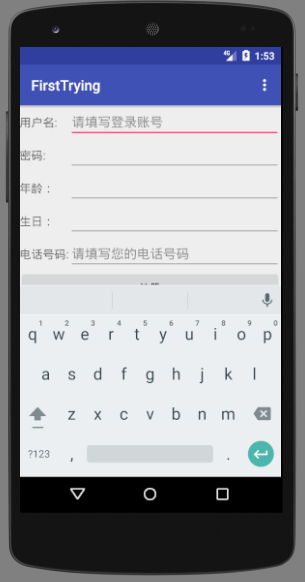
二、问题整理
『问题一』关于API版本的疑问及解决
- 同样的代码,在物理机上程序报异常退出,但在Android自带的模拟器上可以正常运行。
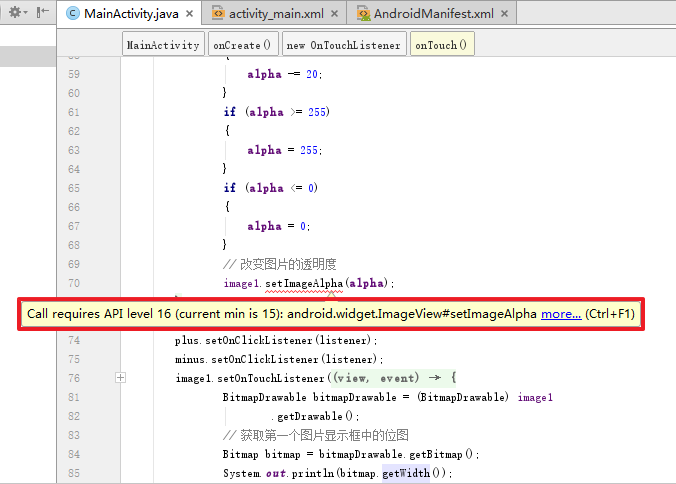
- 观察代码,发现是API版本的问题。查询了解到,模拟器API的版本是22,物理机API版本是15,而
imageView.setImageAlpha(alpha);是API 16之后才有的方法;如果需要在API 15机上运行,需要使用imageView.setAlpha(alpha);方法。
『问题二』如何实现按钮按下和松开时为不同的图片
- 可以调用以下方法:
<?xml version="1.0" encoding="UTF-8"?>
<selector xmlns:android="http://schemas.android.com/apk/res/android">
	<!-- 指定按钮按下时的图片 -->
	<item android:state_pressed="true"
	android:drawable="@drawable/red"
	/>
	<!-- 指定按钮松开时的图片 -->
	<item android:state_pressed="false"
	android:drawable="@drawable/purple"
	/>
</selector>
『问题三』关于如何实现文本域中灰色的提示文本的一点思考
-
前面提到,Android中可以使用
android:hint显示文本区域内的灰色提示文本,这让我想起计算机实习时候娄老师也提出了类似的建议。如果用Java如何实现呢?查询API发现没有Android这样直接的方法可供调用,所以需要自己编写相关方法实现这种功能。 -
我的思考是,可以设置循环检测用户输入框的内容是否为空(前提是焦点不在输入框内,也就是鼠标的光标不在输入框上),如果为空则显示提示文本,否则置空。比如这样:
while (true) {
        if (userText.hasFocus() == false) {
            if (userText.getText().equals("")) {
                userText.setText("请填写登录账号");
            }
        }
}
当按下鼠标左键时:(一个mouseClicked点击过程分为press按下和release释放)
public void mousePressed(MouseEvent e) {
        if (userText.getText().equals("请填写登录账号")) {
            userText.setText("");
        }
    }
- 其实...何必这么麻烦,直接使用HTML 5 <input> placeholder 属性就能搞定
<input type="text" name="userName" id="userName" placeholder="请填写登录账号" class="input-text input-long"/>
效果为:
三、每日体会
暑假实在是一个容易堕落的时期啊,空调房、冰淇淋,以及各种电影综艺电视剧,都充满了诱惑...有时候下午起床安慰自己“我就看一会儿电影”,不知不觉就到了晚上´Д`(这也是把博客拖延到现在的原因┭┮﹏┭┮惭愧惭愧)老师常说“假期放松不放纵”,这个度还真不好把握,常常放松着放松着就回不到正轨上了(逃...
见了一个朋友A,目前在中原某211名校王牌专业读书。为了争取国奖和保研资格,他一学期都没有松懈过,期末考试某一挂科率高达40%的科目他竟然拿到了90+的高分。到了暑假也不会放松自己,去了某国企实习。另外一个在天津读书的同学B,暑假干脆没回家,去了北京学德语;还有一个朋友C,已经回学校做大创项目去了...
看到大家暑假都这么忙碌,我就放心了(偷笑)。每次放松到濒临放纵时,就想想,那么多人都还在努力呢,要撑住呐...
四、参考资料
Day-3
一、学习笔记
AdapterView及其子类
AdapterView组件是一组重要的组件,AdapterView本身是一个抽象基类,它派生的子类在用法上十分相似,只是显示界面有些不同。
从AdapterView派生出的三个子类:AdsListView、AdsSpinner、AdapterViewAnimator,这3个子类依然是抽象的,实际运用时需要它们的子类。
- ListView(列表视图)和ListActivity:ListView应用十分广泛,它以垂直列表的形式显示所有的列表项
- Adapter接口及其实现类:接口:Adapter接口派生出了ListAdapter和SpinnerAdapter两个子接口;实现类:通过ArrayAdapter实现的Adapter很简单,其功能也比较有限,而且它的每个列表都只能是TextView,如果要实现复杂的功能,则可以使用SimpleAdapter。
- GridView(网格视图):GridView用于在界面上按行列分布的方式来显示多个组件,GridView和ListView具有相同的父类:AbsListView,因此GridView和ListView很相似,但是ListView只显示一列,GridView可以显示多列。
- ExpandableListView(可展开的列表组件):ExpandableListView是ListView的子类,它在普通ListView的基础上进行扩展,把应用中的列表项分为几组,每组又可以包含多个列表项,ExpandableListView与普通的ListView用法十分相似,只是ExpandableListView所显示的列表应该由ExpandableListAdapter提供。
- Spinner:Spinner组件就是一个列表选择框,这里相当于弹出一个菜单供用户选择。Spinner继承AbsSpinner,AbsSpinner继承AdapterView,因此Spinner表现出ApdaterView的特征。
ProgressBar及其子类
ProgressBar组件是非常重要的组件,ProgressBar本身代表着进度条组件。
- ProgressBar(进度条)
- SeekBar(拖动条):拖动条与进度条十分相似,进度条采用颜色填充来表明进度完成的程度,拖动条则通过滑块的位置来标记数值。
- RatingBar(星级评分条):RatingBar与SeekBar功能十分相似,它们最大的区别在于:RatingBar通过星星来表示进度。
二、问题整理
『问题一』Android中xml的控件属性app:与Android:有什么区别
在设置menu_main时出现以下错误提示:
参考提示,将android:showAsAction="never"改为app:showAsAction="never"即可。那么,app:与Android:这两种控件属性有什么区别呢?
查询资料了解到,这两个是声明的不同的命名空间,android的是系统的,app是自定义的。
-
android:命名空间
android用于 Android 系统定义的一些属性。 -
app:命名空间app用于我们应用自定义的一些属性,这个与Android自定义属性和系统控件扩展应该有关系,目前还在学习中...
『问题二』PNG、JPEG、GIF三种图片格式的特性
这个问题是在设计logo以及APP中的各种图标时想到的,希望了解各种格式的特性,以便达到品质和性能的最优化。查询了有关资料,大致总结如下:
-
GIF图形交换格式是一种位图图形文件格式,以8位色(即256种颜色)重现真彩色的图像。它实际上是一种压缩文档,采用LZW压缩算法进行编码,有效地减少了图像文件在网络上传输的时间。它是目前广泛应用于网络传输的图像格式之一。
-
便携式网络图片(Portable Network Graphics),简称PNG,是一种无损数据压缩位图图形文件格式。PNG格式是无损数据压缩的,允许使用类似于GIF格式的调色板技术,支持真彩色图像,并具备Alpha(半透明)等特性。现在有很多人使用PNG格式于互联网及其他方面上。
-
JPEG是一种针对相片影像而广泛使用的一种失真压缩标准方法。JPEG的压缩方式通常是破坏性资料压缩(lossy compression),意即在压缩过程中图像的品质会遭受到可见的破坏。
一般来说,GIF使用的压缩算法使其在一定程度上保证图像质量的同时将体积变得很小,同时可插入多帧,从而实现动画效果。当图像上颜色较少,并且主要以纯色或者平滑的渐变色进行填充,或者图像具备较大亮度差异以及强烈对比时,可以使用PNG格式。而一般层次丰富颜色较多的图像采用JPEG存储。
- 目前大致了解了这些,不过还是应该在实践中区分三种格式,在开发过程中如有需要,还会进一步学习。
『问题三』如何实现自动完成文本框
自动完成文本框(AutoCompleteTextView)用途非常广泛,它是一个文本编辑框,但多了一个功能:当用户输入一定字符后,自动完成文本框会显示一个下拉菜单,供用户从中选择,当用户选择某个菜单项之后,AutoCompleteTextView按用户选择自动填写该文本框。
- AutoCompleteTextView支持的常用的XML属性和相关方法及说明:
| XML属性 | ** 相关方法 ** | 说明 |
|---|---|---|
| android:completionHint | setCompletionHint(CharSequence) | 设置出现在下拉菜单中的提示标题 |
| android:completionThreshold | setThreshold(int) | 设置用户至少输入几个字符才会显示提示 |
| android:dropDownHeight | setDropDownHeight(int) | 设置下拉菜单的高度 |
| android:dropDownHorizontalOffset | 设置下拉菜单与文本框之间的水平偏移,下拉菜单默认与文本框左对齐 | |
| android:dropDownVerticalOffset | 设置下拉菜单与文本框之间的垂直偏移,下拉菜单默认紧跟文本框 | |
| android:dropDownWidth | setdropDownWidth(int) | 设置下拉菜单的宽度 |
| android:popupBackground | setDropDownBackgroundResource(int) | 设置下拉菜单的背景 |
- 在Java代码中创建一个ArrayAdapter,封装数组,绑定适配器,提示词使用适配器加入,对于适配器创建,主要有通过资源文件创建和Java字符串创建两种。
- 在实际中,往往将AutoCompleteTextView与数据库相结合,根据某字段进行查询。
三、每日体会
计算机实习时期由于时间紧迫,并没有系统学习GUI编程,只是在需要某个组件的时候才查询学习相关用法,所以相关知识的脉络并不是很清晰。吸取教训,借暑假这个机会用了几天时间整体学习Android的界面编程。学习过程中发现界面编程的内容非常丰富,各种组件以及类之间的继承关系都需要细细梳理。
事件处理也是Android开发的重要部分之一,所以接下来我会在继续补充界面编程知识的同时,开始学习Android的事件处理机制。


