

IIS自动发布脚本
目的:使用powershell脚本的方式实现自动化在iis部署网站的功能。
1.使用管理员身份运行powershell

2.脚本如下
auto_iis_deploy.ps1

#iis自动部署脚本
param(
    [string]$siteName = "default",
    [string]$port = "80"
)

Write-Host "siteName:$siteName,port:$port"
$physicalPath="d:\www\$siteName"

Import-Module WebAdministration
Write-Host "Setting up IIS"

if(!(Test-Path $physicalPath))
{
    mkdir $physicalPath
}

#创建站点
Write-Host "create or update site.."
if((Test-Path IIS:\Sites\$siteName))
{
    Remove-Website $siteName
}
New-Website -Name $siteName -PhysicalPath $physicalPath -ApplicationPool $siteName -Port $port -ErrorAction Stop

#创建应用程序池
Write-Host "create appPool or next step.."
if(!(Test-Path IIS:\AppPools\$siteName))
{
    New-Item -path IIS:\AppPools\$siteName
}
Set-ItemProperty IIS:\AppPools\$siteName managedRuntimeVersion v4.0

#停止应用程序池
Write-Host "stop appPool"
$appPool=Get-WebAppPoolState -Name $siteName
if($appPool -eq "Started")
{
    Stop-WebAppPool -Name $siteName
}

#解压文件
#Write-Host "unzip the source file"
#$sourceFile=$siteName+".zip"
#[System.IO.Compression.ZipFile]::ExtractToDirectory($sourceFile,$siteName)

#启动网站
Write-Host "start website"
Start-Website -Name $siteName

#启动应用程序池
Write-Host "start webAppPool"
Start-WebAppPool -Name $siteName

Write-Host "$siteName successfully started"
这里设置的是一个空站点,可以自己设置文件路径;这里的路径是 $physicalPath 变量的值。
3.运行脚本
.\auto_iis_deploy.ps1 -siteName myWeb -port 8083
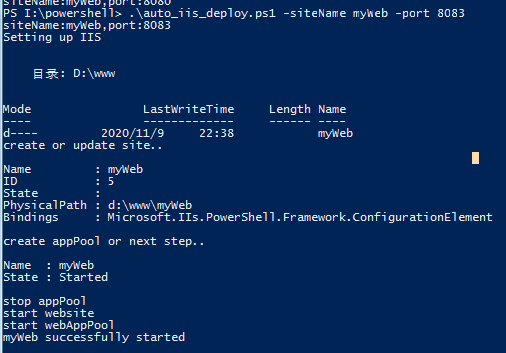
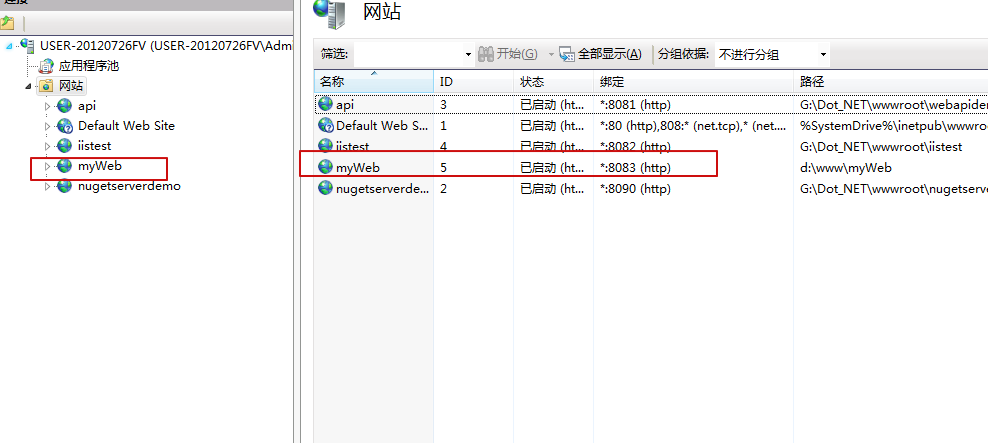
4.效果图
参考网址:
https://cloud.tencent.com/developer/article/1462776
https://cloud.tencent.com/developer/article/1047718
https://docs.microsoft.com/en-us/powershell/module/webadministration/?view=win10-ps


【推荐】国内首个AI IDE,深度理解中文开发场景,立即下载体验Trae
【推荐】编程新体验,更懂你的AI,立即体验豆包MarsCode编程助手
【推荐】抖音旗下AI助手豆包,你的智能百科全书,全免费不限次数
【推荐】轻量又高性能的 SSH 工具 IShell:AI 加持,快人一步
· AI与.NET技术实操系列:基于图像分类模型对图像进行分类
· go语言实现终端里的倒计时
· 如何编写易于单元测试的代码
· 10年+ .NET Coder 心语,封装的思维:从隐藏、稳定开始理解其本质意义
· .NET Core 中如何实现缓存的预热?
· 分享一个免费、快速、无限量使用的满血 DeepSeek R1 模型,支持深度思考和联网搜索!
· 基于 Docker 搭建 FRP 内网穿透开源项目(很简单哒)
· 25岁的心里话
· ollama系列01:轻松3步本地部署deepseek,普通电脑可用
· 按钮权限的设计及实现