Android用GSon处理Json数据
2011-02-25 12:05 Vincent.C 阅读(12280) 评论(44) 编辑 收藏 举报此篇接上篇 Android访问WCF(下篇)-客户端开发 将服务器获取的JSON数据通过GSON这个类库, 进行反序列化, 并通过UI显示出来.
如何在Android平台上用GSON反序列化JSON数据, 参考了这篇文章 http://benjii.me/2010/04/deserializing-json-in-android-using-gson/
一. 建立我们包装好的Http请求类文件 WebDataGetApi.java
package com.demo;

import java.io.IOException;
import java.io.InputStreamReader;
import java.io.UnsupportedEncodingException;

import org.apache.http.HttpEntity;
import org.apache.http.HttpResponse;
import org.apache.http.client.methods.HttpGet;
import org.apache.http.impl.client.DefaultHttpClient;
import org.apache.http.params.BasicHttpParams;
import org.apache.http.protocol.HTTP;

import android.util.Log;

public class WebDataGetApi {

    private static final String TAG = "WebDataGetAPI";
    private static final String USER_AGENT = "Mozilla/4.5";

    protected String getRequest(String url) throws Exception {
        return getRequest(url, new DefaultHttpClient(new BasicHttpParams()));
    }

    protected String getRequest(String url, DefaultHttpClient client)
            throws Exception {
        String result = null;
        int statusCode = 0;
        HttpGet getMethod = new HttpGet(url);
        Log.d(TAG, "do the getRequest,url=" + url + "");
        try {
            getMethod.setHeader("User-Agent", USER_AGENT);
            // HttpParams params = new HttpParams();

            // 添加用户密码验证信息
            // client.getCredentialsProvider().setCredentials(
            // new AuthScope(null, -1),
            // new UsernamePasswordCredentials(mUsername, mPassword));

            HttpResponse httpResponse = client.execute(getMethod);
            // statusCode == 200 正常
            statusCode = httpResponse.getStatusLine().getStatusCode();
            Log.d(TAG, "statuscode = " + statusCode);
            // 处理返回的httpResponse信息
            result = retrieveInputStream(httpResponse.getEntity());
        } catch (Exception e) {
            Log.e(TAG, e.getMessage());
            throw new Exception(e);
        } finally {
            getMethod.abort();
        }
        return result;
    }

    /**
     * 处理httpResponse信息,返回String
     *
     * @param httpEntity
     * @return String
     */
    protected String retrieveInputStream(HttpEntity httpEntity) {
        int length = (int) httpEntity.getContentLength();
        if (length < 0)
            length = 10000;
        StringBuffer stringBuffer = new StringBuffer(length);
        try {
            InputStreamReader inputStreamReader = new InputStreamReader(
                    httpEntity.getContent(), HTTP.UTF_8);
            char buffer[] = new char[length];
            int count;
            while ((count = inputStreamReader.read(buffer, 0, length - 1)) > 0) {
                stringBuffer.append(buffer, 0, count);
            }
        } catch (UnsupportedEncodingException e) {
            Log.e(TAG, e.getMessage());
        } catch (IllegalStateException e) {
            Log.e(TAG, e.getMessage());
        } catch (IOException e) {
            Log.e(TAG, e.getMessage());
        }
        return stringBuffer.toString();
    }
}
二. 建立JsonDataGetApi.java
package com.demo;

import org.json.JSONArray;
import org.json.JSONException;
import org.json.JSONObject;

public class JsonDataGetApi extends WebDataGetApi {
    private static final String BASE_URL = "http://10.0.2.2:82/AccountService/";
    private static final String EXTENSION = "Json/";;

    public JSONObject getObject(String sbj) throws JSONException, Exception {
        return new JSONObject(getRequest(BASE_URL + EXTENSION + sbj));
    }

    public JSONArray getArray(String sbj) throws JSONException, Exception {
        return new JSONArray(getRequest(BASE_URL + EXTENSION + sbj));
    }
}
三. 建立Android端Account模型Account.java
package com.demo;

import java.util.Date;

public class Account {

    public String Name;

    public int Age;

    public String Address;

    public Date Birthday;
}
四. 在我们的主Activity中调用刚才的方法, 在这一步中我们需要引入Google的gson 库gson-1.6.jar至我们的工程(下载地址)
package com.demo;

import java.util.Date;

import org.json.JSONArray;
import org.json.JSONObject;

import com.google.gson.Gson;
import com.google.gson.GsonBuilder;

import android.app.Activity;
import android.os.Bundle;
import android.util.Log;
import android.widget.TextView;
import android.widget.Toast;

public class WebData extends Activity {
    /** Called when the activity is first created. */
    @Override
    public void onCreate(Bundle savedInstanceState) {
        super.onCreate(savedInstanceState);
        setContentView(R.layout.main);
        getJsonData();
    }

    public void getJsonData() {
        JsonDataGetApi api = new JsonDataGetApi();
        JSONArray jArr;
        JSONObject jobj;
        try {
            //调用GetAccountData方法
            jArr = api.getArray("GetAccountData");
            //从返回的Account Array中取出第一个数据
            jobj = jArr.getJSONObject(0);

          GsonBuilder gsonb = new GsonBuilder();
            //Json中的日期表达方式没有办法直接转换成我们的Date类型, 因此需要单独注册一个Date的反序列化类.
            //DateDeserializer ds = new DateDeserializer();
            //给GsonBuilder方法单独指定Date类型的反序列化方法
              //gsonb.registerTypeAdapter(Date.class, ds);

            Gson gson = gsonb.create();

            Account account = gson.fromJson(jobj.toString(), Account.class);

            Log.d("LOG_CAT", jobj.toString());
            ((TextView) findViewById(R.id.Name)).setText(account.Name);
            ((TextView) findViewById(R.id.Age)).setText(account.Age);
            ((TextView) findViewById(R.id.Birthday)).setText(account.Birthday
                    .toGMTString());
            ((TextView) findViewById(R.id.Address)).setText(account.Address);

        } catch (Exception e) {
            Toast.makeText(getApplicationContext(), e.getMessage(),
                    Toast.LENGTH_LONG).show();
            e.printStackTrace();
            TextView movie_Address = (TextView) findViewById(R.id.Address);
            movie_Address.setText(e.getMessage());
        }
    }
}
五.我们开始构建UI
打开layout下的main.xml
<?xml version="1.0" encoding="utf-8"?>
<LinearLayout xmlns:android="http://schemas.android.com/apk/res/android"
    android:orientation="vertical" android:layout_width="fill_parent"
    android:layout_height="fill_parent">
    <TextView android:id="@+id/Name" android:layout_width="fill_parent"
        android:layout_height="wrap_content" />
    <TextView android:id="@+id/Age" android:layout_width="fill_parent"
        android:layout_height="wrap_content" />
    <TextView android:id="@+id/Birthday" android:layout_width="fill_parent"
        android:layout_height="wrap_content" />
    <TextView android:id="@+id/Address" android:layout_width="fill_parent"
        android:layout_height="wrap_content" />
</LinearLayout>
在配置好RunConfiguration之后,我们开始运行程序, 查看Log发现有以下错误,
意思是说访问被禁止,也就是未授权访问, 其意思并不是我们的服务未授权, 因为Andriod具有很好的很好很好的安全机制, 我们要访问网络必须要经过授权才可以;
我们打开res目录下AndroidManifest.xml, 注意字体加粗放大的那句, 就是给我们的程序加入Internet的访问授权.
<?xml version="1.0" encoding="utf-8"?>
<manifest xmlns:android="http://schemas.android.com/apk/res/android"
      package="com.demo"
      android:versionCode="1"
      android:versionName="1.0">

      <uses-permission android:name="android.permission.INTERNET"></uses-permission>

    <application android:icon="@drawable/icon" android:label="@string/app_name">
        <activity android:name=".WebData"
                  android:label="@string/app_name">
            <intent-filter>
                <action android:name="android.intent.action.MAIN" />
                <category android:name="android.intent.category.LAUNCHER" />
            </intent-filter>
        </activity>

    </application>
</manifest>
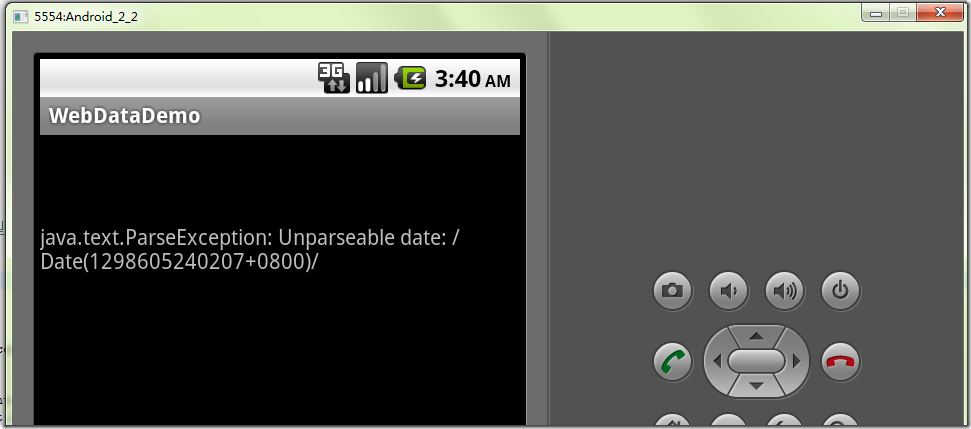
再次运行程序, 会发现显示如下:
从上图中的statuscode = 200来看,说明我们的请求已经成功, 问题出现在Json Parse(Json数据转换/反序列化/格式化)的过程中, 我们现在把从服务器传过来的数据拿出来看看, 在浏览器输入我们的服务地址: http://localhost:82/AccountService/Json/GetAccountData
[
 {
     "Address": "YouYi East Road",
     "Age": 56,
     "Birthday": "/Date(1298605481453+0800)/",
     "Name": "Bill Gates"
 },
 {
     "Address": "YouYi West Road",
     "Age": 57,
     "Birthday": "/Date(1298605481453+0800)/",
     "Name": "Steve Paul Jobs"
 },
 {
     "Address": "YouYi North Road",
     "Age": 65,
     "Birthday": "/Date(1298605481453+0800)/",
     "Name": "John D. Rockefeller"
 }
]
我们发现其中的Birthday的结果并非我们想象中yyyy-mm-dd HH:mm:ss类型, 究其原因可以查看MSDN文章《JavaScript 和 .NET 中的 JavaScript Object Notation (JSON) 简介》
现在我们给我们的GsonBuilder指定Date的序列化方法, 先增加一个Date反序列化的类DateDeserializer.java
package com.demo;

import java.lang.reflect.Type;
import java.util.Date;
import java.util.regex.Matcher;
import java.util.regex.Pattern;

import com.google.gson.JsonDeserializationContext;
import com.google.gson.JsonDeserializer;
import com.google.gson.JsonElement;
import com.google.gson.JsonParseException;

public class DateDeserializer implements JsonDeserializer<Date> {
    public Date deserialize(JsonElement json, Type typeOfT,
            JsonDeserializationContext context) throws JsonParseException {
        String JSONDateToMilliseconds = "\\/(Date\\((.*?)(\\+.*)?\\))\\/";
        Pattern pattern = Pattern.compile(JSONDateToMilliseconds);
        Matcher matcher = pattern.matcher(json.getAsJsonPrimitive()
                .getAsString());
        String result = matcher.replaceAll("$2");
        return new Date(new Long(result));
    }
}
其次修改Activity类中的GetDate方法如下, 注意其中加粗的部分.
    public void getJsonData() {
        JsonDataGetApi api = new JsonDataGetApi();
        JSONArray jArr;
        JSONObject jobj;
        try {
            //调用GetAccountData方法
            jArr = api.getArray("GetAccountData");
            //从返回的Account Array中取出第一个数据
            jobj = jArr.getJSONObject(0);

            GsonBuilder gsonb = new GsonBuilder();
            //Json中的日期表达方式没有办法直接转换成我们的Date类型, 因此需要单独注册一个Date的反序列化类.
            DateDeserializer ds = new DateDeserializer();
            //给GsonBuilder方法单独指定Date类型的反序列化方法
              gsonb.registerTypeAdapter(Date.class, ds);

            Gson gson = gsonb.create();

            Account account = gson.fromJson(jobj.toString(), Account.class);

            Log.d("LOG_CAT", jobj.toString());
            ((TextView) findViewById(R.id.Name)).setText(account.Name);
            ((TextView) findViewById(R.id.Age)).setText(String.valueOf(account.Age));
            ((TextView) findViewById(R.id.Birthday)).setText(account.Birthday
                    .toGMTString());
            ((TextView) findViewById(R.id.Address)).setText(account.Address);

        } catch (Exception e) {
            Toast.makeText(getApplicationContext(), e.getMessage(),
                    Toast.LENGTH_LONG).show();
            e.printStackTrace();
        }
    }
}
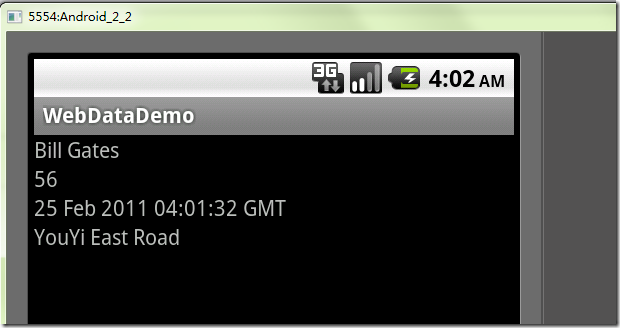
我们现在再运行程序 :
执行成功.


