
git 学习笔记
参考:
本地版本库
自报家门
git config --global user.name "name"
git config --global user.email "email"
git config --global init.defaultBranch main
git config --get user.name  # 获取 user.name
创建版本库
-
创建版本库
git init # 将当前目录设置为版本库 -
把文件添加到版本库
# 提交到暂存区
git add <file>
git add .   # 提交当前目录下所有文件,包括隐藏文件
git add *   # 提交当前目录下所有文件,不包括隐藏文件,并且会提示忽略的文件
git add -A  # 提交版本库所有文件

# 暂存区提交到版本库
git commit -m "message"
git commit -a                    # 自动将工作区所有修改的文件添加到暂存区并提交
git commit --amend -m "message"  # 重新提交
我觉得
git add *更好不要使用 Windows 自带的记事本编辑文本文件
时光机穿梭
git status                # 查看当前暂存区状态

git diff <file>           # 查看文件的改动情况
git diff HEAD -- <file>   # 查看工作区版本和版本库最新版本的区别

git log                   # 显示从最近到最久的提交日志
git log --graph           # 显示提交分支图
git log --pretty=oneline  # 单行模式:只显示 commit-id 和 commit-message
git log --abbrev-commit   # 只显示前 7 位 commit-id
git log --graph --oneline --abbrev-commit  # 混合上面三种
git diff后面两个参数的顺序对输出是有影响的。习惯上应该这样使用:git diff <old> <new>
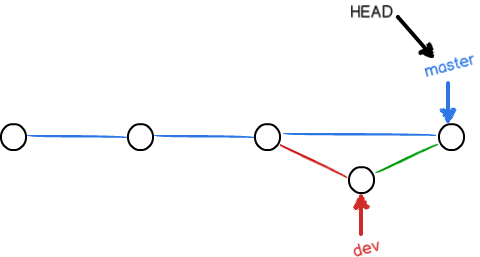
操作符 ^ 与 ~
HEAD^:HEAD 的上一个提交
HEAD^^ 或 HEAD~2:HEAD 的上上个提交
当某提交有两个父提交时,HEAD^ 指向第一个父提交,而 HEAD^2 指向第二个父提交。
这些操作符支持链式操作:HEAD~^2~2
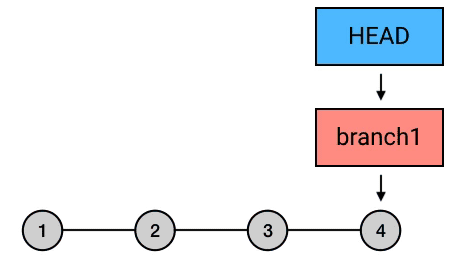
reset
将当前分支指针置到指定提交,提交之后的日志记录被删除(但是 commit-id 依然存在)。
git reset --hard HEAD^
reset 的三种模式
-
--hard:丢弃指定提交之后的修改。 -
--soft:保留修改到暂存区,可以再次提交。(回到 commit 前的状态) -
--mixed(默认):保留修改到工作区,可以再次提交。(回到 add 前的状态)
取消 reset
- 使用
git reflog命令显示参考日志(命令日志) - 找到要恢复的版本的 commit-id,再次使用
git reset --hard <commit_id>命令
$ git reflog
e849d38 (HEAD -> master) HEAD@{0}: reset: moving to HEAD^
188d795 HEAD@{1}: commit: appended a new line
e849d38 (HEAD -> master) HEAD@{2}: commit: modified self-introduction
1a0ec02 HEAD@{3}: commit (initial): added a self-introduction

$ git reset --hard 188d  # commit-id 不用输全,只要通过前几位能确定版本就行
HEAD is now at 188d795 appended a new line
revert
可以理解为对某次提交进行反向修改,如果要回退已经上传到版本库的提交,则只能用这个命令。
git revert --no-commit HEAD # 撤销 HEAD 提交的修改
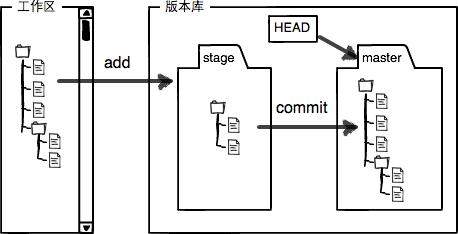
工作区与暂存区
工作区就是我们在电脑里能看到的目录
工作区有一个隐藏目录 .git,是 Git 的版本库。
-
git add命令的作用就是将文件修改添加到暂存区 -
git commit命令的作用就是把暂存区的所有修改提交到当前分支
一旦提交后,并且对工作区没有任何修改,那么工作区就是 "clean" 的。
Git 管理的是修改,而不是文件。
撤销修改
git reset HEAD <file>        # 将 file 在暂存区的修改撤回到工作区
git restore --staged <file>  # 在 Git 2.23 版本引入了 git restore

git checkout -- <file>       # 将 file 恢复到暂存区或版本库的最新版本,相当于丢弃工作区的修改
分支管理
git branch                # 查看分支

git branch <branch>       # 创建分支

git checkout <branch>     # 切换分支
git switch <branch>       # 新版本命令

git checkout -b <branch>  # 创建并切换分支
git switch -c <branch>    # 新版本命令
git switch -t origin/dev  # 切换到新引入的远程 dev 分支

git merge <branch>        # 将 branch 合并到当前分支

git branch -d <branch>    # 删除分支
git branch -D <branch>    # 强制删除

git branch -f <branch> <ref> # 将 branch 分支强制指向 ref
使用 git merge 时,有时会遇到 "both added" 情况,即两个分支都提交了一个同名的新文件。这时需要我们选择留下其中一个文件:
git checkout --ours <file>    # 保留当前分支的文件
git checkout --theirs <file>  # 保留合并分支的文件
分支管理策略
合并分支时,Git 会优先采用 Fast forward 模式,即把当前分支直接指向合并的分支:
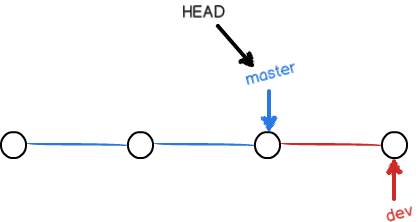
在这种模式下,删除分支后,在分支历史上看不到分支信息。
我们可以通过命令 git merge no-ff -m "message" <branch> 命令来禁用 Fast forward 模式进行合并:
此时 Git 会在 merge 时生成一个新的 commit。这样,从分支历史上就可以看出分支信息。
因为禁用 Fast forward 模式合并时要生成一个新的 commit,因此在
git merge no-ff命令中还要加上-m选项写入描述信息。
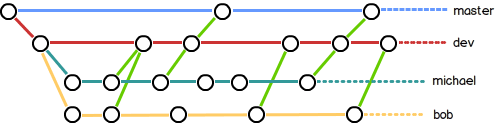
多人开发分支策略
在实际开发中,master 分支用来发布新版本。dev 分支是所有人干活的地方。每个人在 dev 分支上再创建自己的分支,完成自己的工作。
stash
git stash [push] ["message"]   # 将当前工作现场暂存到当前分支
git stash list                 # 查看暂存的工作现场

git stash pop [stash@{<n>}]    # 恢复工作现场并删除 stash@{n}

# pop 等价于下面两条命令
git stash apply [stash@{<n>}]  # 恢复 stash@{n}
git stash drop [stash@{<n>}]   # 删除 stash@{n}

git stash clear                # 清除所有暂存的修改
当我们在一个分支上做了修改,改完之后发现自己用错了分支,这时可以使用 stash 命令将改动暂存起来,等切换到正确的分支后再使用 stash pop 命令将改动应用到该分支上。
cherry-pick
git cherry-pick <ref> # 摘取一个或几个提交到 HEAD
Detached HEAD
一般 HEAD 都是指向某个分支,并随分支一起移动。但当我们 checkout 到某个具体的 commit 时,这种绑定状态被解除,成为分离头指针状态 (Detached HEAD)。在这种情况下,我们可以对文件进行修改并提交,但在我们 checkout 到其他地方之前,必须创建一个新的分支来保留做的修改。
tag
git tag                                     # 查看所有标签
git tag "1.0.0" [<ref>]                     # 为 ref 创建一个 "1.0.0" 标签
git tag -a "tag_name" -m "message" [<ref>]  # 为 ref 创建带说明的标签
git show "1.0.0"                            # 查看标签 "1.0.0" 的信息
git tag -d <tag_name>                       # 删除本地标签
默认情况下,push 并不会把标签推送到远程库,必须通过显式命令才会推送标签:
git push [<remote>] <tag_name>           # 推送一个标签
git push [<remote>] --tags               # 推送所有标签

git push <remote> :refs/tags/<tag_name>  # 删除远程标签
标签相当于一个锚点,可以用它来为一些里程碑式的修改进行标记。
标签中不允许有空格。
describe
$ git describe <ref>        # ref 可以是任何能被 git 识别成提交记录的引用,默认值为 HEAD
<tag>-<numCommits>-g<hash>  # tag 是 ref 之前最近的标签,numCommits 是 tag 与 ref 相差的提交数,hash 是 ref 的哈希值的前几位
如果 ref 本身就有一个标签,则只输出该标签名。
rebase
rebase 是从当前分支与目标分支分离的地方开始,把属于当前分支的那一段挪到目标分支下面。
git rebase <branch>  # 把当前分支摘下来,放到指定分支上
git rebase -i <ref>  # 将当前分支以 ref 为根,重新整理中间的提交
pull request
当远程分支被锁定时,不允许你直接将本地分支内容 push 到远程分支。你应该新建一个分支,push 这个分支并申请 pull request。
.gitignore
黑名单模式
file   # 忽略当前目录下的 file 文件
dir/   # 忽略当前目录下的 dir 目录
/file  # 忽略版本库根目录下的 file 文件
* 指单个目录或一个字符串,** 指多个目录:
*.c        # 忽略所有 .c 文件
**/file    # 忽略 /file, a/file, a/b/file...
a/**/file  # 忽略 a/file, a/x/file, a/x/y/file..
白名单模式
*            # 忽略所有文件
!.gitignore  # 跟踪 .gitignore 文件自身
!**/*.tex    # 跟踪所有 .tex 文件
!chapters/   # 白名单模式下默认所有目录都被忽略,此时必须显式指定要跟踪的目录
git check-ignore -v <file> # 检查 file 是否在 .gitignore 中
貌似
.DS_Store就能忽略所有的.DS_Store文件(相当于**/.DS_Store)
取消跟踪
.gitignore 只能忽略那些原来没有被跟踪(track)的文件。如果文件已经被跟踪,则需要先清空本地缓存,然后再提交。
git rm -r --cached .
远程版本库
创建 SSH Key
ssh-keygen -t rsa -C "email@example.com"  # 接下来一路回车,以默认值创建 SSH Key
cat ~/.ssh/id_rsa.pub
公钥相当于锁,私钥相当于钥匙,如果版本库上有你的锁,那么你就可以用钥匙打开版本库。
登录 GitHub,点击头像,打开 Settings -> SSH and GPG keys,点击 New SSH key,填写任意 Title,在 Key 中粘贴 id_rsa.pub 文件的内容,完成添加。
SSH 用于实现安全远程登陆
Git 也支持 HTTPS 协议,但相比 SSH 速度慢,且每次推送都必须输入口令。
添加远程库
在 GitHub 上新建一个库。
复制 …or push an existing repository from the command line 下的命令:
git remote add origin <url>  # 关联 url 指向的远程库并将其命名为 origin
git branch -M main           # 修改当前分支的名字为 main
git push -u origin main      # 将 main 分支推送到远程库 origin 并将 main 与 origin/main 关联
新创建的分支并不会自动关联到远程库,因此在 push 新分支时需要使用
git push <remote> [<branch>]命令指定要将 branch 推送到哪个远程库。
-u | --set-upstream选项可以在推送完成后设置 branch 与远程库的 remote/branch 相关联。这样以后在 push 和 pull 时可以省略 remote 参数。
push
git push <remote> <branch>        # 将 branch 的内容推送到远程库的 branch
git push <remote> <ref>:<branch>  # 将 ref 的内容推送到远程库的 branch。ref 可以是分支,也可以是提交。
远程分支 remote/branch 也是存储在本地的,它记录了上次和远程库通信时远程库的状态。
如果不提供 remote 参数的话,Git 会将 branch 的内容推送到其 track 的分支。
如果使用
git push,但当前分支没有 track 任何分支,或当前处于 Detached Head 状态,push 会失败。如果不提供 ref 的话,Git 会删除远程库的 branch。
fetch
fetch 可以获取远程库上的内容而不对本地内容产生任何影响。通过 fetch 与 checkout 结合可以让你查看其他人在远程库上完成的工作而不影响你本地的工作。
git fetch  # 将远程库所有内容下载到本地的 remote/branch
git fetch <remote> [<branch>]  # 只下载 remote 库的 branch 分支
pull
将远程库中指定分支的内容抓取下来,并与当前分支合并。
git pull <remote> <branch> 等价于:
git fetch <remote> <branch>
git merge <remote>/<branch>  # 注意是与当前分支合并,而不是 branch 关联的分支
# 设置默认合并方式
git config pull.rebase false  # merge (the default strategy)
git config pull.rebase true   # rebase
git config pull.ff only       # fast-forward only
可以添加 --global 参数来设置全局默认合并方式。
也可以添加 --rebase, --no-rebase, 或 --ff-only 参数在一次 pull 时指定合并方式。
关联分支(track)
# 直接创建并进入一个跟踪远程分支的本地分支
git checkout -b <branch> <remote>/<branch>
git switch -c <branch> <remote>/<branch> # 新版本命令

git branch -u <remote>/<branch> [<branch>]  # 设置 branch 同步 remote/branch
💡 Tip: 只有在远程分支 remote/branch 已经存在的情况下才能设置 branch 同步 remote/branch。
查看所有远程分支:
git branch -r
关联多个远程库
-
同步推送:
git remote set-url --add <remote> <url> # 为现有的远程库添加额外的 URL -
或者分别推送
再添加一个远程库,以后在 push,pull 时都需指定 remote:
git remote add <remote> <url>
删除远程库
可以先用 git remote -v 命令查看远程库的详细信息。
详细信息中 fetch 表示可以抓取的地址,push 表示可以推送的地址。
然后运行 git remote rm <remote> 命令删除远程库。
此处的删除只是解除本地库和远程库的绑定关系
克隆远程库
在 GitHub 库的 <> Code 区的绿色按钮 Code 中拷贝 SSH Key,然后运行命令:
git clone <url>
Git 将把远程库拷贝到当前目录。注意,当前目录下不能有 .git 文件。
其他
比较两个分支的差异:
git diff <branch1> <branch2> --stat

 浙公网安备 33010602011771号