SSH 免密登录 Windows
安装 OpenSSH Server
-
安装 OpenSSH Server 打开终端(管理员),运行以下命令:
# 列出可安装的 OpenSSH Server 版本 Get-WindowsCapability -Online | Where-Object Name -like 'OpenSSH*' # 安装 OpenSSH Server Add-WindowsCapability -Online -Name OpenSSH.Server~~~~0.0.1.0 -
启动 OpenSSH Server:
Start-Service sshd                       # 启动 sshd 服务
Set-Service -StartupType Automatic sshd  # 设置 sshd 服务自动启动
参考:适用于 Windows 的 OpenSSH 入门 | Microsoft Learn
登录
-
在 Windows 上查询用户名和主机名:
$env:UserName # 查询用户名 $env:ComputerName # 查询主机名 -
使用 SSH 远程登录 Windows:
ssh username@computername.local用户密码是 Microsoft 帐户的密码。
上传公钥
管理员
Windows 管理员用户组(Administrators)的 OpenSSH 公钥验证文件为 $env:ProgramData\ssh\administors_authorized_keys。因此如果你登录的用户属于管理员组,需要将公钥添加到这个文件。
-
本机是 Linux / macOS:
# 上传公钥文件
scp ~/.ssh/id_rsa.pub USER@HOST:/ProgramData/ssh/administrators_authorized_keys
# 设置文件权限
ssh USER@HOST 'icacls "%ProgramData%\ssh\administrators_authorized_keys" /inheritance:r /grant "Administrators:F" /grant "SYSTEM:F"'
ssh USER@HOST 'icacls "$env:ProgramData\ssh\administrators_authorized_keys" /inheritance:r /grant "Administrators:F" /grant "SYSTEM:F"'
将
USER和HOST分别改为你自己的用户名和主机名 -
本机是 Windows:
# 存储公钥内容
$authorizedKey = Get-Content -Path $env:USERPROFILE\.ssh\id_rsa.pub
# 上传公钥内容并设置权限
ssh USER@HOST "powershell Add-Content -Force -Path $env:ProgramData\ssh\administrators_authorized_keys -Value '''$authorizedKey'''; icacls.exe ""$env:ProgramData\ssh\administrators_authorized_keys"" /inheritance:r /grant ""Administrators:F"" /grant ""SYSTEM:F"""
这里没有使用
ssh-copy-id命令,因为ssh-copy-id内部会执行一些 *nix shell 命令,因此只能用于 *nix 机器。参考:
标准用户
-
本机是 Linux / macOS:
# 上传公钥文件 scp ~/.ssh/id_rsa.pub USER@HOST:.ssh/authorized_keys # 设置权限 ssh USER@HOST 'icacls "$env:USERPROFILE\.ssh\authorized_keys" /inheritance:r /grant Everyone:F' -
本机是 Windows:
# 存储公钥内容
$authorizedKey = Get-Content -Path $env:USERPROFILE\.ssh\id_rsa.pub
# 创建公钥目录及公钥文件
ssh USER@HOST "powershell New-Item -Force -ItemType Directory -Path $env:USERPROFILE\.ssh; Add-Content -Force -Path $env:USERPROFILE\.ssh\authorized_keys -Value '$authorizedKey'"
更改默认 Shell(可选)
通过 SSH 连接到 Windows 时默认登录的 Shell 是 CMD,可以在管理员终端中通过下面的命令将默认 Shell 改为 PowerShell 7(需要已安装 PowerShell 7):
# 添加默认 Shell 配置
New-ItemProperty -Path "HKLM:\SOFTWARE\OpenSSH" -Name DefaultShell -Value "C:\Program Files\PowerShell\7\pwsh.exe" -PropertyType String -Force
# 删除默认 Shell 配置
Remove-ItemProperty -Path "HKLM:\SOFTWARE\OpenSSH" -Name DefaultShell
参考:
- Configuring the default shell for OpenSSH in Windows | Microsoft Learn
- 通过 SSH 进行 PowerShell 远程处理 - PowerShell | Microsoft Learn
Troubleshooting
无法登录:No auth methods could be used
有一次为了偷懒,没有上传公钥,想直接用密码登录 Windows。结果提示:
ssh: Connection to USER@HOST:22 exited: No auth methods could be used.
最后发现无法登录的原因是没有启用密码登录的选项。
解决方法:编辑 SSH 配置文件 $env:ProgramData\ssh\sshd_config,找到 PasswordAuthentication 项,将选项改为 yes:
PasswordAuthentication yes
然后重启 SSH 服务器。在终端(管理员)下运行:
Restart-Service sshd
然后再次尝试连接。
Operation timed out
在进行 SSH 连接时遇到如下错误:
ssh: connect to host 172.18.160.67 port 22: Operation timed out
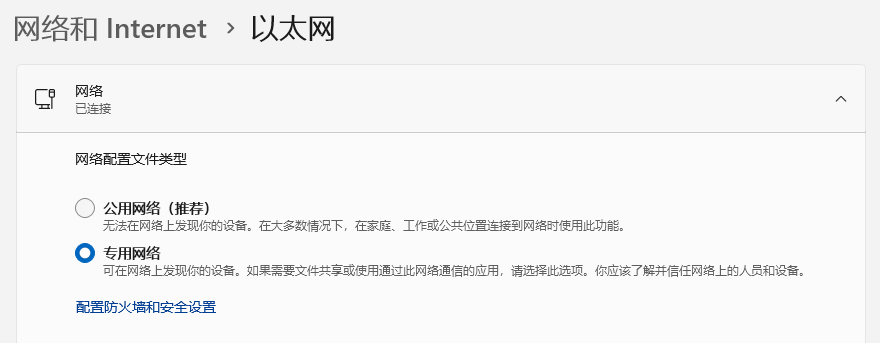
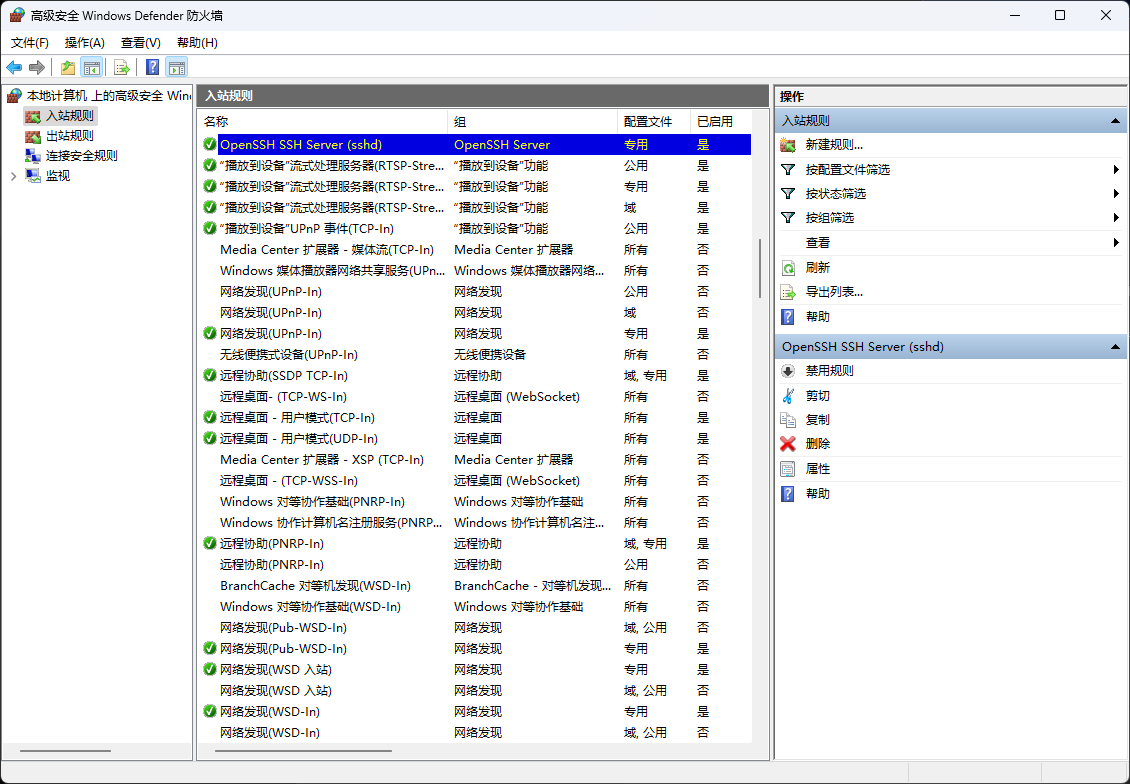
解决方法:检查网络设置,确保当前网络配置文件类型为 专用网络。因为防火墙默认只允许专用网络下的 SSH 入站流量。


 浙公网安备 33010602011771号