博客样式编辑
博客园的文章越写越多,最初只关注数量,逐渐关注排版,现在关注阅读体验。
以下内容大部分来自博客园,自己做了部分修改,文章末尾有原文链接,感谢园子里的朋友!我的博客皮肤是SimpleBlue,添加元素的色调主要是博客蓝(#399ab2)、草绿(#9cba39)。
1、推荐悬浮
【页面定制CSS代码】添加以下代码


#div_digg {
position: fixed;
bottom: 10px;
right: 280px;
border: 1px dashed #eeeeee;/*虚边框*/
padding: 5px;
width: 121px;
background-color: rgba(255,255,255,0.7);/*背景色透明化#ffffff*/
border-radius: 5px;
}
修改:背景色透明化,将16位颜色代码转换成RGB颜色,使用rgba得到透明色。
小技巧:看到喜欢的样式,但不知道样式属性。直接浏览器中选中右击选择审查元素(不同浏览器稍有区别),在右侧的Style中即可看到相关属性。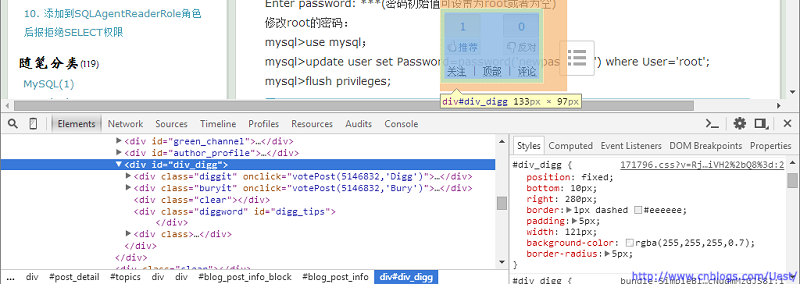
2、公告栏时钟
需申请JS权限,最开始直接将整段时钟代码放入【博客侧边栏公告】
<!DOCTYPE html>
<html xmlns="http://www.w3.org/1999/xhtml">
<head>
<meta http-equiv="Content-Type" content="text/html; charset=utf-8"/>
    <title></title>
</head>
<body>
    <div style="text-align: center; color: #399ab2; font-weight:bold;">
        <canvas id="canvas" height="160" width="160">
            您的浏览器不支持html5的canvas
        </canvas>
        <div style="height: 10px">
        </div>
        <div style="background-color: #ffffff;">
            <div id="div1">
            </div>
            <div id="div2">
            </div>
        </div>
    </div>
    <script type="text/javascript">
        window.onload = function () {
            var canvas = document.getElementById("canvas");
            var can = canvas.getContext("2d");
            var radius = 80; //半径
            var centre = [80, 80]; //中心点

            setInterval(function () {
                mydrawclock();

            }, 1000);
            //Blog蓝(#5ab2ce)、浅蓝(#399ab2)、草绿(#9cba39)

            function mydrawclock() {
                //清空画布
                can.clearRect(0, 0, 500, 500);
                //钟的大小(圆)
                can.fillStyle = "#ffffff";
                can.beginPath();
                can.arc(centre[0], centre[1], radius, 0, Math.PI * 2, true);
                can.closePath();
                can.fill();
                //中心点
                can.fillStyle = "#5ab2ce";
                can.beginPath();
                can.arc(centre[0], centre[1], 4, 0, Math.PI * 2, true);
                can.closePath();
                can.fill();
                //画钟 宽度 度数 颜色 长度
                function drawclock(w, d, c, l) {
                    can.beginPath();
                    can.strokeStyle = c;
                    can.lineWidth = w;
                    can.moveTo(centre[0], centre[1]);
                    can.lineTo(centre[0] + (radius - l) * Math.cos(d), centre[1] + (radius - l) * Math.sin(d));
                    can.stroke();
                }

                var date = new Date();
                //因为画圆是从3点钟方向开始的 所以要减去
                var years = date.getFullYear();
                var months = add_zero(date.getMonth()+1);
                var days = add_zero(date.getDate());
                var hours = add_zero(date.getHours());
                var minutes = add_zero(date.getMinutes());
                var seconds = add_zero(date.getSeconds());
                var week = date.getDay();

                //加0操作
                function add_zero(temp)
                {
                    if(temp<10) return "0"+temp;
                    else return temp;
                }

                drawclock(4, (hours - 3 + minutes / 60) * 30 * Math.PI / 180, "#5ab2ce", 33);
                drawclock(3, (minutes - 15 + seconds / 60) * 6 * Math.PI / 180, "#5ab2ce", 22);
                drawclock(2, (seconds - 15) * 6 * Math.PI / 180, "#9cba39", 1);

                switch (week) {
                    case 1:week = "星期一";break;
                    case 2:week = "星期二";break;
                    case 3:week = "星期三";break;
                    case 4:week = "星期四";break;
                    case 5:week = "星期五";break;
                    case 6:week = "星期六";break;
                    default:week = "星期日";
                }

                document.getElementById("div1").innerHTML = years+"/"+months+"/"+days+" "+hours+":"+minutes+":"+seconds+" "+week;
                //document.getElementById("div2").innerHTML = week; // "</br>" + week;
                //画分钟刻度
                for (var i = 0; i < 60; i++) {
                    var angle = i * 6 * Math.PI / 180;
                    can.strokeStyle = "#9cba39";
                    can.beginPath();
                    can.lineWidth = 1;
                    can.moveTo(centre[0] + radius * Math.cos(angle), centre[1] + radius * Math.sin(angle));
                    can.lineTo(centre[0] + (radius - 5) * Math.cos(angle), centre[1] + (radius - 5) * Math.sin(angle));
                    can.stroke();
                }
                //画时钟刻度
                for (var i = 0; i < 12; i++) {
                    var angle = i * 30 * Math.PI / 180;
                    can.strokeStyle = "#5ab2ce";
                    can.lineWidth = 2;
                    can.beginPath();
                    can.moveTo(centre[0] + radius * Math.cos(angle), centre[1] + radius * Math.sin(angle));
                    can.lineTo(centre[0] + (radius - 8) * Math.cos(angle), centre[1] + (radius - 8) * Math.sin(angle));
                    can.stroke();
                }
            }
        }
    </script>
</body>
</html>
部分页面无法显示时钟(不是浏览器不支持),之后修改为引用文件。【页面定制CSS代码】添加以下代码
/*时钟*/
#div_clock {
  background-color: #ffffff;
}
【博客侧边栏公告】添加以下代码
<!--html5画时钟-->
<div style="text-align: center; color: #399ab2;font-weight: bold;">
    <canvas id="canvas" height="160" width="160">
        您的浏览器不支持html5的canvas
    </canvas>
    <div style="height: 10px">
    </div>
    <div id="div_clock;">
        <div id="div1">
        </div>
        <div id="div2">
        </div>
    </div>
</div>
原始脚本中的<script>块保存为Clock.js文件,并上传到博客园文件
$(function () {
    try {
        customTimer("#canvas", function () {
            var canvas = document.getElementById("canvas");
            var can = canvas.getContext("2d");
            var radius = 80; //半径
            var centre = [80, 80]; //中心点

            setInterval(function () {
                mydrawclock();

            }, 1000);
            //Blog蓝(#5ab2ce)、浅蓝(#399ab2)、草绿(#9cba39)

            function mydrawclock() {
                //清空画布
                can.clearRect(0, 0, 500, 500);
                //钟的大小(圆)
                can.fillStyle = "#ffffff";
                can.beginPath();
                can.arc(centre[0], centre[1], radius, 0, Math.PI * 2, true);
                can.closePath();
                can.fill();
                //中心点
                can.fillStyle = "#5ab2ce";
                can.beginPath();
                can.arc(centre[0], centre[1], 4, 0, Math.PI * 2, true);
                can.closePath();
                can.fill();
                //画钟 宽度 度数 颜色 长度
                function drawclock(w, d, c, l) {
                    can.beginPath();
                    can.strokeStyle = c;
                    can.lineWidth = w;
                    can.moveTo(centre[0], centre[1]);
                    can.lineTo(centre[0] + (radius - l) * Math.cos(d), centre[1] + (radius - l) * Math.sin(d));
                    can.stroke();
                }

                var datenow = new Date();
                //因为画圆是从3点钟方向开始的 所以要减去
                var years = datenow.getFullYear();
                var months = add_zero(datenow.getMonth()+1);
                var days = add_zero(datenow.getDate());
                var hours = add_zero(datenow.getHours());
                var minutes = add_zero(datenow.getMinutes());
                var seconds = add_zero(datenow.getSeconds());
                var week = datenow.getDay();

                //加0操作
                function add_zero(temp)
                {
                    if(temp<10) return "0"+temp;
                    else return temp;
                }

                drawclock(4, (hours - 3 + minutes / 60) * 30 * Math.PI / 180, "#5ab2ce", 33);
                drawclock(3, (minutes - 15 + seconds / 60) * 6 * Math.PI / 180, "#5ab2ce", 22);
                drawclock(2, (seconds - 15) * 6 * Math.PI / 180, "#9cba39", 1);

                switch (week) {
                    case 1:week = "星期一";break;
                    case 2:week = "星期二";break;
                    case 3:week = "星期三";break;
                    case 4:week = "星期四";break;
                    case 5:week = "星期五";break;
                    case 6:week = "星期六";break;
                    default:week = "星期日";
                }

                //可用+"</br>"+换行
                document.getElementById("div1").innerHTML = years+"/"+months+"/"+days+" "+hours+":"+minutes+":"+seconds+" "+week;
                //document.getElementById("div2").innerHTML = week;

                //画分钟刻度
                for (var i = 0; i < 60; i++) {
                    var angle = i * 6 * Math.PI / 180;
                    can.strokeStyle = "#9cba39";
                    can.beginPath();
                    can.lineWidth = 1;
                    can.moveTo(centre[0] + radius * Math.cos(angle), centre[1] + radius * Math.sin(angle));
                    can.lineTo(centre[0] + (radius - 5) * Math.cos(angle), centre[1] + (radius - 5) * Math.sin(angle));
                    can.stroke();
                }
                //画时钟刻度
                for (var i = 0; i < 12; i++) {
                    var angle = i * 30 * Math.PI / 180;
                    can.strokeStyle = "#5ab2ce";
                    can.lineWidth = 2;
                    can.beginPath();
                    can.moveTo(centre[0] + radius * Math.cos(angle), centre[1] + radius * Math.sin(angle));
                    can.lineTo(centre[0] + (radius - 8) * Math.cos(angle), centre[1] + (radius - 8) * Math.sin(angle));
                    can.stroke();
                }
            }
        });
    } catch (e) { }
});
【页脚Html代码】添加以下代码
<script src="http://cdn.bootcss.com/bootstrap/3.2.0/js/bootstrap.min.js"></script>
<!--时钟-->
<script type="text/javascript" src="https://files.cnblogs.com/files/Uest/Clock.js"> charset="utf-8"></script>
修改:时钟脚本拆分成CSS和JS两部分引用,对月、日、时、分、秒补0操作。
3、返回顶部
将发表评论和返回顶部添加到快捷按钮。以下脚本保存为Top.js文件,并上传到博客园文件
//自定义定时器[当元素加载完成时执行回调函数] function customTimer(inpId, fn) { if ($(inpId).length) { fn(); } else { var intervalId = setInterval(function () { if ($(inpId).length) { //如果存在了 clearInterval(intervalId); //则关闭定时器 customTimer(inpId, fn); //执行自身 } }, 100); } } //页面加载完成时执行 $(function () { //添加关注、顶部、评论 customTimer("#div_digg", function () { var div_html = "<div class=''>\ <a href='javascript:void(0);' onclick='c_follow();'>关注</a>\ | \ <a href='#top'>顶部</a>\ | \ <a href='javascript:void(0);' onclick=\" $('#tbCommentBody').focus();\">评论</a>\ </div>"; $("#div_digg").append(div_html); //tbCommentBody }); });
【页脚Html代码】添加以下代码
<!--顶部-->
<script type="text/javascript" src="https://files.cnblogs.com/files/Uest/Top.js"> charset="utf-8"></script>
对于文章过长,我们想快速发表评论或者返回顶部十分高效!
4、快捷目录
目录,对文章的总体概括,方便读者快速选择自己感兴趣的章节阅读。
4.1、目录样式
样式文件定义了目录的范围和相关格式,例如缩进、颜色等。以下脚本保存为Catalog.css文件,并上传到博客园文件
/*定义整个目录框架的大小*/
#sideToolbar {
    position: fixed;
    bottom: 71px;/*距离页面底部的距离,不能设置过小,否则按钮看不到无法关闭*/
    right: 45px;
    width: 250px;
    height: 354px
}

#sideCatalog{
    background-color: rgba(255,255,255,0.7);/*背景颜色白色#ffffff,70%透明度*/
    padding-bottom: 10px;
    border-radius: 5px;
}
/*目录左侧竖栏颜色*/
#sideCatalog-sidebar {
    -moz-border-bottom-colors: none;
    -moz-border-left-colors: none;
    -moz-border-right-colors: none;
    -moz-border-top-colors: none;
    background-color: #eaeaea;
    border-color: -moz-use-text-color #eaeaea;
    border-image: none;
    border-left: 1px solid #eaeaea;
    border-right: 1px solid #eaeaea;
    border-style: none solid;
    border-width: 0 1px;
    height: 353px;
    left: 5px;
    position: absolute;
    top: 0;
    width: 0
}
/*目录形成的范围*/
#sideCatalog-catalog {
    height: 325px;
    padding-top: 18px;
    overflow: hidden;
    padding-left: 23px;
    position: relative
}
#sideCatalog #sideCatalog-sidebar .sideCatalog-sidebar-top {
    cursor: pointer;
    top: 0
}
#sideCatalog #sideCatalog-sidebar .sideCatalog-sidebar-bottom {
    bottom: 0
}
#sideCatalog #sideCatalog-sidebar .sideCatalog-sidebar-top,#sideCatalog #sideCatalog-sidebar .sideCatalog-sidebar-bottom {
    background: url("https://files.cnblogs.com/files/Uest/sideToolbar.gif") no-repeat scroll 0 -199px transparent;
    height: 10px;
    left: -5px;
    overflow: hidden;
    position: absolute;
    width: 10px
}
#sideCatalog li {
    margin: 0px;
    padding: 0 7px;
    text-align: left;
    position: relative
}
/*选中目录时背景颜色*/
#sideCatalog li: hover {
    background-color: rgba(156,186,57,0.7);/*#9cba39*/
    border-radius: 3px;
}
#sideCatalog-catalog ul .active {
    background-color: rgba(156,186,57,0.7);/*#9cba39*/
    border-radius: 3px;
}
/*选中目录时字体颜色*/
#sideCatalog-catalog .active a {
    color: #ffffff
}
#sideCatalog-catalog a: hover {
    color: #ffffff
}
#sideCatalog span: first-child {
    color: #999999;
    font-family: Arial;
    font-size: 14px;
    font-weight: bold;
    padding-right: 5px
}
/*这里比较重要,设置h2级别目录的缩进和左边距*/
#sideCatalog li.h2Offset {
    padding-left: 45px;
    text-indent: -25px
}
/*这里比较重要,设置h3级别目录的缩进和左边距*/
#sideCatalog li.h3Offset {
    padding-left: 90px;
    text-indent: -60px
}
/*目录字体颜色*/
#sideCatalog a {
    text-decoration: none;
    color: #999999;
    font-size: 17px;
    font-family: STKaiti;
    font-weight: bold
}
.sideCatalog-dot {
    background: url("https://files.cnblogs.com/files/Uest/sideToolbar.gif") repeat scroll 0 -222px transparent;
    cursor: pointer;
    font-size: 12px;
    height: 10px;
    left: -20px;
    line-height: 12px;
    overflow: hidden;
    position: absolute;
    top: 4px;
    width: 6px
}
#sideCatalog .highlight .sideCatalog-dot {
    background: url("https://files.cnblogs.com/files/Uest/sideToolbar.gif") no-repeat scroll -271px -38px transparent;
    height: 13px;
    left: -23px;
    top: 3px;
    width: 18px
}
#sideCatalogBtn {
    background: url("https://files.cnblogs.com/files/Uest/sideToolbar.gif") no-repeat scroll 0 0 transparent;
    cursor: pointer;
    display: block;
    height: 45px;
    margin-bottom: 5px;
    margin-left: 5px;
    position: relative;
    width: 45px;
    margin-top: 7px;
    outline: 0
}
#sideCatalogBtn: hover {
    background: url("https://files.cnblogs.com/files/Uest/sideToolbar.gif") no-repeat scroll -154px 0 transparent
}
.sideCatalogBtnDisable {
    background: url("https://files.cnblogs.com/files/Uest/sideToolbar.gif") no-repeat scroll -104px 0 transparent !important
}
#sideToolbar-up {
    background: url("https://files.cnblogs.com/files/Uest/sideToolbar.gif") no-repeat scroll -1px -62px transparent;
    border-radius: 2px;
    display: block;
    height: 45px;
    margin-left: 5px;
    width: 45px;
    outline: 0
}
#sideToolbar-up: hover {
    background: url("https://files.cnblogs.com/files/Uest/sideToolbar.gif") no-repeat scroll -74px -62px transparent
}
修改:目录背景透明化,高亮颜色/背景色,字体。注意引用sideToolbar.gif文件,请从原文下载。
4.2、自动生成目录
自动生成目录的代码是通过js完成的,就是寻找正文的h2、h3、h4,然后把标题按照长度截断处理。以下脚本保存为Catalog.js文件,并上传到博客园文件
var a = $(document);
a.ready(function () {
    var b = $('body'),
        c = 'cnblogs_post_body',
        d = 'sideToolbar',
        e = 'sideCatalog',
        f = 'sideCatalog-catalog',
        g = 'sideCatalogBtn',
        h = 'sideToolbar-up',
        i = '<div id="sideToolbar"style="display:none;">\<div class="sideCatalogBg"id="sideCatalog">\<div id="sideCatalog-sidebar">\<div class="sideCatalog-sidebar-top"></div>\<div class="sideCatalog-sidebar-bottom"></div>\</div>\<div id="sideCatalog-catalog">\<ul class="nav"style="width:227px;zoom:1">\</ul>\</div>\</div>\<a href="javascript:void(0);"id="sideCatalogBtn"class="sideCatalogBtnDisable"></a>\</div>',
        j = '',
        k = 200,
        l = 0,
        m = 0,
        n = 0,
        o, p = 18,
        q = true,
        r = true,
        s = $('#' + c);
    if (s.length === 0) {
        return
    };
    b.append(i);
    o = s.find(':header');
    if (o.length > p) {
        r = false;
        var t = s.find('h2');
        var u = s.find('h3');
        if (t.length + u.length > p) {
            q = false
        }
    };
    j += '<li><span style="color: #999999;font-size: 20px;font-family: STKaiti;font-weight: bold;">★ 本文目录</span></li>';
    o.each(function (t) {
        var u = $(this),
            v = u[0];

        var title=u.text();
        var text=u.text();

    //设置id属性并获取属性
        if (v.localName === 'h2') {
            l += 1;
            m = 0;
            u.attr('id', 'autoid-' + l + '-' + m + '-' + n)
            if(text.length>26) text=text.substr(0,26)+"...";
            j += '<li><a href="#' + u.attr('id') + '" title="' + title + '">' + text + '</a><span class="sideCatalog-dot"></span></li>';
        } else if (v.localName === 'h3') {
            m += 1;
            n = 0;
            u.attr('id', 'autoid-' + l + '-' + m + '-' + n)
            if(q){
            if(text.length>30) text=text.substr(0,30)+"...";
            j += '<li class="h2Offset"><a href="#' + u.attr('id') + '" title="' + title + '">' + text + '</a></li>';
            }
        } else if (v.localName === 'h4') {
            n +=1 ;
            u.attr('id', 'autoid-' + l + '-' + m + '-' + n)
            if(r){
                if(text.length>30) text=text.substr(0,30)+"...";
                j += '<li class="h3Offset"><a href="#' + u.attr('id') + '" title="' + title + '">' + text + '</a></li>';
            }
        }
    });
    //如果没有标题,给出提示
    if (l == 0 && m == 0 && n == 0) {
    j += '<li><span style="color: #ff0000;font-size: 17px;font-family: STKaiti;font-weight: bold;">文章未设置标题,无法生成目录!</span></li>';
    j += '<li><a href="http://www.cnblogs.com/Uest/p/5855547.html#autoid-4-0-0' + '">' + '<span style="color: #ff0000;font-size: 17px;font-family: STKaiti;font-weight: bold;">您可以通过编辑设置h2、h3、h4标题,后台脚本将自动生成目录方便阅读。</span>' + '</a><span class="sideCatalog-dot"></span></li>';
    };
    $('#' + f + '>ul').html(j);
    b.data('spy', 'scroll');
    b.data('target', '.sideCatalogBg');
    $('body').scrollspy({
        target: '.sideCatalogBg'
    });
    $sideCatelog = $('#' + e);
    $('#' + g).on('click', function () {
        if ($(this).hasClass('sideCatalogBtnDisable')) {
            $sideCatelog.css('visibility', 'hidden')
        } else {
            $sideCatelog.css('visibility', 'visible')
        };
        $(this).toggleClass('sideCatalogBtnDisable')
    });
    $('#' + h).on('click', function () {
        $("html,body").animate({
            scrollTop: 0
        }, 500)
    });
    $sideToolbar = $('#' + d);
    a.on('scroll', function () {
        var t = a.scrollTop();
        if (t > k) {
            $sideToolbar.css('display', 'block')
        } else {
            $sideToolbar.css('display', 'none')
        }
    })
});
修改:调整h2、h3、h4标题作为目录,修改字体与目录样式保持一致。添加标题判断,如果文章没有设置标题,给出提示。修改目录href属性值,原始脚本在标题过渡时会不合适地顺延或继承之前的数值。为了让属性值与目录关系明了,调整u.attr()方法调用位置。
最终体现是点击目录,跳转到对应章节,同时在地址栏的最后三个数字准确对应层级关系。比如你现在可以点击目录上的[4.2、自动生成目录],在地址栏你会看到"#autoid-4-2-0",非常清楚的表示出章节信息。
【页脚Html代码】添加以下代码
<!--目录-->
<link href="https://files.cnblogs.com/files/Uest/Catalog.css" rel="stylesheet">
<script type="text/javascript" src="https://files.cnblogs.com/files/Uest/Catalog.js"> charset="utf-8"></script>
存在问题:目录点击隐藏后,实际只是不可见,但还是占用空间位置。比如我对目录部分透明化,可以看到[编辑]处于目录之后,此时隐藏目录,然后移动鼠标到[编辑]上,没有任何反应。只有将原目录滚走,才能编辑文章。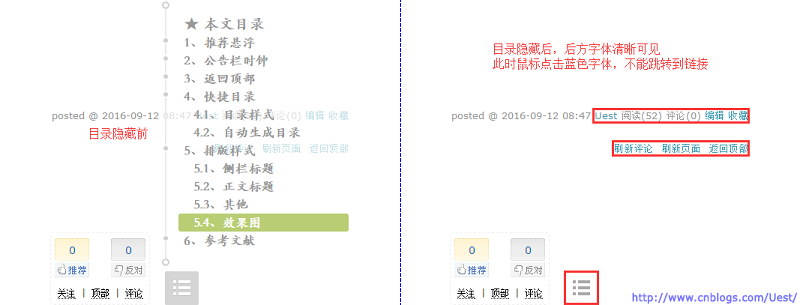
目录隐藏前、后其所覆盖的区域不能操作,只有当目录离开后才能操作。
5、排版样式
很多时候默认模板无法满足大家对个性的追求。
5.1、侧栏标题
不要说你不知道侧栏标题的属性,别忘了有F12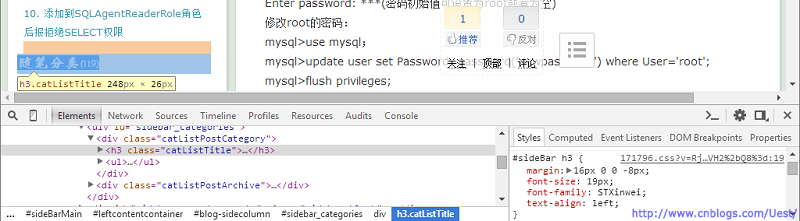
就是说#sideBar h3对应的就是侧边随笔分类、随笔档案的属性信息。【页面定制CSS代码】添加以下代码
/*侧栏标题*/
#sideBar h3 {
    margin: 16px 0 0 -8px;
    font-size: 19px;
    font-family: STXinwei;
    text-align: left;
}
根据需求调整任何属性,大小、颜色、背景色等。
5.2、正文标题
正文添加标题,最后可生成目录。标题的样式如何调整
图片中"补充"对应标题2,属性值由#cnblogs_post_body h2确定。【页面定制CSS代码】添加以下代码
#cnblogs_post_body h2 {
    font-size: 20px;
    font-family: STKaiti;
    font-weight: bold;
    line-height: 24px;
    padding: 0px 0px 0px 5px;
    background-color: rgba(57,154,178,0.7);/*半透明#399ab2*/
    border-radius: 3px;
}
#cnblogs_post_body h3 {
    font-size: 17px;
    font-family: STKaiti;
    font-weight: bold;
    line-height: 20px;
    border-left: 13px solid rgba(57,154,178,0.7);
    padding: 0px 0px 0px 0px;
    background-color: rgba(57,154,178,0.5);/*半透明#399ab2*/
    border-radius: 3px;
}
正文标题都可以参考此脚本修改。
对于完全不懂CSS、JS的,在操作有疑问时,别忘记使用F12查看别人引用的CSS、JS文件,通过对比很快就能明白,大不了完全照搬。
其实所有的CSS代码都可以综合到.css文件,然后通过引用,方便管理。文中代码可能和我博客的当前样式稍有不同,因为我会根据喜好适当调整。因此请自行上传相关文件,不然别人调整样式,你的博客跟着悲剧!
5.3、其他
表情:~.~、●-●、^_-、(・ω・)、(⊙_⊙)
引用:打开HTML源码编辑器在引用的开始加上<blockquote>,在引用的结束加上</blockquote>
行距:通常在图片前后,发现图片与上下文行距过宽,打开HTML源码编辑器在段落的开始加上<br />
标题:打开HTML源码编辑器在标题的开始加上<h2>,在标题的结束加上</h2>,这对应的是标题2
虚线:打开HTML源码编辑器在对应位置加上<hr style="border: silver 1px dashed;">
这中间就是普通随笔段落,可以使用所有的编辑选项。下面插入一张图片
图片(段落)与前后段落通过<br />分隔,这样行距就不会过宽。
引用中间可以嵌套引用加底纹的文字,好像没有直接去掉底纹的选项。只能在HTML源码编辑器,删除span格式:
<span style="background-color: #ffff00;">加底纹的文字</span>

本身编辑工具栏可以直接操作以上内容,但很多时候的效果没有想象的那么好(个人观点)。有格式综合症的可以尝试用上面的方法调整~
5.4、效果图
下面欣赏最终效果图
时钟、推荐悬浮以及返回顶部
可以看到目录呈透明状态,此时目录选择的是[2、公告栏时钟],目录高亮,正文跳转到第2节。
6、参考文档
博客园页面设置:http://www.cnblogs.com/zhaopei/p/4174811.html
【分享】博客美化(6)为你的博文自动添加目录:http://www.cnblogs.com/asxinyu/p/Bolg_Category_AddArticleCategory_6.html
如何给你的为知笔记添加一个漂亮的导航目录:http://www.cnblogs.com/marvin/p/ExtendWizNoteAutoNnavigation.html
|
|
【作者】: 醒嘞 |
| 【出处】: http://www.cnblogs.com/Uest/ | |
| 【声明】: 本文内容仅代表个人观点。如需转载请保留此段声明,且在文章页面明显位置给出原文链接! |

 浙公网安备 33010602011771号