基于MCSDK 6.x 的自定义控制板实现
前言
本文介绍了如何在ST的MCSDK 6.x中,通过撰写配置文件,以实现自定义的控制套件。
关键词:FOC,MCSDK,STM32,STMC Board Manager
准备
在启动MCSDK后,需要选择电机,控制器和驱动器。对于Modular,需要分别配置Power Board和Control Board,Inverter只需要配置单个文件即可。
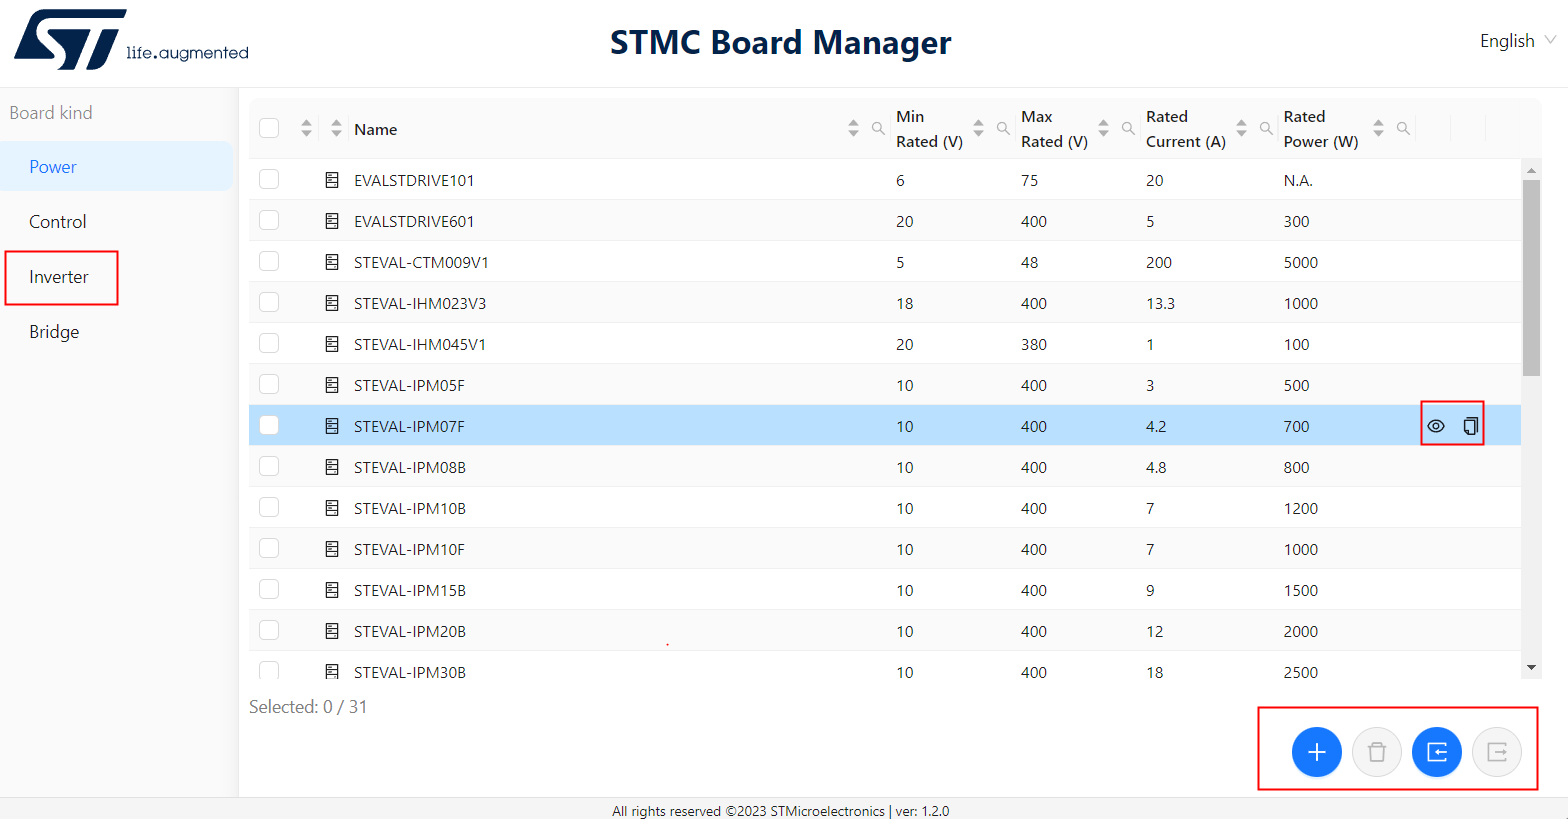
在主页面 点击Tools -> Boards Manager,即可对配置文件进行编辑。如图1所示,可以查看、复制现有的配置文件,或者创建新配置文件。
创建配置文件
点击Inverter,点击右下角的+,创建新的文件。

基础配置
按照提示,随便填些参数
{
  "type": "inverter",
  "descVersion": 4,
  "contentVersion": "1.0",
  "name": "my_self_control",
  "PN": "0",
  "mcu": "STM32",
  "clockFrequency": 170,
  "clockSource": "1",
  "motorDrives": []
}
其中mcu, clockSource, motorDrives的具体参数我们不知道并且没提示。
在软件安装目录下\MC_SDK_6.2.1\Utilities\PC_Software\STMCWB\assets\hardware\mcu,有所有支持的mcu配置文件, 我们能配置的MCU型号只能从其中选择。这里我们选择STM32G431KBUx。
clockSource可以参考官方wiki 2.3.1 Specific properties 一节,对应的有四个参数:
| Value | Description | supported MCUs |
|---|---|---|
| internal_osc | The source of the clock is the internal oscillator. | All MCUs |
| 8_crystal | The source of the clock is an 8 MHz crystal. | All MCUs |
| 24_crystal | The source of the clock is a 24 MHz crystal. | STM32G4xx and STM32G0xx |
| 48_crystal | The source of the clock is a 48 MHz crystal. | STM32G4xx |
选择自己驱动板对应的即可。
motorDrives
参考别的配置文件,motorDrives配置较为复杂,还好有部分提示,跟着提示先一步一步填。
Missing property "name".
Missing property "maxRatedVoltage".
Missing property "minRatedVoltage".
Missing property "maxRatedCurrent".
Missing property "features".
前4个参数填起来轻轻松松,按照实际电路填写即可。
"motorDrives": [
  {
    "name": "M1",
    "maxRatedVoltage": 24,
    "minRatedVoltage": 8,
    "maxRatedCurrent": 2
  }]
features则描述了驱动器支持的特性,也是配置文件的核心。相关介绍见 WIKI: 《3 Features Specification》。
电流采样模式
首先配置电流采样模式。电流采样支持以下几种模式:
| mode | Description |
|---|---|
ThreeShunt_AmplifiedCurrents |
Three-shunt, amplified current hardware variant |
ThreeShunt_RawCurrents_SingleEnded |
Three-Shunt, Raw Currents, Single Ended OpAmp hardware variant |
ThreeShunt_RawCurrents_Differential |
Three-Shunt, Raw Currents, Differential OpAmp hardware variant |
ThreeShunt_RawCurrents_SingleEnded_ExternalGain |
Three-Shunt, Raw Currents, Single Ended Internal OpAmp with External Gain hardware variant |
ThreeShunt_RawCurrents_SingleEnded_InternalGain |
Three-Shunt, Raw Currents, Single Ended internal OpAmp with Internal Gain hardware variant |
| ...... | ...... |
参数
我这里使用的是driver带的电流放大器,因此选择三电阻,外部放大,即最简单的ThreeShunt_AmplifiedCurrents。
"features": [
  {
    "name": "CurrentSensing",
    "type": "CurrentSensing",
    "tRise": 1000,
    "hwVariants": [
      {
        "type": "ThreeShunt_AmplifiedCurrents"
      }]
  }]
该模式对应如下参数:
Parameters Type Description tNoise Number TNoise parameter of the phase switches. In ns shuntResistor Number Shunt Resistor value in Ohm offsetNetworkAttenuation Number Gain of the offset network opAmpGain Number Gain of the OpAmp amplification polarizationOffset Number Shift voltage added by the Offset network, in Volts, at OpAmp output. amplifyingNetworkImax Number Maximum current that is measurable by the current sensing network. amplifyingNetworkVm Number Voltage reference of the current sensing network amplifyingNetworkPrating Number Rated power (that can go through the shunt resistor)
根据实际分压电路,填写参数如下:
  "type": "ThreeShunt_AmplifiedCurrents",

  "shuntResistor": 0.01,
  "amplifyingNetworkImax": 21.429,
  "amplifyingNetworkVm": 3.3,
  "amplifyingNetworkPrating": 2,
  "offsetNetworkAttenuation": 0.885,
  "opAmpGain": 8.697,
  "polarizationOffset": 1.65
参数计算
对于电压采样,无论外围电路如何,最终转换公式均为。MCSDK,会根据参数,自动计算出Gain。
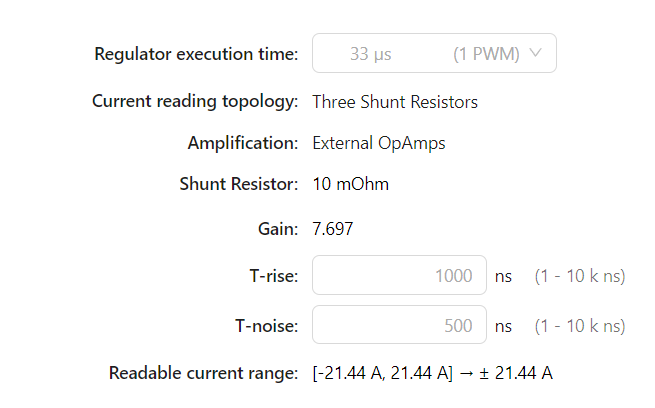
对于我们自己的驱动板,很多时候无法获取详细的参数,此时我们就可以根据上述公式,反推出合适的值,代入到配置项中。
引脚配置
signals为引脚配置,编辑器会提示每个模式需要配置的引脚,在cubeMX中找到可以使用的ADC脚,填写上即可。
  "signals": {
    "CURRENT_AMPL_U": [
      {
        "name": "PA4",
        "help": "",
        "cost": 0
      }
    ],
    "CURRENT_AMPL_V": [
      {
        "name": "PA5",
        "help": "",
        "cost": 0
      }
    ],
    "CURRENT_AMPL_W": [
      {
        "name": "PA6",
        "help": "",
        "cost": 0
      }
    ]
  },
传感器模式
通过此特性,定义驱动的传感器模式。通常有反电动势,霍尔,编码器几种,这里使用霍尔传感器配置。
通过CUBEMX查找支持HALL的引脚,填上即可。
  {
    "name": "SpeedAndPositionSensing",
    "type": "SpeedAndPositionSensing",
    "hwVariants": [
      {
        "type": "HallEffectSensor",
        "help": "",
        "signals": {
          "HALLSENSOR_H1": [
            {
              "name": "PA0",
              "help": "",
              "cost": 0
            }
          ],
          "HALLSENSOR_H2": [
            {
              "name": "PA1",
              "help": "",
              "cost": 0
            }
          ],
          "HALLSENSOR_H3": [
            {
              "name": "PA2",
              "help": "",
              "cost": 0
            }
          ]
        }
      }
    ]
  }
相电压生成
此项用于设定电压输出方式,FOC模式下有2种模式,分别是
DrivingHighAndLowSides:输出6路PWM,分别控制高低半桥;
DrivingHighSidesAndThreeEnables:输出3路PWM,控制高侧半桥,以及3个使能信号。
这里使用3路PWM模式。同样在CUBEMX中查找可用的引脚。
  {
    "name": "PhaseVoltageGeneration",
    "type": "PhaseVoltageGeneration",
    "driverName": "Driver or IGBT or MOSFET name",
    "driverPN": "Driver or IGBT or MOSFET Part Number",
    "minDeadTime": 500,
    "maxSwitchingFreq": 100,
    "tNoise": 500,
    "hwVariants": [
      {
        "type": "DrivingHighSidesAndThreeEnables",
        "help": "How to enable this variant",
        "signals": {
          "PWM_CHU_H": [
            {
              "name": "PA8",
              "help": "",
              "cost": 0
            }
          ],
          "PWM_CHV_H": [
            {
              "name": "PA9",
              "help": "",
              "cost": 0
            }
          ],
          "PWM_CHW_H": [
            {
              "name": "PA10",
              "help": "",
              "cost": 0
            }
          ],
          "PWM_CHU_EN": [
            {
              "name": "PA7",
              "help": "",
              "cost": 0
            }
          ],
          "PWM_CHV_EN": [
            {
              "name": "PA12",
              "help": "",
              "cost": 0
            }
          ],
          "PWM_CHW_EN": [
            {
              "name": "PB5",
              "help": "",
              "cost": 0
            }
          ]
        },
        "highSideSwitchesDrivingPolarity": "Active high",
        "enableDrivingPolarity": "Active high",
        "deadTime": 550
      }
    ]
  },
其他配置
有了以上核心配置,就可以在Motor Control WorkBench中导入自定义控制器了。除了以上功能,还有电路保护等其他功能可以配置,跟着官方配置照葫芦画瓢即可。
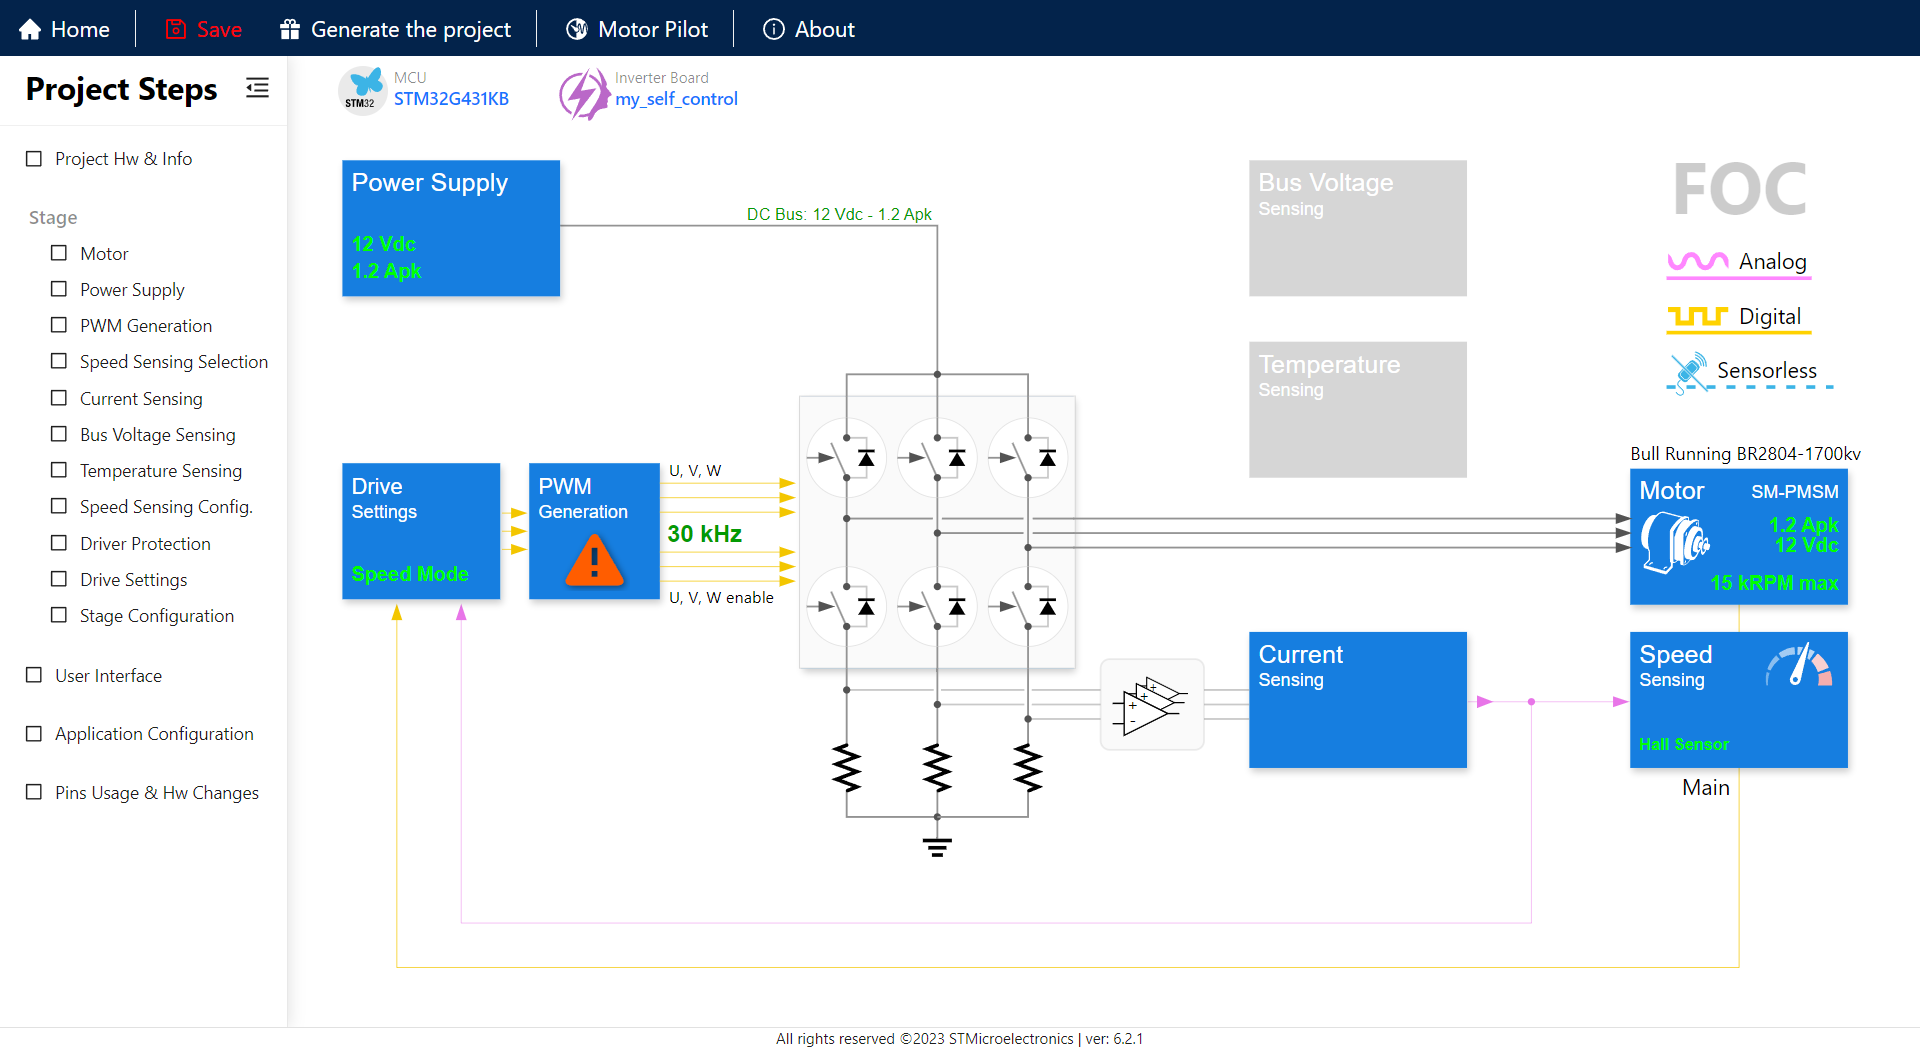
导入效果
在Motor Control WorkBench中,新建项目,在inverter中可以看到我们新建的控制板

勾选上,一般情况下便可以生成代码了。
完整配置文件
{
  "type": "inverter",
  "descVersion": 4,
  "contentVersion": "1.0",
  "name": "my_self_control",
  "PN": "0",
  "mcu": "STM32G431KBUx",
  "clockFrequency": 170,
  "clockSource": "24_crystal",
  "motorDrives": [
    {
      "name": "M1",
      "maxRatedVoltage": 24,
      "minRatedVoltage": 8,
      "maxRatedCurrent": 2,
      "features": [
        {
          "name": "CurrentSensing",
          "type": "CurrentSensing",
          "tRise": 1000,
          "hwVariants": [
            {
              "type": "ThreeShunt_AmplifiedCurrents",
              "shuntResistor": 0.01,
              "amplifyingNetworkImax": 21.429,
              "amplifyingNetworkVm": 3.3,
              "amplifyingNetworkPrating": 2,
              "offsetNetworkAttenuation": 0.885,
              "opAmpGain": 8.697,
              "polarizationOffset": 1.65,
              "signals": {
                "CURRENT_AMPL_U": [
                  {
                    "name": "PA4",
                    "help": "",
                    "cost": 0
                  }
                ],
                "CURRENT_AMPL_V": [
                  {
                    "name": "PA5",
                    "help": "",
                    "cost": 0
                  }
                ],
                "CURRENT_AMPL_W": [
                  {
                    "name": "PA6",
                    "help": "",
                    "cost": 0
                  }
                ]
              }
            }
          ]
        },
        {
          "name": "SpeedAndPositionSensing",
          "type": "SpeedAndPositionSensing",
          "hwVariants": [
            {
              "type": "HallEffectSensor",
              "help": "",
              "signals": {
                "HALLSENSOR_H1": [
                  {
                    "name": "PA0",
                    "help": "",
                    "cost": 0
                  }
                ],
                "HALLSENSOR_H2": [
                  {
                    "name": "PA1",
                    "help": "",
                    "cost": 0
                  }
                ],
                "HALLSENSOR_H3": [
                  {
                    "name": "PA2",
                    "help": "",
                    "cost": 0
                  }
                ]
              }
            }
          ]
        },
        {
          "name": "PhaseVoltageGeneration",
          "type": "PhaseVoltageGeneration",
          "driverName": "MP6450",
          "driverPN": "MP6450",
          "minDeadTime": 500,
          "maxSwitchingFreq": 100,
          "tNoise": 500,
          "hwVariants": [
            {
              "type": "DrivingHighSidesAndThreeEnables",
              "help": "How to enable this variant",
              "signals": {
                "PWM_CHU_H": [
                  {
                    "name": "PA8",
                    "help": "",
                    "cost": 0
                  }
                ],
                "PWM_CHV_H": [
                  {
                    "name": "PA9",
                    "help": "",
                    "cost": 0
                  }
                ],
                "PWM_CHW_H": [
                  {
                    "name": "PA10",
                    "help": "",
                    "cost": 0
                  }
                ],
                "PWM_CHU_EN": [
                  {
                    "name": "PA7",
                    "help": "",
                    "cost": 0
                  }
                ],
                "PWM_CHV_EN": [
                  {
                    "name": "PA12",
                    "help": "",
                    "cost": 0
                  }
                ],
                "PWM_CHW_EN": [
                  {
                    "name": "PB5",
                    "help": "",
                    "cost": 0
                  }
                ]
              },
              "highSideSwitchesDrivingPolarity": "Active high",
              "enableDrivingPolarity": "Active high",
              "deadTime": 550
            }
          ]
        }
      ]
    }
  ]
}
更多配置项
待补充


【推荐】国内首个AI IDE,深度理解中文开发场景,立即下载体验Trae
【推荐】编程新体验,更懂你的AI,立即体验豆包MarsCode编程助手
【推荐】抖音旗下AI助手豆包,你的智能百科全书,全免费不限次数
【推荐】轻量又高性能的 SSH 工具 IShell:AI 加持,快人一步
· 阿里最新开源QwQ-32B,效果媲美deepseek-r1满血版,部署成本又又又降低了!
· 开源Multi-agent AI智能体框架aevatar.ai,欢迎大家贡献代码
· Manus重磅发布:全球首款通用AI代理技术深度解析与实战指南
· 被坑几百块钱后,我竟然真的恢复了删除的微信聊天记录!
· AI技术革命,工作效率10个最佳AI工具