

selenium模拟携程旅行自动登录
携程旅行实现自动登录还是有点麻烦的,我们先看官网:
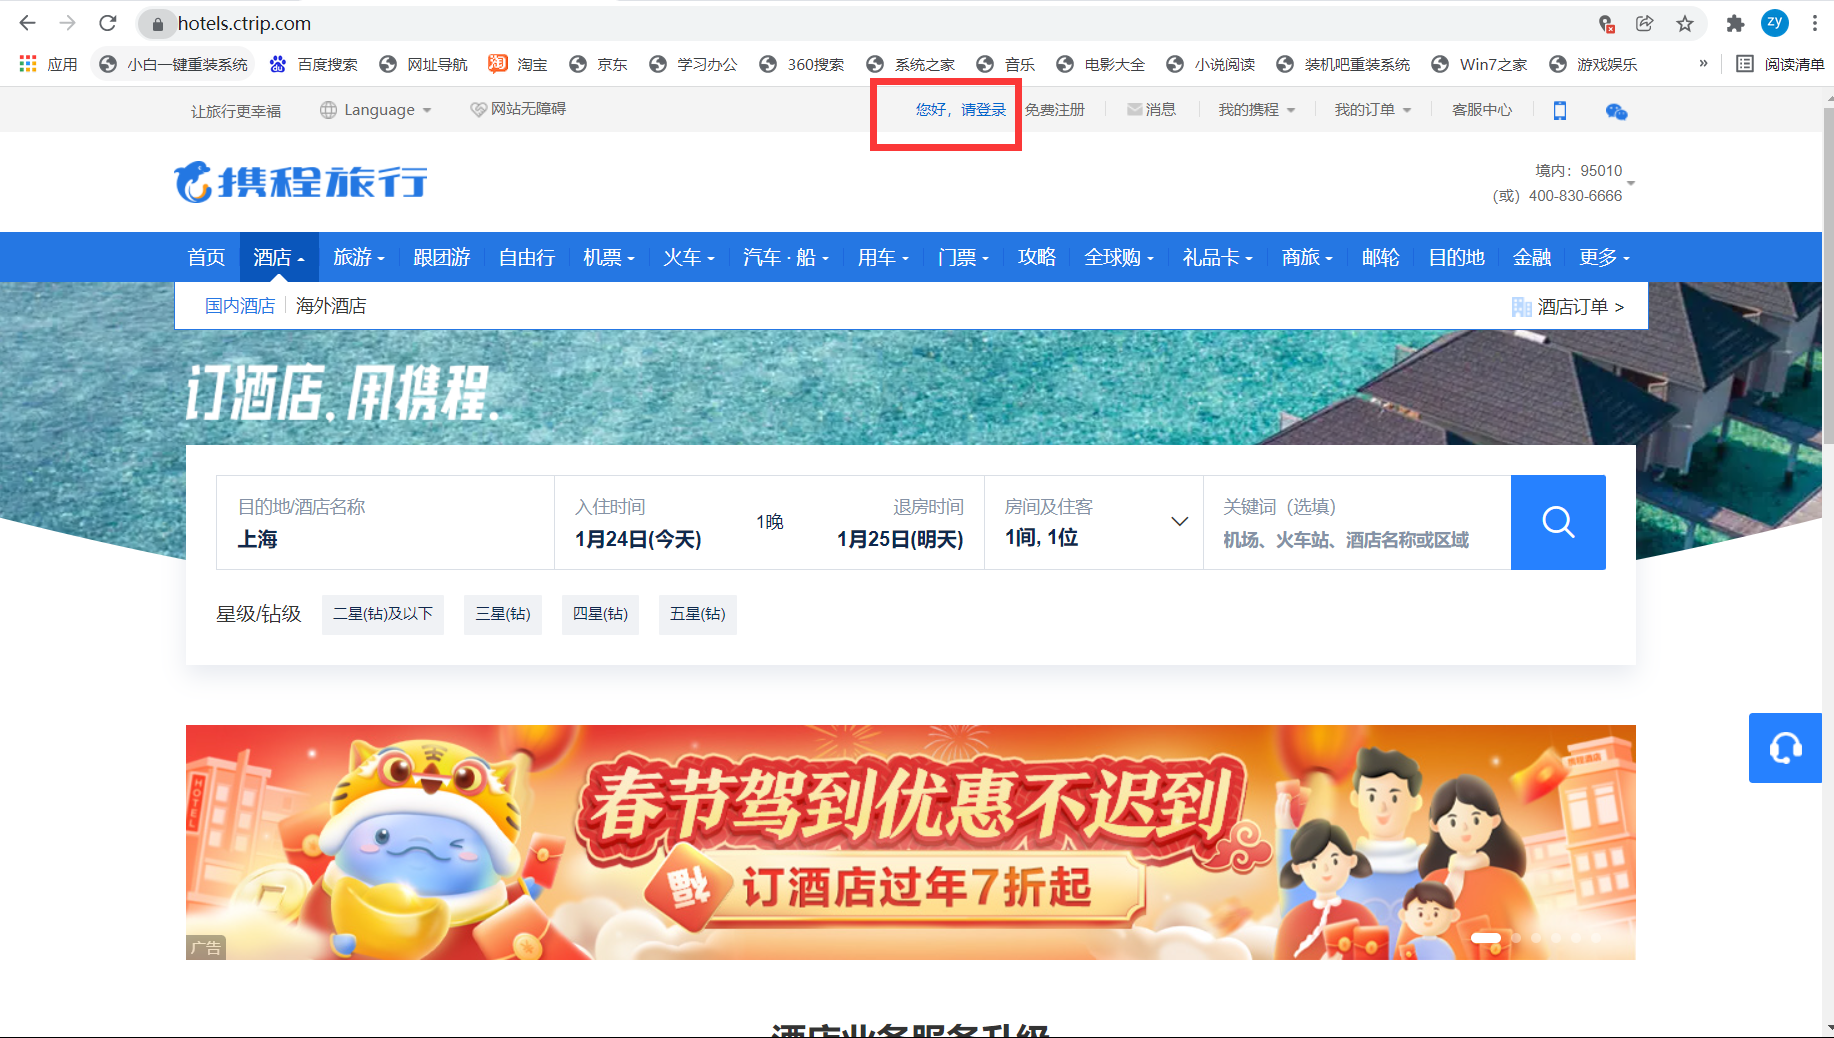
不用多说,肯定需要先进行标签定位,定位到红框处,通过click()实现跳转,来到了下面的页面:
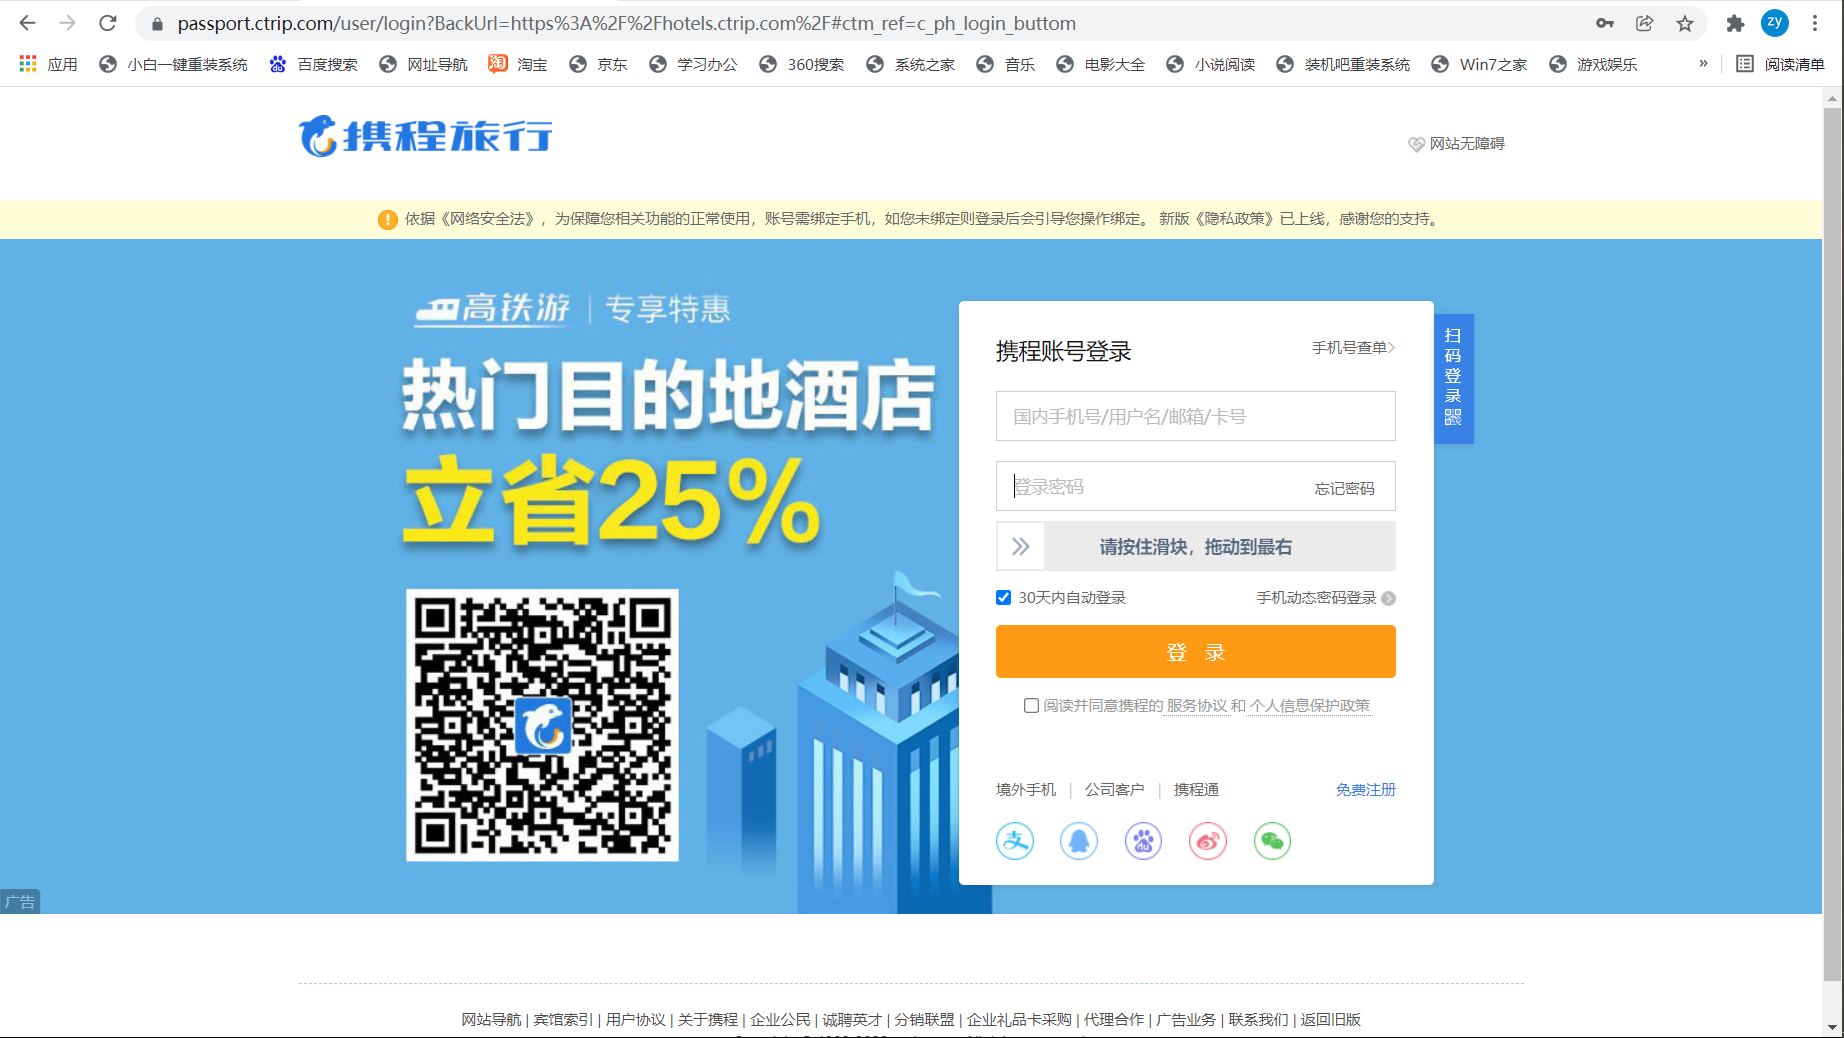
这里的话,先标签定位到输入用户名和密码的地方,然后通过send_keys()可以输入用户名和密码,这里很简单,然后定位到滑块,定义个动作链,再通过click_and_hold()将滑块拖动到最右,这里也简单,本以为这样模拟登陆成功,但麻烦的来了,它又弹出了一个验证方式!!!
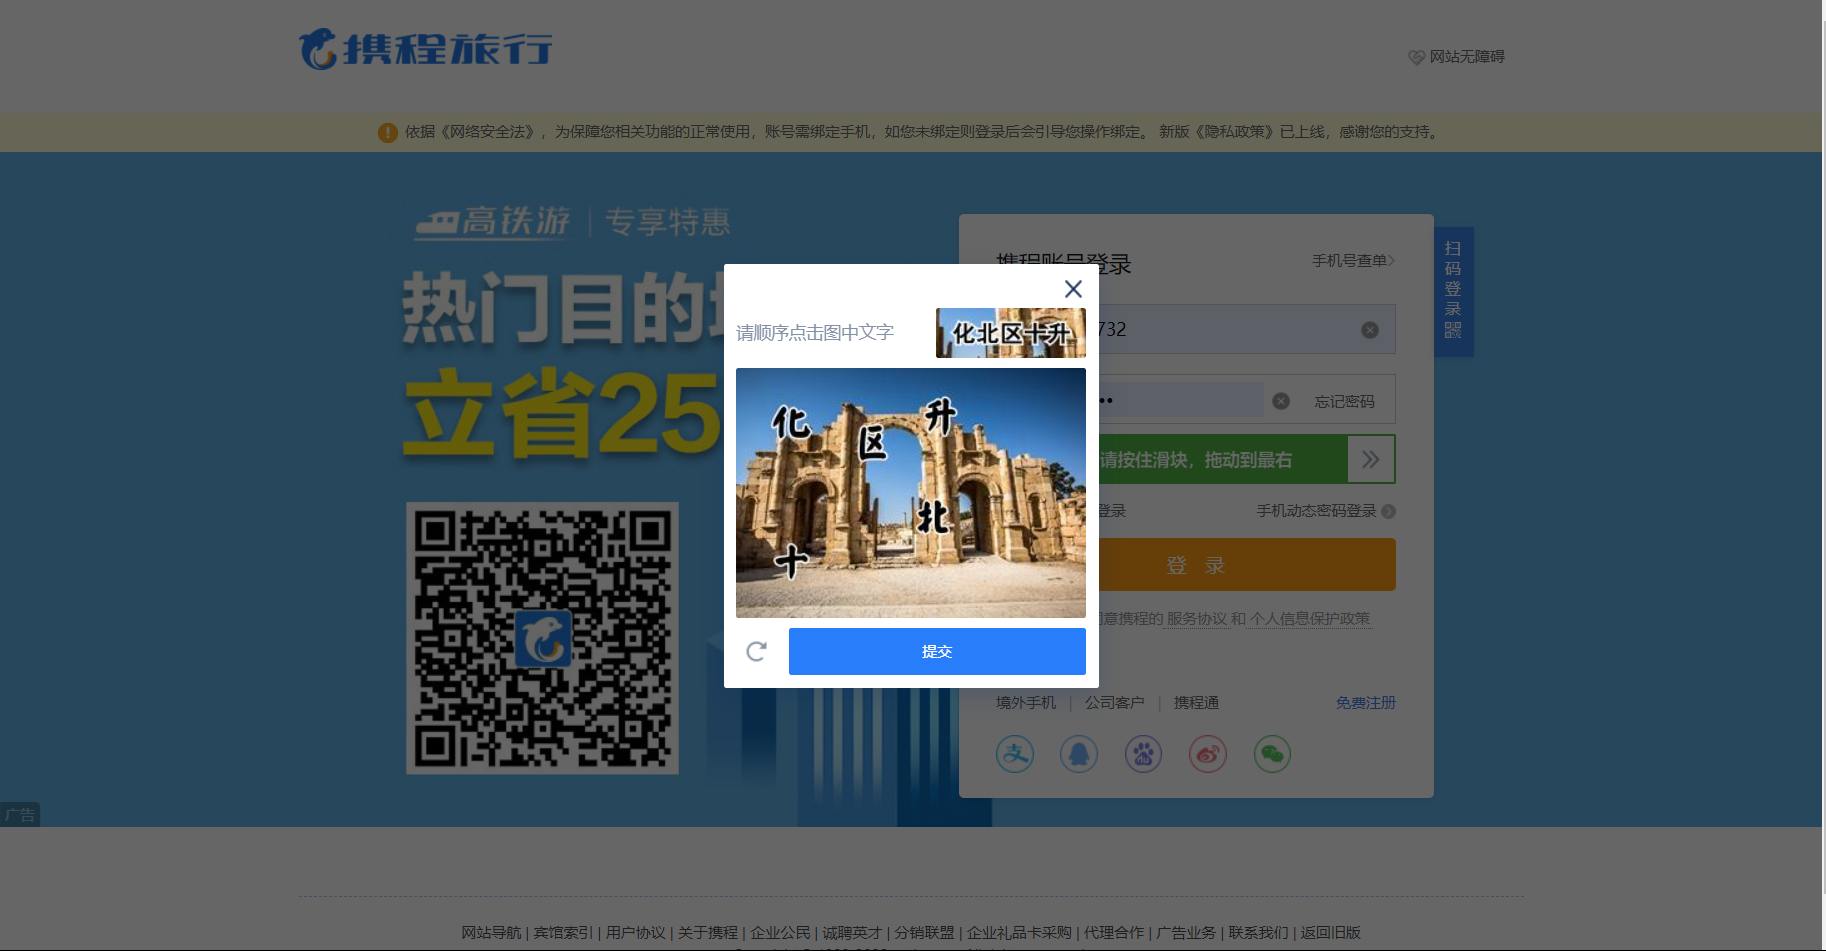
其实,它的出现让我比较意外,但有一说一不难操作的,先将当前页面截图,然后定位验证码区域,获取location和size,然后计算右下角的位置,然后用crop()就可以对验证码区域进行截图,接着把该截图放到超级鹰中进行检测,接着存储验证码的坐标,最后使用动作链对每一个列表元素对应的x,y指定的位置进行点击操作,最后再点击提交按钮,当前验证就成功结束了。
最后,再勾选同意协议的框,模拟登录就算成功,但接下来问题来了:
首先,贴出我之前的代码:
  1 # -*- coding:utf-8 -*-
  2 # @Time : 2022/1/24 0024 11:33
  3 # @Author : Tzy0425
  4 # @File : 模拟登录携程旅行.py
  5
  6 from selenium import webdriver
  7 from selenium.webdriver.chrome.service import Service
  8 from selenium.webdriver.common.by import By
  9 from selenium.webdriver import ActionChains
 10 # 裁剪特定区域需要事先导包
 11 from PIL import Image
 12 from time import sleep
 13 from selenium.webdriver import ChromeOptions
 14 from hashlib import md5
 15 import requests
 16
 17 #实现规避检测
 18 options = ChromeOptions()
 19 options.add_experimental_option('excludeSwitches', ['enable-automation'])
 20
 21 # 超级鹰
 22 class Chaojiying_Client(object):
 23
 24     def __init__(self, username, password, soft_id):
 25         self.username = username
 26         password =  password.encode('utf8')
 27         self.password = md5(password).hexdigest()
 28         self.soft_id = soft_id
 29         self.base_params = {
 30             'user': self.username,
 31             'pass2': self.password,
 32             'softid': self.soft_id,
 33         }
 34         self.headers = {
 35             'Connection': 'Keep-Alive',
 36             'User-Agent': 'Mozilla/4.0 (compatible; MSIE 8.0; Windows NT 5.1; Trident/4.0)',
 37         }
 38
 39     def PostPic(self, im, codetype):
 40         """
 41         im: 图片字节
 42         codetype: 题目类型 参考 http://www.chaojiying.com/price.html
 43         """
 44         params = {
 45             'codetype': codetype,
 46         }
 47         params.update(self.base_params)
 48         files = {'userfile': ('ccc.jpg', im)}
 49         r = requests.post('http://upload.chaojiying.net/Upload/Processing.php', data=params, files=files, headers=self.headers)
 50         return r.json()
 51
 52     def ReportError(self, im_id):
 53         """
 54         im_id:报错题目的图片ID
 55         """
 56         params = {
 57             'id': im_id,
 58         }
 59         params.update(self.base_params)
 60         r = requests.post('http://upload.chaojiying.net/Upload/ReportError.php', data=params, headers=self.headers)
 61         return r.json()
 62
 63 s = Service(r'./chromedriver.exe')
 64 driver = webdriver.Chrome(service=s,options=options)
 65 driver.get('https://www.ctrip.com/')
 66 sleep(1)
 67
 68 login_href = driver.find_element(By.XPATH,'//*[@id="nav-bar-set-login-person-text"]/span')
 69 login_href.click()
 70 sleep(2)
 71
 72 userName_tag = driver.find_element(By.ID,'nloginname')
 73 userName_tag.click()
 74 userName_tag.send_keys('15110403732')
 75 sleep(1)
 76
 77 passWord_tag = driver.find_element(By.ID,'npwd')
 78 passWord_tag.click()
 79 passWord_tag.send_keys('080015yuan...')
 80 sleep(1)
 81
 82 slider_btn = driver.find_element(By.XPATH,'//*[@id="sliderddnormal"]/div[1]/div[2]')
 83 action = ActionChains(driver)
 84 action.click_and_hold(slider_btn)
 85 action.move_by_offset(300,0).perform()
 86 sleep(1)
 87
 88 refresh_btn = driver.find_element(By.XPATH,'//*[@id="sliderddnormal-choose"]/div[2]/div[4]/div/a')
 89 refresh_btn.click()
 90
 91 # 对当前页面进行截图并保存
 92 driver.save_screenshot('whole.png')
 93
 94 # 验证码图片左上角和右下角的坐标(裁剪的区域就确定)
 95 code_ele = driver.find_element(By.XPATH,'//*[@id="sliderddnormal-choose"]/div[2]')
 96
 97 # 获取验证码图片左上角的坐标 x,y
 98 location = code_ele.location
 99
100 # 获取验证码图片的长和宽
101 size = code_ele.size
102 print('location',location)
103 # print('size',size)
104
105 # 计算右下角坐标,之后就确定好了验证码区域
106 rangle = (
107     int(location['x']),int(location['y']),
108     int(location['x'] + size['width']),int(location['y'] + size['height'])
109 )
110
111 # 通过crop()对验证码区域进行裁剪
112 i = Image.open('./whole.png')
113 code_img_name = './code.png'
114 frame = i.crop(rangle)
115 frame.save(code_img_name)
116
117 # 将验证码图片提交给超级鹰进行识别
118 chaojiying = Chaojiying_Client('yyy666', 'a123456789', '928028')  # 用户名称、密码、软件ID
119 im = open('./code.png', 'rb').read()  # 本地图片文件路径
120 print(chaojiying.PostPic(im, 9005)['pic_str'])
121 result = chaojiying.PostPic(im,9005)['pic_str']
122
123 # 存储要被点击的验证码的坐标[[x1,y1],[x2,y2],[x3,y3]]
124 all_list = []
125 if '|' in result:
126     list_1 = result.split('|')
127     for i in range(len(list_1)):
128         x = list_1[i].split(',')[0]
129         y = list_1[i].split(',')[1]
130         xy_list = []
131         xy_list.append(x)
132         xy_list.append(y)
133         all_list.append(xy_list)
134 else:
135     x = int(result.split(',')[0])
136     y = int(result.split(',')[1])
137     xy_list = []
138     xy_list.append(x)
139     xy_list.append(y)
140     all_list.append(xy_list)
141 print(all_list)
142
143 # 遍历列表,使用动作链对每一个列表元素对应的x,y指定的位置进行点击操作
144 for l in all_list:
145     x = l[0]
146     y = l[1]
147     action = ActionChains(driver)
148     # move_to_element_with_offset()在验证码的区域上根据x与y进行偏移定位(作用域先由当前页面调整到验证码区域)
149     # move_by_offset()在当前页面直接进行偏移定位即可
150     action.move_to_element_with_offset(code_ele,x,y).click().perform()
151     sleep(0.5)
152 sleep(1)
153
154 submit_btn = driver.find_element(By.XPATH,'//*[@id="sliderddnormal-choose"]/div[2]/div[4]/a')
155 submit_btn.click()
156 sleep(1)
157
158 agree_checkbox = driver.find_element(By.XPATH,'//*[@id="normalview"]/p/input')
159 agree_checkbox.click()
160 sleep(1)
161
162 login_btn = driver.find_element(By.ID,'nsubmit')
163 login_btn.click()
164 sleep(1)
165
166 driver.quit()
事先说明,95行的xpath路径是我直接在浏览器的控制台复制的:
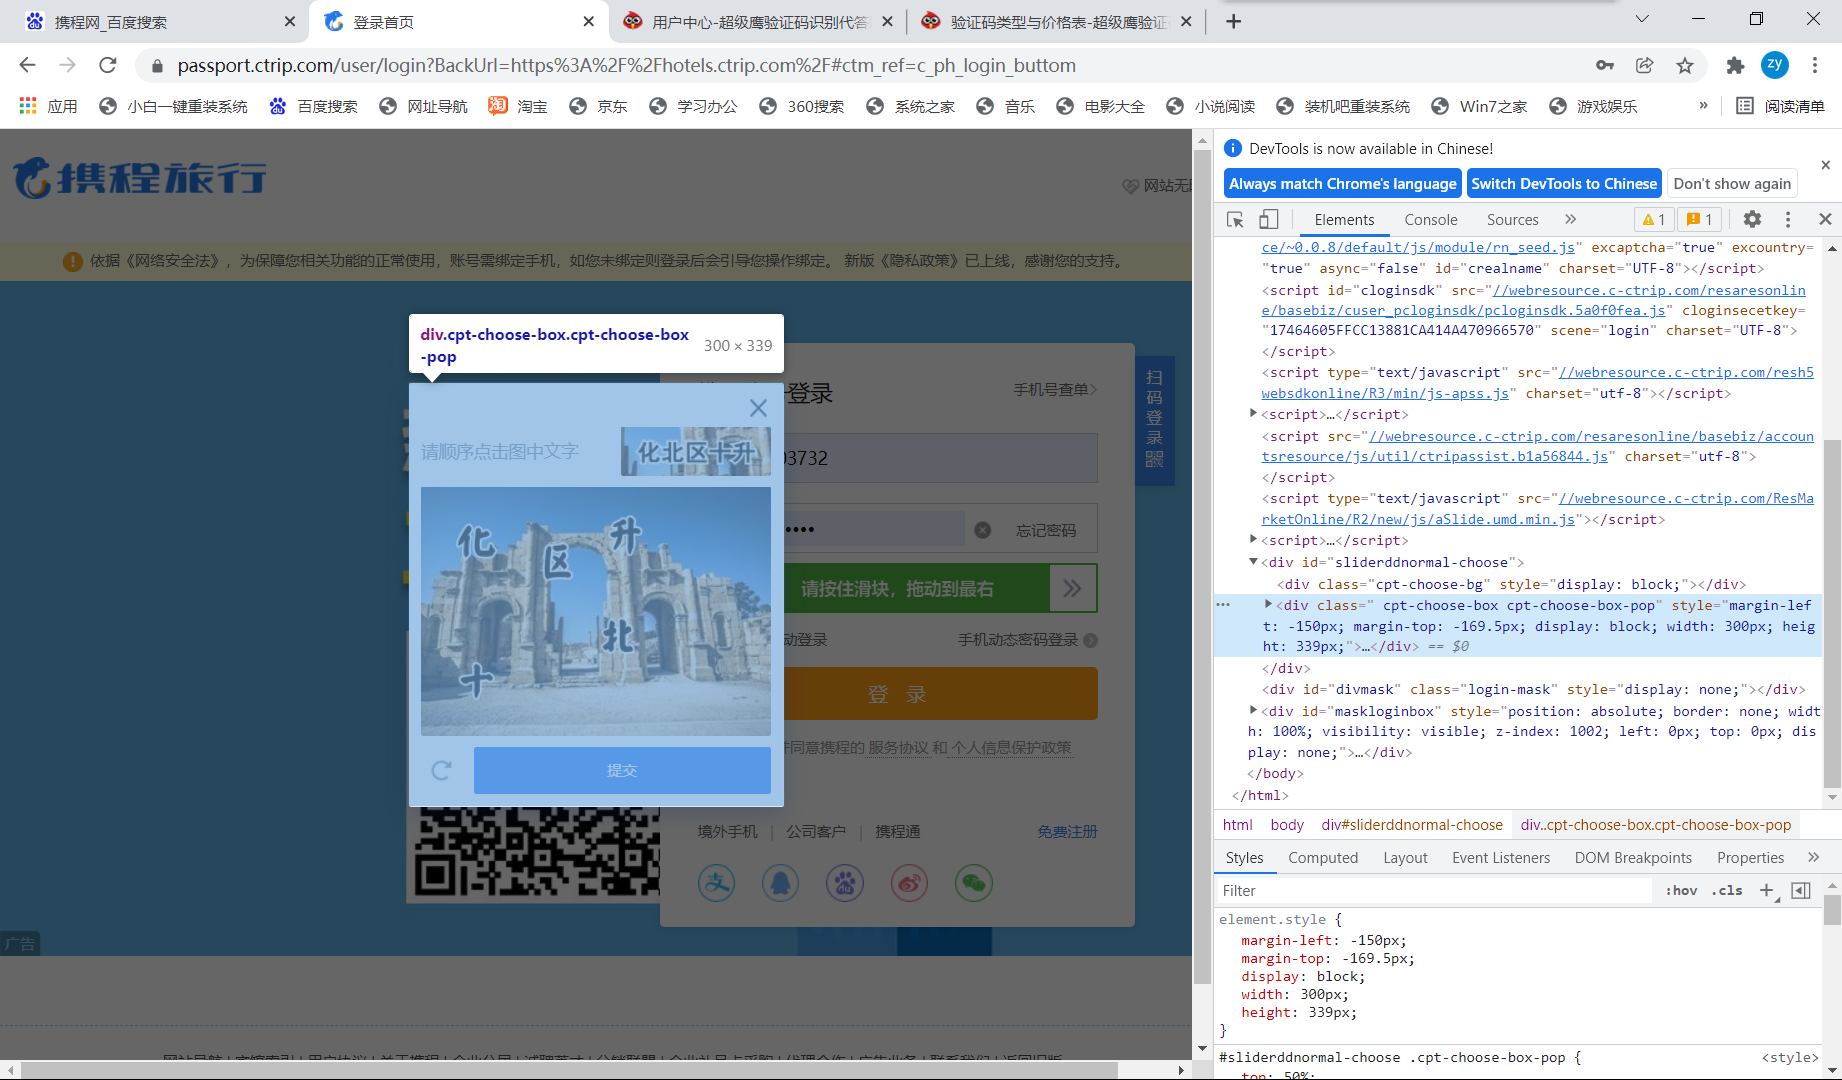
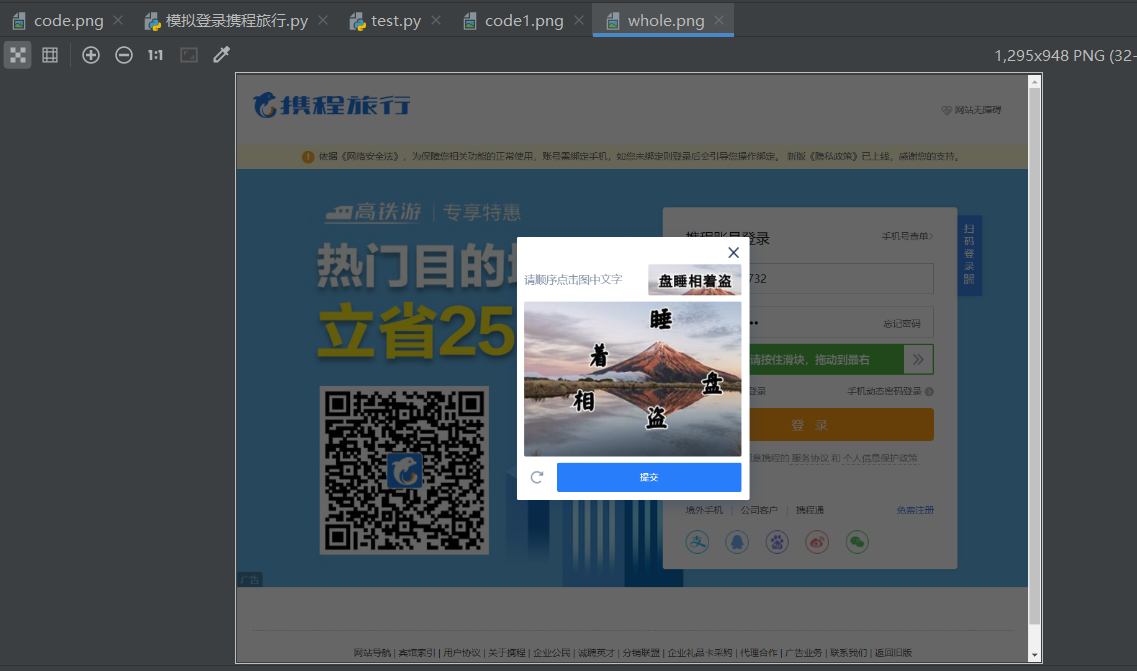
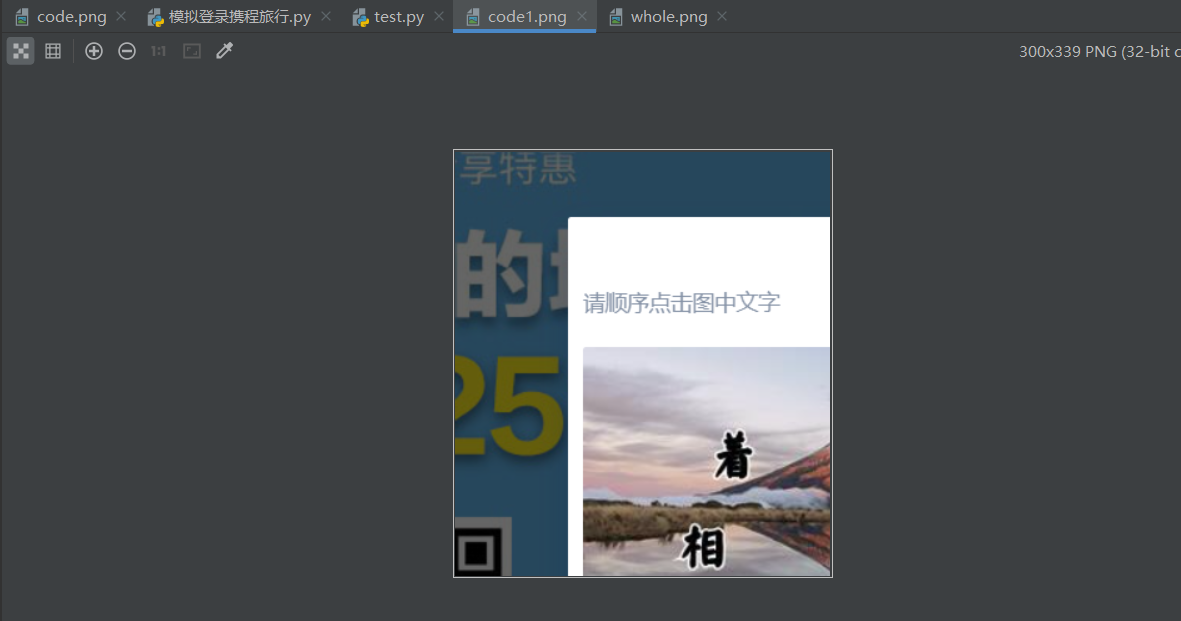
按道理运行后验证码区域应该可以成功截取下来,但我运行后确实这样的(图1为当前页面的截图,图2为验证码区域的截图):

后面通过自己一遍又一遍的测试,最后发现,通过标签定位获取的location和size,并不是验证码区域左上角的坐标,也不是验证码区域的长宽,理由如下:
 1 # 对当前页面进行截图并保存
 2 driver.save_screenshot('whole.png')
 3
 4 # 验证码图片左上角和右下角的坐标(裁剪的区域就确定)
 5 # code_ele = driver.find_element(By.XPATH,'//*[@id="sliderddnormal-choose"]/div[2]')
 6
 7 # 获取验证码图片左上角的坐标 x,y
 8 # location = code_ele.location
 9 location = {'x':448,'y':260}
10
11 # 获取验证码图片的长和宽
12 # size = code_ele.size
13 print('location',location)
14 # print('size',size)
15
16 # 计算右下角坐标,之后就确定好了验证码区域
17 rangle = (
18     int(location['x']),int(location['y']),
19     int(location['x'] + 380),int(location['y'] + 405)
20 )
21
22 # 通过crop()对验证码区域进行裁剪
23 i = Image.open('./whole.png')
24 code_img_name = './code.png'
25 frame = i.crop(rangle)
26 frame.save(code_img_name)
27
28 # 将验证码图片提交给超级鹰进行识别
29 chaojiying = Chaojiying_Client('yyy666', 'a123456789', '928028')  # 用户名称、密码、软件ID
30 im = open('./code.png', 'rb').read()  # 本地图片文件路径
31 print(chaojiying.PostPic(im, 9005)['pic_str'])
32 result = chaojiying.PostPic(im,9005)['pic_str']
33
34 # 存储要被点击的验证码的坐标[[x1,y1],[x2,y2],[x3,y3]]
35 all_list = []
36 if '|' in result:
37     list_1 = result.split('|')
38     for i in range(len(list_1)):
39         x = list_1[i].split(',')[0]
40         y = list_1[i].split(',')[1]
41         xy_list = []
42         xy_list.append(x)
43         xy_list.append(y)
44         all_list.append(xy_list)
45 else:
46     x = int(result.split(',')[0])
47     y = int(result.split(',')[1])
48     xy_list = []
49     xy_list.append(x)
50     xy_list.append(y)
51     all_list.append(xy_list)
52 print(all_list)
53
54 # 遍历列表,使用动作链对每一个列表元素对应的x,y指定的位置进行点击操作
55 for l in all_list:
56     x = l[0]
57     y = l[1]
58     action = ActionChains(driver)
59     # move_to_element_with_offset()在验证码的区域上根据x与y进行偏移定位(作用域先由当前页面调整到验证码区域)
60     # move_by_offset()在当前页面直接进行偏移定位即可
61     action.move_to_element_with_offset(code_ele,x,y).click().perform()
62     sleep(0.5)
63 sleep(1)
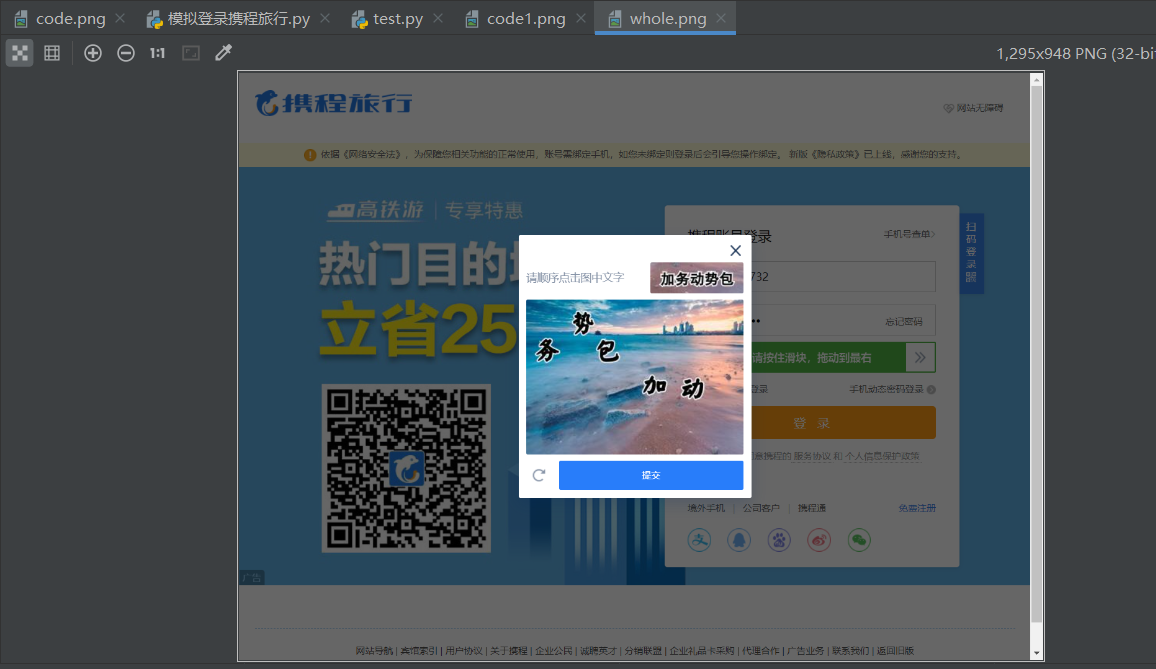
第9行和第19行都是自己测试出来的数据,成功截取到了验证码区域:

可接下来问题又来了,move_to_element_with_offset()第一个参数就需要把作用域调整到验证码区域,但由于我的验证码区域是自己写死的并没有通过标签定位获取,导致这里的参数一我没法传参,于是这里又再次报错......
最后,我想说我知道把location和size直接写死在代码中是不对的,应该用传统的标签定位然后获取location的方法,但很明显那样的话,验证码的区域并没有成功截取,why???

如果有大佬看到这篇博客还请赐教:


 浙公网安备 33010602011771号