java设计模式——适配器模式 Java源代码
前言:适配器模式就是把一个类的接口变换成客户端所能接受的另一种接口,从而使两个接口不匹配而无法在一起工作的两个类能够在一起工作。通常被用在一个项目需要引用一些开源框架来一起工作时,这些框架的内部都有一些关于环境信息的接口,需要从外部引入,但是外部的接口不一定能匹配,在这种情况下,就需要适配器模式来转换接口。
情景:美国的插座,提供110伏电压;中国的插座,提供220伏电压。
在中国,用两孔插座充电
然后坐飞机去美国旅游,假设美国某旅馆的墙上有只有一个三孔插座
幸好我有美国适配器,一头插到三孔插座,另一头转换成二孔插座,就可以给我的荣耀手机充电
在美国,通过美国适配器,用三空插座充电
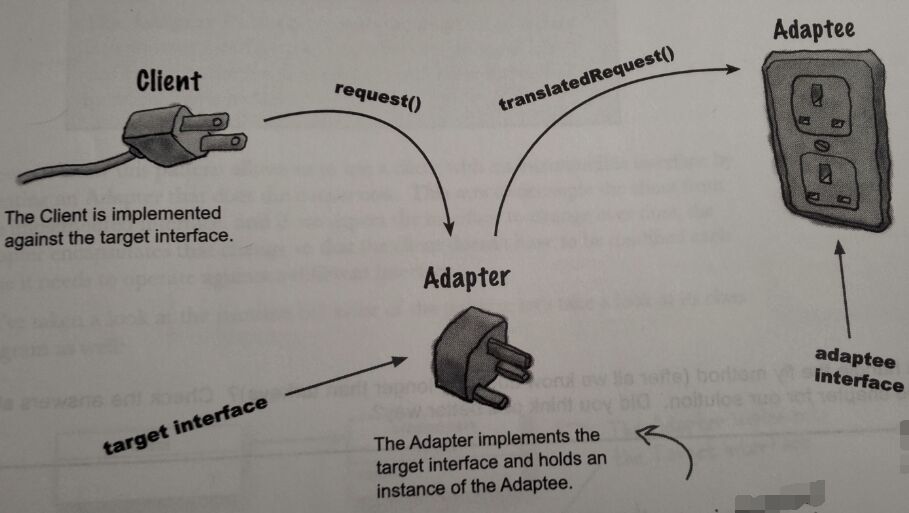
图:不同国家的插座,插头不一样,呵呵哒
图:所以需要写一个适配器模式
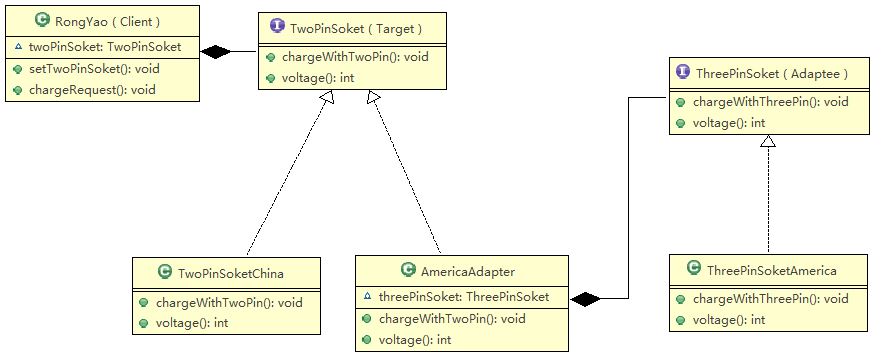
说明例子总共7个类
一个三孔插座接口(Adaptee, 被适配者)
一个三孔插座类
一个两孔插座接口(Target, 适配目标)
一个两孔插座类
一个适配器(Adapter:实现Target, 组合Adaptee)
一个手机类(Client)
一个Main类,用于测试
例子
三孔插座接口(Adaptee)
package adapter;

// adaptee(被适配者) ———— 假设在美国某旅馆的墙上,只有一个三孔插座
public interface ThreePinSoket
{
public void chargeWithThreePin();
public int voltage();
}
三孔插座类
package adapter;

// 实现一个具体的 adaptee
public class ThreePinSoketAmerica implements ThreePinSoket
{
    @Override
    public void chargeWithThreePin()
    {
        System.out.println("美国标准的三孔的插座");
    }
    @Override
    public int voltage()
    {
        return 110;      // 美国电压是110伏
    }
}
两孔插座接口(Target)
package adapter;

// client(具体的adaptee) ———— 这个就是我在中国的墙上的两个插孔的插座,我充电只能用这个
public class TwoPinSoketChina implements TwoPinSoket
{
    @Override
    public void chargeWithTwoPin()
    {
        System.out.println("中国标准的两孔的插座");
    }
    @Override
    public int voltage()
    {
        return 220;      // 中国电压是220伏
    }
}
适配器(Adapter)
实现Target, 组合Adaptee
package adapter;

// 去美国旅游,必须带上一个“美国适配器”:实现两孔插座,组合三孔插座。用来给我的荣耀手机充电
public class AmericaAdapter implements TwoPinSoket // 实现两孔插座(target)
{
    ThreePinSoket threePinSoket; // 组合三孔插座(adaptee)

    public AmericaAdapter(ThreePinSoket threePinSoket)
    {
        this.threePinSoket = threePinSoket;
    }

    @Override
    public void chargeWithTwoPin()
    {
        threePinSoket.chargeWithThreePin();
    }

    @Override
    public int voltage()
    {
        return threePinSoket.voltage() * 2; // 适配器把电压从 110V 升到 220V
    }

}
手机类(Client)
package adapter;

public class RongYao
{
    TwoPinSoket twoPinSoket;

    public RongYao() {}

    public void setTwoPinSoket(TwoPinSoket twoPinSoket)
    {
        this.twoPinSoket = twoPinSoket;
    }

    public void chargeRequest()
    {
        System.out.println("华为荣耀手机, " + twoPinSoket.voltage() + " 伏特充电中\n");
    }

}
Main类,用于测试
package adapter;

public class Main
{

    public static void main(String[] args)
    {
        // 在中国,用两孔插座充电
        TwoPinSoketChina twoPinSoketChina = new TwoPinSoketChina();
        RongYao myRongYao = new RongYao();
        myRongYao.setTwoPinSoket(twoPinSoketChina);
        myRongYao.chargeRequest();

        // 然后坐飞机去美国旅游,美国某旅馆的墙上有只有一个三孔插座
        ThreePinSoketAmerica threePinSoketAmerica = new ThreePinSoketAmerica();
        testThreePin(threePinSoketAmerica);

        // 幸好我有美国适配器,一头插到三孔插座,另一头转换成二孔插座,就可以给我的荣耀手机充电
        AmericaAdapter americaAdapter = new AmericaAdapter(threePinSoketAmerica);
        testTwoPin(americaAdapter);

        // 在美国,通过美国适配器,用三空插座充电
        myRongYao.setTwoPinSoket(americaAdapter);
        myRongYao.chargeRequest();

    }

    static void testTwoPin(TwoPinSoket twoPinSoket)
    {
        twoPinSoket.chargeWithTwoPin();
        System.out.println("电压是" + twoPinSoket.voltage() + "伏特\n");
    }

    static void testThreePin(ThreePinSoket threePinSoket)
    {
        threePinSoket.chargeWithThreePin();
        System.out.println("电压是" + threePinSoket.voltage() + "伏特\n");
    }
}
运行结果
华为荣耀手机,
220 伏特充电中
美国标准的三孔的插座
电压是110伏特
美国标准的三孔的插座
电压是220伏特
华为荣耀手机,
220 伏特充电中
分析
适配器模式有三个重要角色:
- 目标角色(Target),要转换成的目标接口。在我的代码例子中,是中国的两孔接口
- 源角色(Adaptee),需要被转换的源接口。在我的代码例子中,是美国的三孔接口
- 适配器角色(Adapter),核心是实现Target接口, 组合Adaptee接口
这样,Adaptee和Target两个原本不兼容的接口,就可以在一起工作了(我的荣耀手机就可以在美国充电了)。这里的面向接口编程,得到了松耦合的效果。
美国的三孔插座可以实现Adaptee接口,那么英国、法国的三孔插座也可以去实现Adaptee接口,它们都成为了Adaptee接口的子类。在Adapter类中,由于组合了一个Adaptee的引用,根据Java的多态性,我就可以拿着相同的Adapter类去英国,法国充电了。
另一方面,Client类组合一个Target接口的引用。我们就可制造多个Adapter类,实现同一个Target接口。假设索尼手机的需要日本标准的两孔插座,那么写一个日本两孔插座类实现Target接口,我就可以拿着相同的Adapter类,在美国给日本的索尼手机充电了。


