
爬虫
爬虫
什么是爬虫?就是伪造浏览器,下载网页源代码,再从源代码获取需要的数据,一般分为两步: 1、伪造浏览器下载网页(requests模块) 2、对网页的内容进行结构化处理(BeautifulSoup模块)requests模块
安装:pip install requests 下面是这个模块常用到的方法、属性# 实例化对象,把所有的内容都封装到对象里,以下是get请求
response = requests.get(url="https://XXXXXXX")
# post请求,某些网站做了限制,需要headers中添加User-Agent、Host、Referer
response = requests.post(url="https://XXXXXXX",data={},headers={}, cookies={})
# 获取cookies
response.cookies.get_dict()
# 获取状态码
print(response.status_code)
# 获取文本内容,
print(response.text)
# 但此文本内容是乱码,因为默认用的是utf8,而此文本用的是gbk
# 设置编码
response.encoding = 'gbk'
print(response.text)
# 获取二进制格式的文本内容
print(response.content)
关于请求头中Content-Type
这个头主要有两种类型application/x-www-form-urlencoded;charset=UTF-8和application/json;charset=UTF-8 第一种主要是用于发送简单数据,如简单字典{'k1':'v1','k2':'v2}, 第二种主要是用于发送复杂数据,如复杂字典,值中又包含字典的,案例如下:# django服务器端
def server(request):
# request.POST只能处理简单请求,也就是请求头中Content-Type是application/x-www-form-urlencoded;charset=UTF-8
# print(request.POST)
# 要处理复杂请求,也就是请求头中Content-Type是application/json;charset=UTF-8
# 需要从request.body中获取,再解码,然后再json.loads
print(json.loads(request.body.decode('utf-8')))
return HttpResponse('已接收')
# 客户端
import requests
import json
# 发送简单数据给服务器
# response = requests.post(
# url=' http://127.0.0.1:8000/server/',
# headers={
# # 默认值,可不设置
# 'Content-Type': 'application/x-www-form-urlencoded;charset=UTF-8',
# },
# data={'name': 'Treelight', 'age': 18}
# )
# print(response.text)
# 发送复杂数据比如字典的值只能为列表、数字、字符串等,不可以用字典,如以下的data
# 这就请求头中的Content-Type用到application/json格式,同时需要用到json
# response = requests.post(
# url=' http://127.0.0.1:8000/server/',
# headers={
# # 默认值
# 'Content-Type': 'application/json;charset=UTF-8',
# },
# data=json.dumps({
# 'disk': ['disk1', 'disk2'],
# 'cpu': {
# 1: 'cpu1',
# 2: 'cpu2',
# 3: 'cpu3',
# }
# })
# )
# print(response.text)
# 发送复杂数据的第二种形式
response = requests.post(
url=' http://127.0.0.1:8000/server/',
json=({
'disk': ['disk1', 'disk2'],
'cpu': {
1: 'cpu1',
2: 'cpu2',
3: 'cpu3',
}
})
)
print(response.text)
requests参数
response = requests.request(
				method='get', # 请求方式
				url="", # 请求地址
				params = {}, # get形式传的参数  requests.get(url='http://www.cnblogs.com/wupeiqi',params={'id':1,'page':2})
				data={}, # 发送的请求体内容,
				json={}, # 发送的请求体内容,内部json.dumps({....})
				headers={},
				cookies={},
				proxies={}, # 代理、

				files = (), #上传文件
				auth=None, # 简单常用的验证规则
				timeout=(1,2), # 连接超时;响应超时
				allow_redirects=True, # 允许重定向
				stream=True, # 流式下载
				cert=(), # 证书
			)
import requests

session = requests.Session()

### 1、首先登陆任何页面,获取cookie
i1 = session.get(url="http://dig.chouti.com/help/service")

### 2、用户登陆,携带上一次的cookie,后台对cookie中的 gpsd 进行授权
i2 = session.post(
	url="http://dig.chouti.com/login",
	data={
		'phone': "8615131255089",
		'password': "xxxxxx",
		'oneMonth': ""
	}
)

i3 = session.post(
	url="http://dig.chouti.com/link/vote?linksId=8589623",
)
print(i3.text)
更多请参考https://www.cnblogs.com/wupeiqi/articles/5354900.html
请求体:FormData
Request
用户凭证:响应体 cookie中
BeautifulSoup模块
安装:pip install BeautifulSoup4 这个模块是对下载的html或xml内容进行结构化处理的 常用的属性、方法如下:# 把文本传过去,然后用python自带的html解释器处理,进行结构化,返回的是顶级结构
soup = BeautifulSoup(response.text, 'html.parser')
# 找到id为i1的标签
tag1 = soup.select('#i1')
# 属性的增删改
del tag1.attrs['name']
tag1.attrs['name'] = 'username'
# 如果没有此属性则会增加
tag1.attrs['result'] = 'Good'
# 找孩子
tag1.children
# 找子子孙孙
tag1.descendsants
# 删除标签里的所有内容,但不包括自己
tag1.clear
# 全部删除,包括自己
tag1.decompose()
# 全部删除,包括自己,而且有返回值
ret = tag1.extra()
# 转换成字符串
tag1.decode()
# 转换成字符串,但不包括自己
tag1.decode_contents()
# 转换成字节
tag1.encode()
# 转换成字节,但不包括自己
tag1.encode_contents()
# 找第一个标签,文本为Beckham
tag2 = soup.find(name='div', attrs={'class':'form-control','id':'username'}, recursive=True, text='Beckham')
# 和上面效果一样的,但注意class需要有下划线,建议使用上面的
tag2 = soup.find(name='div', class_='form-control',id='username', recursive=True, text='Beckham')
# find_all:找到第一个div标签
tag3 = soup.find_all(name='div', limit=1)
# find_all要找的属性值可以是列表,以下是找到div或a标签
tag3 = soup.find_all(name=['div', 'a'])
# 找到类为form-control或myform的标签
tag3 = soup.find_all(class=['form-control', 'myform'])
# 也可为正则
reg = re.compile('form-.*')
tag3 = soup.find_all(class=reg)
# 也可为函数,找到同时有class和id属性的标签
def func(tag):
return tag.has_attr('class') and tag.has_attr('id')
v = soup.find_all(name=func)
print(v)
# 标签是否有此属性
tag3.has_attr('class')
# 获取文本
tag3.get_text()
更多请参考https://www.cnblogs.com/wupeiqi/articles/6283017.html
例一、爬取汽车之家的数据
import requests
from bs4 import BeautifulSoup

# 伪造浏览器,下载页面
# 实例化对象,把所有的内容都封装到对象里
response = requests.get(url="https://www.autohome.com.cn/news/")
# 获取状态码
# print(response.status_code)
# 获取文本内容,
# print(response.text)
# 但此文本内容是乱码,因为默认用的是utf8,而此文本用的是gbk
# 设置编码
response.encoding = 'gbk'
# print(response.text)
# 获取二进制格式的文本内容
# print(response.content)
# 下载页面完毕

# 结构化处理开始
# 把文本传过去,然后用python自带的html解释器处理,进行结构化,返回的是顶级结构
soup = BeautifulSoup(response.text, 'html.parser')
# 找到id是auto-channel-lazyload-article的div 标签,返回的是Tag对象
div = soup.find(name='div', id='auto-channel-lazyload-article')
# 从tag对象可继续找其下面的孩子,如找其li,find_all返回的是Tag对象列表
li_list = div.find_all(name='li')
for li in li_list:
    h3 = li.find(name='h3')
    a = li.find(name='a')
    p = li.find(name='p')
    img = li.find(name='img')
    if not h3:
        continue
    # 获取tag对象文本
    print(h3.text)
    # 获取属性
    print(a.get('href'))
    print(p.text)
    # 下载图片
    img_url = 'https:' + img.get('src')
    filename = img_url.rsplit('/', maxsplit=1)[1]
    img_res = requests.get(img_url)
    with open(filename, 'wb') as f:
        # 需要的是二进制格式
        f.write(img_res.content)
    # 下载图片结构
    print('-------------------------------------------------')
**------------恢复内容开始------------**
爬虫
什么是爬虫?就是伪造浏览器,下载网页源代码,再从源代码获取需要的数据,一般分为两步: 1、伪造浏览器下载网页(requests模块) 2、对网页的内容进行结构化处理(BeautifulSoup模块)requests模块
安装:pip install requests 下面是这个模块常用到的方法、属性# 实例化对象,把所有的内容都封装到对象里,以下是get请求
response = requests.get(url="https://XXXXXXX")
# post请求,某些网站做了限制,需要headers中添加User-Agent、Host、Referer
response = requests.post(url="https://XXXXXXX",data={},headers={}, cookies={})
# 获取cookies
response.cookies.get_dict()
# 获取状态码
print(response.status_code)
# 获取文本内容,
print(response.text)
# 但此文本内容是乱码,因为默认用的是utf8,而此文本用的是gbk
# 设置编码
response.encoding = 'gbk'
print(response.text)
# 获取二进制格式的文本内容
print(response.content)
关于请求头中Content-Type
这个头主要有两种类型application/x-www-form-urlencoded;charset=UTF-8和application/json;charset=UTF-8 第一种主要是用于发送简单数据,如简单字典{'k1':'v1','k2':'v2}, 第二种主要是用于发送复杂数据,如复杂字典,值中又包含字典的,案例如下:# django服务器端
def server(request):
# request.POST只能处理简单请求,也就是请求头中Content-Type是application/x-www-form-urlencoded;charset=UTF-8
# print(request.POST)
# 要处理复杂请求,也就是请求头中Content-Type是application/json;charset=UTF-8
# 需要从request.body中获取,再解码,然后再json.loads
print(json.loads(request.body.decode('utf-8')))
return HttpResponse('已接收')
# 客户端
import requests
import json
# 发送简单数据给服务器
# response = requests.post(
# url=' http://127.0.0.1:8000/server/',
# headers={
# # 默认值,可不设置
# 'Content-Type': 'application/x-www-form-urlencoded;charset=UTF-8',
# },
# data={'name': 'Treelight', 'age': 18}
# )
# print(response.text)
# 发送复杂数据比如字典的值只能为列表、数字、字符串等,不可以用字典,如以下的data
# 这就请求头中的Content-Type用到application/json格式,同时需要用到json
# response = requests.post(
# url=' http://127.0.0.1:8000/server/',
# headers={
# # 默认值
# 'Content-Type': 'application/json;charset=UTF-8',
# },
# data=json.dumps({
# 'disk': ['disk1', 'disk2'],
# 'cpu': {
# 1: 'cpu1',
# 2: 'cpu2',
# 3: 'cpu3',
# }
# })
# )
# print(response.text)
# 发送复杂数据的第二种形式
response = requests.post(
url=' http://127.0.0.1:8000/server/',
json=({
'disk': ['disk1', 'disk2'],
'cpu': {
1: 'cpu1',
2: 'cpu2',
3: 'cpu3',
}
})
)
print(response.text)
requests参数
response = requests.request(
				method='get', # 请求方式
				url="", # 请求地址
				params = {}, # get形式传的参数  requests.get(url='http://www.cnblogs.com/wupeiqi',params={'id':1,'page':2})
				data={}, # 发送的请求体内容,
				json={}, # 发送的请求体内容,内部json.dumps({....})
				headers={},
				cookies={},
				proxies={}, # 代理、

				files = (), #上传文件
				auth=None, # 简单常用的验证规则
				timeout=(1,2), # 连接超时;响应超时
				allow_redirects=True, # 允许重定向
				stream=True, # 流式下载
				cert=(), # 证书
			)
import requests

session = requests.Session()

### 1、首先登陆任何页面,获取cookie
i1 = session.get(url="http://dig.chouti.com/help/service")

### 2、用户登陆,携带上一次的cookie,后台对cookie中的 gpsd 进行授权
i2 = session.post(
	url="http://dig.chouti.com/login",
	data={
		'phone': "8615131255089",
		'password': "xxxxxx",
		'oneMonth': ""
	}
)

i3 = session.post(
	url="http://dig.chouti.com/link/vote?linksId=8589623",
)
print(i3.text)
更多请参考https://www.cnblogs.com/wupeiqi/articles/5354900.html
请求体:FormData
Request
用户凭证:响应体 cookie中
BeautifulSoup模块
安装:pip install BeautifulSoup4 这个模块是对下载的html或xml内容进行结构化处理的 常用的属性、方法如下:# 把文本传过去,然后用python自带的html解释器处理,进行结构化,返回的是顶级结构
soup = BeautifulSoup(response.text, 'html.parser')
# 找到id为i1的标签
tag1 = soup.select('#i1')
# 属性的增删改
del tag1.attrs['name']
tag1.attrs['name'] = 'username'
# 如果没有此属性则会增加
tag1.attrs['result'] = 'Good'
# 找孩子
tag1.children
# 找子子孙孙
tag1.descendsants
# 删除标签里的所有内容,但不包括自己
tag1.clear
# 全部删除,包括自己
tag1.decompose()
# 全部删除,包括自己,而且有返回值
ret = tag1.extra()
# 转换成字符串
tag1.decode()
# 转换成字符串,但不包括自己
tag1.decode_contents()
# 转换成字节
tag1.encode()
# 转换成字节,但不包括自己
tag1.encode_contents()
# 找第一个标签,文本为Beckham
tag2 = soup.find(name='div', attrs={'class':'form-control','id':'username'}, recursive=True, text='Beckham')
# 和上面效果一样的,但注意class需要有下划线,建议使用上面的
tag2 = soup.find(name='div', class_='form-control',id='username', recursive=True, text='Beckham')
# find_all:找到第一个div标签
tag3 = soup.find_all(name='div', limit=1)
# find_all要找的属性值可以是列表,以下是找到div或a标签
tag3 = soup.find_all(name=['div', 'a'])
# 找到类为form-control或myform的标签
tag3 = soup.find_all(class=['form-control', 'myform'])
# 也可为正则
reg = re.compile('form-.*')
tag3 = soup.find_all(class=reg)
# 也可为函数,找到同时有class和id属性的标签
def func(tag):
return tag.has_attr('class') and tag.has_attr('id')
v = soup.find_all(name=func)
print(v)
# 标签是否有此属性
tag3.has_attr('class')
# 获取文本
tag3.get_text()
更多请参考https://www.cnblogs.com/wupeiqi/articles/6283017.html
例一、爬取汽车之家的数据
import requests
from bs4 import BeautifulSoup

# 伪造浏览器,下载页面
# 实例化对象,把所有的内容都封装到对象里
response = requests.get(url="https://www.autohome.com.cn/news/")
# 获取状态码
# print(response.status_code)
# 获取文本内容,
# print(response.text)
# 但此文本内容是乱码,因为默认用的是utf8,而此文本用的是gbk
# 设置编码
response.encoding = 'gbk'
# print(response.text)
# 获取二进制格式的文本内容
# print(response.content)
# 下载页面完毕

# 结构化处理开始
# 把文本传过去,然后用python自带的html解释器处理,进行结构化,返回的是顶级结构
soup = BeautifulSoup(response.text, 'html.parser')
# 找到id是auto-channel-lazyload-article的div 标签,返回的是Tag对象
div = soup.find(name='div', id='auto-channel-lazyload-article')
# 从tag对象可继续找其下面的孩子,如找其li,find_all返回的是Tag对象列表
li_list = div.find_all(name='li')
for li in li_list:
    h3 = li.find(name='h3')
    a = li.find(name='a')
    p = li.find(name='p')
    img = li.find(name='img')
    if not h3:
        continue
    # 获取tag对象文本
    print(h3.text)
    # 获取属性
    print(a.get('href'))
    print(p.text)
    # 下载图片
    img_url = 'https:' + img.get('src')
    filename = img_url.rsplit('/', maxsplit=1)[1]
    img_res = requests.get(img_url)
    with open(filename, 'wb') as f:
        # 需要的是二进制格式
        f.write(img_res.content)
    # 下载图片结构
    print('-------------------------------------------------')
Scrapy框架
安装
本人在pycharm中按以下步骤安装暂时没问题。由于要依赖twisted和wheel,: 步骤一、安装pywin32 步骤二、安装wheel 步骤三、安装twisted 步骤四、安装scrapy 下一次尝试一下直接安装scrapy初次使用
使用上感觉上和Django差不多,都要创建项目、创建爬虫、编写内容、启动爬虫 创建项目:scrapy startproject 项目名称 以下操作必须要cd到项目目录文件夹下操作 创建爬虫:scrapy genspider 爬虫名称 域名 编写内容:在“项目名称\spider”中对应的爬虫名称文件编写 启动爬虫:scrapy crawl 爬虫名称 --nolog(没有日记)scrapy爬虫流程
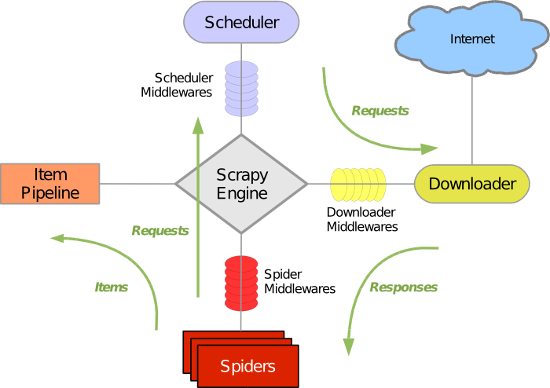
图片来源于https://www.cnblogs.com/wupeiqi/articles/6229292.html
定义起始url处理函数
运行scrapy crawl chouti --nolog,会找到name为chouti的类。然后根据起始url下载网页,下载完成后,会根据此类来定义回调函数处理下载的数据。定义起始urls回调函数的有两种方式# 定义爬虫方式之一、不推荐,不灵活,因为如果有多个起始url,就会交给同一个parse函数处理
class ChoutiSpider(scrapy.Spider):
name = 'chouti'
allowed_domains = ['chouti.com']
start_urls = ['https://dig.chouti.com/']
def parse(self, response):
print(response.text)
from scrapy.http import Request

# 定义爬虫处理方式二,推荐,不同的起始url可交给不同的函数处理
class ChoutiSpider(scrapy.Spider):
    name = 'chouti'
    allowed_domains = ['chouti.com']

    def start_requests(self):
        # 定义处理url下载完的处理函数,相当于加入图中的任务队列
        yield Request(url='https://dig.chouti.com', callback=self.parse_chouti)
        yield Request(url='https://www.baidu.com', callback=self.parse_baidu)
        # 相当于以下操作,两都均可
        # return [Request(url='https://dig.chouti.com', callback=self.parse_chouti),
        #         Request(url='https://www.baidu.com', callback=self.parse_baidu)]

    def parse_chouti(self, response):
        print('处理chouti', response)

    def parse_baidu(self, response):
        print('处理baidu', response)
选择器
在scrapy框架中,下载网页会自动完成,但要从网页中抽取数据,还是需要自己手动完成。可使用BeautifulSoup模块,可使用scrapy自带的选择器,这里就介绍一下选择器,先送上例子: def parse_chouti(self, response):
"""获取抽屉中所有的标题和其对应url"""
# response封装了选择器可选择对象
# 以以下为例,如果属性class是模糊匹配,则需要[contains(@class, "值")]
# 属性精确匹配,则[@class="link-item"]
# //是从根找,.//是从当前为根找子子孙孙,/只找孩子
# 从最根部开始找子孙中class中含有link-item属性的div
item_list = response.selector.xpath('//div[contains(@class, "link-item")]')
for item in item_list:
# 在选择条件后加上/text()获取文本对象,get方法是把提取第一个值
# 相对get方法,也有get_list
# 以当前标签作为根,在子孙中查找class中含有link-title的标签
title = item.xpath('.//a[contains(@class, "link-title")]/text()').get()
# 在选择条件后加/@属性获取属性值
url = item.xpath('.//a[contains(@class, "link-title")]/@href').get()
知识点:
一、实例化选择器
方式一、response.selector.xpath('选择条件')
方式二、
from scrapy import Selector
tag = Selector(body=body).xpaht('选择条件')
二、搜索起点
//:从最根的目录查找子孙
.//:从当前标签开始找子孙
/:找儿子
三、属性可模糊匹配或精确匹配
1、模糊匹配,则需要[contains(@class, "值")]
2、精确匹配,则[@class="link-item"]
四、查找文本或属性选择器
文本:'选择条件/text()',返回文本选择器
属性:'选择条件/@href',返回href属性选择器
五、提取文本或属性
以上只是找到选择器,但没返回字符串,可通过get、getl_list取
1、get:以字符串形式返回第一个的文本或属性
2、get_list:返回的是列表
六、选择条件中使用正则表达式
格式://标签名[re:test(@属性, "正则表达式")]
如//div[re:test(@class, "^item-\d&")]
Pipelines
有一个pipelines.py文件,此文件里定义了一个类,有什么作用呢?这个文件定义了一个接口,提供了一些函数以供爬虫使用的前、中、后使用,比如: open_spider:在爬虫前调用此函数 close_spider:在爬虫执行完毕调用此函数 process_item:在爬虫回调函数中如果使用yield返回一个item对象,则执行此函数 也提供了以下方法: __init__:这个就不多说了 from_crawler:最先执行的方法,必须要返回一个对象(基本上不用),类的静态方法,需要加上@classmethod 以上方法执行的顺序 from_crawler--->__init__--->open_spider-->process_item-->close_spider 使用示例如下:class DBPipeline(object):
def process_item(self, item, spider):
"""回调函数执行完yield后执行此方法"""
return item
class FilePipeline(object):
def open_spider(self, spider):
"""在执行爬虫前执行的方法"""
self.f = open('log.txt', 'w', encoding='utf-8')
def process_item(self, item, spider):
"""回调函数执行完yield后执行此方法"""
self.f.write(item['title'] + '\n')
self.f.flush()
return item
def close_spider(self, spider):
"""在爬虫执行完毕的方法"""
self.f.close()
不过使用这些函数,还需要以下步骤:
一、在settings.py中注册,如下
# 值越小就优先执行
ITEM_PIPELINES = {
   's1.pipelines.DBPipeline': 300,
   's1.pipelines.FilePipeline': 400,
}
二、在items.py中定义item类
import scrapy


class S1Item(scrapy.Item):
    # define the fields for your item here like:
    # name = scrapy.Field()
    url = scrapy.Field()
    title = scrapy.Field()
三、在回调函数中使用yield,返回一个item对象
yield S1Item(title=title, url=url)
关于process_item函数的传递
由于pipelines中可注册多个类,也就是说会有多个process_item执行,它们的执行顺序是按照settings中设置的值执行,越小的越优先,而且首先执行的会传递item给下一个process_item,如下图 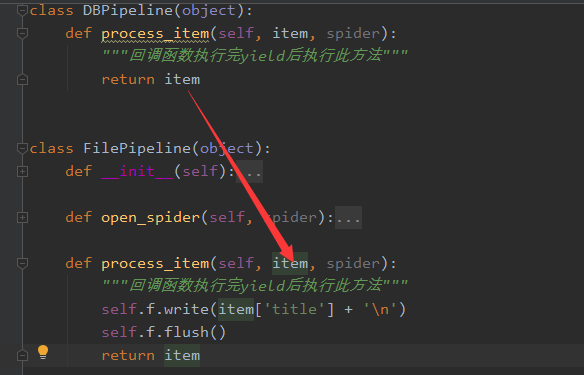如果不想传递,则可以这样做
from scrapy.exceptions import DropItem  # 导入模块


class DBPipeline(object):
    def process_item(self, item, spider):
        """回调函数执行完yield后执行此方法"""
        # 不传递item了
        return DropItem()
settings.py
一、pipelines配置# 值越小就优先执行
ITEM_PIPELINES = {
's1.pipelines.DBPipeline': 300,
's1.pipelines.FilePipeline': 400,
}
二、递归层级限制:DEPTH_LIMIT = 2
三、过滤规则设置
DUPEFILTER_CLASS = 's1.dupefilter.RepeatUrl'
四、下载中间件设置
DOWNLOADER_MIDDLEWARES = {
   's1.middlewares.S1DownloaderMiddleware': 543,
}
五、是否遵循网站规则
ROBOTSTXT_OBEY = True
自定义过滤规则
比如说有一些网页已经爬过了,就不想再爬,可以通过过滤来。是怎么样过滤的呢?其实是把任务放到调度器前,它会经过过滤规则过滤一下看看是否符合规则的。例子如下:class RepeatUrl:
def __init__(self):
self.visited_url = set()
@classmethod
def from_settings(cls, settings):
"""
初始化时,调用
:param settings:
:return:
"""
return cls()
def request_seen(self, request):
"""
检测当前请求是否已经被访问过
:param request:
:return: True表示已经访问过;False表示未访问过
"""
if request.url in self.visited_url:
return True
self.visited_url.add(request.url)
return False
def open(self):
"""
开始爬去请求时,调用
:return:
"""
print('open replication')
def close(self, reason):
"""
结束爬虫爬取时,调用
:param reason:
:return:
"""
print('close replication')
def log(self, request, spider):
"""
记录日志
:param request:
:param spider:
:return:
"""
print('repeat', request.url)
settings.py中
DUPEFILTER_CLASS = 's1.dupefilter.RepeatUrl'
来源https://www.cnblogs.com/wupeiqi/articles/6229292.html
下载中间件
scrapy提供了多个中间件,比较常用的是下载中间件,要使用中间件,要设置settings.pyDOWNLOADER_MIDDLEWARES = {
's1.middlewares.S1DownloaderMiddleware': 543,
}
一般有以下的作用,前两个比较常用
1、设置请求头,返回None
2、设置代理,返回None
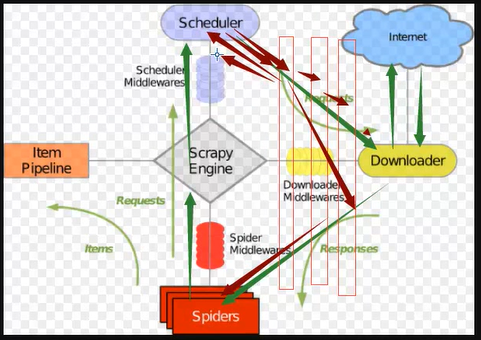
3、返回Response,流程如下:

4、返回Request,由于会添加到调试器,会不断在中间件和调度器来回流程如下:
5、丢弃请求
from scrapy.exceptions import IgnoreRequest
raise IgnoreRequest
所有示例请看以下例子:
中间件
# -*- coding: utf-8 -*-

# Define here the models for your spider middleware
#
# See documentation in:
# https://docs.scrapy.org/en/latest/topics/spider-middleware.html

from scrapy import signals


class S1SpiderMiddleware(object):
    # Not all methods need to be defined. If a method is not defined,
    # scrapy acts as if the spider middleware does not modify the
    # passed objects.

    @classmethod
    def from_crawler(cls, crawler):
        # This method is used by Scrapy to create your spiders.
        s = cls()
        crawler.signals.connect(s.spider_opened, signal=signals.spider_opened)
        return s

    def process_spider_input(self, response, spider):
        # Called for each response that goes through the spider
        # middleware and into the spider.

        # Should return None or raise an exception.
        return None

    def process_spider_output(self, response, result, spider):
        # Called with the results returned from the Spider, after
        # it has processed the response.

        # Must return an iterable of Request, dict or Item objects.
        for i in result:
            yield i

    def process_spider_exception(self, response, exception, spider):
        # Called when a spider or process_spider_input() method
        # (from other spider middleware) raises an exception.

        # Should return either None or an iterable of Request, dict
        # or Item objects.
        pass

    def process_start_requests(self, start_requests, spider):
        # Called with the start requests of the spider, and works
        # similarly to the process_spider_output() method, except
        # that it doesn’t have a response associated.

        # Must return only requests (not items).
        for r in start_requests:
            yield r

    def spider_opened(self, spider):
        spider.logger.info('Spider opened: %s' % spider.name)


class S1DownloaderMiddleware(object):
    # Not all methods need to be defined. If a method is not defined,
    # scrapy acts as if the downloader middleware does not modify the
    # passed objects.

    @classmethod
    def from_crawler(cls, crawler):
        # This method is used by Scrapy to create your spiders.
        s = cls()
        crawler.signals.connect(s.spider_opened, signal=signals.spider_opened)
        return s

    def process_request(self, request, spider):
        # Called for each request that goes through the downloader
        # middleware.

        # Must either:
        # - return None: continue processing this request
        # - or return a Response object
        # - or return a Request object
        # - or raise IgnoreRequest: process_exception() methods of
        #   installed downloader middleware will be called
        # 1、请求头处理,所有的请求都会加上
        request.headers['User-Agent'] = 'Mozilla/5.0 (Windows NT 6.1; WOW64) AppleWebKit/537.36 (KHTML, like Gecko) Chrome/69.0.3497.100 Safari/537.36'
        # 2、添加代理
        # 3、返回响应
        # from scrapy.http import Response
        # return Response(url='www.abc.com', body=b'request failed')
        # 4、 返回request,这样会不断地在下载中间件和调试器来回
        # from scrapy.http import Request
        # return Request(url='dig.chouti.com')
        # 5、丢弃请求
        # from scrapy.exceptions import IgnoreRequest
        # raise IgnoreRequest

    def process_response(self, request, response, spider):
        # Called with the response returned from the downloader.

        # Must either;
        # - return a Response object
        # - return a Request object
        # - or raise IgnoreRequest
        return response

    def process_exception(self, request, exception, spider):
        # Called when a download handler or a process_request()
        # (from other downloader middleware) raises an exception.

        # Must either:
        # - return None: continue processing this exception
        # - return a Response object: stops process_exception() chain
        # - return a Request object: stops process_exception() chain
        pass

    def spider_opened(self, spider):
        spider.logger.info('Spider opened: %s' % spider.name)
代理
实现方式有两种 一、内置 在start_request中加入以下语句import os os.environ['http_proxy'] = "http://root:woshiniba@192.168.11.11:9999/" os.environ['https_proxy'] = "http://192.168.11.11:9999/"
二、下载中间件中实现
代理中间件
import random
import base64
import six

def to_bytes(text, encoding=None, errors='strict'):
    if isinstance(text, bytes):
	return text
    if not isinstance(text, six.string_types):
	raise TypeError('to_bytes must receive a unicode, str or bytes '
			'object, got %s' % type(text).__name__)
    if encoding is None:
	encoding = 'utf-8'
    return text.encode(encoding, errors)


class ProxyMiddleware(object):
    def process_request(self, request, spider):
	PROXIES = [
	    {'ip_port': '111.11.228.75:80', 'user_pass': ''},
	    {'ip_port': '120.198.243.22:80', 'user_pass': ''},
	    {'ip_port': '111.8.60.9:8123', 'user_pass': ''},
	    {'ip_port': '101.71.27.120:80', 'user_pass': ''},
	    {'ip_port': '122.96.59.104:80', 'user_pass': ''},
	    {'ip_port': '122.224.249.122:8088', 'user_pass': ''},
	]

	proxy = random.choice(PROXIES)
	if proxy['user_pass'] is not None:
	    request.meta['proxy'] = to_bytes("http://%s" % proxy['ip_port'])
	    encoded_user_pass = base64.encodestring(to_bytes(proxy['user_pass']))
	    request.headers['Proxy-Authorization'] = to_bytes('Basic ' + encoded_user_pass)

	else:
	    request.meta['proxy'] = to_bytes("http://%s" % proxy['ip_port'])
扩展
自定义扩展时,利用信号在指定位置注册制定操作自定义扩展
from scrapy import signals


class MyExtension(object):
    def __init__(self, value):
        self.value = value

    @classmethod
    def from_crawler(cls, crawler):
        val = crawler.settings.getint('MMMM')
        ext = cls(val)

        crawler.signals.connect(ext.spider_opened, signal=signals.spider_opened)
        crawler.signals.connect(ext.spider_closed, signal=signals.spider_closed)

        return ext

    def spider_opened(self, spider):
        print('open')

    def spider_closed(self, spider):
        print('close')
自定制命令
在spiders同级创建任意目录,如:commands 在其中创建 crawlall.py 文件 (此处文件名就是自定义的命令)自定制命令
from scrapy.commands import ScrapyCommand
    from scrapy.utils.project import get_project_settings


    class Command(ScrapyCommand):

        requires_project = True

        def syntax(self):
            return '[options]'

        def short_desc(self):
            return 'Runs all of the spiders'

        def run(self, args, opts):
            spider_list = self.crawler_process.spiders.list()
            for name in spider_list:
                self.crawler_process.crawl(name, **opts.__dict__)
            self.crawler_process.start()

 浙公网安备 33010602011771号