
前端之DOM操作
DOM概述
DOM的全程是document,即文档。哪里的文档?html中的文档文本。DOM我理解为是JavaScript中的模块之一。DOM操作即是要对文档操作,一般分为两步
1、找到标签
2、操作标签
选择器
直接选择器:
document.getElementById 根据ID获取一个标签
document.getElementsByName 根据name属性获取标签集合document.getElementsByClassName 根据class属性获取标签集合document.getElementsByTagName 根据标签名获取标签集合间接选择器
tag = document.getElementById('i1')
parentElement // 父节点标签元素
children // 所有子标签
firstElementChild // 第一个子标签元素
lastElementChild // 最后一个子标签元素
nextElementtSibling // 下一个兄弟标签元素
previousElementSibling // 上一个兄弟标签元素
标签操作
获取内容
tag = document.getElementById('i1')
tag.innerText 仅文本
tag.innerHTML 获取全部内容
tag.value 对于input系列和select、textarea标签,获取当前标签的值
设置内容
tag.innerText='newcontent'
tag.innerHTML=''
tag.value=<str> 对于input系列和select、textarea标签,设置值
tag.selectIndex 获取select标签的索引值
样式操作
tag.className='' 对整个样式操作
tag.classList.add('样式名') 添加样式
tag.classList.remove('样式名') 删除样式
tag.selectIndex=<int> 设置select标签的索引
tag.style.<css属性>=‘’ 设置某个css的某个属性
注意:在Dom中,如background-color属性则以上css属性要去年-。
checkbox
checkbox.checked 获取是否选中
checkbox.checked=true 或false 设置checkbox是否选中
返回顶部
document.body.scrollTop = 0;
document.documentElement.scrollTop = 0;
案例:模态对话框
<!DOCTYPE html>
<html lang="en">
<head>
    <meta charset="UTF-8">
    <title>Title</title>
    <style>
        .border{
        border:1px solid black;}
        .shadow{
        position:fixed;z-index:9;
        top:0;right:0;left:0;bottom:0;
        background-color:black;opacity:0.5}
        .hide{
        display:none}
        .modal{
        position:fixed;z-index:10;
        width:300px;height:300px;
        top:50%;left:50%;
        margin-top:-150px;margin-left:-150px;
        background-color:white;}
    </style>
</head>
<body>
<input type="button" value="添加" onclick="showModal();" \>
<table>
    <thead>
        <tr>
            <th class="border">主机名</th>
            <th class="border">端口</th>
        </tr>
    </thead>
    <tbody>
        <tr>
            <td class="border">192.168.0.10</td>
            <td class="border">80</td>
        </tr>
        <tr>
            <td class="border">192.168.0.20</td>
            <td class="border">8080</td>
        </tr>
    </tbody>
</table>
<!--遮罩层开始-->
<div class="shadow hide" id="i1"></div>
<!--模态层开始-->
<div class="modal hide" id="i2">
    <input type="text" style="height:30px;width:200px;margin-left:20px;margin-top:20px" \>
    <input type="text" style="height:30px;width:200px;margin-top:20px;margin-left:20px"\>
    <br \>
    <input type="button" value="确定" \>
    <input type="button" value="取消" onclick="hideModal();" \>
</div>
<script>
    function showModal(){
        document.getElementById('i1').classList.remove('hide')
        document.getElementById('i2').classList.remove('hide')
    }
    function hideModal(){
        document.getElementById('i1').classList.add('hide')
        document.getElementById('i2').classList.add('hide')
    }
</script>
</body>
</html>
案例:全选、反选、取消
<!DOCTYPE html>
<html lang="en">
<head>
    <meta charset="UTF-8">
    <title>Title</title>
    <style>
        .border{
        border:1px solid black;}
        .shadow{
        position:fixed;z-index:9;
        top:0;right:0;left:0;bottom:0;
        background-color:black;opacity:0.5}
        .hide{
        display:none}
        .modal{
        position:fixed;z-index:10;
        width:300px;height:300px;
        top:50%;left:50%;
        margin-top:-150px;margin-left:-150px;
        background-color:white;}

    </style>
</head>
<body>
<input type="button" value="添加" onclick="showModal();" \>
<input type="button" value="全选" onclick="selectAll();" \>
<input type="button" value="反选" onclick="reverseAll();" \>
<input type="button" value="取消" onclick="cancelAll();" \>
<table id="tb">
    <thead>
    <tr>
        <th class="border">选择</th>
        <th class="border">主机名</th>
        <th class="border">端口</th>
    </tr>
    </thead>
    <tbody>
    <tr>
        <td>
            <input type="checkbox" class="border" \>
        </td>
        <td class="border">192.168.0.10</td>
        <td class="border">80</td>
    </tr>
    <tr>
        <td>
            <input type="checkbox" class="border" \>
        </td>
        <td class="border">192.168.0.20</td>
        <td class="border">8080</td>
    </tr>
    <tr>
        <td>
            <input type="checkbox" class="border" \>
        </td>
        <td class="border">192.168.0.30</td>
        <td class="border">808</td>
    </tr>
    <tr>
        <td>
            <input type="checkbox" class="border" \>
        </td>
        <td class="border">192.168.0.40</td>
        <td class="border">9999</td>
    </tr>
    </tbody>
</table>
<!--遮罩层开始-->
<div class="shadow hide" id="i1"></div>
<!--模态层开始-->
<div class="modal hide" id="i2">
    <input type="text" style="height:30px;width:200px;margin-left:20px;margin-top:20px" \>
    <input type="text" style="height:30px;width:200px;margin-top:20px;margin-left:20px" \>
    <br \>
    <input type="button" value="确定" \>
    <input type="button" value="取消" onclick="hideModal();" \>
</div>
<script>
    function showModal(){
        document.getElementById('i1').classList.remove('hide')
        document.getElementById('i2').classList.remove('hide')
    }
    function hideModal(){
        document.getElementById('i1').classList.add('hide')
        document.getElementById('i2').classList.add('hide')
    }
    function selectAll(){
        var table_tag = document.getElementById('tb')
        var table_body = table_tag.children[1]
        var trs = table_body.children
        for (var i=0;i<trs.length;i++){
            tr=trs[i]
            td=tr.children[0]
            checkbox=td.children[0]
            checkbox.checked=true
        }
    }
    function cancelAll(){
        var table_tag = document.getElementById('tb')
        var table_body = table_tag.children[1]
        var trs = table_body.children
        for (var i=0;i<trs.length;i++){
            tr=trs[i]
            td=tr.children[0]
            checkbox=td.children[0]
            checkbox.checked=false
        }
    }
    function reverseAll(){
        var table_tag = document.getElementById('tb')
        var table_body = table_tag.children[1]
        var trs = table_body.children
        for (var i=0;i<trs.length;i++){
            tr=trs[i]
            td=tr.children[0]
            checkbox=td.children[0]
            if (checkbox.checked){
                checkbox.checked=false
            }
            else{
                checkbox.checked=true
            }
        }
    }

</script>
</body>
</html>
案例:实现左侧菜单的切换
this代指的是触发事件的标签
<!DOCTYPE html>
<html lang="en">
<head>
    <meta charset="UTF-8">
    <title>Title</title>
    <style>
        .header{
        background-color:blue;
        }
        .hide{
        display:none;
        }

    </style>
</head>
<body>
<div style="width:200px">
    <div class="item">
        <div class="header" onclick="changeMenu(this);">菜单1</div>
        <div class="content">
            <div>内容1</div>
            <div>内容1</div>
            <div>内容1</div>
            <div>内容1</div>
        </div>
    </div>
    <div class="item">
        <div class="header" onclick="changeMenu(this);">菜单2</div>
        <div class="content hide">
            <div>内容2</div>
            <div>内容2</div>
            <div>内容2</div>
            <div>内容2</div>
        </div>
    </div>
    <div class="item">
        <div class="header" onclick="changeMenu(this);">菜单3</div>
        <div class="content hide">
            <div>内容3</div>
            <div>内容3</div>
            <div>内容3</div>
            <div>内容3</div>
        </div>
    </div>
    <div class="item">
        <div class="header" onclick="changeMenu(this);">菜单4</div>
        <div class="content hide">
            <div>内容4</div>
            <div>内容4</div>
            <div>内容4</div>
            <div>内容4</div>
        </div>
    </div>
</div>
<script>
    function changeMenu(self){
        tags = self.parentElement.parentElement.children
        for (var i=0;i<tags.length;i++){
            tags[i].children[1].classList.add('hide')
        }
        self.nextElementSibling.classList.remove('hide')
    }
</script>
</body>
</html>
设置属性
tag.attributes 获取所有属性
tag.removeattribute(name)
tag.setAttribute(name,value)
tag.getattribute(name)
tag,<attr>=value
添加标签
方法一、字符串的方式添加
1、先定义一个标签 var tag = '<hr><input type="text">'
2、插入标签
document.getElementById('i1').insertAdjacentHTML('beforeEnd', tag)
其中beforeEnd为position参数,值可为afterEnd、beforeBegin、afterBegin。
<!DOCTYPE html>
<html lang="en">
<head>
    <meta charset="UTF-8">
    <title>Title</title>
</head>
<body>
<input value="+" onclick="addTag();" type="button" \>
<hr>
<div id="i1">
    <input type="text"\>
</div>
<script>
    function addTag() {
        var tag = '<hr><input type="text">'
        document.getElementById('i1').insertAdjacentHTML('beforeEnd', tag)
    }
</script>
</body>
</html>
方法二、对象的方式添加
1、首先创建一个标签
var tag = document.createElement('input')
2、可设置标签的属性,如tag.style.color='red'
3、添加标签:document.getElementById('i1').appendChild(tag)
如下:
<!DOCTYPE html>
<html lang="en">
<head>
    <meta charset="UTF-8">
    <title>Title</title>
</head>
<body>
<input value="+" onclick="addTag();" type="button" \>
<hr>
<div id="i1">
    <input type="text"\>
</div>
<script>
    function addTag() {
        var tag = document.createElement('input')
        tag.style.color='red'
        document.getElementById('i1').appendChild(tag)
    }
</script>
</body>
</html>
任何标签都可通过javascript提交表单。
<!DOCTYPE html>
<html lang="en">
<head>
    <meta charset="UTF-8">
    <title>Title</title>
</head>
<body>
<form action="https://www.oldboyedu.com/" id="i1">
    <a onclick="submit();">走你</a>
</form>
<script>
    function submit(){
        tag = document.getElementById('i1');
        tag.submit();
    }
</script>
</body>
</html>
删除元素
parent_tag.removeChild(child_tag)
替换元素
parent_tag.replaceChild(new_tag, old_tag);
事件传播
如果在页面上的某一个地方有多个标签,则默认情况下会事件传播,如下:在绿色框,既有类为inner的标签,也有类为outer的标签,则点此处,先执行inner标签绑定的事件,再执行outer
<!DOCTYPE html>
<html lang="en">
<head>
    <meta charset="UTF-8">
    <title>Title</title>
    <style>
        .outer {
            width: 200px;
            height: 200px;
            background-color: red;
        }

        .inner {
            width: 100px;
            height: 100px;
            background-color: green;
        }
    </style>
</head>
<body>
<div class="outer">
    <div class="inner"></div>
</div>
<script>
    var out_ele = document.getElementsByClassName('outer')[0];
    var in_ele = document.getElementsByClassName('inner')[0];
    out_ele.onclick = function () {
        alert(123);
    };
    in_ele.onclick = function () {
        alert(888);
    };
</script>
</body>
</html>
如需阻止事件传播,如下:
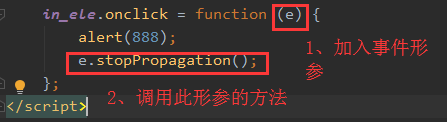
Bytheway:e存储的是事件的具体信息。比如e.KeyCode获取键盘的代码。
其它操作
1、console.log 在console中输出值
2、alert 在弹出框中输出值
3、confirm 确认框
4、location.href 获取url
5、location.reload() 刷新
6、location.href='' 重定向
7、setInterval(func(),5000):设置定时器
8、clearInterval():删除定时器,一般的用法:获取定时器对象,然后在setInterval中定义的函数使用
<!DOCTYPE html>
<html lang="en">
<head>
    <meta charset="UTF-8">
    <title>Title</title>
</head>
<body>
<script>
    obj = setInterval(function () {
        console.log(1);
        clearInterval(obj)
    }, 1000)
</script>
</body>
</html>
9、setTimeout(func(),time):设置过多长时间才执行func,只执行一次
10、clearTimeout:清除单次定时器,使用方法
obj=setTimeout()
clearTimeout(obj)
案例:显示已删除5秒
<!DOCTYPE html>
<html lang="en">
<head>
    <meta charset="UTF-8">
    <title>Title</title>
</head>
<body>
<div id="status"></div>
<input type="button" value="删除" onclick="func();">
<script>
    function func() {
        document.getElementById('status').innerText='已删除'
        setTimeout(function () {
            document.getElementById('status').innerText=''
        },5000)
    }
</script>
</body>
</html>
事件
onclick:鼠标单击
ondblclick:鼠标双击
onload:一个页面或一张图像加载完成就立马执行,比如window.onload
onsubmit:当提交表单时
onfocus:获取焦点
onblur:失去焦点
onmouseover:鼠标悬浮
onmouseout:鼠标移开
onselect:当文本被选中
案例:当搜索框获取焦点时,“输入关键字”消失,当搜索框失去焦点时并且为空,则显示“输入关键字”
<!DOCTYPE html>
<html lang="en">
<head>
    <meta charset="UTF-8">
    <title>Title</title>
</head>
<body>
<div style="width:980px;margin:0 auto">
    <input type="text" style="width:600px;height:48px" value="请输入关键字"
            onfocus="Focus();" onblur="Blur();" id="i1">
</div>
<script>
    function Focus(){
        var tag = document.getElementById('i1');
        var text=tag.value;
        if(text=='请输入关键字'){
            tag.value='';
        }
    }
    function Blur(){
        var tag = document.getElementById('i1');
        var text = tag.value;
        if (text.length == 0){
            tag.value = '请输入关键字';
        }
    }
</script>
</body>
</html>
也可设置input中的placeholder属性代替以上功能,只用于新浏览器
<!DOCTYPE html>
<html lang="en">
<head>
    <meta charset="UTF-8">
    <title>Title</title>
</head>
<body>
<div style="width:980px;margin:0 auto">
    <input type="text" style="width:600px;height:48px" placeholder="请输入关键字">
</div>
<script>
</script>
</body>
</html>
绑定事件
方法一、直接在代码标签中写上<事件>="函数();"
此处this:全局变量window?

方法二、在script标签中,找到标签对象,并对此标签对象绑定事件。如下:
this:触发事件的标签
<!DOCTYPE html>
<html lang="en">
<head>
    <meta charset="UTF-8">
    <title>Title</title>
</head>
<body>
<div id="status"></div>
<input type="button" value="删除">
<script>
    objs = document.getElementsByTagName('input')
    obj = objs[0]
    obj.onclick = function () {
        tag = document.getElementById('status')
        tag.innerText = '已删除'
        setTimeout(function () {
            tag = document.getElementById('status')
            tag.innerText = ''
        },5000)
    }
</script>
</body>
</html>

案例:以下能实现的功能:把鼠标放到某一行上,其背景色为红色;鼠标移开,背景色为白色
<!DOCTYPE html>
<html lang="en">
<head>
    <meta charset="UTF-8">
    <title>Title</title>
</head>
<body>
<table border="1">
    <thead>
        <tr>
            <th>IP</th>
            <th>端口</th>
        </tr>
    </thead>
    <tbody>
        <tr>
            <td>192.168.10.10</td>
            <td>8080</td>
        </tr>
        <tr>
            <td>192.168.10.20</td>
            <td>80</td>
        </tr>
        <tr>
            <td>192.168.10.30</td>
            <td>9999</td>
        </tr>
    </tbody>
</table>
<script>
    var trs = document.getElementsByTagName('tr')
    for (var i=0;i<trs.length;i++){
        trs[i].onmouseover = function () {
            this.style.backgroundColor='red'
        }
        trs[i].onmouseout = function () {
            this.style.backgroundColor=''
        }
    }
</script>
</body>
</html>
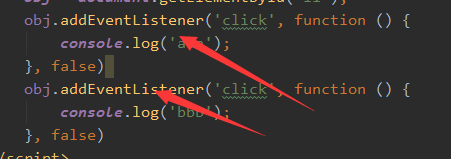
方法三、tag.addEventListener:一个标签可绑定多个事件。
<!DOCTYPE html>
<html lang="en">
<head>
    <meta charset="UTF-8">
    <title>Title</title>
</head>
<body>
<div id="i1">abcd</div>
<script>
    obj = document.getElementById('i1');
    obj.addEventListener('click', function () {
        console.log('aaa');
    }, false)
    obj.addEventListener('click', function () {
        console.log('bbb');
    }, false)
</script>
</body>
</html>
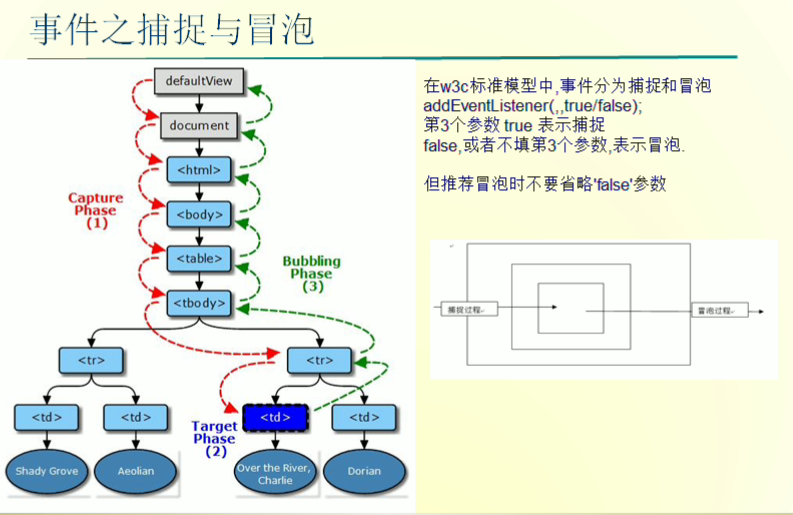
案例:说明在addEventListener中第三个参数true或false的不同
<!DOCTYPE html>
<html lang="en">
<head>
    <meta charset="UTF-8">
    <title>Title</title>
    <style>
        #main{
            width:400px;height:400px;
            background-color: red;
        }
        #content{
            width:200px;height:200px;
            background-color: pink;
        }
    </style>
</head>
<body>
<div id="main">
    <div id="content"></div>
</div>
<script>
    main_obj = document.getElementById('main');
    content_obj = document.getElementById('content');
    main_obj.addEventListener('click', function(){console.log('main');}, true);
    content_obj.addEventListener('click', function(){console.log('content');}, true)
</script>
</body>
</html>
标签克隆
<tag_obj>.cloneNode()
一些高级应用(也有可能用到JQuery)
实现图像预览功能

$('#img_choice').change(function () {
        var choose_file = $('#img_choice')[0].files[0];
        // 获取文件对象
        reader = new FileReader();
        // 新建阅读器对象
        reader.readAsDataURL(choose_file);
        // 阅读器读取文件路径
        reader.onload=function () {
            // 阅读器加载文件完成执行
            $('#avatar_img').attr('src', this.result);
            // 设置img的src路径,this指的是阅读器,获取阅读器的结果
        };
    })

 浙公网安备 33010602011771号