
前端之CSS
什么是CSS?
在标签上设置标签的style属性。
编写CSS的方法
一、直接在标签中写style属性。

二、在head标签中写style标签,这里就需要选择器选择所需的标签
1、id选择器,以#开头,例子如下:

<!DOCTYPE html>
<html lang="en">
<head>
    <meta charset="UTF-8">
    <title>Title</title>
<!--    定义了id为i1的使用style-->
    <style>
        #i1{
        background-color:blue;
        }
    </style>
</head>
<body>

    <div>Treelight</div>
    <div id="i1">Alex</div>
    <div>Syvia</div>
    <div>HeMinLing</div>
</body>
</html>
2、类选择器,以.开头
<!DOCTYPE html>
<html lang="en">
<head>
    <meta charset="UTF-8">
    <title>Title</title>
<!--    定义了类名为c1标签的使用style-->
    <style>
        .c1{
        background-color:blue;
        }
    </style>
</head>
<body>
    <div>Treelight</div>
    <div>Alex</div>
    <div class="c1">Syvia</div>
    <div>HeMinLing</div>
</body>
</html>
3、标签选择器,例子如下:
<!DOCTYPE html>
<html lang="en">
<head>
    <meta charset="UTF-8">
    <title>Title</title>
<!--    定义了span标签的使用style-->
    <style>
        span{
        background-color:blue;
        }
    </style>
</head>
<body>
    <div>Treelight</div>
    <div>Alex</div>
    <div>Syvia</div>
    <div>HeMinLing</div>
    <span>Diana</span>
</body>
</html>
4、层级选择器(空格分隔会从子子孙孙那里找,>会从儿子那里找)
<!DOCTYPE html>
<html lang="en">
<head>
    <meta charset="UTF-8">
    <title>Title</title>
<!--    定义了div标签中的span标签的使用style(中间用空格分开),标签可用以点开头的类或以#开头的id代替-->
    <style>
        div span{
        background-color:blue;
        }
    </style>
</head>
<body>
    <div>
        Treelight
        <span>30岁</span>
    </div>
    <div>Alex</div>
    <div>Syvia</div>
    <div>
        HeMinLing
        <span>18岁</span>
    </div>
</body>
</html>
5、组合选择器
<!DOCTYPE html>
<html lang="en">
<head>
    <meta charset="UTF-8">
    <title>Title</title>
<!--    此处定义的标签或类或ID(用逗号分隔)均可用此style-->
    <style>
        div,span{
        background-color:blue;
        }
    </style>
</head>
<body>
    <div>
        Treelight
        <span>30岁</span>
    </div>
    <div>Alex</div>
    <div>Syvia</div>
    <div>
        HeMinLing
        <span>18岁</span>
    </div>
</body>
</html>
6、属性选择器
<!DOCTYPE html>
<html lang="en">
<head>
    <meta charset="UTF-8">
    <title>Title</title>
<!--    此处定义了具有属性n="30"的div标签可用此style,其中标签可用类或id代替-->
    <style>
        div[n="30"]{
        background-color:blue;
        }
    </style>
</head>
<body>
    <div n="30">
        Treelight
        <span>30岁</span>
    </div>
    <div>Alex</div>
    <div>Syvia</div>
    <div>
        HeMinLing
        <span>18岁</span>
    </div>
</body>
</html>
7、全选:*号选择器,通配选择器
8、E + F 毗邻元素选择器,匹配所有紧随E元素之后的同级元素F :div + p { color:#f00; }
9、E ~ F 普通兄弟选择器(以破折号分隔) :.div1 ~ p{font-size: 30px; }
10、属性选择器(可使用多个[][][])
E[att]          匹配所有具有att属性的E元素,不考虑它的值。(注意:E在此处可以省略。
                比如“[cheacked]”。以下同。)   p[title] { color:#f00; }


E[att=val]      匹配所有att属性等于“val”的E元素   div[class=”error”] { color:#f00; }


E[att~=val]     匹配所有att属性具有多个空格分隔的值、其中一个值等于“val”的E元素
                td[class~=”name”] { color:#f00; }

E[attr^=val]    匹配属性值以指定值开头的每个元素
                div[class^="test"]{background:#ffff00;}

E[attr$=val]    匹配属性值以指定值结尾的每个元素    div[class$="test"]{background:#ffff00;}

E[attr*=val]    匹配属性值中包含指定值的每个元素    div[class*="test"]{background:#ffff00;}
11、且选择器:<选择器1><选择器2>,同时符合两个选择器的,不用符号分隔。如p.c1,选择的是p标签中class属性是c1的
12、伪类选择器(针对a标签)
a:link:尚未用过时的css
a:hover:悬浮时的css
a:active:点击时尚未放开鼠标
a:visited:已经访问过的
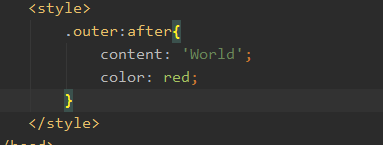
13、after、before选择器:
<选择器>:<after or before>{
content:...
<css style>
}
作用:在选中的标签的子类追加content,也可以设置样式
优先级:
1、!import是最优先的
2、然后按照以下的规则来比较,主要是按权重来比较。如果是层级选择器,则要把所有层的权重加起来。
内嵌(即在标签中写style)(1000)>id(100)>class(10)>element(1)
括号内为权重
7、css还可存在于文件中,然后可在html的头标签中利用link标签,示例如下:
css样式文件
.c1{
background-color:red;}

.c2{
background-color:green;}
html文件
<!DOCTYPE html>
<html lang="en">
<head>
    <meta charset="UTF-8">
    <title>Title</title>
<!--    此处引用了commons.css样式-->
    <link rel="stylesheet" href="commons.css">
</head>
<body>
    <div>
        Treelight
        <span>30岁</span>
    </div>
    <div class="c1">Alex</div>
    <div class="c2">Syvia</div>
    <div>
        HeMinLing
        <span>18岁</span>
    </div>
</body>
</html>
CSS中常用属性
一、border:设置边框的宽度、颜色、样式

二、height:标签高度,单位像素,不能使用百分比
三、width:标签宽度,单位可为像素或百分比
四、text-align:center:水平居中
五、line-height:<标签高度>:可实现垂直居中
六、color:red:字体颜色
七、font-size:num:字号
八、font-weight:bold:加粗
<!DOCTYPE html>
<html lang="en">
<head>
    <meta charset="UTF-8">
    <title>Title</title>
</head>
<body>
<div style="border:1px solid red;
height:50px;
width:400px;
text-align:center;
line-height:50px;
color:blue;
font-size:20px;
font-weight:bold">Treelight
</div>
</body>
</html>
九:float:<left><right>:使得块级标签可堆叠
clear:both:使用情况如下:如果父级标签没设置高度,此时可在子级标签(设置了浮动)下加上一个样式clear:both,清除浮动,此时可撑起父级标签。
<!DOCTYPE html>
<html lang="en">
<head>
    <meta charset="UTF-8">
    <title>Title</title>
</head>
<body>
    <div style="width:80%;background-color:red;float:left">Treelight</div>
    <div style="width:20%;background-color:blue;float:right">Alex</div>
</body>
</html>
十、display属性:
display:inline:使得块级标签有多少占多少
display:block:使得行内标签占一行
display:inline-block:使得标签有多少占多少;可以设置高度,宽度,padding margin
display:none:使得标签消失
<!DOCTYPE html>
<html lang="en">
<head>
    <meta charset="UTF-8">
    <title>Title</title>
</head>
<body>
    <div style="display:inline;background-color:red">Treelight</div>
    <span style="display:block;background-color:blue">Alex</span>
</body>
</html>
默认情况下,行内标签无法设置高度、宽度等,但以下程序使用display则可实现
<!DOCTYPE html>
<html lang="en">
<head>
    <meta charset="UTF-8">
    <title>Title</title>
</head>
<body>
    <span style="width:600px;height:100px;display:inline-block;background-color:blue">Alex</span>
</body>
</html>
十一、margin属性:外边距,就是标签的外边框与上一层标签之间的距离
关于父子div:
if 父级div中没有border,padding,inlinecontent,子级div的margin会一直向上找,直到找到某个标签包括border,padding,inline content中的其中一个,然后按此div 进行margin;
解决办法:
父div中:overflow:hidden
<!DOCTYPE html>
<html lang="en">
<head>
    <meta charset="UTF-8">
    <title>Title</title>
</head>
<body>
    <div style="height:60px;border:1px solid blue">
        <div style="margin:0px">Treelight</div>
    </div>
</body>
</html>
十二、padding属性:内边距,标签的内边框与标签内容的距离。
<!DOCTYPE html>
<html lang="en">
<head>
    <meta charset="UTF-8">
    <title>Title</title>
</head>
<body>
    <div style="height:60px">
        <div style="padding:10px;background-color:red;border:3px solid blue">Treelight</div>
    </div>
</body>
</html>
写html注意事项
1、应该在最外面设置绝对宽度(像素》,然后在里面用百分比
十三、postion属性
1、fixed:另起一层,可固定在页面的一个地方,参照物是当前窗口,脱离了文档流
案例一 :返回顶部按钮固定在右下角
<!DOCTYPE html>
<html lang="en">
<head>
    <meta charset="UTF-8">
    <title>Document</title>
</head>
<body>
<div style="height:800px;border: 1px solid red"></div>
<div style="position: fixed;bottom:5px;right:5px;background-color: black;color:white">返回顶部</div>
</body>
</html>
案例二:头部内容永远固定在页面的最上面
<!DOCTYPE html>
<html lang="en">
<head>
    <meta charset="UTF-8">
    <title>Document</title>
    <style>
        .pg-header{
        height:48px;
        position:fixed;
        top:0;
        left:0;
        right:0;
        background-color:black;
        color:white
        }
        .pg-body{
        margin-top:53px;
        border:1px solid red;
        height:800px
        }
    </style>
</head>
<body>
<div class="pg-header">头部</div>
<div class="pg-body">内容</div>
</body>
</html>
2、relative:相当于原来的位置定位,没有脱离文档流
2、absolute:脱离文档流,参照物是已定位(已经设置了position为absolute或relative)的父级标签
案例:
<!DOCTYPE html>
<html lang="en">
<head>
    <meta charset="UTF-8">
    <title>Title</title>
</head>
<body>
<div style="width:980px;height:200px;margin:0 auto;position:relative;border:1px solid red;">
    <div style="background-color:black;
                position:absolute;top:0;left:0;
                width:50px;height:50px"></div>
</div>
<div style="width:980px;height:200px;margin:0 auto;position:relative;border:1px solid red;">
    <div style="background-color:black;
                position:absolute;top:0;right:0;
                width:50px;height:50px"></div>
</div>
<div style="width:980px;height:200px;margin:0 auto;position:relative;border:1px solid red;">
    <div style="background-color:black;
                position:absolute;bottom:0;left:0;
                width:50px;height:50px"></div>
</div>
</body>
</html>
十四、opacity:透明度,值为0-1之间
十五、z-index:层级;越大就在上面
<!DOCTYPE html>
<html lang="en">
<head>
    <meta charset="UTF-8">
    <title>Title</title>
    <style>
        .layer1{
        border:1px solid red;
        height:5000px;
        }
        .layer2{
        position:fixed;
        top:0;
        right:0;
        left:0;
        bottom:0;
        z-index:9;
        opacity:0.5;
        background-color:black}
        .layer3{
        position:fixed;
        top:50%;
        left:50%;
        height:100px;
        width:250px;
        margin-top:-100px;
        margin-left:-250px;
        z-index:10;
        background-color:white;
        }
    </style>
</head>
<body>
<div class="layer1">
    第一层
</div>
<div class="layer2">
    第二层
</div>
<div class="layer3">
    <input type="text "\>
    <input type="text "\>
    <input type="text "\>
</div>

</body>
</html>
十六、overflow:应用场景:父div中含有一个img标签,而此标签中的图片的宽、长比父div的大,则overflow设置为auto或scroll则会出现滚动条。设为hidden,则超出的范围不显示。
案例:
<!DOCTYPE html>
<html lang="en">
<head>
    <meta charset="UTF-8">
    <title>Title</title>
</head>
<body>
<div style="height:400px;width:400px;overflow:auto">
    <img src="1.jpg"\>
</div>

</body>
</html>
十七、hover
使用方法:在style标签中,.<classname>:hover,表示此样式,在鼠标移动到对应的classname的标签上才应用
案例:
<!DOCTYPE html>
<html lang="en">
<head>
    <meta charset="UTF-8">
    <title>Title</title>
    <style>
        .pg-header{
        background-color:blue;
        height:48px
        }
        .pg-header .content{
        width:1000px;
        margin:0 auto;
        line-height:48px;
        }
        .topic{
        float:left;
        padding:0px 40px}
        .topic:hover{
        background-color:red}
    </style>
</head>
<body>
<div class="pg-header">
    <div class="content">
        <div class="topic">全部</div>
        <div class="topic">42区</div>
        <div class="topic">段子</div>
        <div class="topic">图片</div>
        <div class="topic">挨踢1024</div>
    </div>
</div>
<div class="pg-body">
    a
</div>

</body>
</html>
十八、background-color:设置背景颜色
十九、background-image:url(path):设置背景图片,默认情况下会占满整个标签。
<!DOCTYPE html>
<html lang="en">
<head>
    <meta charset="UTF-8">
    <title>Title</title>
</head>
<body>
<div style="background-image:url(4.gif);height:150px"></div>
</body>
</html>
二十、background-repeat:no-repeat:设置图片不重复
<!DOCTYPE html>
<html lang="en">
<head>
    <meta charset="UTF-8">
    <title>Title</title>
</head>
<body>
<div style="background-image:url(4.gif);height:150px;background-repeat:no-repeat"></div>
</body>
</html>
二十一、background-repeat-x background-repeat-y:no repeat:设置不在x或y方向重复
二十二、background-position-x、background-position-y:设置背景图片的位置
background-position:设置背景图片的位置,也可设置为center
<!DOCTYPE html>
<html lang="en">
<head>
    <meta charset="UTF-8">
    <title>Title</title>
</head>
<body>
<div style="height:100px">
    <div style="background-image:url(2.png);height:19px;
                background-repeat:no-repeat;width:20px;
                border:1px solid red;
                background-position-y:10px">
    </div>
</div>
</body>
</html>
案例:用户登录框
<!DOCTYPE html>
<html lang="en">
<head>
    <meta charset="UTF-8">
    <title>Title</title>
</head>
<body>
<div>
    <div style="width:980px;height:48px;
                margin:0 auto">
        <div style="color:red;line-height:48px;font-size:20px;float:left">*</div>
        <div style="line-height:48px;font-size:20px;float:left;margin-left:10px">用户名</div>
        <div style="height:48px;width:400px;float:left;margin-left:10px;position:relative">
            <input type="text" style="height:48px;width:370px;padding-right:30px" \>
            <span style="background-image:url(i_name.jpg);
                         height:48px;display:inline-block;
                         width:30px;background-repeat:no-repeat;
                         position:absolute;right:0;top:20px;
"                        ></span>

        </div>
    </div>
</div>

</body>
</html>
案例:后台管理页面(左侧菜单不动,右侧的内容可动)
<!DOCTYPE html>
<html lang="en">
<head>
    <meta charset="UTF-8">
    <title>Title</title>
    <style>
        .pg-header{
        background-color:#3825a2;
        height:48px;color:white;
        }
        body{
        margin:0;}
        .pg-content .menu{
        position:fixed;
        top:48px;left:0;
        bottom:0;width:200px;
        background-color:red;}
        .pg-content .content{
        position:fixed;
        top:48px;left:200px;
        bottom:0;right:0;
        background-color:green;
        overflow:auto;}

    </style>
</head>
<body>
<div class="pg-header"></div>
<div class="pg-content">
    <div class="menu">a</div>
    <div class="content">
        <p>asdf</p>
        <p>asdf</p>
        <p>asdf</p>
        <p>asdf</p>
        <p>asdf</p>
        <p>asdf</p>
        <p>asdf</p>
        <p>asdf</p>
        <p>asdf</p>
        <p>asdf</p>
        <p>asdf</p>
        <p>asdf</p>
        <p>asdf</p>
        <p>asdf</p>
        <p>asdf</p>
        <p>asdf</p>
        <p>asdf</p>
        <p>asdf</p>
        <p>asdf</p>
        <p>asdf</p>
        <p>asdf</p>
    </div>
</div>
<div class="pg-footer"></div>
</body>
</html>
案例:后台管理页面(左侧菜单可随着滚动条移动)
<!DOCTYPE html>
<html lang="en">
<head>
    <meta charset="UTF-8">
    <title>Title</title>
    <style>
        .pg-header{
            background-color:#3825a2;
            height:48px;color:white;
        }
        body{
            margin:0;}
        .pg-content .menu{
            position:absolute;
            top:48px;left:0;
            bottom:0;width:200px;
            background-color:red;}
        .pg-content .content{
            position:absolute;
            top:48px;left:200px;
            bottom:0;right:0;
            background-color:green;
            }


    </style>
</head>
<body>
<div class="pg-header"></div>
<div class="pg-content">
    <div class="menu">a</div>
    <div class="content">
        <div style="background-">
            <p>asdf</p>
            <p>asdf</p>
            <p>asdf</p>
            <p>asdf</p>
            <p>asdf</p>
            <p>asdf</p>
            <p>asdf</p>
            <p>asdf</p>
            <p>asdf</p>
            <p>asdf</p>
            <p>asdf</p>
            <p>asdf</p>
            <p>asdf</p>
            <p>asdf</p>
            <p>asdf</p>
            <p>asdf</p>
            <p>asdf</p>
            <p>asdf</p>
            <p>asdf</p>
            <p>asdf</p>
            <p>asdf</p>
        </div>
    </div>
</div>
<div class="pg-footer"></div>
</body>
</html>
案例:后台管理页面(左侧菜单不动,右侧的可滚动)
<!DOCTYPE html>
<html lang="en">
<head>
    <meta charset="UTF-8">
    <title>Title</title>
    <style>
        .pg-header{
            background-color:#3825a2;
            height:48px;color:white;
        }
        body{
            margin:0;}
        .pg-content .menu{
            position:absolute;
            top:48px;left:0;
            bottom:0;width:200px;
            background-color:red;}
        .pg-content .content{
            position:absolute;
            top:48px;left:200px;
            bottom:0;right:0;
            background-color:green;
            overflow:auto;
            }


    </style>
</head>
<body>
<div class="pg-header"></div>
<div class="pg-content">
    <div class="menu">a</div>
    <div class="content">
        <div style="background-">
            <p>asdf</p>
            <p>asdf</p>
            <p>asdf</p>
            <p>asdf</p>
            <p>asdf</p>
            <p>asdf</p>
            <p>asdf</p>
            <p>asdf</p>
            <p>asdf</p>
            <p>asdf</p>
            <p>asdf</p>
            <p>asdf</p>
            <p>asdf</p>
            <p>asdf</p>
            <p>asdf</p>
            <p>asdf</p>
            <p>asdf</p>
            <p>asdf</p>
            <p>asdf</p>
            <p>asdf</p>
            <p>asdf</p>
        </div>
    </div>
</div>
<div class="pg-footer"></div>
</body>
</html>
主要是在content中添加了overflow:auto,则此标签可流动
建议加上mini-width,则少于mini-width出现横排滚动条,防止变形。
案例:鼠标放到父标签上,其中的一个子标签可显示红色背景
<!DOCTYPE html>
<html lang="en">
<head>
    <meta charset="UTF-8">
    <title>Title</title>
    <style>
        .item:hover .item2{
            background-color:red
        }

    </style>
</head>
<body>
<div class="item">
    <div class="item1">123</div>
    <div class="item2">456</div>
</div>
</body>
</html>
案例:后台管理(用户菜单的显示和隐藏)
<!DOCTYPE html>
<html lang="en">
<head>
    <meta charset="UTF-8">
    <title>Title</title>
    <style>
        .pg-header{
            background-color:#3825a2;
            height:48px;color:white;
        }
        .pg-header .logo{
            width:200px;height:48px;
            background-color:#3cb572;
            line-height:48px;
            text-align:center;
        }
        .pg-header .login{
            width:200px;
            height:48px;
            background-color:#a97c38;
            postion:relative;
        }
        .pg-header .login:hover{
            background-color:blue;
        }
        body{
            margin:0;}
        .pg-content .menu{
            position:absolute;
            top:48px;left:0;
            bottom:0;width:200px;
            background-color:red;}
        .pg-content .content{
            position:absolute;
            top:48px;left:200px;
            bottom:0;right:0;
            background-color:green;
            overflow:auto;
            z-index:10;
            }
        .left{
            float:left;
        }
        .right{
            float:right;
        }
        .pg-header .login a img{
            width:40px;height:40px;
            border-radius:50%;
            margin-top:5px;
            }
        .pg-header .login .usermenu{
            position:absolute;
            top:48px;right:120px;
            z-index:20;
            width:80px;height:60px;
            padding:10px;
            background-color:red;
        }
        .hide{
            display:none
        }
        .login:hover .usermenu{
            display:block
        }
    </style>
</head>
<body>
<div class="pg-header">
    <div class="logo left">老男孩</div>
    <div class="login right">
        <a>
            <img src="1.jpeg">
        </a>
        <div class="usermenu hide">
            <a style="display:block">我的资料</a>
            <a style="display:block">注销</a>
        </div>
    </div>
</div>
<div class="pg-content">
    <div class="menu">a</div>
    <div class="content">
        <div style="background-">
            <p>asdf</p>
            <p>asdf</p>
            <p>asdf</p>
            <p>asdf</p>
            <p>asdf</p>
            <p>asdf</p>
            <p>asdf</p>
            <p>asdf</p>
            <p>asdf</p>
            <p>asdf</p>
            <p>asdf</p>
            <p>asdf</p>
            <p>asdf</p>
            <p>asdf</p>
            <p>asdf</p>
            <p>asdf</p>
            <p>asdf</p>
            <p>asdf</p>
            <p>asdf</p>
            <p>asdf</p>
            <p>asdf</p>
        </div>
    </div>
</div>
<div class="pg-footer"></div>
</body>
</html>
二十四、text-decoration:属性规定添加到文本的修饰。
| 值 | 描述 |
|---|---|
| none | 默认。定义标准的文本。 |
| underline | 定义文本下的一条线。 |
| overline | 定义文本上的一条线。 |
| line-through | 定义穿过文本下的一条线。 |
| blink | 定义闪烁的文本。 |
| inherit | 规定应该从父元素继承 text-decoration 属性的值。 |
二十五、vertical-align:用于垂直对齐,主要用于图片
每一个文本元素自身都会有四条线,顶线,中线,基线,底线。而基线一般是指文本元素中以x字母为准,x字母的下边缘为该文本元素的基线。
而行高则是两个文本行基线之间的距离,往往使段落产生间距。
但是也可以这样理解,行高 = 字体大小 + 上半行距 + 下半行距(其中上下半行距相等,这个等式可以从图中推导出来)
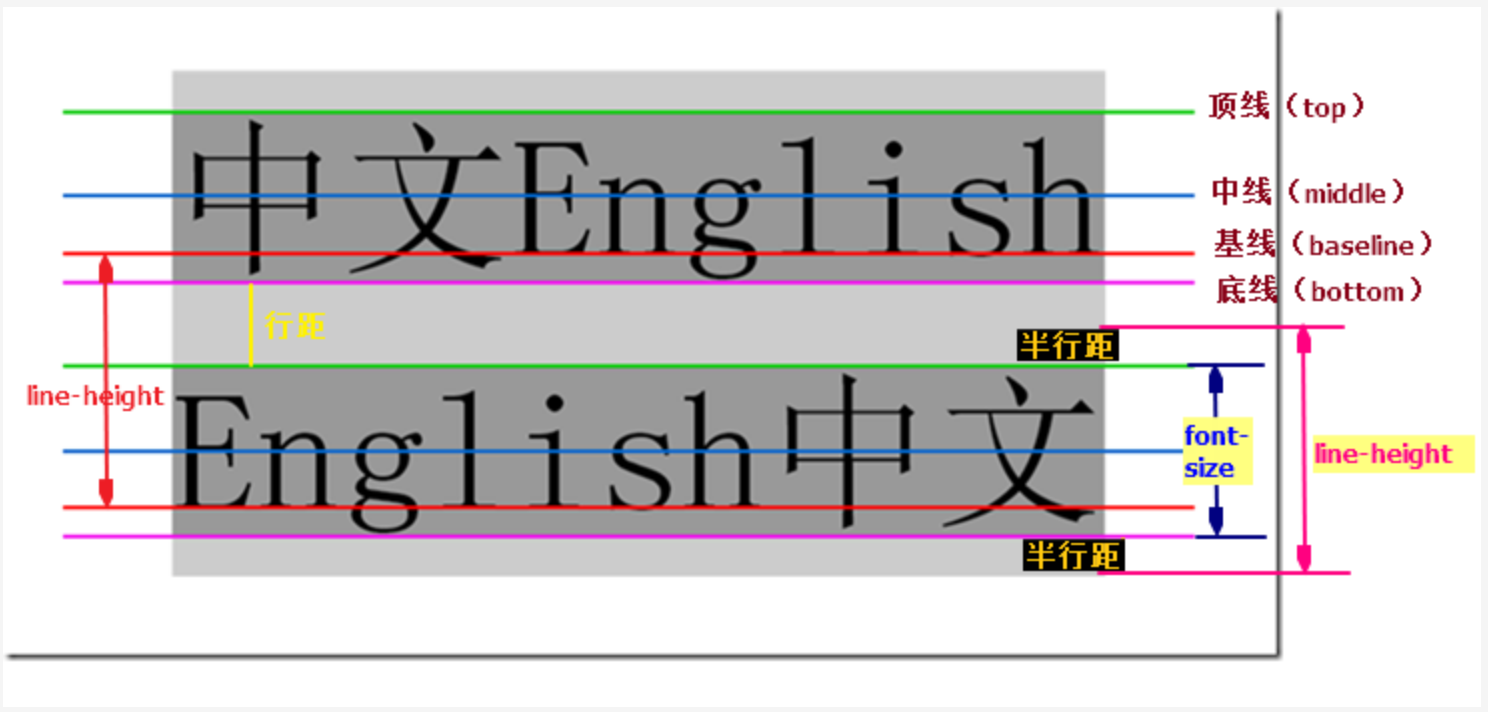
vertical-align的主要参数:
middle:基于中线对齐
npx:在垂直方向移动图片
二十六、文本属性
font-family:字体
font-weight:字体粗细
font-style:斜体的样式
text-indent:缩进
letter-spacing:单词与单词之间的距离
word-spacing:汉字之间的距离
text-transform:capitalize(首字母大写)
lowercase小写
uppercase大写
二十七、list-style:对于无序列表,设置前置符号的样式。
二十八、clear
清除浮动元素,值有left、right、both
作用:清除元素左、右或两边的浮动元素,不过由于不能改变别人的属性,所以一般如果发现左右有浮动,则会移动自己,以达到此效果
图标使用
网络上具有大量的图标提供,可直接使用,如http://www.fontawesome.com.cn
一、使用方法
1、下载:http://www.fontawesome.com.cn
2、解压缩下载文件,并把font-awesome.min.css放在某个文件夹
3、引入:在html中的<head>处加载font-awesome.min.css如下。
link rel="stylesheet" href="path/to/font-awesome/css/font-awesome.min.css">
4、使用:参考http://www.fontawesome.com.cn/faicons/,点击对应的图标有使用的教程
案例
<!DOCTYPE html>
<html lang="en">
<head>
    <meta charset="UTF-8">
    <title>Title</title>
    <link rel="stylesheet" href="font-awesome.min.css">
</head>
<body>
<i class="fa fa-superpowers" aria-hidden="true" style="font-size:50px"></i>
</body>
</html>
后台管理页面(终极版)
<!DOCTYPE html>
<html lang="en">
<head>
    <meta charset="UTF-8">
    <title>Title</title>
    <link rel="stylesheet" href="font-awesome-4.7.0\css\font-awesome.min.css">
    <style>
        .pg-header{
            background-color:#3825a2;
            height:48px;color:white;
        }
        .pg-header .logo{
            width:200px;height:48px;
            background-color:#3cb572;
            line-height:48px;
            text-align:center;
        }
        .pg-header .login{
            width:70px;
            height:48px;
            position:relative;
            margin-right:40px;
            text-align:center;
        }
        .pg-header .login:hover{
            background-color:blue;
        }
        body{
            margin:0;}
        .pg-content .menu{
            position:absolute;
            top:48px;left:0;
            bottom:0;width:200px;
            background-color:red;}
        .pg-content .content{
            position:absolute;
            top:48px;left:200px;
            bottom:0;right:0;
            background-color:green;
            overflow:auto;
            z-index:10;
            }
        .left{
            float:left;
        }
        .right{
            float:right;
        }
        .pg-header .login a img{
            width:40px;height:40px;
            border-radius:50%;
            margin-top:5px;
            }
        .pg-header .login .usermenu{
            position:absolute;
            top:48px;right:-15px;
            z-index:20;
            width:80px;height:60px;
            padding:10px;
            background-color:red;
        }
        .hide{
            display:none
        }
        .login:hover .usermenu{
            display:block
        }

    </style>
</head>
<body>
<div class="pg-header">
    <div class="logo left">老男孩</div>
    <div class="login right">
        <div style="position:absolute;
                    top:14px;left:-130px;">
            <i class="fa fa-bell-o" aria-hidden="true"></i>
        </div>
        <div style="position:absolute;
                    top:14px;left:-70px;">
            <i class="fa fa-comment-o" aria-hidden="true"></i>
        </div>
        <span style="position:absolute;
                     top:14px;left:-50px;
                     background-color:red;
                     border-radius:50%;
                     padding:1px 12px;">5</span>

        <a>
            <img src="1.jpeg">
        </a>
        <div class="usermenu hide">
            <a style="display:block">我的资料</a>
            <a style="display:block">注销</a>
        </div>
    </div>
</div>
<div class="pg-content">
    <div class="menu">a</div>
    <div class="content">
        <div style="background-">
            <p>asdf</p>
            <p>asdf</p>
            <p>asdf</p>
            <p>asdf</p>
            <p>asdf</p>
            <p>asdf</p>
            <p>asdf</p>
            <p>asdf</p>
            <p>asdf</p>
            <p>asdf</p>
            <p>asdf</p>
            <p>asdf</p>
            <p>asdf</p>
            <p>asdf</p>
            <p>asdf</p>
            <p>asdf</p>
            <p>asdf</p>
            <p>asdf</p>
            <p>asdf</p>
            <p>asdf</p>
            <p>asdf</p>
        </div>
    </div>
</div>
<div class="pg-footer"></div>
</body>
</html>
弧形背景的实现:
用border-radius和padding相结合实现
二十三、border-radius:设置边框的弧度,用百分比。
二十四、@media:响应式,格式如下:
@media (<condition>){
<css>
}
案例:当width少于500px显示红色,大于500px显示绿色
<!DOCTYPE html>
<html lang="en">
<head>
    <meta charset="UTF-8">
    <title>Title</title>
    <style>
        .c1{
            background-color: red;
            height: 50px;
        }
        @media (min-width:500px) {
            .c2{
                background-color: green;
            }
        }
    </style>
</head>
<body>
<div class="c1 c2"></div>
</body>
</html>
关于bootstrap
一、响应式
@media (<cond>){
<css>
}
二、图标、字体
在bootstrap中的图标是以字体的形式出现的,要使用其中的图标,步骤如下:
1、可打开网页https://v3.bootcss.com/components/
2、使用浏览器的检查元素,找到对应的源码,复制到本机上即可
三、基本使用
1、下载https://v3.bootcss.com/getting-started/#download
2、引入:bootstrap.css、bootstrap-theme.css、jquery、bootstrap.js

3、从https://v3.bootcss.com/components/把代码复制下来即可使用。


【推荐】国内首个AI IDE,深度理解中文开发场景,立即下载体验Trae
【推荐】编程新体验,更懂你的AI,立即体验豆包MarsCode编程助手
【推荐】抖音旗下AI助手豆包,你的智能百科全书,全免费不限次数
【推荐】轻量又高性能的 SSH 工具 IShell:AI 加持,快人一步
· 从 HTTP 原因短语缺失研究 HTTP/2 和 HTTP/3 的设计差异
· AI与.NET技术实操系列:向量存储与相似性搜索在 .NET 中的实现
· 基于Microsoft.Extensions.AI核心库实现RAG应用
· Linux系列:如何用heaptrack跟踪.NET程序的非托管内存泄露
· 开发者必知的日志记录最佳实践
· winform 绘制太阳,地球,月球 运作规律
· AI与.NET技术实操系列(五):向量存储与相似性搜索在 .NET 中的实现
· 超详细:普通电脑也行Windows部署deepseek R1训练数据并当服务器共享给他人
· 上周热点回顾(3.3-3.9)
· AI 智能体引爆开源社区「GitHub 热点速览」