
RabbitMQ
准备阶段
1、安装ERLang和RabbitMQ,并且启动RabbitMQ
2、pyp install pika
应用阶段
一、使用方法:
1、发送端的使用步骤:
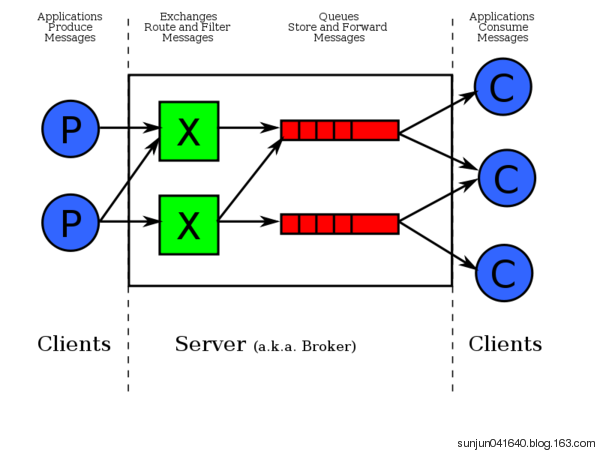
A、建立一个连接
B、通过连接建立一个管道对象
C、声明管道名称
D、利用basic_publish(不会阻塞)在管道里发送数据
E、关闭连接


import pika
# 建立连接
connection = pika.BlockingConnection(pika.ConnectionParameters('localhost'))
# 设置管道
channel = connection.channel()
# 设置管道名称
channel.queue_declare(queue='hello')
# 发布信息,routing_key为管道名称,body为内容
channel.basic_publish(exchange='',
                      routing_key='hello',
                      body='Hello World!')
print("[X] Sent 'Hello world!'")
# 关闭连接
connection.close()
2、接收端的使用步骤:
A、建立一个连接
B、通过连接建立一个管道对象
C、声明管道名称
D、利用basic_consume监听管道,并交给相应的函数处理,如果有消息过来,此函数会接收到4个参数。
E、start_consume开始接收,默认为阻塞
import pika
connection = pika.BlockingConnection(pika.ConnectionParameters('localhost'))
channel = connection.channel()
channel.queue_declare(queue='hello')


def callback(ch, method, properties, body):
    print("[X] Received %r" % body)


# 接收hello管道的消息,交给callbak处理
channel.basic_consume('hello', callback)
print('[*] waiting for messages.To exit press Ctrl+C')
# 开始接收消息,默认阻塞
channel.start_consuming()
注意:一个生产者可对多个消费者,生产的每个消息会按顺序发给消费者,而不会一次全部都发。
二、服务器端的确认
在接收端的basic_publich()加上auto_ack=True的参数,则接收端一收到消息就发给rabbitmq服务器确认,服务器就把消息从队列中删除。如果设为False,则不会给服务器确认,消息一直存在队列中,除非在callback函数中添加ch.basic_ack(delivery_tag=method.delivery_tag),则会提醒服务器删除消息
import pika
import time
connection = pika.BlockingConnection(pika.ConnectionParameters('localhost'))
channel = connection.channel()
channel.queue_declare(queue='hello')


def callback(ch, method, properties, body):
    print('-->', ch, method, properties)
    time.sleep(10)
    print("[X] Received %r" % body)
    ch.basic_ack(delivery_tag=method.delivery_tag)  # 手动确认,配合auto_ack=False使用


# 接收hello管道的消息,交给callbak处理
channel.basic_consume('hello', callback, auto_ack=False)  # 加上auto_ack=True一发给服务器就确认,就把消息从队列删除
print('[*] waiting for messages.To exit press Ctrl+C')
# 开始接收消息,默认阻塞
channel.start_consuming()
import pika
# 建立连接
connection = pika.BlockingConnection(pika.ConnectionParameters('localhost'))
# 设置管道
channel = connection.channel()
# 设置管道名称
channel.queue_declare(queue='hello')
# 发布信息,routing_key为管道名称,body为内容
channel.basic_publish(exchange='',
                      routing_key='hello',
                      body='Hello World!')
print("[X] Sent 'Hello world!'")
# 关闭连接
connection.close()
查看消息队列的方法:
1、在cmd中打开rabbitmq安装目录下的sbin目录
2、rabbitmqctl.bat list_queues
消息队列的持久化
一、概念:由于RabbitMQ服务重启则会清空缓存中的队列,故需要把消息队列持久化,以便再发消息。
二、实现步骤
1、发送端与接收端均需要在声明队列名称中加上参数:durable = True。但这只实现了此队列的持久化,此队列中的消息服务一重启还是会消失。
2、在basic_publish添加参数:properties = pika.BasicProperites(delivery_mode=2)
import pika
# 建立连接
connection = pika.BlockingConnection(pika.ConnectionParameters('localhost'))
# 设置管道
channel = connection.channel()
# 设置管道名称
channel.queue_declare(queue='hello', durable=True)
# 发布信息,routing_key为管道名称,body为内容
channel.basic_publish(exchange='',
                      properties=pika.BasicProperties(delivery_mode=2),
                      routing_key='hello',
                      body='Hello World!')
print("[X] Sent 'Hello world!'")
# 关闭连接
connection.close()
import pika
import time
connection = pika.BlockingConnection(pika.ConnectionParameters('localhost'))
channel = connection.channel()
channel.queue_declare(queue='hello', durable=True)


def callback(ch, method, properties, body):
    print('-->', ch, method, properties)
    time.sleep(10)
    print("[X] Received %r" % body)
    ch.basic_ack(delivery_tag=method.delivery_tag)  # 手动确认,配合auto_ack=False使用


# 接收hello管道的消息,交给callbak处理
channel.basic_consume('hello', callback, auto_ack=False)  # 加上auto_ack=True一发给服务器就确认,就把消息从队列删除
print('[*] waiting for messages.To exit press Ctrl+C')
# 开始接收消息,默认阻塞
channel.start_consuming()
负载均衡
一、由于每台电脑的性能不同,处理消息的速度不同。速度快的电脑可发送多条指令,慢的发少一点
二、实现步骤
在客户端中basic_consume()前加上basic_qos(prefetch_count=1)
import pika
import time
connection = pika.BlockingConnection(pika.ConnectionParameters('localhost'))
channel = connection.channel()
channel.queue_declare(queue='hello', durable=True)


def callback(ch, method, properties, body):
    print('-->', ch, method, properties)
    print("[X] Received %r" % body)
    ch.basic_ack(delivery_tag=method.delivery_tag)  # 手动确认,配合auto_ack=False使用


# 定义接收端还在处理的消息条数时发送端发送消息
channel.basic_qos(prefetch_count=1)
# 接收hello管道的消息,交给callbak处理
channel.basic_consume('hello', callback, auto_ack=False)  # 加上auto_ack=True一发给服务器就确认,就把消息从队列删除
print('[*] waiting for messages.To exit press Ctrl+C')
# 开始接收消息,默认阻塞
channel.start_consuming()
广播消息
一、原理图:
二、发送端的实现:
1、声明管道的名称,类型,channel.exchage_declare(exchage='logs',exchage_type='fanout')
2、在exchange中发布信息:channel.basic_publish(exchange='logs',routing_key='',body=msg)
三、接收端的实现
1、声明管道的名称、类型
2、生成一个随机队列,并且此队列用完会自动删除。result = channel.queue_declare('',exclusive=True)
queue_name = result.method.queue
3、队列与Exchange的绑定
channel.queue_bind(queue_name,'logs')
4、channel.basic_consume()
5、channel.start_consuming()
import pika
# 建立连接对象
connection = pika.BlockingConnection(pika.ConnectionParameters('localhost'))
# 创建管道对象
channel = connection.channel()
# 为管道中的exchange起个名字,设置exchange类型
msg = 'Info of the World!'
# exchange的名称和类型
channel.exchange_declare(exchange='logs',
                         exchange_type='fanout')
# 发布信息
channel.basic_publish(exchange='logs',
                      routing_key='',
                      body=msg)
print("[X] sent Hello World")
connection.close()
import pika
connection = pika.BlockingConnection(pika.ConnectionParameters('localhost'))
channel = connection.channel()
# 声明exchange的类型,名称
channel.exchange_declare(exchange='logs',
                         exchange_type='fanout')
# 随机生成一个队列
result = channel.queue_declare('', exclusive=True)
# 获取队列名称
queue_name = result.method.queue
# 队列和exchange绑定
channel.queue_bind(queue=queue_name,
                   exchange='logs')
print("[*] waiting for exchange.Press Ctrl+C to exit")


def callback(ch, method, properties, body):
    print("[X] received %r" % body)


channel.basic_consume(queue=queue_name,
                      on_message_callback=callback,
                      auto_ack=True)
channel.start_consuming()
注意:发送者就像收音机那样,不管你收到没有,只发一次。
发送到指定的接收端
一、原理图
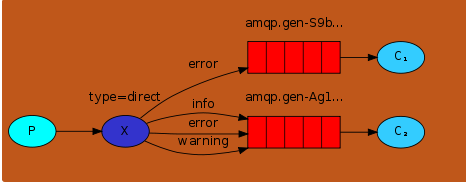
二、实现步骤
1、发送端(只需声明队列和发布消息)
A、使用Exchange的类型为direct
B、发布basic_publish()消息时要设置参数routing_key,此处为了与接收端的routing_key匹配。
2、接收端(需要声明随机队列,必须是随机队列,并把队列与exchange绑定)
A、声明队列
B、把队列与exchange绑定,channel.queue_bind(queue,exchange,routing_key),此处的routing_key是为了与发送端的routing_key匹配
C、调用basic_consume。
D、start_consuming
import pika
import sys
connection = pika.BlockingConnection(pika.ConnectionParameters(host='localhost'))
channel = connection.channel()
# 设置exchange类型,名称
channel.exchange_declare(exchange='direct_logs',
                         exchange_type='direct')
severity = sys.argv[1] if len(sys.argv) > 1 else 'info'
msg = ' '.join(sys.argv[2:]) or 'Hello World!'
channel.basic_publish(exchange='direct_logs',
                      routing_key=severity,
                      body=msg
                      )
connection.close()
import pika
import sys
connection = pika.BlockingConnection(pika.ConnectionParameters(host='localhost'))
channel = connection.channel()
channel.exchange_declare(exchange='direct_logs',
                         exchange_type='direct')
result = channel.queue_declare('', exclusive=True)
queue_name = result.method.queue
if len(sys.argv) < 2:
    print('Usage: %s [info] [warning] [error]' % sys.argv[0])
    sys.exit(-1)
severities = sys.argv[1:]
for severity in severities:
    channel.queue_bind(queue=queue_name,
                       exchange='direct_logs',
                       routing_key=severity)


def callback(ch, method, properites, body):
    print('Receiver %r:%r' % (method.routing_key, body))


channel.basic_consume(queue=queue_name,
                      on_message_callback=callback)
channel.start_consuming()
topic类型的Exchange
一、主要作用:使用topic类型的Exchange,可使得rabbitmq识别带有通配符的routing_key。
二、常用的通配符:
*:和windows的通配符一样
#:代表所有
三、用法:和direct差不多,只是改一下Exchange类型
import pika
import sys
connection = pika.BlockingConnection(pika.ConnectionParameters(host='localhost'))
channel = connection.channel()
channel.exchange_declare(exchange='topic_logs',
                         exchange_type='topic')
result = channel.queue_declare(queue='', exclusive=True)
queue_name = result.method.queue
if len(sys.argv) < 2:
    print('Usage: %s [info] [warning] [error]' % sys.argv[0])
    exit(-1)
serverties = sys.argv[1:]
for severty in serverties:
    channel.queue_bind(queue=queue_name,
                       exchange='topic_logs',
                       routing_key=severty)


def callback(ch, method, properties, body):
    print('Receiver %r:%r' % (method.routing_key, body))


channel.basic_consume(queue=queue_name,
                      on_message_callback=callback)
channel.start_consuming()
import pika
import sys
connection = pika.BlockingConnection(pika.ConnectionParameters(host='localhost'))
channel = connection.channel()
channel.exchange_declare(exchange='topic_logs',
                         exchange_type='topic')
serverity = sys.argv[1] if len(sys.argv) > 1 else 'anonymous.info'
msg = ' '.join(sys.argv[2:]) or 'Hello World!'
channel.basic_publish(exchange='topic_logs',
                      routing_key=serverity,
                      body=msg)
connection.close()
RPC
import pika
import uuid


class FibonacciRpcClient(object):
    def __init__(self, num):
        """初始化函数"""
        # 斐波纳契参数
        self.num = num
        self.connection = pika.BlockingConnection(pika.ConnectionParameters(host='localhost'))
        self.channel = self.connection.channel()
        # 生成队列发送命令参数
        self.channel.queue_declare(queue='rpc_queue')
        # 随机生成一个队列,以便接收结果
        result = self.channel.queue_declare(queue='', exclusive=True)
        self.queue_name = result.method.queue
        self.response = None
        self.channel.basic_consume(queue=self.queue_name,
                                   on_message_callback=self.on_response)

    def on_response(self, ch, method, properties, body):
        """处理response"""
        # 比较本方的的id标识符和服务器端的id标识符,相同则说明body是客户端需要的,设response为body
        if properties.correlation_id == self.cor_id:
            self.response = body

    def send_number_to_server(self):
        """发送数字给服务器计算斐波纳契数"""
        # 获取客户端的id标识符
        self.cor_id = str(uuid.uuid4())
        # 发送标识符和结果队列给服务端
        self.channel.basic_publish(exchange='',
                                   routing_key='rpc_queue',
                                   body=str(self.num),
                                   properties=pika.BasicProperties(reply_to=self.queue_name,
                                                                   correlation_id=self.cor_id))

    def result_from_server(self):
        """从服务器端收结果"""
        while self.response is None:
            self.connection.process_data_events()  # start_consuming的非阻塞版
        print(self.response)


fibprcclient = FibonacciRpcClient(7)
fibprcclient.send_number_to_server()
fibprcclient.result_from_server()
import pika
connection = pika.BlockingConnection(pika.ConnectionParameters(host='localhost'))
channel = connection.channel()
channel.queue_declare(queue='rpc_queue')
fib_result = 0


def on_request(ch, method, properties, body):
    n = int(body)
    cor_id = properties.correlation_id
    fib_result = fib(n)
    channel.basic_publish(exchange='',
                          routing_key=properties.reply_to,
                          body=str(fib_result),
                          properties=pika.BasicProperties(correlation_id=cor_id))
    ch.basic_ack(delivery_tag=method.delivery_tag)


def fib(n):
    if n == 1 or n == 2:
        return 1
    else:
        return fib(n-1) + fib(n-2)


channel.basic_qos(prefetch_count=1)
channel.basic_consume(queue='rpc_queue',
                      on_message_callback=on_request,
                      auto_ack=False)
channel.start_consuming()
一、新知识点:
1、uuid模块:uuid.uuid4()随机生成一个uuid类型的数据
2、properties=pika.BasicProperties(reply_to=self.queue_name,correlation_id=self.cor_id)):设置回复的queue,并且利用cor_id来确认回复的答案
3、self.connection.process_data_events():非阻塞版的start_consuming()
Rabbitmq远程连接
默认情况下,guest帐号不能远程连接到rabbitmq
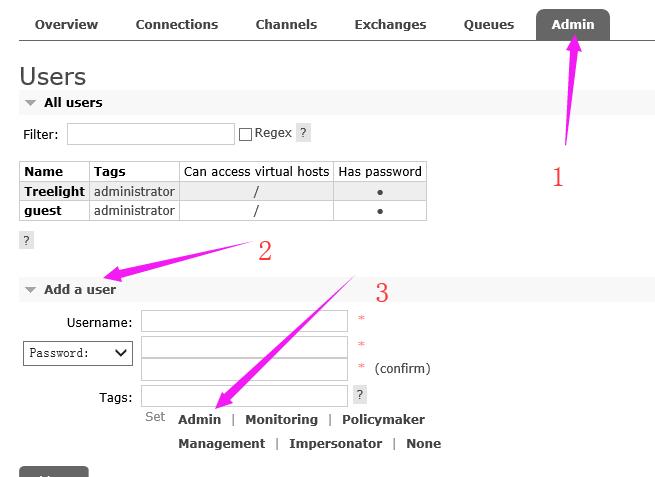
1、服务器配置(centos):添加一个新的帐户
(1)、rabbitmq-plugins enable rabbitmq_management
(2)、Centos允许防火墙通过:
fire-wall-cmd --zone=public --add-port=15672 --permanent
fire-wall-cmd --zone=public --add-port=5672 --permanent
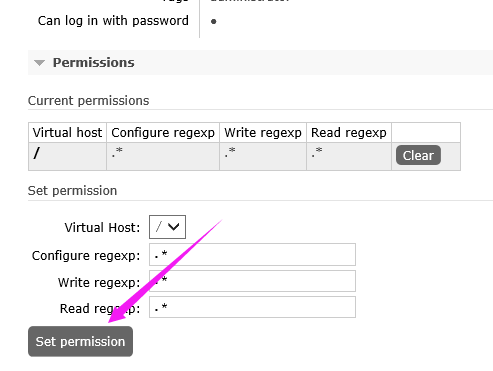
(3)、通过ip:15672访问,添加用户,并且设置权限
2、Python程序
(1)、需要用户认证:auth = pika.PlainCredentials(username,password)
conn = pika.BlockingConnection(pika.ConnectionParameters(host=hostname,
                                                         credentials=auth))

 浙公网安备 33010602011771号